3.SpringBoot整合Thymeleaf模板
一、前言
SrpingBoot支援如JSP、Thymeleaf、FreeMarker、Mustache、Velocity等各種模板引擎,同時還為開發者提供了自定義模板擴充套件的支援。
使用嵌入式Servlet容器時,請避免使用JSP,因為使用JSP打包後會存在一些限制。
在SpringBoot使用上述模板,預設從src/main/resources/templates下載入。
二、thymeleaf介紹
Thymeleaf是現代化伺服器端的Java模板引擎,不同與其它幾種模板的是Thymeleaf的語法更加接近HTML,並且具有很高的擴充套件性。詳細資料可以瀏覽官網。
特點
- 支援無網路環境下執行,由於它支援 html 原型,然後在 html 標籤裡增加額外的屬性來達到模板+資料的展示方式。瀏覽器解釋 html 時會忽略未定義的標籤屬性,所以 thymeleaf 的模板可以靜態地執行;當有資料返回到頁面時,Thymeleaf 標籤會動態地替換掉靜態內容,使頁面動態顯示。所以它可以讓前端小姐姐在瀏覽器中檢視頁面的靜態效果,又可以讓程式設計師小哥哥在服務端檢視帶資料的動態頁面效果。
- 開箱即用,為
Spring提供方言,可直接套用模板實現JSTL、 OGNL表示式效果,避免每天因套用模板而修改JSTL、 OGNL標籤的困擾。同時開發人員可以擴充套件自定義的方言。 SpringBoot官方推薦模板,提供了可選整合模組(spring-boot-starter-thymeleaf),可以快速的實現表單繫結、屬性編輯器、國際化等功能。
三、使用
3.1 首先要在pom.xml中新增對thymeleaf模板依賴
1 <dependency> 2 <groupId>org.springframework.boot</groupId> 3 <artifactId>spring-boot-starter-thymeleaf</artifactId> 4 </dependency> 5 <dependency> 6 <groupId>org.springframework.boot</groupId> 7 <artifactId>spring-boot-starter-web</artifactId> 8 </dependency>
3.2 新增完thymeleaf模板依賴的pom.xml檔案內容如下
 1 <?xml version="1.0" encoding="UTF-8"?>
 2 <project xmlns="http://maven.apache.org/POM/4.0.0" xmlns:xsi="http://www.w3.org/2001/XMLSchema-instance"
 3     xsi:schemaLocation="http://maven.apache.org/POM/4.0.0 http://maven.apache.org/xsd/maven-4.0.0.xsd">
 4     <modelVersion>4.0.0</modelVersion>
 5
 6     <groupId>cn.kgc</groupId>
 7     <artifactId>springboot1</artifactId>
 8     <version>0.0.1-SNAPSHOT</version>
 9     <packaging>jar</packaging>
10
11     <name>springboot1</name>
12     <description>我用的第一個maven工程</description>
13
14
15     <!--版本採用的是最新的 2.0.1.RELEASE
16     TODO 開發中請記得版本一定要選擇 RELEASE ,因為是穩定版本且BUG少-->
17     <parent>
18         <groupId>org.springframework.boot</groupId>
19         <artifactId>spring-boot-starter-parent</artifactId>
20         <version>2.0.5.RELEASE</version>
21         <relativePath/> <!-- lookup parent from repository -->
22     </parent>
23
24     <properties>
25         <project.build.sourceEncoding>UTF-8</project.build.sourceEncoding>
26         <project.reporting.outputEncoding>UTF-8</project.reporting.outputEncoding>
27         <java.version>1.8</java.version>
28     </properties>
29
30     <dependencies>
31
32         <!--模組(spring-boot-starter-thymeleaf),可以快速的實現表單繫結、屬性編輯器、國際化等功能。-->
33         <dependency>
34             <groupId>org.springframework.boot</groupId>
35             <artifactId>spring-boot-starter-thymeleaf</artifactId>
36         </dependency>
37         <!-- 預設就內嵌了Tomcat 容器,如需要更換容器也極其簡單-->
38         <dependency>
39             <groupId>org.springframework.boot</groupId>
40             <artifactId>spring-boot-starter-web</artifactId>
41         </dependency>
42         <!-- 測試包,當我們使用 mvn package 的時候該包並不會被打入,因為它的生命週期只在 test 之內-->
43         <dependency>
44             <groupId>org.springframework.boot</groupId>
45             <artifactId>spring-boot-starter-test</artifactId>
46             <scope>test</scope>
47         </dependency>
48         <!--該依賴可以不新增,但是在 IDEA 和 STS 中不會有屬性提示,
49         沒有提示的配置就跟你用記事本寫程式碼一樣苦逼,出個問題弄哭你去-->
50         <dependency>
51             <groupId>org.springframework.boot</groupId>
52             <artifactId>spring-boot-configuration-processor</artifactId>
53             <optional>true</optional>
54         </dependency>
55     </dependencies>
56
57     <build>
58         <plugins>
59             <!-- 編譯外掛 -->
60             <plugin>
61                 <groupId>org.springframework.boot</groupId>
62                 <artifactId>spring-boot-maven-plugin</artifactId>
63             </plugin>
64         </plugins>
65     </build>
66
67
68 </project>
3.3 建立ThymeleafController.java
建立一個ThymeleafController用來對映HTTP請求與頁面的跳轉,下面寫了兩種方式,第一種比較直觀和優雅,第二種相對普遍且程式碼較少,且迎合從struts2跳坑的朋友們…
Spring4.3以後為簡化@RequestMapping(method = RequestMethod.XXX)的寫法,故而將其做了一層包裝,也就是現在的GetMapping、PostMapping、PutMapping、DeleteMapping、PatchMapping
 1 package cn.kgc.controller;
 2 import org.springframework.stereotype.Controller;
 3 import org.springframework.web.bind.annotation.GetMapping;
 4 import org.springframework.web.bind.annotation.RequestMapping;
 5 import org.springframework.web.servlet.ModelAndView;
 6 import javax.servlet.http.HttpServletRequest;
 7 /**
 8  * ThymeleafController用來對映HTTP請求與頁面的跳轉
 9  */
10 @Controller
11 @RequestMapping
12 public class ThymeleafController {
13     /**
14      * 方法1:返回ModelAndView物件,
15      * 將檢視名稱封裝到該物件的viewName屬性中
16      * 將頁面所需要的資料封裝到該物件的addObject物件中
17      * @return
18      */
19     @GetMapping("/index.do")
20     public ModelAndView index() {
21         ModelAndView view = new ModelAndView();
22         // 設定跳轉的檢視 預設對映到 src/main/resources/templates/{viewName}.html
23         view.setViewName("index");
24         // 設定屬性
25         view.addObject("title", "我的第一個ThymeleafWEB頁面");
26         view.addObject("desc", "歡迎進入課工場學習");
27         Teacher teacher=new Teacher(1,"Holly","964918306","北大青鳥-南京中博軟體學院-課工場");
28         view.addObject("teacher", teacher);
29         return view;
30     }
31
32     @GetMapping("/index1")
33     public String index1(HttpServletRequest request) {
34         // TODO 與上面的寫法不同,但是結果一致。
35         // 設定屬性
36         Teacher teacher=new Teacher(1,"Holly","964918306","北大青鳥-南京中博軟體學院-課工場");
37         request.setAttribute("teacher", teacher);
38         request.setAttribute("title", "我的第一個ThymeleafWEB頁面");
39         request.setAttribute("desc", "歡迎進入課工場學習");
40         // 返回的 index 預設對映到 src/main/resources/templates/xxxx.html
41         return "index";
42     }
43
44     class Teacher {
45         private int tid;
46         private String tname;
47         private String qq;
48         private String address;
49
50         public Teacher() {
51         }
52
53         public Teacher(int tid, String tname, String qq, String address) {
54             this.tid = tid;
55             this.tname = tname;
56             this.qq = qq;
57             this.address = address;
58         }
59
60         public int getTid() {
61             return tid;
62         }
63
64         public void setTid(int tid) {
65             this.tid = tid;
66         }
67
68         public String getTname() {
69             return tname;
70         }
71
72         public void setTname(String tname) {
73             this.tname = tname;
74         }
75
76         public String getQq() {
77             return qq;
78         }
79
80         public void setQq(String qq) {
81             this.qq = qq;
82         }
83
84         public String getAddress() {
85             return address;
86         }
87
88         public void setAddress(String address) {
89             this.address = address;
90         }
91     }
92 }
3.4 建立index.html的模板檔案
在src/main/resources/templates目錄下建立一個名index.html的模板檔案,可以看到thymeleaf是通過在標籤中新增額外屬性動態繫結資料的
 1 <!DOCTYPE html>
 2 <html xmlns="http://www.w3.org/1999/xhtml"
 3       xmlns:th="http://www.thymeleaf.org">
 4 <head>
 5     <meta charset="UTF-8">
 6     <!-- 可以看到 thymeleaf 是通過在標籤裡新增額外屬性來繫結動態資料的 -->
 7     <!--/*@thymesVar id="title" type=""*/-->
 8     <title th:text="${title}">Title</title>
 9     <!-- 在/resources/static/js目錄下建立一個hello.js 用如下語法依賴即可-->
10     <script type="text/javascript" th:src="@{/js/hello.js}"></script>
11 </head>
12 <body>
13 <h1 th:text="${desc}">Hello World</h1>
14 <h2>=====作者資訊=====</h2>
15 <p th:text="${teacher.tid}"></p>
16 <p th:text="${teacher.tname}"></p>
17 <p th:text="${teacher.qq}"></p>
18 <p th:text="${teacher.address}"></p>
19 </body>
20 </html>
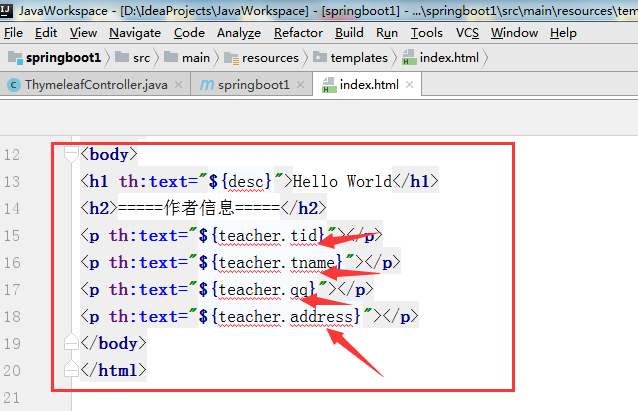
停一下,在你的機器上看到的是報錯的情況,如下圖所示,但是頁面卻可以展示資料,這個我們稍加配置就可以解決錯誤問題
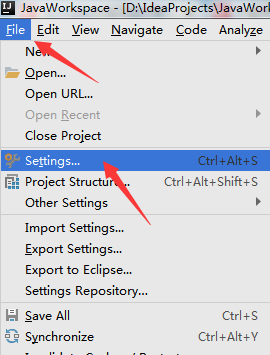
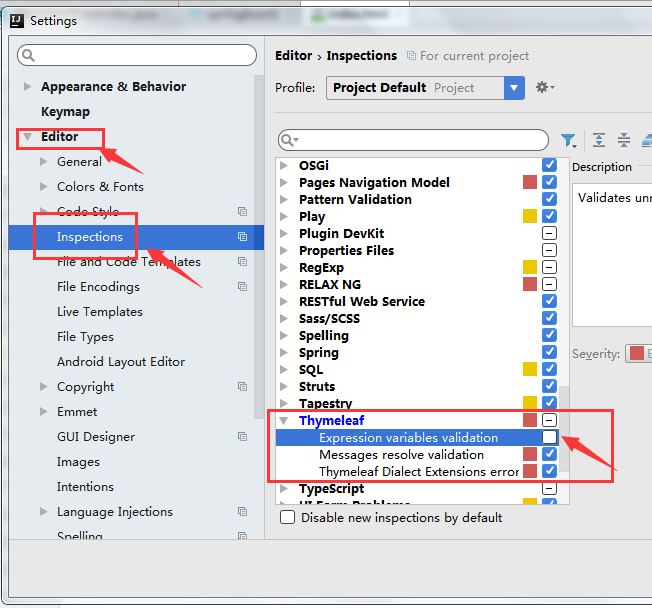
我們在idea中設定一下就ok

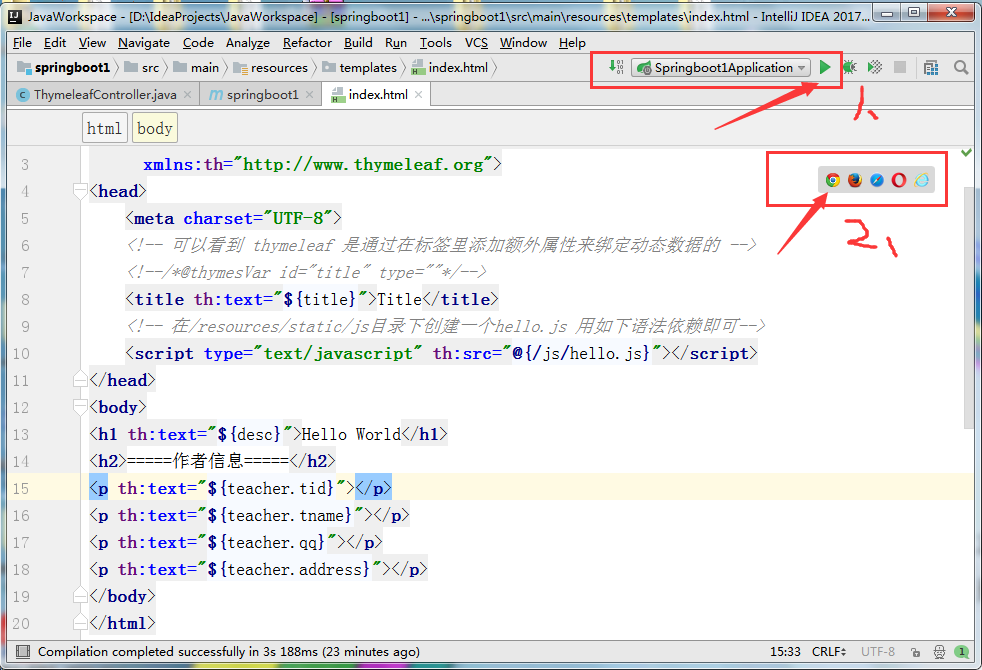
3.5 靜態效果: 執行index.html既可以看到如下的靜態效果


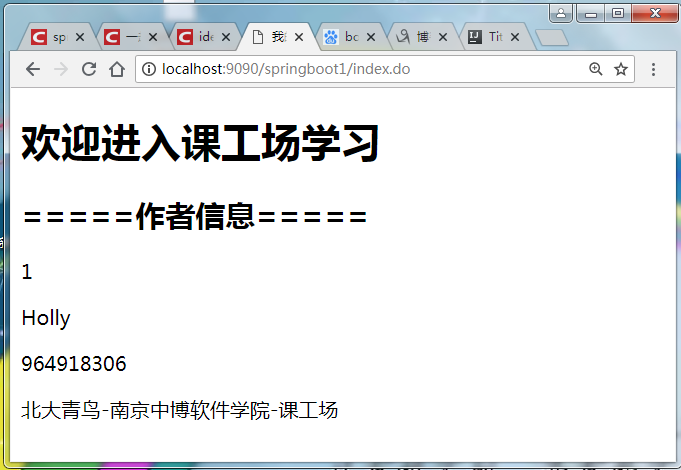
3.5 動態效果:
在瀏覽器輸入:http://localhost:9090/springboot1/index.do可以看到渲染後的效果,真正意義上的動靜分離了
總結:
Thymeleaf參考手冊:https://blog.csdn.net/zrk1000/article/details/72667478
參考文章出處:
- 本文作者:唐亞峰
- 本文連結:http://blog.battcn.com/2018/04/28/springboot/v2-web-thymeleaf/
- 版權宣告:本部落格所有文章除特別宣告外,均採用CC BY-NC-SA 3.0許可協議。轉載請註明出處!
