
maven的ssm搭建,簡單版
阿新 • • 發佈:2018-11-13
(1)新建一個maven專案叫做ssmcurd
(2)web.xml裡面要匯入相關jar包:
  <project xmlns="http://maven.apache.org/POM/4.0.0"
	xmlns:xsi="http://www.w3.org/2001/XMLSchema-instance"
	xsi:schemaLocation="http://maven.apache.org/POM/4.0.0 http://maven.apache.org/xsd/maven-4.0.0.xsd">
	<modelVersion>4.0.0</modelVersion>
	<groupId>hua</groupId>
	<artifactId>ssmcurd</artifactId>
	<version>0.0.1-SNAPSHOT</version>
	<packaging>war</packaging>

	<properties>
		<failOnMissingWebXml>false</failOnMissingWebXml>
	</properties>

	<!-- 引入專案依賴的jar包 -->

	<dependencies>
		<!-- springmvc、spring -->
		<!-- https://mvnrepository.com/artifact/org.springframework/spring-webmvc -->
		<dependency>
			<groupId>org.springframework</groupId>
			<artifactId>spring-webmvc</artifactId>
			<version>4.3.7.RELEASE</version>
		</dependency>

		<!-- spring-jdbc -->
		<!-- https://mvnrepository.com/artifact/org.springframework/spring-jdbc -->
		<dependency>
			<groupId>org.springframework</groupId>
			<artifactId>spring-jdbc</artifactId>
			<version>4.3.7.RELEASE</version>
		</dependency>

		<!-- spring 面向切面程式設計 -->
		<!-- https://mvnrepository.com/artifact/org.springframework/spring-aspects -->
		<dependency>
			<groupId>org.springframework</groupId>
			<artifactId>spring-aspects</artifactId>
			<version>4.3.7.RELEASE</version>
		</dependency>

		<!-- mybatis -->
		<!-- https://mvnrepository.com/artifact/org.mybatis/mybatis -->
		<dependency>
			<groupId>org.mybatis</groupId>
			<artifactId>mybatis</artifactId>
			<version>3.4.2</version>
		</dependency>

		<!-- mybatis整合spring的適配包 -->
		<!-- https://mvnrepository.com/artifact/org.mybatis/mybatis-spring -->
		<dependency>
			<groupId>org.mybatis</groupId>
			<artifactId>mybatis-spring</artifactId>
			<version>1.3.1</version>
		</dependency>

		<!-- 資料庫連線池 -->
		<!-- https://mvnrepository.com/artifact/c3p0/c3p0 -->
		<dependency>
			<groupId>c3p0</groupId>
			<artifactId>c3p0</artifactId>
			<version>0.9.1.2</version>
		</dependency>
		<!-- https://mvnrepository.com/artifact/mysql/mysql-connector-java -->
		<dependency>
			<groupId>mysql</groupId>
			<artifactId>mysql-connector-java</artifactId>
			<version>5.1.41</version>
		</dependency>

		<!-- jstl -->
		<!-- https://mvnrepository.com/artifact/jstl/jstl -->
		<dependency>
			<groupId>jstl</groupId>
			<artifactId>jstl</artifactId>
			<version>1.2</version>
		</dependency>

		<!-- https://mvnrepository.com/artifact/javax.servlet/javax.servlet-api -->
		<dependency>
			<groupId>javax.servlet</groupId>
			<artifactId>javax.servlet-api</artifactId>
			<version>3.0.1</version>
			<scope>provided</scope><!-- tomcat中也有servlet-api包,provided表明該包只在編譯和測試的時候用,所以,當啟動tomcat的時候,這個包自動剔除,就不會衝突了 -->
		</dependency>

		<!-- Junit -->
		<!-- https://mvnrepository.com/artifact/junit/junit -->
		<dependency>
			<groupId>junit</groupId>
			<artifactId>junit</artifactId>
			<version>4.12</version>
		</dependency>

		<!-- jackson 返回json字串的 支援 -->
		<!-- https://mvnrepository.com/artifact/com.fasterxml.jackson.core/jackson-databind -->
		<dependency>
			<groupId>com.fasterxml.jackson.core</groupId>
			<artifactId>jackson-databind</artifactId>
			<version>2.8.8</version>
		</dependency>

		<!--其他jar包-->
		<!-- pageHelper -->
		<dependency>
			<groupId>com.github.pagehelper</groupId>
			<artifactId>pagehelper</artifactId>
			<version>5.0.0</version>
		</dependency>

	</dependencies>

</project>
(3)在resource下建立一個數據庫配置檔案dbconfig.properties:
jdbc.jdbcUrl=jdbc:mysql://localhost:3306/ssm_curd?useUnicode=true&characterEncoding=UTF-8
jdbc.driverClass=com.mysql.jdbc.Driver
jdbc.user=root
jdbc.password=1234567890
(4)在resource下建立一個applicationContext.xml,配置spring:
<?xml version="1.0" encoding="UTF-8"?>
<beans xmlns="http://www.springframework.org/schema/beans"
	xmlns:xsi="http://www.w3.org/2001/XMLSchema-instance"
	xmlns:context="http://www.springframework.org/schema/context"
	xmlns:aop="http://www.springframework.org/schema/aop"
	xmlns:tx="http://www.springframework.org/schema/tx"
	xsi:schemaLocation="http://www.springframework.org/schema/beans http://www.springframework.org/schema/beans/spring-beans-4.3.xsd
		http://www.springframework.org/schema/context http://www.springframework.org/schema/context/spring-context-4.3.xsd
		http://www.springframework.org/schema/aop http://www.springframework.org/schema/aop/spring-aop-4.3.xsd
		http://www.springframework.org/schema/tx http://www.springframework.org/schema/tx/spring-tx-4.3.xsd">

	<!-- spring的配置檔案,這裡主要配置和業務邏輯有關的 ,比如資料來源,事務控制,配置和mybatis的整合(mybatis配置檔案的位置,mapper.xml位置,dao介面實現的位置,批量操作SqlSession)-->
	<!-- 核心點:資料來源,與mybatis的整合,事務控制 -->

	<!-- 註解掃描 -->
	<context:component-scan base-package="hua" >
		<!-- 不掃控制器的-->
		<context:exclude-filter type="annotation" expression="org.springframework.stereotype.Controller"/>
	</context:component-scan>

	<!-- 引入外部檔案 ,需要namespaces加個context-->
	<context:property-placeholder location="classpath:dbconfig.properties"/>
	<bean id="pooledDataSource" class="com.mchange.v2.c3p0.ComboPooledDataSource">
		<property name="jdbcUrl" value="${jdbc.jdbcUrl}"></property>
		<property name="driverClass"  value="${jdbc.driverClass}"></property>
		<property name="user"  value="${jdbc.user}"></property>
		<property name="password"  value="${jdbc.password}"></property>
	</bean>

	<!-- 配置和mybatis的整合 -->
	<bean id="sqlSessionFactory" class="org.mybatis.spring.SqlSessionFactoryBean">
		<!-- 指定mybatis全域性配置檔案的位置 -->
		<property name="configLocation" value="classpath:mybatis-config.xml"></property>
		<property name="dataSource" ref="pooledDataSource"></property>
		<!-- 指定mybatis、mapper檔案的位置 -->
		<property name="mapperLocations" value="classpath:mapper/*.xml"></property>
	</bean>

	<!-- 配置掃描器,將mybatis介面的實現加入到ioc容器中。因為mybatis介面的實現是一個代理物件 -->
	<bean class="org.mybatis.spring.mapper.MapperScannerConfigurer">
		<!-- 掃描所有的dao介面的實現,加入到ioc容器中 -->
		<property name="basePackage" value="hua.dao"></property>
	</bean>

	<!-- 配置一個可以執行批量的SqlSession -->
	<bean id="sqlSession" class="org.mybatis.spring.SqlSessionTemplate" >
		<constructor-arg name="sqlSessionFactory" ref="sqlSessionFactory"></constructor-arg>
		<constructor-arg name="executorType" value="BATCH"></constructor-arg>
	</bean>

	<!-- 事物控制配置 -->
	<bean id="transactionManager" class="org.springframework.jdbc.datasource.DataSourceTransactionManager">
		<!-- 控制資料來源 -->
		<property name="dataSource" ref="pooledDataSource"></property>
	</bean>

	<!-- 開啟基於註解的事務,使用xml配置形式的事務,(推薦比較重要的都是使用配置式) -->
	<aop:config>
		<!-- 切入點表示式  	service下的所有類的所有方法都想來控制事務-->
		<aop:pointcut expression="execution(* hua.service..*())" id="txPoint"/>
		<!-- 配置事務增強:事務如何切入規則指定,切入方法指定-->
		<aop:advisor advice-ref="txAdvice" pointcut-ref="txPoint"/>
	</aop:config>

	<!-- 配置事務增強,也就是配置事務如何切入 -->
	<tx:advice id="txAdvice" transaction-manager="transactionManager">
		<tx:attributes>
			<!-- 這個切入點切入的所有方法都是事務方法 -->
			<tx:method name="*"/>
			<!-- 以get開始的所有方法都是查詢 -->
			<tx:method name="get*" read-only="true"/>
		</tx:attributes>
	</tx:advice>
</beans>
(5)在resource下建立一個mybatis-config.xml檔案,配置mybatis
<?xml version="1.0" encoding="UTF-8"?>
<!DOCTYPE configuration
  PUBLIC "-//mybatis.org//DTD Config 3.0//EN"
  "http://mybatis.org/dtd/mybatis-3-config.dtd">

<configuration>
	<typeAliases>
		<package name="hua.bean"/>
	</typeAliases>

	<!-- 在 MyBatis 的xml 中配置攔截器外掛 -->
	<plugins>
    <!-- com.github.pagehelper為PageHelper類所在包名 -->
    <plugin interceptor="com.github.pagehelper.PageInterceptor">
    	<!-- 分頁引數合理化 -->
    	<property name="reasonable" value="true"/>
	</plugin>
</plugins>
</configuration>
(6)在WEB—INF下面建立dispatcherServlet-servlet.xml,配置springmvc
<?xml version="1.0" encoding="UTF-8"?>
<beans xmlns="http://www.springframework.org/schema/beans"
	xmlns:xsi="http://www.w3.org/2001/XMLSchema-instance"
	xmlns:context="http://www.springframework.org/schema/context"
	xmlns:mvc="http://www.springframework.org/schema/mvc"
	xsi:schemaLocation="http://www.springframework.org/schema/mvc http://www.springframework.org/schema/mvc/spring-mvc-4.3.xsd
		http://www.springframework.org/schema/beans http://www.springframework.org/schema/beans/spring-beans.xsd
		http://www.springframework.org/schema/context http://www.springframework.org/schema/context/spring-context-4.3.xsd">
	<!-- springmvc的配置檔案、包含網站的跳轉邏輯的控制、配置 -->

	<!-- 註解掃描 -->
	<context:component-scan base-package="hua" use-default-filters="false">
		<!-- 只掃描控制器 ,所有標了控制器註解的就是控制器,只掃這些-->
		<context:include-filter type="annotation" expression="org.springframework.stereotype.Controller"/>
	</context:component-scan>

	<!-- 配置檢視解析器。方便頁面返回 -->
	<bean class="org.springframework.web.servlet.view.InternalResourceViewResolver">
		<property name="prefix" value="/WEB-INF/views/"></property>
		<property name="suffix" value=".jsp"></property>
	</bean>

	<!-- 兩個標準配置 -->
	<!-- 將springmvc不能處理的請求交給tomcat,實現動態靜態資源都能訪問成功 -->
	<mvc:default-servlet-handler/>
	<!-- 能支援springmvc更高階的一些功能,比如基於jsr303的校驗,快捷的ajax請求,更重要的是對映動態請求 -->
	<mvc:annotation-driven/>

</beans>
(7)在web.xml配置
<?xml version="1.0" encoding="UTF-8"?>
<web-app xmlns:xsi="http://www.w3.org/2001/XMLSchema-instance" xmlns="http://java.sun.com/xml/ns/javaee" xsi:schemaLocation="http://java.sun.com/xml/ns/javaee http://java.sun.com/xml/ns/javaee/web-app_2_5.xsd" id="WebApp_ID" version="2.5">

	<!-- 1、啟動Spring的容器 -->
	<!-- needed for ContextLoaderListener -->
	<context-param>
		<param-name>contextConfigLocation</param-name>
		<param-value>classpath:applicationContext.xml</param-value>
	</context-param>

	<!-- Bootstraps the root web application context before servlet initialization -->
	<listener>
		<listener-class>org.springframework.web.context.ContextLoaderListener</listener-class>
	</listener>

	<!-- 2、springmvc的前端控制器,攔截所有請求 -->
	<!-- The front controller of this Spring Web application, responsible for handling all application requests -->
	<servlet>
		<servlet-name>dispatcherServlet</servlet-name>
		<servlet-class>org.springframework.web.servlet.DispatcherServlet</servlet-class>
		<load-on-startup>1</load-on-startup>
	</servlet>

	<!-- Map all requests to the DispatcherServlet for handling -->
	<servlet-mapping>
		<servlet-name>dispatcherServlet</servlet-name>
		<url-pattern>/</url-pattern>
	</servlet-mapping>

	<!-- 3、字元編碼過濾器,攔截所有請求,一定要在所有過濾器之前 -->
	<filter>
		<filter-name>CharacterEncodingFilter</filter-name>
		<filter-class>org.springframework.web.filter.CharacterEncodingFilter</filter-class>
		<init-param>
			<param-name>encoding</param-name>
			<param-value>utf-8</param-value>
		</init-param>
		<init-param>
			<param-name>forceRequestEncoding</param-name>
			<param-value>true</param-value>
		</init-param>
		<init-param>
			<param-name>forceResponseEncoding</param-name>
			<param-value>true</param-value>
		</init-param>
	</filter>
	<filter-mapping>
		<filter-name>CharacterEncodingFilter</filter-name>
		<url-pattern>/*</url-pattern>
	</filter-mapping>
</web-app>
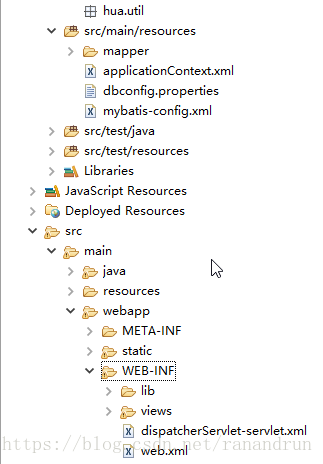
(8)專案結構如下:
補充:
<%
	pageContext.setAttribute("Pro_Path", request.getContextPath());
%>
<!-- 注意:web路徑:
	不以/開始的相對路徑,找資源,以當前資源的路徑為基準,經常容易出問題
	以/開始的相對路徑,找資源,以伺服器的路徑為標準(http://localhost:3306/),然後再加上專案名才能找到
 -->
<script src="${Pro_Path }/static/jquery/jquery-2.0.3.min.js"></script>