一步一步實現web程式資訊管理系統之三----登陸業務邏輯實現(驗證碼功能+引數獲取)
阿新 • • 發佈:2018-11-14
本篇緊接著上一篇文章[一步一步實現web程式資訊管理系統之二----後臺框架實現跳轉登陸頁面]
驗證碼功能
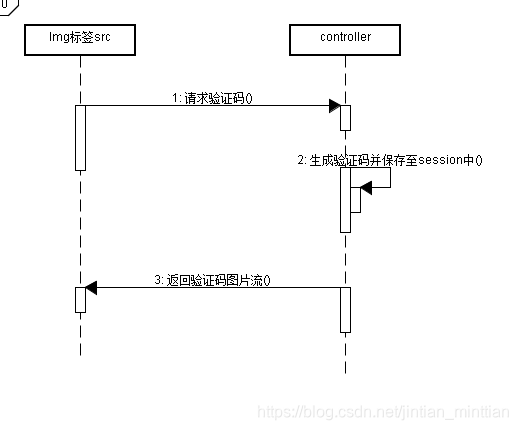
一般驗證碼功能實現方式為,前端介面訪問一個url請求,後端服務程式碼生成一個圖片流返回至瀏覽器,瀏覽器通過img標籤來展示圖片資訊,其流程模式如下所示:
- 前端介面
前端介面需要完成的功能,
1)跳轉到登陸頁面後立即生成一個驗證碼圖片
2)由於看不清或其他原因,可以更改驗證碼圖片資料
更改img標籤的屬性以及增加一個事件
<img src="/verify/authImage?1" id="codeImg" alt="點選更換" onclick="javascript:changeImg()"
                                title="點選更換" />
增加以下javascript程式碼,來向後端服務請求圖片,滑鼠點選一下驗證碼圖片即可實現重新整理驗證碼
<script src="../static/plugins/jquery-1.12.4/jquery.min.js" th:src="@{/plugins/jquery-1.12.4/jquery.min.js}" ></script>
<script type="text/javascript">
    function changeImg(){
        var imageCode=$("#codeImg");
        imageCode.attr('src', '/verify/authImage?date=' + new Date());
    }
</script>
- 後端業務
生成驗證碼功能是一個通用的方法,其他業務或以後其他地方也能使用的到。我們可以再次建立一個maven module模組專案,用於存放一些公共元件。比如:現在的生成驗證碼程式碼模組、以後的web模組統一返回資料功能等等。建立工程專案可以參照上一篇文章完成。
生成驗證碼圖片原始碼
package springboot.study.common;

import java.awt.Color;
import java.awt.Font;
import java.awt.Graphics;
import java.awt.image.BufferedImage;
import java.io.IOException;
import java.io.OutputStream;
import java.util.Random;

import javax.imageio.ImageIO;

public class AuthImageCodeUtils {

    private static final Color Color = null;
    private static char mapTable[] = { 'a', 'b', 'c', 'd', 'e', 'f', 'g', 'h', 'i', 'j', 'k', 'l', 'm', 'n', 'o', 'p', 'q',
            'r', 's', 't', 'u', 'v', 'w', 'x', 'y', 'z', '0', '1', '2', '3', '4', '5', '6', '7', '8', '9', };

    /**
     * 功能:生成彩色驗證碼圖片 引數width為生成圖片的寬度,引數height為生成圖片的高度,引數os為頁面的輸出流
     */

    public static String getCerPic(int width, int height, OutputStream os) {
        if (width < 60) {
            width = 60;
        }
        if (height <= 0) {
            height = 20;
        }
        BufferedImage image = new BufferedImage(width, height, BufferedImage.TYPE_3BYTE_BGR);
        // 獲取圖形上下文
        Graphics graphics = image.getGraphics();
        // 設定背景顏色
        graphics.setColor(new Color(0xDCDCDC));
        graphics.fillRect(0, 0, width, height);
        // 邊框
        graphics.setColor(Color.black);
        graphics.drawRect(0, 0, width - 1, height - 1);
        // 隨機產生驗證碼
        String strEnsure = "";
        // 4代表4位驗證碼
        for (int i = 1; i <= 4; i++) {
            strEnsure += mapTable[(int) (mapTable.length * Math.random())];
        }
        // 將圖形驗證碼顯示在圖片中
        graphics.setColor(Color.black);
        graphics.setFont(new Font("Atlantic Inline", Font.PLAIN, 20));
        String str = strEnsure.substring(0, 1);
        graphics.drawString(str, 8, 17);// 8:左右距離,17:上下距離
        str = strEnsure.substring(1, 2);
        graphics.drawString(str, 20, 15);
        str = strEnsure.substring(2, 3);
        graphics.drawString(str, 35, 18);
        str = strEnsure.substring(3, 4);
        graphics.drawString(str, 45, 15);
        // 隨機產生10個干擾點
        Random random = new Random();
        for (int i = 0; i <= 10; i++) {
            int x = random.nextInt(width);
            int y = random.nextInt(height);
            graphics.drawOval(x, y, 1, 1);
        }
        // 釋放圖形上下文
        graphics.dispose();

        try {
            ImageIO.write(image, "JPEG", os);
        } catch (IOException e) {
            e.printStackTrace();
            return "";
        }
        return strEnsure;

    }
}
controller處理請求原始碼
    @RequestMapping("/verify/authImage")
    public void authImage(HttpServletRequest request,HttpServletResponse response) throws IOException {
        response.setHeader("Pragma", "No-cache");
        response.setHeader("Cache-Control", "no-cache");
        response.setDateHeader("Expires", 0);
        response.setContentType("image/jpeg");
        // 生成隨機字串
        //String verifyCode = VerifyCodeUtils.generateVerifyCode(4);
        // 存入會話session
        HttpSession session = request.getSession(true);
        // 刪除以前的

        // 生成圖片
        int w = 60, h = 20;
        OutputStream out = response.getOutputStream();
        //VerifyCodeUtils.outputImage(w, h, out, verifyCode);
        String verifyCode=AuthImageCodeUtils.getCerPic(w, h, out);
System.out.println(verifyCode);
        session.removeAttribute("verCode");
        session.removeAttribute("codeTime");
        session.setAttribute("verCode", verifyCode.toLowerCase());
        session.setAttribute("codeTime", LocalDateTime.now());
    }
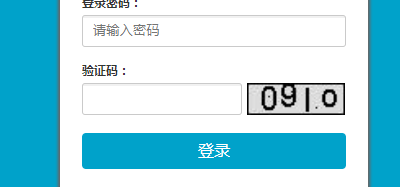
完成後啟動一下程式,訪問http://localhost:9001/即可看到後端生成的驗證碼圖片
滑鼠點選一個圖示可以更換驗證碼圖片。這裡只是我實現的驗證碼圖片,效果可能不是特別好。
如果哪位小夥伴有好一點的演算法或效果,可以互相學習一下
提示:eclipse中如何在一個專案中引用其他專案,右鍵點選專案->maven->add dependency
登陸實現
上面已經實現驗證碼功能,但我們還沒有完成提交登陸表單資料,還無法完成登陸功能。在實現提交登陸表單之前應該對輸入的資料進行校驗一下,複雜的校驗不在我們考慮之內(應該以自己實際專案需要來制定)但使用者名稱為空、密碼為空、驗證碼資訊為空這些基本的應該有,所以我們繼續完善登陸頁面。
- 介面html程式碼
function checkValidity() {
        var userText = $("#username");
        var passwordText = $("#password");
        var codeText = $("#code");
        if (userText.val() == "") {
            userText.tips({
                side : 2,
                msg : '使用者名稱不得為空',
                bg : '#AE81FF',
                time : 3
            });
            userText.focus();
            return false;
        }
        if (passwordText.val() == "") {
            passwordText.tips({
                side : 2,
                msg : '密碼資料不得為空',
                bg : '#AE81FF',
                time : 3
            });
            passwordText.focus();
            return false;
        }
        if (codeText.val() == "") {
            codeText.tips({
                side : 2,
                msg : '驗證碼不得為空',
                bg : '#AE81FF',
                time : 3
            });
            codeText.focus();
            return false;
        }
        return true;
    }
    function loginCheck() {
        if(checkValidity()){

        }
    }
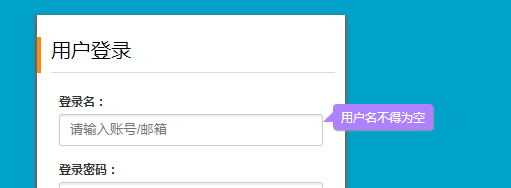
當不輸入密碼時,介面提示效果
密碼與驗證碼效果類似。
登陸表單提交採用post方式提交
function loginCheck() {
        if(checkValidity()){
            var username=$("#username").val();
            var password=$("#password").val();
            var code=$("#code").val();
            $.ajax({
                type: "post",//post型別請求
                url: '/login',//url
                data: {'username':username,'password':password,'code':code,'tm':new Date().getTime()},//請求資料
                dataType:'json',//資料型別為JSON型別
                cache: false,//關閉快取
                success: function(data){

                }
            });
        }
    }
登陸邏輯實現程式碼
@RequestMapping("/login")
    @ResponseBody
    public JsonResult loginCheck(String username,String password,String code){
System.out.println("username == "+ username +" password=== "+password +"   code==="+code);
        JsonResult js=null;
        return js;
    }
僅僅實現顯示出前端介面傳送來的資料。編寫完成後,我們重新啟動一下程式。可以看到如下效果:
可以看到我們在後端獲取到 前端介面傳送來的資料。
下一篇整合資料庫來實現真正的登陸。
附上本篇文章的原始碼地址
一步一步實現web程式資訊管理系統之三----登陸業務邏輯實現(驗證碼功能+引數獲取)
