iView基礎學習(1)-Vue-Cli3.0建立專案
Vue-Cli3.0建立專案
一、基礎知識
(1)使用Vue UI建立、管理專案
(2)專案結構目錄整理
(3)初始檔案新增
(4)基本配置講解
(5)跨域配置
二、使用Vue UI建立、管理專案
1、首先安裝vue-cli3.0
2、終端執行vue ui

Vue UI介面介紹

Projects:表示vue專案
Create:表示建立vue專案
Import:表示匯入vue專案
3、建立專案
詳情

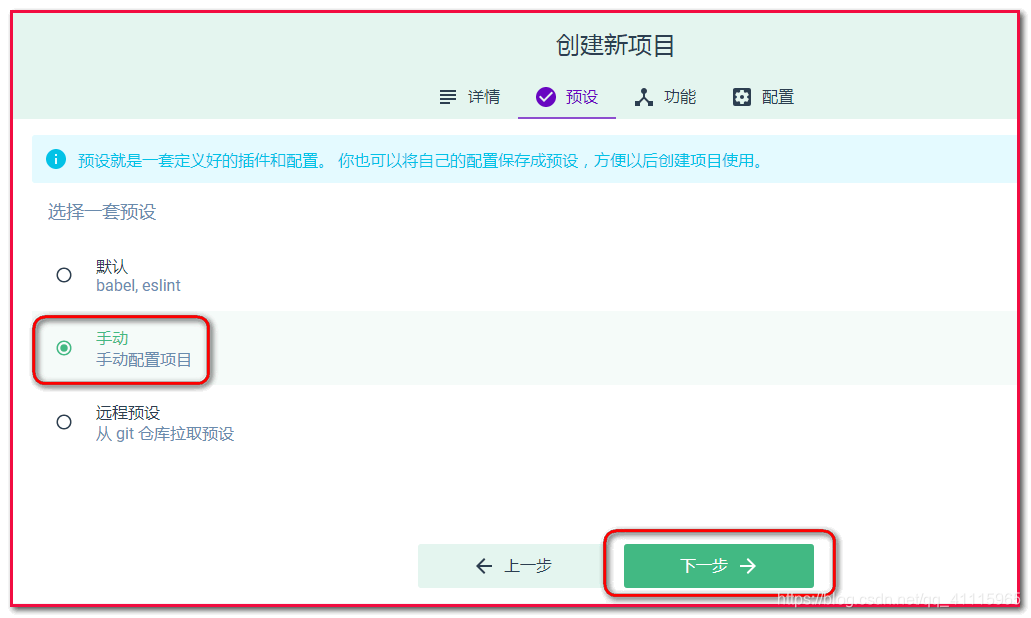
預設

功能
通常,我們一般選擇一下功能:Babel,Router,Vuex,CSS Pre-processors,Linter/Formatter,使用配置檔案等等
配置

是否儲存預設
儲存之後,可以用於下次建立專案 。

建立完成後,我們可以檢視專案中的外掛、依賴、配置、任務等。

三、專案結構目錄整理
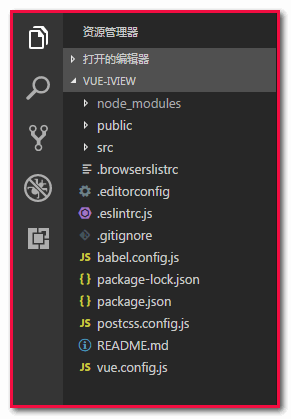
專案目錄如下圖:

解釋:
vue.config.js:配置檔案。
package.js:定義專案的描述,專案版本、名稱、執行的指令碼、依賴等等。
babelconfig.js:babel的配置檔案。
.gitignore:Git提交時的忽略檔案。
.eslintrc.js:配置eslint規則的檔案。
public:公共檔案。public/index.html:模板檔案。public/favicon:圖示檔案。
src:開發檔案。src/assets:靜態檔案、src/components:抽離的元件、src/iview:檢視檔案(頁面)。
app.vue:基礎元件。
main.js:入口檔案。
router.js:路由檔案。
store.js:vuex狀態管理檔案。
四、初始檔案新增
對於使用vscode的開發者,可以新增編輯器配置檔案(.editorconfig),並進行基本配置。
[*.{js,jsx,ts,tsx,vue}]
indent_style = tabs
indent_size = 2
trim_trailing_whitespace = true
insert_final_newline = true
charset = utf-8
root = true
注意:配置完成之後,需要安裝EditorConfig for VS Code。
五、新增資料夾/檔案
api:該資料夾用於存放api介面請求。
assets/img、assets/font:分別對應放置圖片、圖示字型。
config:專案的配置資料夾。
config/index.js:對專案的一些配置。介紹:使用eslint語法,使用 export default { } 匯出配置物件,在使用的時候直接引入即可。舉例:config/index.js 在 store.js 檔案中使用,程式碼如下:
import Vue from 'vue'
import Vuex from 'vuex'
import config from './config/index'

Vue.use(Vuex)

export default new Vuex.Store({
    state: {

    },
    mutations: {

    },
    actions: {

    }
})directive/index.js:儲存 自定義指令 的檔案。
lib/util.js:與業務有關係 的方法。
lib/tools.js:與 業務沒有直接關係 的方法,即 純粹的方法。
router/router.js:原有的router.js移入router資料夾,以後放置 路由列表 。
router/index.js:將原有的router.js檔案中的除路由列表以外的部分。
store/index.js:將原有的store.js檔案移入store資料夾中,並重命名為index.js。注意:需要將拆分後的 state.js、mutations.js、actions.js 檔案引入,並註冊。如下:
store/state.js:vuex中的 state 。
store/mutations.js:vuex中的 mutations 。
store/actions.js:vuex中的 actions 。
import Vue from 'vue'
import Vuex from 'vuex'
import state from './state'
import mutations from './mutations'
import actions from './actions'
Vue.use(Vuex)

export default new Vuex.Store({
    state,
    mutations,
    actions
})
新增模組的使用方法:
store/module/user.js:儲存使用者資訊的模組(以user.js為例)
const state = {

}

const mutations = {

}

const actions = {

}
export default {
    state,
    mutations,
    actions

}
使用很簡單,只需要在store/index.js中引入即可。如下:
import Vue from 'vue'
import Vuex from 'vuex'
import state from './state'
import mutations from './mutations'
import actions from './actions'
// 引入module模板(user為例)
import user from './module/user'
Vue.use(Vuex)

export default new Vuex.Store({
    state,
    mutations,
    actions,
    modules: {
        user
    }
})mock/index.js:用於資料模擬。在後端介面為提供之前,前端開發者,可以用該檔案(終端:npm instal mockjs -D 安裝)進行資料模擬。
import Mock from 'mockjs';

// 在這裡封裝介面請求......


export default Mock
此時,我們新增的檔案已經完成了。
六、基礎檔案 vue.config.js 配置
具體的名詞解釋,請留意程式碼註釋。程式碼如下:
// 定義基礎路徑
const BASE_URL = process.env.NODE_ENV === 'production' ? '/iview-admin' : '/';

const resolve = dir => path.join(_dirname, dir);
module.exports = {
    // 不儲存為eslintt規範的程式碼
    lintOnSave: false,
    baseUrl: BASE_URL,
    // 以下鏈式結構作用:指定檔案路徑的簡化縮寫。
    chainWebpack: config => {
        config.resolve.alias
            .set('@', resolve('src'))
            .set('_c', resolve('src/components'))
    },
    // 打包時不生成map檔案,加快打包速度,減少體積。
    prodctionSourceMap: false,
    // 設定跨域轉發:將任務未請求到靜態檔案的請求均代理到http://localhost:4000
    devServer: {
        proxy: 'http://localhost:4000'
    }
}
