Zabbix監控搭建部署
環境:zabbix-server :192.168.200.130
zabbix-被 監 控:192.168.200.128
一 ZabbixServer的安裝:
1.1 搭建自定義yum倉庫並安裝支援包:
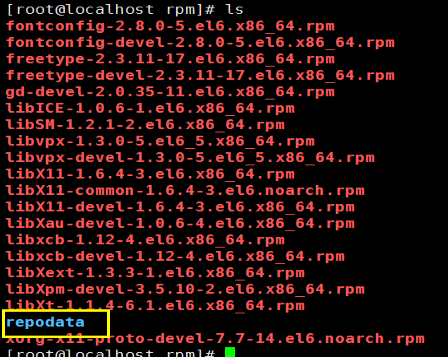
fontconfig-2.8.0-5.el6.x86_64.rpm libX11-common-1.6.4-3.el6.noarch.rpm fontconfig-devel-2.8.0-5.el6.x86_64.rpm libX11-devel-1.6.4-3.el6.x86_64.rpm freetype-2.3.11-17.el6.x86_64.rpm libXau-devel-1.0.6-4.el6.x86_64.rpm freetype-devel-2.3.11-17.el6.x86_64.rpm libxcb-1.12-4.el6.x86_64.rpm gd-devel-2.0.35-11.el6.x86_64.rpm libxcb-devel-1.12-4.el6.x86_64.rpm libICE-1.0.6-1.el6.x86_64.rpm libXext-1.3.3-1.el6.x86_64.rpm libSM-1.2.1-2.el6.x86_64.rpm libXpm-devel-3.5.10-2.el6.x86_64.rpm libvpx-1.3.0-5.el6_5.x86_64.rpm libXt-1.1.4-6.1.el6.x86_64.rpm libvpx-devel-1.3.0-5.el6_5.x86_64.rpm repodata libX11-1.6.4-3.el6.x86_64.rpm xorg-x11-proto-devel-7.7-14.el6.noarch.rpm
支援包下載路徑:待寫-------
1.2 自定義yum倉庫並安裝支援包:
[[email protected]zabbix-server ~]# mkdir rpm
[[email protected]zabbix-server ~]# cd rpm
[[email protected]zabbix-server rpm]# createrepo -v .
1.3 自定義yum倉庫,配置檔案修改:
[c6-media]
name=CentOS-$releasever - Media
baseurl=file:///media/CentOS/
file:///media/cdrom/
file:///media/cdrecorder/
gpgcheck=1
enabled=1
gpgkey=file:///etc/pki/rpm-gpg/RPM-GPG-KEY-CentOS-6
[rpm]
name=rpm #隨便設定
baseurl=file:///root/rpm/ #依賴包安裝的路徑
gpgcheck=0 #開機不檢查
enabled=1
~
1.4 安裝支援包:
yum -y install pcre pcre-devel zlib-devel libaio libaio-devel libxml2 libxml2-devel bzip2-devel openssl openssl-devel net-snmp-devel net-snmp curl-devel gd gcc gcc-c++ make libjpeg-devel libpng-devel libcurl-devel perl-ExtUtils-CBuilder perl-ExtUtils-MakeMaker mysql-devel net-snmp-utils
#如果下一步出現問題,請註釋掉yum配置檔案裡的本地光碟源
yum -y install libvpx-devel gd-devel
具體操作不一樣方法:6.5虛擬機器:
yum配置檔案中,原yum配置檔案刪除,或移動別處,建立自定義yum源,例如rpm.repo
[root@zabbix-server ~]# cd /etc/yum.repos.d/
[root@zabbix-server yum.repos.d]# ls
bak CentOS-Media.repo
[rootzabbix-server yum.repos.d]# vim rpm.repo #建立自定義yum
[rpm]
name=rpm
baseurl=file:///root/rpm/ #rpm包所在的路徑
gpgcheck=0
enabled=1
[root@zabbix-server yum.repos.d]# mv CentOS-Media.repo bak/
#把本地yum源註釋,或者移動到別處。
[root@zabbix-server yum.repos.d]# yum -y install libvpx-devel gd-devel
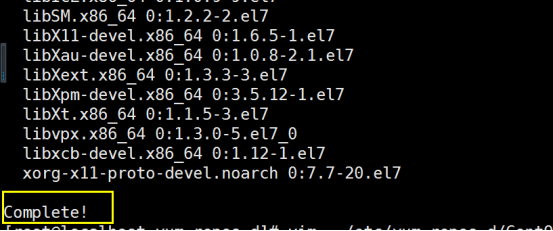
成功如下:------------

具體操作方法:7.5虛擬機器:
[root@zabbix-server ~]# cd /etc/yum.repos.d
[root@zabbix-server yum.repos.d]# ls
CentOS-Base.repo CentOS-fasttrack.repo CentOS-Vault.repo
CentOS-CR.repo CentOS-Media.repo epel.repo
CentOS-Debuginfo.repo CentOS-Sources.repo epel-testing.repo
[[email protected] yum.repos.d]# vim /etc/yum.repos.d/CentOS-Media.repo
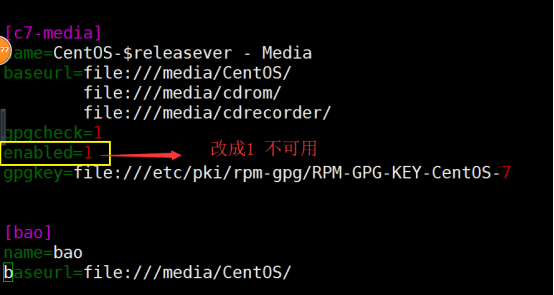
[[email protected]@zabbix-server yum.repos.d]# yum -y install libvpx-devel gd-devel
二 編譯安裝LNMP環境
2.1 安裝nginx
[[email protected]@zabbix-server ~]# useradd -s /sbin/nologin -M www
[[email protected]@zabbix-server ~]# tar xf nginx-1.10.2.tar.gz -C /usr/src/
[[email protected]@zabbix-server ~]# cd /usr/src/nginx-1.10.2/
[[email protected]@zabbix-server nginx-1.10.2]# ./configure --prefix=/usr/local/nginx --user=www --group=www --with-http_stub_status_module --with-http_ssl_module && make && make install
[[email protected]@zabbix-server nginx-1.10.2]# ln -s /usr/local/nginx/sbin/* /usr/local/sbin/
#建立nginx配置檔案模版
[[email protected]@zabbix-server nginx-1.10.2]# cd /usr/local/nginx/conf/
egrep -v "^$|#" nginx.conf.default > nginx.conf
#將nginx配置檔案改成如下內容
[[email protected]@zabbix-server conf]# vim nginx.conf
worker_processes 1;
events {
worker_connections 1024;
}
http {
include mime.types;
default_type application/octet-stream;
sendfile on;
keepalive_timeout 65;
server {
listen 80;
server_name localhost;
location / {
root html;
index index.php index.html index.htm;
}
location = /nginx-status {
stub_status on;
access_log off;
}
location ~ \.php$ {
fastcgi_pass 127.0.0.1:9000;
fastcgi_index index.php;
fastcgi_param SCRIPT_FILENAME $document_root$fastcgi_script_name;
include fastcgi_params;
}
}
}
[[email protected]@zabbix-server conf]# nginx -t

# /usr/local/nginx/sbin/nginx啟動
#補充:/usr/local/nginx/sbin/nginx -s stop 停止
/usr/local/nginx/sbin/nginx -s reload 平滑重啟
[[email protected]@zabbix-server conf]# /usr/local/nginx/sbin/nginx
[[email protected]@zabbix-server conf]#ss -antup | grep 80 #檢視是否啟動

yum -y install pcre-devel openssl-devel
[[email protected]@zabbix-server conf]# scp nginx.conf 192.168.200.128://usr/local/nginx/conf/
#管理機ngxin.conf 複製到 192.168.200.128://usr/local/nginx/conf/ 被管理機下:
2.2 安裝mysql
[[email protected]@zabbix-server ~]# tar xf mysql-5.5.32-linux2.6-x86_64.tar.gz -C /usr/local/
[[email protected]@zabbix-server~]# cd /usr/local/
[[email protected]@zabbix-server local]# mv mysql-5.5.32-linux2.6-x86_64 mysql
[[email protected]@zabbix-server local]# cd mysql
[[email protected]@zabbix-server mysql]# /bin/cp support-files/my-small.cnf /etc/my.cnf
[[email protected]@zabbix-server mysql]# useradd -s /sbin/nologin -M mysql
[[email protected]@zabbix-server mysql]# chown -R mysql.mysql data
[[email protected] mysql]# /usr/local/mysql/scripts/mysql_install_db --basedir=/usr/local/mysql --datadir=/usr/local/mysql/data --user=mysql #初始化資料庫

[[email protected]zabbix-server mysql]# cp support-files/mysql.server /etc/init.d/mysqld
[[email protected]zabbix-server mysql]# chmod +x /etc/init.d/mysqld
[root@zabbix-server mysql]# /etc/init.d/mysqld start #啟動mysql
[root@zabbix-server mysql]# ss -antup | grep 3306 #檢視mysql啟動情況

[root@zabbix-server mysql]# chkconfig --add mysqld 設定MySQL開機自啟動
[root@zabbix-server mysql]# chkconfig mysqld on
[root@zabbix-server mysql]# chkconfig --list mysqld
mysqld 0:off 1:off 2:on 3:on 4:on 5:on 6:off
提示:也可以將啟動命令/etc/init.d/mysqld start 放到/etc/rc.local裡面
[root@zabbix-server mysql]# ln -s /usr/local/mysql/bin/* /usr/local/bin/ 建立mysql命令
[root@zabbix-server mysql]# mysql
Welcome to the MySQL monitor. Commands end with ; or \g.
Your MySQL connection id is 1
Copyright (c) 2000, 2013, Oracle and/or its affiliates. All rights reserved.
Oracle is a registered trademark of Oracle Corporation and/or its
affiliates. Other names may be trademarks of their respective
owners.
Type 'help;' or '\h' for help. Type '\c' to clear the current input statement.
mysql> Ctrl-C -- exit!
Server version: 5.5.32 MySQL Community Server (GPL)
[root@zabbix-server mysql]# mysqladmin -u root password '123123' #給mysql設密碼
3 安裝libmcrypt:
[root@zabbix-server ~]# tar xf libmcrypt-2.5.8.tar.gz -C /usr/src/
[root@zabbix-server ~]# cd /usr/src/libmcrypt-2.5.8/
[root@zabbix-serverlibmcrypt-2.5.8]# ./configure && make && make install
4 安裝GD:
[root@zabbix-server ~]# tar xf GD-2.18.tar.gz -C /usr/src/
[root@zabbix-server ~]# cd /usr/src/GD-2.18/
[root@zabbix-server GD-2.18]# perl Makefile.PL
[root@zabbix-servert GD-2.18]# make && make install
5 安裝PHP
[root@zabbix-server ~]# tar xf php-5.6.30.tar.gz -C /usr/src/
[root@zabbix-server ~]# cd /usr/src/php-5.6.30/
[root@zabbix-server php-5.6.30]# ./configure --prefix=/usr/local/php --with-config-file-path=/usr/local/php/etc --with-bz2 --with-curl --enable-sockets --disable-ipv6 --with-gd --with-jpeg-dir=/usr/local --with-png-dir=/usr/local --with-freetype-dir=/usr/local --enable-gd-native-ttf --with-iconv-dir=/usr/local --enable-mbstring --enable-calendar --with-gettext --with-libxml-dir=/usr/local --with-zlib --with-pdo-mysql=mysqlnd --with-mysqli=mysqlnd --with-mysql=mysqlnd --enable-dom --enable-xml --enable-fpm --with-libdir=lib64 --enable-bcmath

[root@zabbix-server php-5.6.30]# make && make install
[root@zabbix-server php-5.6.30]# cp php.ini-development /usr/local/php/etc/php.ini
#建立php配置檔案
[root@zabbix-server php-5.6.30]# vim /usr/local/php/etc/php.ini
[root@zabbix-server php-5.6.30]# cat -n /usr/local/php/etc/php.ini | sed -n '372p;382p;393p;660p;702p;820p;936p'
372 max_execution_time = 300
382 max_input_time = 60
393 memory_limit = 128M
660 post_max_size = 8M
702 always_populate_raw_post_data = -1
820 upload_max_filesize = 2M
936 date.timezone =Asia/Shanghai


cat -n /usr/local/php/etc/php.ini | sed -n '372p;382p;393p;660p;702p;820p;936p'
[root@zabbix-server php-5.6.30]# cd /usr/local/php/etc/ #建立php-fpm配置檔案
[root@zabbix-server etc]# cp php-fpm.conf.default php-fpm.conf
修改php-fpm.conf配置檔案:如下--
[[email protected] etc]# vim php-fpm.conf +149
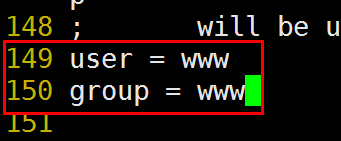
[root@zabbix-server etc]# cat -n php-fpm.conf | sed -n '149,150p'
149user = www
150group = www
2.3 安裝zabbix server端
2.3.1 編譯安裝zabbix server
[[email protected] etc]#useradd zabbix -s /sbin/nologin -M
[[email protected] etc]# cd ~
[[email protected] ~]# tar xf zabbix-3.2.4.tar.gz -C /usr/src/
[[email protected] ~]# cd /usr/src/zabbix-3.2.4/
[[email protected] zabbix-3.2.4]# ./configure --prefix=/usr/local/zabbix --with-mysql --with-net-snmp --with-libcurl --enable-server --enable-agent --enable-proxy --with-libxml2
[[email protected] zabbix-3.2.4]# make && make install
#由於zabbix啟動指令碼路徑預設指向的是/usr/local/sbin路徑,因此,需要提前簡歷軟連線:
[[email protected] zabbix-3.2.4]# ln -s /usr/local/zabbix/sbin/* /usr/local/sbin/
[[email protected] zabbix-3.2.4]# ln -s /usr/local/zabbix/bin/* /usr/local/bin/
2.3.2 配置zabbix的mysql環境
[[email protected] zabbix-3.2.4]# mysqladmin -uroot password '123123'
[[email protected] zabbix-3.2.4]# mysql -uroot -p123123 -e 'create database zabbix character set utf8;'
[[email protected] zabbix-3.2.4]# mysql -uroot -p123123 -e "grant all privileges on zabbix.* to [email protected]'localhost' identified by '123123';"
[[email protected] zabbix-3.2.4]# mysql -uroot -p123123 -e 'flush privileges;'
#如下資料的匯入順序不可以錯:
[[email protected] zabbix-3.2.4]# mysql -uzabbix -p123123 zabbix < /usr/src/zabbix-3.2.4/database/mysql/schema.sql
[[email protected] zabbix-3.2.4]# mysql -uzabbix -p123123 zabbix < /usr/src/zabbix-3.2.4/database/mysql/images.sql
[[email protected] zabbix-3.2.4]# mysql -uzabbix -p123123 zabbix < /usr/src/zabbix-3.2.4/database/mysql/data.sql
2.4 安裝Zabbix web GUI
[[email protected] zabbix-3.2.4]# cd ~
[[email protected] ~]# cp -rp /usr/src/zabbix-3.2.4/frontends/php /usr/local/nginx/html/zabbix
[[email protected]~]# cd /usr/local/nginx/html/
[[email protected] html]# chown -R www.www zabbix
2.4.2 啟動nginx服務及php-fpm
[[email protected] html]# /usr/local/nginx/sbin/nginx
[[email protected] html]# /usr/local/php/sbin/php-fpm
[[email protected] html]# netstat -antup | grep php-fpm
tcp 0 0 127.0.0.1:9000 0.0.0.0:* LISTEN 32657/php-fpm: mast
2.4.3 登入web根據提示生成zabbix.conf.php配置檔案
[[email protected] ~]# cd /usr/local/nginx/html/zabbix/conf
[[email protected] conf]# ls
maintenance.inc.php zabbix.conf.php.example #登入目錄鎖有的東西
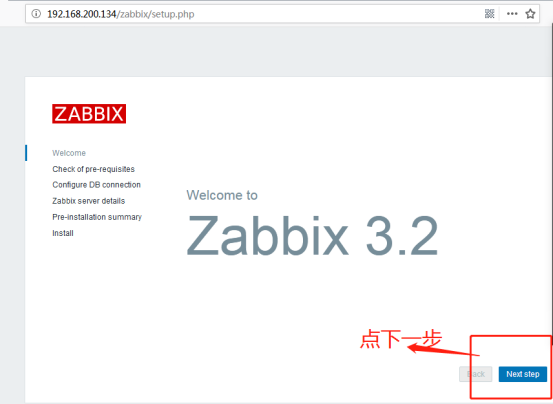
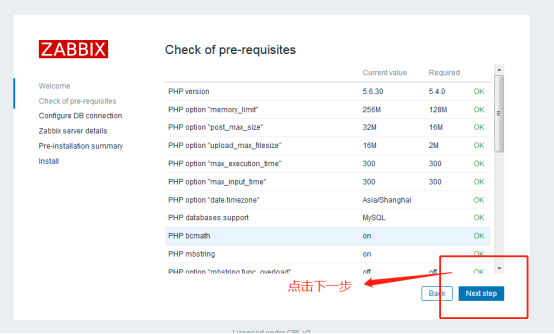
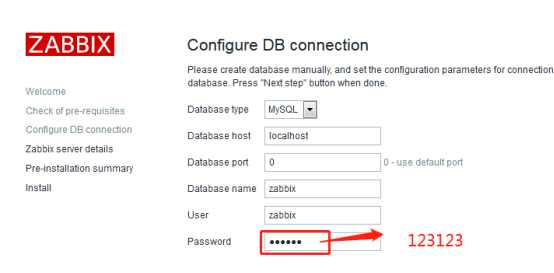
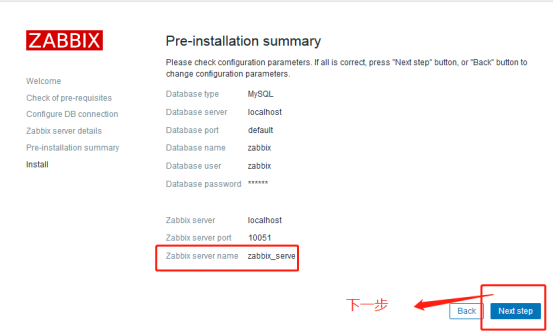
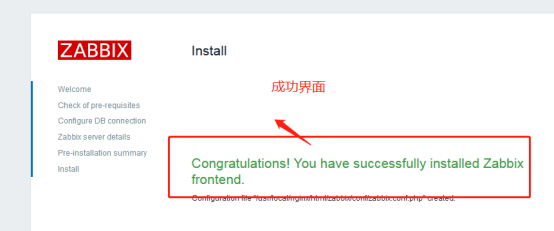
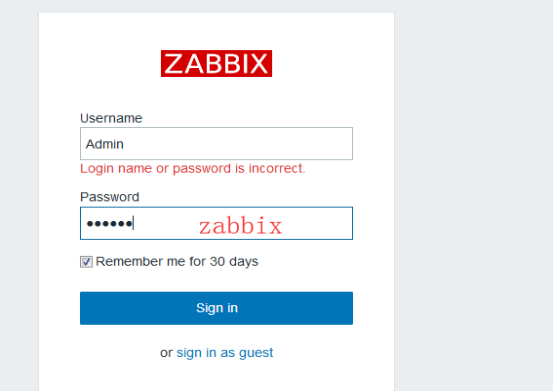
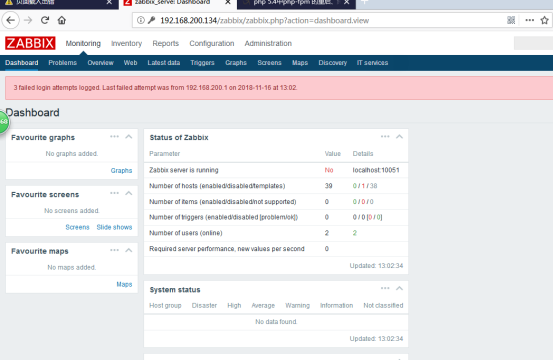
在瀏覽器裡輸入http://IP/zabbix,配置zabbix資料庫環境,如下圖所示
調中文模式:
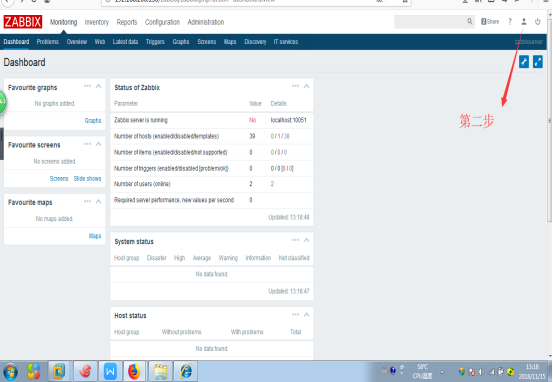
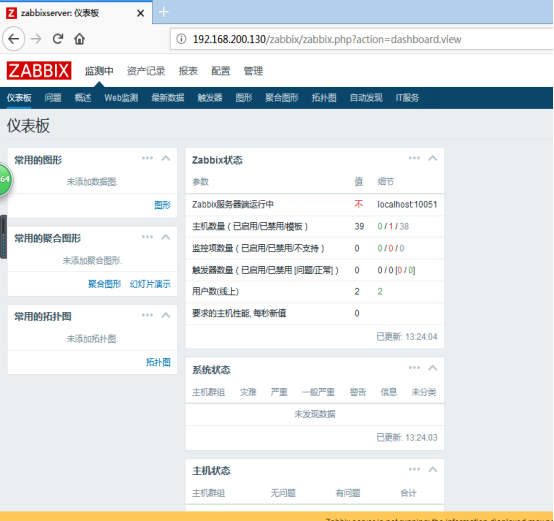
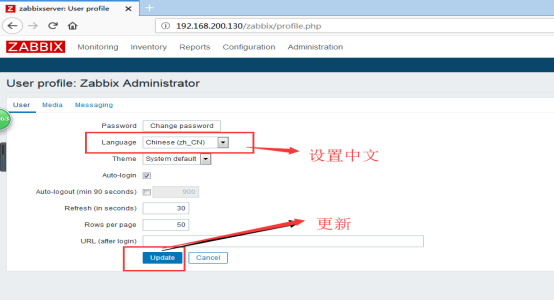
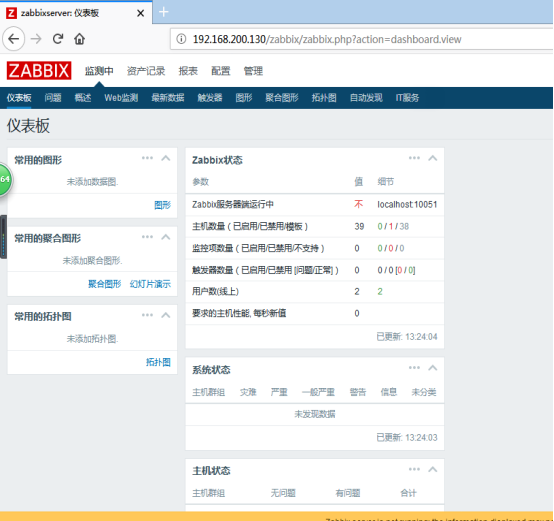
執行如上圖所示的步驟生成zabbix.conf.php配置檔案
[[email protected] conf]# ls
maintenance.inc.php zabbix.conf.php zabbix.conf.php.example

修改zabbix密碼:
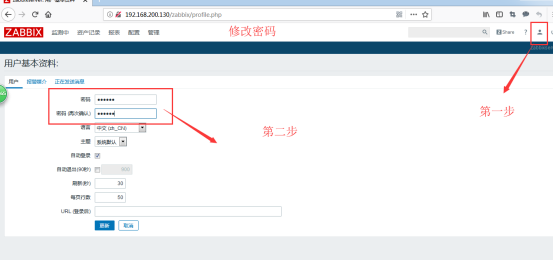
三,zabbix server的配置
3.1 zabbix_server.conf配置
通過原始碼安裝方式將zabbix安裝到/usr/local/zabbix下面,zabbix server的
配置檔案為/usr/local/zabbix/etc/zabbix_server.conf,需要修改的內容為如下:
[[email protected] conf]# cd /usr/local/zabbix/etc/
grep -Ev '^#|^$' zabbix_server.conf
[[email protected] etc]# vim zabbix_server.conf +12 #開啟12行
12 ListenPort=10051 #zabbix server監聽埠
38 LogFile=/tmp/zabbix_server.log #zabbix server日誌路徑
87 DBName=zabbix #zabbix server連線MySQL資料庫的資料庫名
103 DBUser=zabbix #zabbix server連線MySQL資料庫的使用者名稱
111 DBPassword=123123 #zabbix server連線MySQL資料庫的密碼
118 DBSocket=/tmp/mysql.sock #MySQL的例項檔案位置
136 StartPollers=5 #用於設定zabbix server服務啟動時啟動Pollers(主動收集資料程序)的數量,數量越多,則服務端吞吐能力越強,同時對系統資源消耗越大
165 StartTrappers=10 #用於設定zabbix server服務啟動時啟動Trappers(負責處 理Agentd推送過來的資料的程序)的數量。Agentd為主動模式時,zabbix server需要設定這個值大一些。
181 StartDiscoverers=10 #用於設定zabbix server服務啟動時啟動Discoverers程序.數量,如果zabbix監控報Discoverers程序忙時,需要提高該值。
297 ListenIP=0.0.0.0 #zabbix server啟動的監聽埠對哪些ip開放,Agentd為主 動模式時,這個值建議設定為0.0.0.0
447 AlertScriptsPath=/usr/local/zabbix/share/zabbix/alertscripts #zabbix sever執行指令碼存放目錄,一些供zabbix server使用的指令碼,都可以放在這裡。0
[[email protected] etc]# vim /etc/services #最後新增以下內容:
zabbix-agent 10050/tcp # Zabbix Agent
zabbix-agent 10050/udp # Zabbix Agent
zabbix-trapper 10051/tcp # Zabbix Trapper
zabbix-trapper 10051/udp # Zabbix Trapper
(vim 中 :$跳轉最後 :1 跳轉第一行)

3.3 新增管理維護指令碼
[[email protected] etc]# cp /usr/src/zabbix-3.2.4/misc/init.d/fedora/core/zabbix_server /etc/init.d/zabbix_server
[[email protected] etc]# cd /etc/init.d/
[[email protected] init.d]# chmod +x /etc/init.d/zabbix_server
[[email protected] init.d]# chkconfig zabbix_server on
3.4 啟動zabbix_server端程序
[[email protected] init.d]# /etc/init.d/zabbix_server start

[[email protected] init.d]# ss -antup | grep 1005 #檢視1005埠啟動情況
四,zabbix_agent(還在本機安裝agent端)的安裝與配置
zabbix agent端的安裝建議採用rpm包方式安裝 zabbix-
agent-3.2.4-1.el6.x86_64.rpm(和servic端一樣的RPM檔案)
[[email protected] ~]# cd ~
[[email protected] ~]# rpm -ivh zabbix-agent-3.2.4-1.el6.x86_64.rpm

(注意:另一臺zabbix-被監控 也需要安裝,才可被監控 )
[[email protected]zabbix-被監控 ~]# rpm -ivh zabbix-agent-3.2.4-1.el6.x86_64.rpm

然後回到:zabbix-server監控主機:
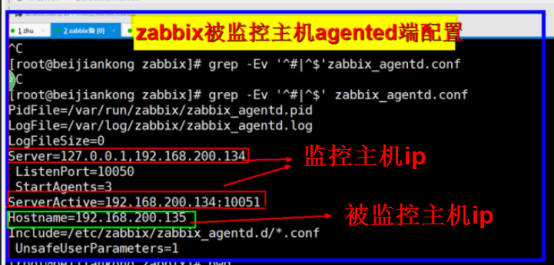
修改zabbix配置檔案:------------------------------------------------
[[email protected] ~]# cd /etc/zabbix/
[[email protected] zabbix]# ls
zabbix_agentd.conf zabbix_agentd.d
[[email protected] zabbix]# vim zabbix_agentd.conf
(注意:vim中 數字+gg 跳轉到那一行)
- 13 PidFile=/var/run/zabbix/zabbix_agentd.pid #程序pid存放路徑
- 32 LogFile=/var/log/zabbix/zabbix_agentd.log #zabbix agent日誌存放路徑
- 95 Server=127.0.0.1,192.168.0.220 #指定zabbix server端IP地址
- 103 ListenPort=10050 #指定agentd的監聽埠
- 120 StartAgents=3 #指定啟動agentd程序數量。設定0表示關閉
- 136 ServerActive=192.168.0.220:10051 #啟用agnetd主動模式,啟動主動模式後,agentd將主動將收集到的資料傳送到zabbix server端,Server Active後面指定的IP就是zabbix server端IP
- 147 Hostname=192.168.0.220 #需要監控伺服器的主機名或者IP地址,此選項的設定一定要和zabbix web端主機配置中對應的主機名一致。
- 265 Include=/etc/zabbix/zabbix_agentd.d/ #相關配置都可以放到此目錄下,自動生效
- 284 UnsafeUserParameters=1 #啟用agent端自定義item功能,設定此引數為1後,就可以使用UserParameter指令了。UserParameter用於自定義item
[[email protected] zabbix]# /etc/init.d/zabbix-agent start
#zabbix-server啟動zabbix_agent端程序

[[email protected] zabbix]# netstat -antup | grep 10050

[[email protected] zabbix]# chkconfig zabbix-agent on
五,被監控端進行操作:
[[email protected]zabbix-被監控 ~]#
[[email protected] zabbix]# scp zabbix_agentd.conf [email protected]:/etc/zabbix/
#zabbix-server端,先把其zabbix_agentd.conf遠端複製到,被監控端,
[[email protected]zabbix-被監控 ~]# cd /etc/zabbix/
[[email protected]zabbix-被監控 zabbix]# vim zabbix_agentd.conf
95 Server=192.168.200.129 #127.0.0.1本地的被監控端要關閉,此時
被監控端。即本機的ip
147 Hostname=192.168.200.135 #改成自己,被監控主機的ip
[[email protected]zabbix-被監控 zabbix]# /etc/init.d/zabbix-agent start

[[email protected]zabbix-被監控 zabbix]# netstat -antup | grep 10050

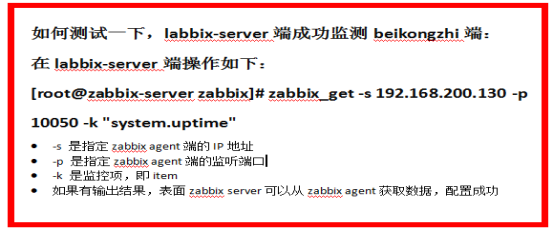
如何測試一下,zabbix-server端成功監測beikongzhi端:
在zabbix-server端操作如下:
zabbix_get -s 192.168.200.134 -p 10050 -k "system.uptime"

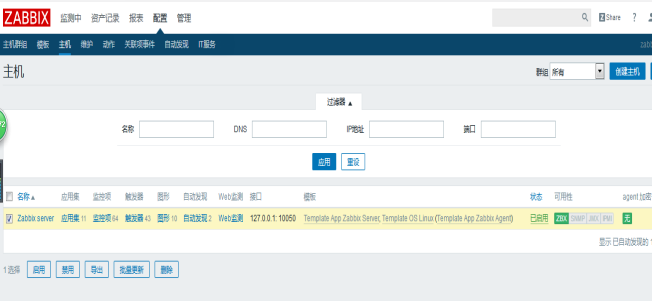
開啟瀏覽器中:zabbix介面:

六,Zabbix的web操作入門


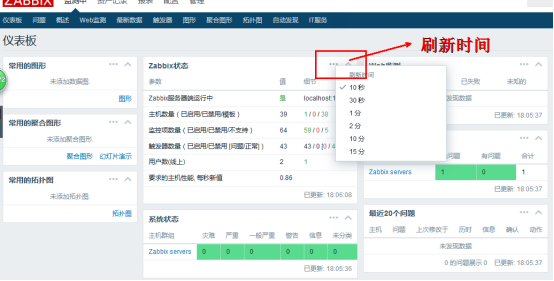
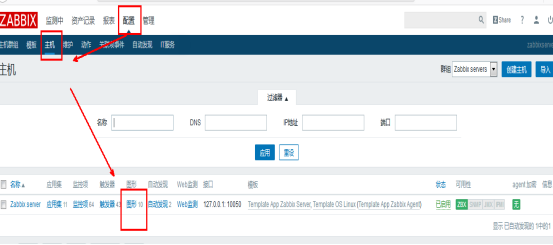
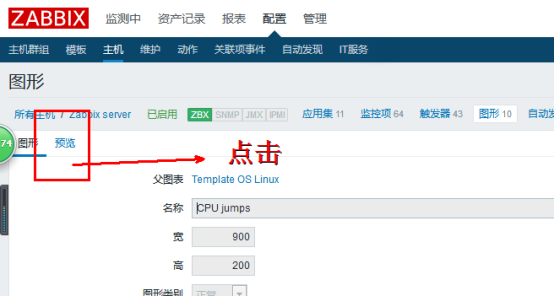
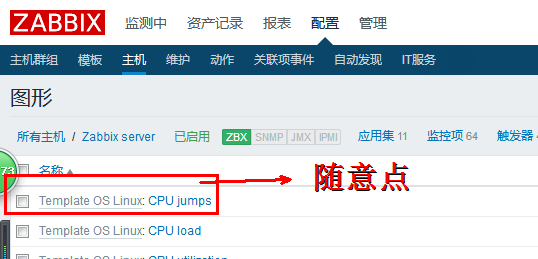
6.1.3 追加常用的監控圖形


報警模式設定:
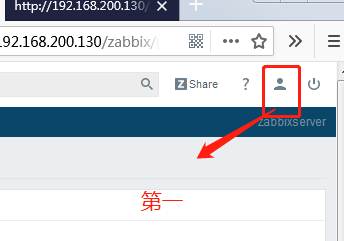
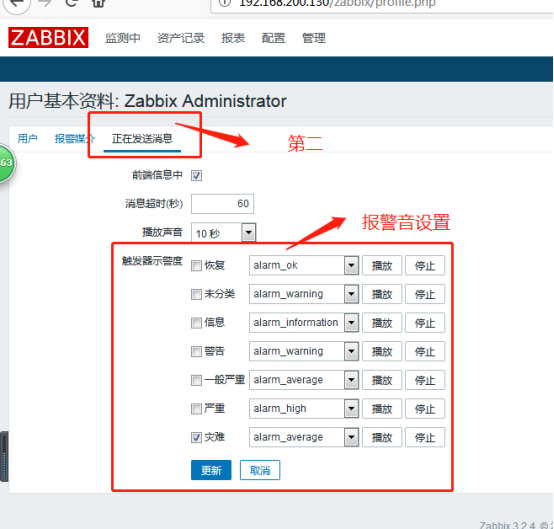
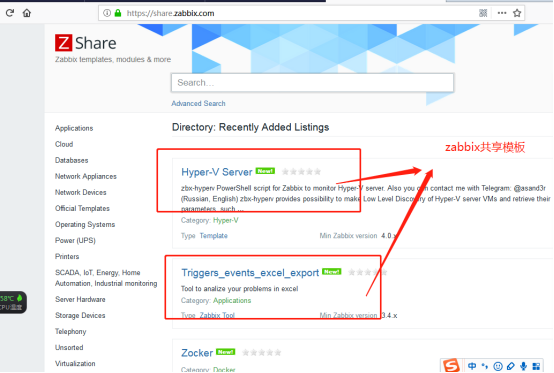
Zabbix共享模板下載:

自定義被監控的伺服器:
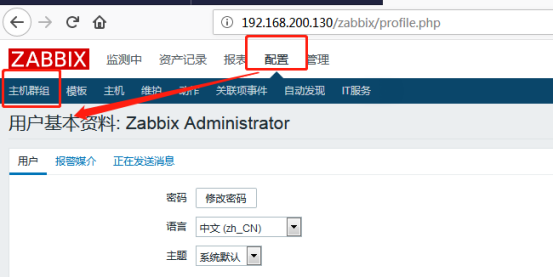

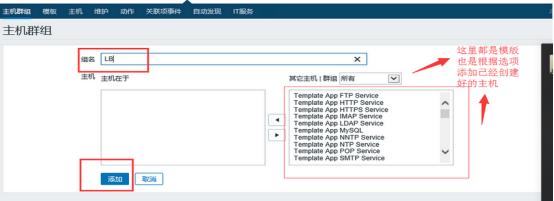

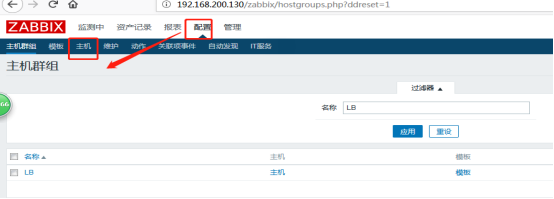
自定義一個主機
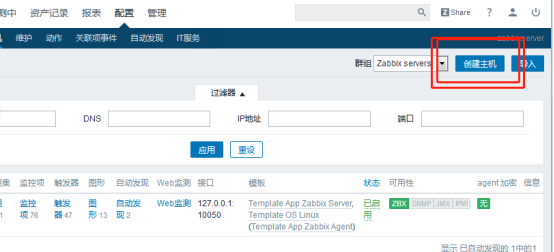
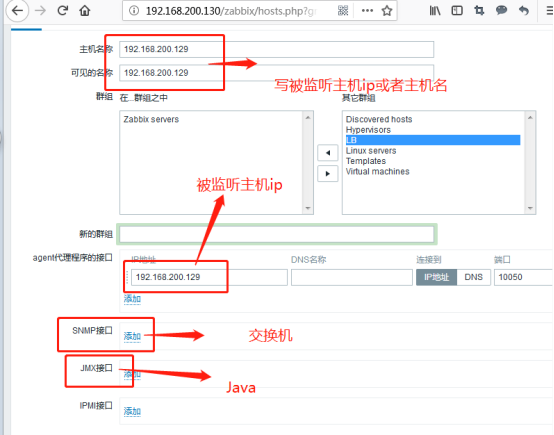


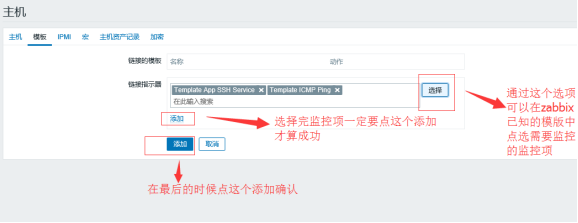

注意:
cd /etc/zabbix/
說明:我的zabbix主機就是本機,用本機來檢測本機內的agentd端:其agentd配置檔案如下:

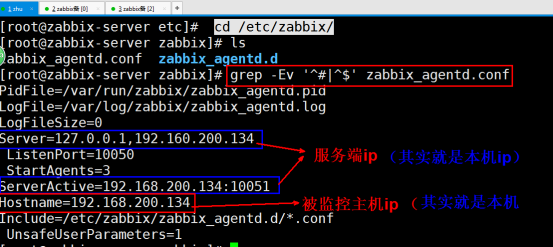

Zabbix主機agentd配置:cd /usr/local/zabbix/etc
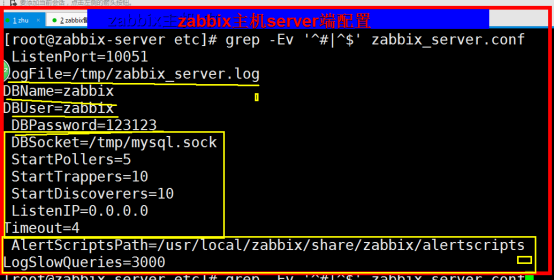
第二臺被監控主機【配置】
