08-SpringBoot之WEB(六)——其他
阿新 • • 發佈:2018-11-17
SpringBoot之WEB(六)
1. 整合 Fastjson
1.1 新增Fastjson依賴
<dependency>
<groupId>com.alibaba</groupId>
<artifactId>fastjson</ 1.2 建立一個配置管理類 WebConfig ,如下:
import com.alibaba.fastjson.serializer.SerializerFeature;
import com.alibaba.fastjson.support.config.FastJsonConfig;
import com.alibaba.fastjson.support.spring.FastJsonHttpMessageConverter;
import 1.3 案例開發
建立一個實體類 User:
import com.alibaba.fastjson.annotation.JSONField;
import lombok.AllArgsConstructor;
import lombok.Data;
import lombok.NoArgsConstructor;

import java.util.Date;

@Data
@AllArgsConstructor
@NoArgsConstructor
public class User {
    private String id;
    private String name;
    private Integer age;

    @JSONField(format="yyyy-MM-dd")
    private Date birthday;

    public User(String id, String name, Integer age) {
        this.id = id;
        this.name = name;
        this.age = age;
    }
}
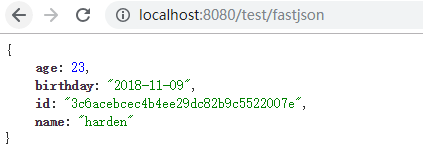
建立控制器類 FastjsonController
import com.springboot.web.model.User;
import com.springboot.web.utils.UUIDUtil;
import org.springframework.web.bind.annotation.RequestMapping;
import org.springframework.web.bind.annotation.RestController;

import java.util.Date;

/**
 * Created by HuangJun
 * 11:31 2018/11/7
 */
@RestController
public class FastJsonController {

    @RequestMapping("/fastjson")
    public User jsontest() {
        User user = new User(UUIDUtil.getUUID(), "harden", 23,new Date());
        return user;
    }
}
2. 生成UUID
import java.util.UUID;

public class UUIDUtil {
    public static String getUUID() {
        String uuid = UUID.randomUUID().toString();
        uuid = uuid.replace("-", "");
        return uuid;
    }
}
3. 修改啟動Banner
首先我們在resource目錄下面放入一個banner.txt檔案,Spring Boot啟動專案的時候就會優先啟動這個檔案中的內容。然後我們用線上生成字元圖示工具
http://www.network-science.de/ascii/
http://patorjk.com/software/taag/

Spring Boot提供了一個列舉類AnsiColor,這個類可以控制banner.txt中的字元顏色,而且非常容易使用。
比如我可以將字元設定成顏色:BRIGHT_YELLOW ,版本號顏色設定成:BRIGHT_BLUE
${AnsiColor.BRIGHT_YELLOW}
'##::::'##:'########:'##:::::::'##::::::::'#######::
 ##:::: ##: ##.....:: ##::::::: ##:::::::'##.... ##:
 ##:::: ##: ##::::::: ##::::::: ##::::::: ##:::: ##:
 #########: ######::: ##::::::: ##::::::: ##:::: ##:
 ##.... ##: ##...:::: ##::::::: ##::::::: ##:::: ##:
 ##:::: ##: ##::::::: ##::::::: ##::::::: ##:::: ##:
 ##:::: ##: ########: ########: ########:. #######::
..:::::..::........::........::........:::.......:::
${AnsiColor.BRIGHT_BLUE}
::: Project (version:${application.version}) :::              Spring-Boot ${spring-boot.version}
配置參考:
${application.version}                這個是MANIFEST.MF檔案中的版本號
${application.formatted-version} 這個是上面的的版本號前面加v後上括號
${spring-boot.version}               這個是springboot的版本號
${spring-boot.formatted-version}同上
執行效果
另外,也可以在使用圖片作為啟動圖示,選擇一個圖片,放入resource目錄,命名為banner.jpg即可
4. 原始碼下載
原始碼下載地址:https://download.csdn.net/download/huangjun0210/10775339


