
Ngins 配置常用八大例項
例項一、Nginx 虛擬主機配置
拷貝一份配置檔案,配置虛擬主機;並且建立一個 nginx 的普通使用者
[[email protected] ~]# cd /usr/local/nginx/conf
[[email protected] conf]# cp nginx.conf.default  nginx.conf
[[email protected] conf]# useradd nginx -s /sbin/nologin
配置虛擬主機: www.gz1.com 以及配置檔案詳解
[[email protected] ~]# vim nginx.conf


1)全域性變數  部分:-----------------------------------------------------------
user  nginx nginx;        ##使用者和使用者組都為 nginx
worker_processes  1;      ##Nginx開啟的程序數,建議設定為等於CPU總核心數

error_log  /usr/local/nginx/logs/error.log  info;    ##定義全域性錯誤日誌定義型別
pid    /usr/local/nginx/logs/nginx.pid;    ##指定程序ID儲存檔案位置


2)事件驅動模型配置 部分:-------------------------------------------------------
events {
    worker_connections  1024;    ##每個程序可以處理的最大連線數
    #multi_accept on;            ##一定程度降低負載,但伺服器吞吐量大時
}


3)設定http 的部分:-----------------------------------------------------------
http {
    include       mime.types;    ##副檔名與檔案型別對映表,設定mime型別,型別由mime.type檔案定義
    default_type  application/octet-stream;  ##預設檔案型別

    charset utf-8;                     ##伺服器預設編碼
    #include /etc/nginx/proxy.conf;     ##反向代理配置
    #include /etc/nginx/fastcgi.conf;   ##fastcgi配置

    log_format  main  '$remote_addr - $remote_user [$time_local] "$request" '
                      '$status $body_bytes_sent "$http_referer" '
                      '"$http_user_agent" "$http_x_forwarded_for"';
                                        ##生成日誌的格式定義

    #access_log  logs/access.log  main;    ##訪問日誌
    sendfile        on;        ##是否呼叫 sendfile 函式來輸出檔案(對於普通應用)
    tcp_nopush     off;        ##禁止了小包的傳送
    tcp_nodelay     on;        ##允許小包的傳送
    #keepalive_timeout  0;
    keepalive_timeout  10;     ##連線超時時間,單位是秒

#gzip模組設定 :  ------------------------------------------------------
    #gzip  on;                ##開啟gzip壓縮輸出
    #gzip_min_length 1k;      ##最小壓縮檔案大小
    #gzip_buffers 4 16k;      ##壓縮緩衝區
    #gzip_http_version 1.0;   ##壓縮版本(預設1.1,前端如果是squid2.5請使用1.0)
    #gzip_comp_level 2;       ##壓縮等級
    #gzip_types text/plain application/x-javascript text/css application/xml;
                              ##壓縮型別,預設就已經包含text/html

#設定負載均衡的伺服器列表 :(nginx 作為 web 代理角色 )--------------------
    #upstream  tomcat {       ##tomcat 命名
      #server 127.0.0.1:8080 weight=1;    ## weight 權值越高被分配到的機率越大
      #server 192.168.1.116:8081 weight=1;
    #}

    #upstream  tomcat2 {      ##可以配置多個負載均衡的伺服器列表
      #server 127.0.0.1:8080 weight=1;
      #server 192.168.1.116:8081 weight=1;
    #}

#虛擬主機的配置 :-------------------------------------------------------
    server {
        listen       80;    ##監聽埠
        server_name  www.gz1.com,www.gz2.com;    ##域名可以有多個,用空格隔開
        #charset utf-8;      ##字元編碼(上面寫有下面可以不用寫)
        access_log  /data/web/gz1.com/logs/gz1.access.log  main;  ##定義本虛擬主機的訪問日誌
        #autoindex  on;   ##所有的檔案都以目錄形式訪問
        location / {
            root   /data/web/gz1.com;       ##訪問路徑
            index  index.html index.htm;    ##定義索引首頁
            proxy_intercept_errors on;      ##自定義404介面
        }

        error_page  404       /404.html;    ##在根鬚根下尋找404.html
        error_page  500 502 503 504  /50x.html;

        location = /404.html {              ##錯誤頁面都在此路徑下尋找
            root   /data/web/gz1.com;
        }
    }
}
在 客戶端 C:\Windows\System32\drivers\etc 上新增解析
192.168.10.75	www.gz1.com
192.168.10.75	www.gz2.com
在 /data/web/gz1.com 下建立對應的首頁檔案以及相應的目錄
[[email protected] ~]# mkdir -p /data/web/gz1.com/logs
[[email protected] gz1.com]# ls
404.html  index.html  logs
例項二、Nginx 訪問控制
1、基於使用者的訪問控制:
1)、建立使用者,並且認證加密。此建立的使用者並非 linux 的登陸使用者
[[email protected] conf]# yum install -y httpd-tools ##安裝外掛
[[email protected] conf]# htpasswd -cm /usr/local/nginx/conf/passwd user1
## “c” 表示是第一次建立 “m” 表示MD5加密
New password:
Re-type new password:
Adding password for user user1
[[email protected] conf]# htpasswd -m /usr/local/nginx/conf/passwd user2
## 後續建立不需要加 “c”
New password:
Re-type new password:
Adding password for user user2
[ 2)、虛擬主機新增的配置段
[[email protected] ~]# vim /usr/local/nginx/conf/nginx.conf
······
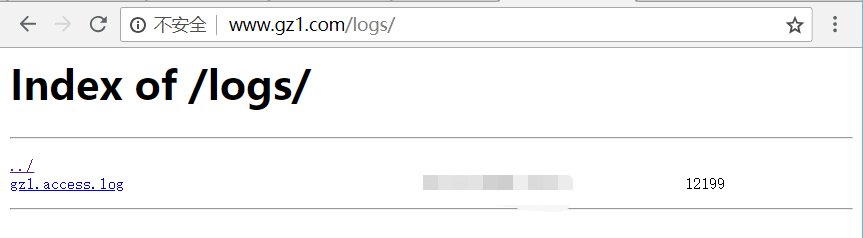
location /logs {
root /data/web/gz1.com; ####訪問路徑
auth_basic "nginx "; ##基礎認證 命名nginx(可自定義)
auth_basic_user_file /usr/local/nginx/conf/passwd; ##密碼認證路徑
autoindex on; ##顯示的檔案以樹狀陳列
}
······
3)、訪問 www.gz1.com/logs 登陸認證
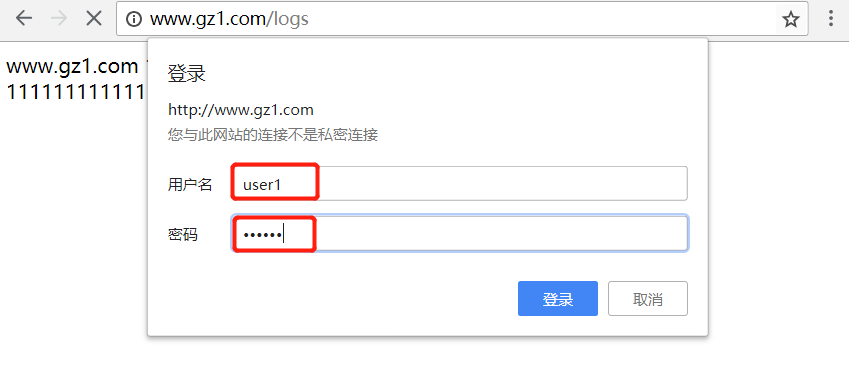
4)、登陸成功,訪問
2、基於主機的訪問控制:
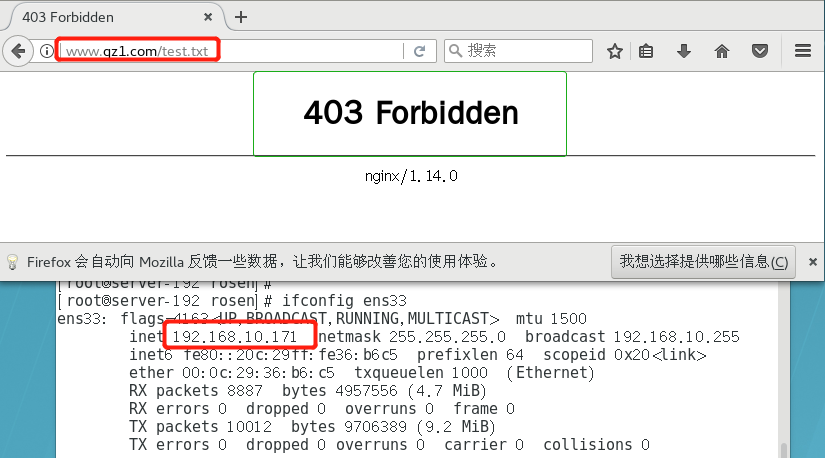
1)、在 /data/web/gz1.com 下建立一個 test.txt 檔案測試
[[email protected] gz1.com]# vim test.txt
只允許 192.168.10.1 訪問
拒絕其他ip訪問
2)、虛擬主機新增的配置段
[[email protected] ~]# vim /usr/local/nginx/conf/nginx.conf
        ······
   location ~* /.*\.txt$ {
        root   /data/web/gz1.com;
        allow 192.168.10.1;
        deny all;
         }
        ······
3)、訪問 www.gz1.com/test.txt

用不是 192.168.10.1 的其他主機訪問;顯示403錯誤,沒有許可權訪問
例項三、Nginx 地址重寫 rewrite:
地址重寫
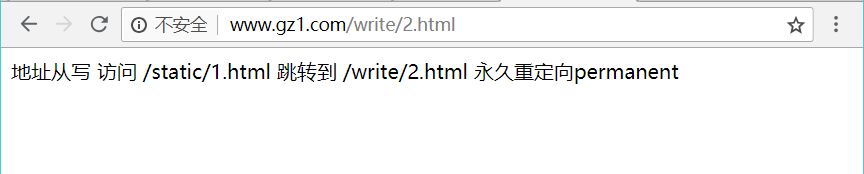
1)、地址從寫訪問 /static 下所有檔案都會跳轉到 /write/2.html (建立對應的目錄和檔案)
[[email protected] gz1.com]# ls
404.html  index.html  logs  static  test.txt  write
[[email protected] gz1.com]# ls write/ static/
static/:
1.html

write/:
2.html
2)、網頁重寫虛擬主機新增的配置段
[[email protected] ~]# vim /usr/local/nginx/conf/nginx.conf
        ······
    location /static {
       root   /data/web/gz1.com;
       rewrite .* /write/2.html  permanent;
       }
        ······
3)、訪問 http://www.gz1.com/static 會自動跳轉到 http://www.gz1.com/write/2.html
域名重寫,引用 if 判斷
訪問 www.gz2.com 的定向到 www.baidu.com;域名重寫虛擬主機新增的配置段
[[email protected] ~]# vim /usr/local/nginx/conf/nginx.conf
        ······
server {
     location / {
       root   /data/web/gz1.com;
       index  index.html index.htm;
	proxy_intercept_errors on;
	   if ( $host ~* www.gz2.com ) {
            rewrite   .*  http://www.baidu.com   permanent;
                }
            }
}
        ······
例項四、Nginx反向代理 :
1、通用匹配 代理
        ······
location  /tset1 {
       root   /data/web/gz1.com;
       proxy_pass  http://www.jd.com;
	}
        ······
2、正則表示式 匹配代理
        ······
location  ~  ^/test2 {
       root   /data/web/gz1.com;
  	proxy_pass http://www.taobao.com;
	}
        ······
3、地址重寫 代理
        ······
location / {
       root   /data/web/gz1.com;
       rewrite  /(.*)$   /index.php?page=$1    break;
       proxy_pass  http://www.tmall.com;
	}
        ······
4、proxy模組的指令
proxy_pass:           ##指定將請求代理至upstream server的URL路徑;
proxy_set_header:     ##傳送至upsream server的報文的某首部進行重寫;
proxy_intercept_errors on; ##攔截後端伺服器大於300 的錯誤資訊(自定義404頁面)
在根系下配置 proxy_intercept_errors on; 自定義 404 頁面
        ······
server {
location / {
     root   /data/web/gz1.com;
     index  index.html index.htm;
     proxy_intercept_errors on;
      }
     error_page  404       /404.html;
     location = /404.html {
        root   /data/web/gz1.com;
      }
}
        ······
例項五、Gzip 傳輸壓縮功能:
在 http 內(server 虛擬主機配置段外):--------------------------------
        ······
http{
  gzip on;     ##開啟Gzip
  gzip_min_length 1k;     ##大於1K的才壓縮,一般不用改
  gzip_buffers  4 16k;    ##用於壓縮的緩衝區大小
  gzip_comp_level  2;     ##壓縮級別,1-10,數字越大壓縮的越好,時間也越長
  gzip_types  text/plain  application/x-javascript   text/css    application/xml   text/javascript  application/x-httpd-php ;
}
        ······
例項六、負載均衡:
新增 upstream 模組
        ······
http{
upstream nginx {
        server 192.168.10.74 weight=1  max_fails=10 fail_timeout=10s;
        server 192.168.10.75 weight=1  max_fails=10 fail_timeout=10s;
         }
}
server {
 location / {
       proxy_pass http://nginx;
       proxy_set_header X-Real-IP   $remote_addr;
           }
      }
}
        ······
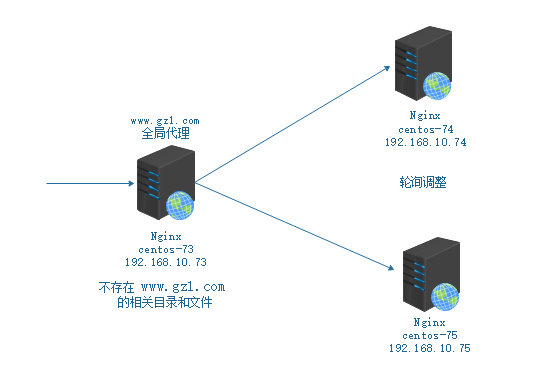
在 客戶端 C:\Windows\System32\drivers\etc 上新增解析
192.168.10.73 www.gz1.com
訪問 www.gz1.com 不斷重新整理觀察效果


例項七、Nginx 的快取模組功能:
        ······
http {
proxy_cache_path  /nginx/cache/first  levels=1:2   keys_zone=first:20m  max_size=1g;
server  {
      ......
      location / {
      ......
             proxy_cache  first;
             proxy_cache_valid   200  10m;
              }
        }
}
        ······

[[email protected] ~]# mkdir -p /nginx/cache/first
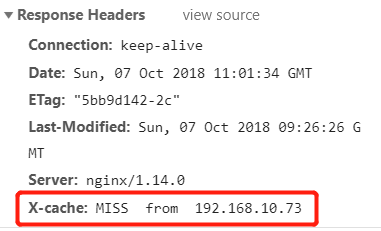
在 http{ }段(server段前),新增以下語句,在伺服器響應報文中,新增一個首部
add_header X-cache "$upstream_cache_status from $server_addr" ;
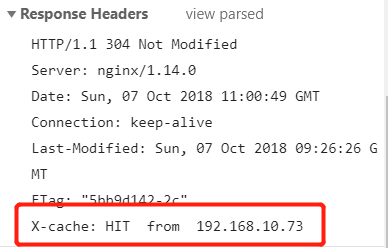
刪除快取路徑下的內容,再次觀察。
[[email protected] ~]# rm -rf /nginx/cache/first/*
例項八、Nginx 的限速模組 以及 其他模組:
1、限速模組
        ······
http{
    limit_conn_zone $binary_remote_addr zone=one:10m;
server {
      location /download {
          limit_conn one 1;         ##限制在one中記錄狀態的每個IP只能發起一個併發連線
          limit_rate_after 1000k;   ##在下載1000k後開始限速
          limit_rate 100k;          ##對每個連線限速100k
           }
       }
}
        ······
2、限制單個IP最大連線數(執行緒數)
http {
limit_conn_zone   $binary_remote_addr zone=client_addr:10m;
    server {
       location /download {
          limit_conn one 1;
          limit_rate_after 1000k;
          limit_rate 100k;
          limit_conn client_addr 10;    ##發數設定為10
           }
       }
}
3、隱藏 Nginx 版本資訊
版本資訊關閉前
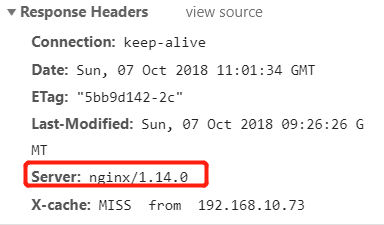
在配置檔案上加
http{
      server_tokens off;
}
版本資訊關閉後
