stl vector原始碼剖析
分享一下我老師大神的人工智慧教程!零基礎,通俗易懂!http://blog.csdn.net/jiangjunshow
也歡迎大家轉載本篇文章。分享知識,造福人民,實現我們中華民族偉大復興!
前言
專案組要實現一個演算法庫,其中涉及到了類似vector的一維陣列的實現。特此,對stl中得vector做個學習和了解。有任何問題,歡迎不吝指正。謝謝。
一、如何實現vector
如果給你一道面試題,如何用資料結構實現STL中vector的功能?聰明的你會怎麼做呢?或許你會如下所述:
- 或許,如果不考慮分配效率,只需要兩個成員就可以實現了
template <class _Ty>
class Vector
{
public:
Vector(int nLen=0):m_nLen(nLen),m_Data(NULL)
{
if(nLen > 0)
{
m_Data = new _Ty[nLen];
}
}
protected:
_Ty * m_Data;
int m_nLen;
}; - 或許,如下一個簡單的思路實現:
#include <iostream>
using std::ostream;
using std::istream;
class Array {
friend ostream &operator < <( ostream &, const Array & );
friend istream &operator> > ( istream &, Array & );
public:
Array( int = 10 );
Array( const Array & );
~Array();
int getSize() const;
const Array &operator=( const Array & );
bool operator==( const Array & ) const;
bool operator!=( const Array &right ) const
{
return ! ( *this == right );
}
int &operator[]( int );
const int &operator[]( int ) const;
private:
int size;
int *ptr;
}; - 或許你會說,應該用模板寫。當陣列大小變化時,就直接new 當前大小,將舊有的或拷貝或加入新的東西加入,然後刪除舊有的m_pData;並更新m_nLen;
當資料大小不變化時,直接使用m_pData;。如果考慮分配效率,則還需要一個成員儲存m_nMaxLen;實際的分配大小。 要記住一定刪除舊的m_pData就可以。
很快,你就會意識到,與其這樣不知方向的摸著石頭過河,不如直接拿來stl裡的vector實現程式碼,來瞧個究竟。ok,下面,咱們來剖析下stl vector的實現。其中的分析藉助了侯捷先生的stl原始碼剖析(大凡研究sgi stl原始碼,此書都不容忽略),然後再加入一些自己的理解。希望對你有所幫助(下面咱們分析的版本是sgi stl v2.9版)。
二、vector的類定義
以下是vector定義的類中的一些資料成員和部分成員函式:
template <class T, class Alloc = alloc> // 預設使用 alloc 為配置器class vector {public: // 以下標示 (1),(2),(3),(4),(5),代表 iterator_traits<I> 所服務的5個型別。 typedef T value_type; // (1) typedef value_type* pointer; // (2) typedef const value_type* const_pointer; typedef const value_type* const_iterator; typedef value_type& reference; // (3) typedef const value_type& const_reference; typedef size_t size_type; typedef ptrdiff_t difference_type; // (4) // 以下,由於vector 所維護的是一個連續線性空間,所以不論其元素型別為何, // 原生指標都可以做為其迭代器而滿足所有需求。 typedef value_type* iterator; /* 根據上述寫法,如果客戶端寫出如下的程式碼: vector<Shape>::iterator is; is 的型別其實就是Shape* 而STL 內部運用 iterator_traits<is>::reference 時,獲得 Shape& 運用iterator_traits<is>::iterator_category 時,獲得 random_access_iterator_tag (5) (此乃iterator_traits 針對原生指標的特化結果) */ //此處省略了一些與本文主題相關性不大的內容.......protected: // 專屬之空間配置器,每次配置一個元素大小 typedef simple_alloc<value_type, Alloc> data_allocator; // vector採用簡單的連續線性空間。以兩個迭代器start和end分別指向頭尾, // 並以迭代器end_of_storage指向容量尾端。容量可能比(尾-頭)還大, // 多餘即借用空間。 iterator start; //表示目前使用空間的頭 iterator finish; //表示目前使用空間的尾 iterator end_of_storage; //表示目前可用空間的尾 void insert_aux(iterator position, const T& x); void deallocate() { if (start) data_allocator::deallocate(start, end_of_storage - start); } void fill_initialize(size_type n, const T& value) { start = allocate_and_fill(n, value); // 配置空間並設初值 finish = start + n; // 調整水位 end_of_storage = finish; // 調整水位 }下面是另外一些成員操作函式的具體實現,
public: iterator begin() { return start; } const_iterator begin() const { return start; } iterator end() { return finish; } const_iterator end() const { return finish; } reverse_iterator rbegin() { return reverse_iterator(end()); } const_reverse_iterator rbegin() const { return const_reverse_iterator(end()); } reverse_iterator rend() { return reverse_iterator(begin()); } const_reverse_iterator rend() const { return const_reverse_iterator(begin()); } size_type size() const { return size_type(end() - begin()); } size_type max_size() const { return size_type(-1) / sizeof(T); } size_type capacity() const { return size_type(end_of_storage - begin()); } bool empty() const { return begin() == end(); } reference operator[](size_type n) { return *(begin() + n); } const_reference operator[](size_type n) const { return *(begin() + n); } vector() : start(0), finish(0), end_of_storage(0) {} // 以下建模式,允許指定大小 n 和初值 value vector(size_type n, const T& value) { fill_initialize(n, value); } vector(int n, const T& value) { fill_initialize(n, value); } vector(long n, const T& value) { fill_initialize(n, value); } explicit vector(size_type n) { fill_initialize(n, T()); } vector(const vector<T, Alloc>& x) { start = allocate_and_copy(x.end() - x.begin(), x.begin(), x.end()); finish = start + (x.end() - x.begin()); end_of_storage = finish; } template <class InputIterator> vector(InputIterator first, InputIterator last) : start(0), finish(0), end_of_storage(0) { range_initialize(first, last, iterator_category(first)); } vector(const_iterator first, const_iterator last) { size_type n = 0; distance(first, last, n); start = allocate_and_copy(n, first, last); finish = start + n; end_of_storage = finish; }#endif /* __STL_MEMBER_TEMPLATES */ ~vector() { destroy(start, finish); // 全域函式,建構/解構基本工具。 deallocate(); // 先前定義好的成員函式 } vector<T, Alloc>& operator=(const vector<T, Alloc>& x); void reserve(size_type n) { if (capacity() < n) { const size_type old_size = size(); iterator tmp = allocate_and_copy(n, start, finish); destroy(start, finish); deallocate(); start = tmp; finish = tmp + old_size; end_of_storage = start + n; } }三、vector中insert的實現
紛紛擾擾的細節,咱們一概忽略,最後,咱們來具體分析vector中insert(插入)一個元素的實現:
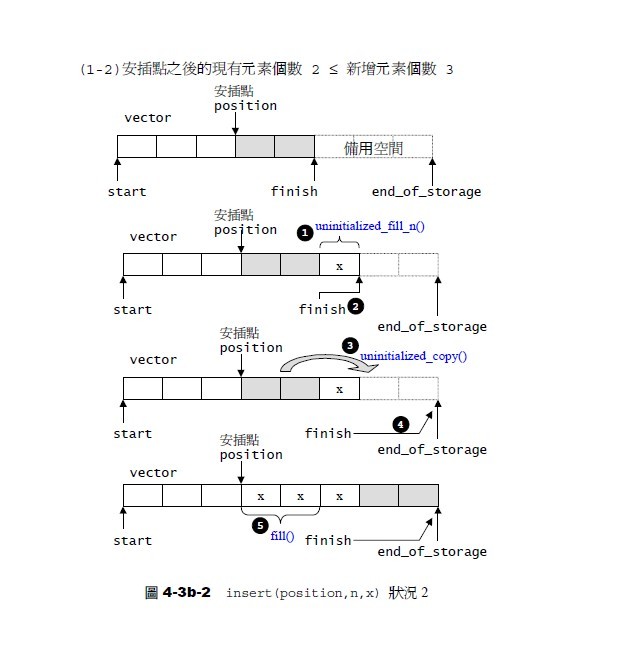
// 從 position 開始,安插 n 個元素,元素初值為 xtemplate <class T, class Alloc>void vector<T, Alloc>::insert(iterator position, size_type n, const T& x) { if (n != 0) { // 當 n != 0 才進行以下所有動作 if (size_type(end_of_storage - finish) >= n) { // 借用空間大於等於 「新增元素個數」 T x_copy = x; // 以下計算插入點之後的現有元素個數 const size_type elems_after = finish - position; iterator old_finish = finish; if (elems_after > n) { // 「插入點之後的現有元素個數」大於「新增元素個數」 uninitialized_copy(finish - n, finish, finish); //finish-n:整體後移 finish += n; //將vector 尾端標記後移 copy_backward(position, old_finish - n, old_finish); //插入點元素A後移至A‘,position->old—finish後移至old_finish fill(position, position + n, x_copy); // 從插入點開始填入新值 } else { // 「插入點之後的現有元素個數」小於等於「新增元素個數」 uninitialized_fill_n(finish, n - elems_after, x_copy); //1.新增元素x_copy插入至finish處 finish += n - elems_after; //2.finish後移n_elems_after uninitialized_copy(position, old_finish, finish); //3.騰出空間,position->old_finish finish += elems_after; //4.finish再次後移 fill(position, old_finish, x_copy); //5.插入新元素,(x_copy)position->old_finish } } else { // 借用空間小於「新增元素個數」(那就必須配置額外的記憶體) // 首先決定新長度:舊長度的兩倍,或舊長度+新增元素個數。 const size_type old_size = size(); const size_type len = old_size + max(old_size, n); // 以下配置新的vector 空間 iterator new_start = data_allocator::allocate(len); iterator new_finish = new_start; __STL_TRY { // 以下首先將舊vector 的插入點之前的元素複製到新空間。 new_finish = uninitialized_copy(start, position, new_start); // 以下再將新增元素(初值皆為n)填入新空間。 new_finish = uninitialized_fill_n(new_finish, n, x); // 以下再將舊vector 的插入點之後的元素複製到新空間。 new_finish = uninitialized_copy(position, finish, new_finish); }# ifdef __STL_USE_EXCEPTIONS catch(...) { // 如有異常發生,實現 "commit or rollback" semantics. destroy(new_start, new_finish); data_allocator::deallocate(new_start, len); throw; }# endif /* __STL_USE_EXCEPTIONS */ // 以下清除並釋放舊的 vector destroy(start, finish); deallocate(); // 以下調整水位標記 start = new_start; finish = new_finish; end_of_storage = new_start + len; } }}我想,如果本文只是單單給出上面的程式碼,你一定內心非常憤懣,道:暈,又是一篇什麼鬼剖析,就一大堆程式碼加註釋,看上去就是一堆亂碼,有什麼意思嘛。是的,我想,讀者肯定並沒有看懂上述insert的實現,那麼,下面,請允許我引用stl原始碼剖析一書裡面的三張圖片,相信,看過圖片之後,您就會對vector中insert的實現清晰不少了:
如下圖4-3b-1所示的情況是,備用空間為2,新增元素也為2,所以,備用空間>=新增元素個數,而插入點之後的元素個數為3大於新增元素個數2(原有元素個數3個+備用空間為2,共5個儲存單位)。此種情況的處理方式是,相當於將插入點之後的原有的3個元素整體向後移2個單位,然後把要新增的2個元素從插入點處插入,剛好滿足新增的2個元素加上原有的3個元素共同儲存在5個單位的空間中。

如下圖4-3b-2所示,插入點之後的現有元素個數2<=新增元素個數3,此種情況的處理方式為:相當於將插入點之後的原有的3個元素整體向後移三個單位,然後把新增的3個元素從原插入點處插入:

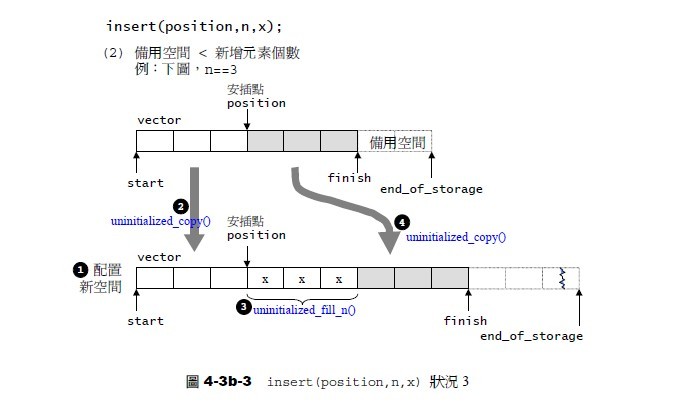
如果原有空間不夠,那麼vector將實施所謂的動態增加大小,而動態增加大小,並不是指在原空間之後接連續新空間(因為無法保證原空間之後尚有可供配置的空間),而是以原大小的兩倍另外配置一塊較大空間,然後將原內容拷貝過來,然後才開始在原內容之後構造新元素,並釋放原空間,這點可以從上述insert的實現中的第二部分,當借用空間小於「新增元素個數」(那就必須配置額外的記憶體)可以看出來。
如下圖4-3b-3所示(另外,必須提醒的是,經過上述操作後,一旦引起空間重新配置,指向原vector的所有迭代器就都失效了。這是一般人會犯的錯誤,務必小心。 --侯捷如是說):

四、vector的擴充套件
最後,我再貼一段程式碼,相當於是vector的高效應用(或者說是拓展):
/* Copyright (c) 2007-2011 iMatix Corporation Copyright (c) 2007-2011 Other contributors as noted in the AUTHORS file This file is part of 0MQ. 0MQ is free software; you can redistribute it and/or modify it under the terms of the GNU Lesser General Public License as published by the Free Software Foundation; either version 3 of the License, or (at your option) any later version. 0MQ is distributed in the hope that it will be useful, but WITHOUT ANY WARRANTY; without even the implied warranty of MERCHANTABILITY or FITNESS FOR A PARTICULAR PURPOSE. See the GNU Lesser General Public License for more details. You should have received a copy of the GNU Lesser General Public License along with this program. If not, see < http://www.gnu.org/licenses/>.*/#ifndef __ZMQ_ARRAY_INCLUDED__#define __ZMQ_ARRAY_INCLUDED__#include <vector>#include <algorithm>//w++ //從個人風格上來講,一般要拒絕這種類中成員函式全部內聯的用法。namespace zmq{ // Base class for objects stored in the array. Note that each object can // be stored in at most one array. class array_item_t { public: inline array_item_t () : array_index (-1) { } // The destructor doesn't have to be virtual. It is mad virtual // just to keep ICC and code checking tools from complaining. inline virtual ~array_item_t () { } inline void set_array_index (int index_) { array_index = index_; } inline int get_array_index () { return array_index; } private: int array_index; array_item_t (const array_item_t&); const array_item_t &operator = (const array_item_t&); }; // stl vector是一種簡單高效的容器,在尾端插入和刪除元素,演算法時間複雜度為O(1)常數階,其他元素的插入和刪除為O(n)線性階, // 其中n為vector容器的元素個數。vector具有自動的記憶體管理功能,對於元素的插入和刪除,可動態調整所佔用的記憶體空間。 // Fast array implementation with O(1) access to item, insertion and // removal. Array stores pointers rather than objects. The objects have // to be derived from array_item_t class. template <typename T> class array_t { public: typedef typename std::vector <T*>::size_type size_type; inline array_t () { } inline ~array_t () { } inline size_type size () { return items.size (); } inline bool empty () { return items.empty (); } inline T *&operator [] (size_type index_) { return items [index_]; } inline void push_back (T *item_) { if (item_) item_->set_array_index (items.size ()); items.push_back (item_); } inline void erase (T *item_) { erase (item_->get_array_index ()); } inline void erase (size_type index_) { if (items.back ())//back函式返回最末一個元素的引用 items.back ()->set_array_index (index_); items [index_] = items.back (); items.pop_back (); } inline void swap (size_type index1_, size_type index2_) { //交換序號和內容 if (items [index1_]) items [index1_]->set_array_index (index2_); if (items [index2_]) items [index2_]->set_array_index (index1_); std::swap (items [index1_], items [index2_]); } inline void clear () { items.clear (); } inline size_type index (T *item_) { return (size_type) item_->get_array_index (); } private: typedef std::vector <T*> items_t; items_t items; array_t (const array_t&); const array_t &operator = (const array_t&); };}#endif說明:@555,在webkit中的WTF模組中,它裡面的vector是直接放棄了STL的vector,它是利用google的tcmalloc來管理記憶體的,比stl的高效。
參考:侯捷先生的stl原始碼剖析。
ok,如果有任何問題,歡迎不吝指正。完。
給我老師的人工智慧教程打call!http://blog.csdn.net/jiangjunshow
 你好! 這是你第一次使用 **Markdown編輯器** 所展示的歡迎頁。如果你想學習如何使用Markdown編輯器, 可以仔細閱讀這篇文章,瞭解一下Markdown的基本語法知識。
新的改變
我們對Markdown編輯器進行了一些功能拓展與語法支援,除了標準的Markdown編輯器功能,我們增加了如下幾點新功能,幫助你用它寫部落格:
- 全新的介面設計 ,將會帶來全新的寫作體驗;
- 在創作中心設定你喜愛的程式碼高亮樣式,Markdown 將程式碼片顯示選擇的高亮樣式 進行展示;
- 增加了 圖片拖拽 功能,你可以將本地的圖片直接拖拽到編輯區域直接展示;
- 全新的 KaTeX數學公式 語法;
- 增加了支援甘特圖的mermaid語法1 功能;
- 增加了 多螢幕編輯 Markdown文章功能;
- 增加了 焦點寫作模式、預覽模式、簡潔寫作模式、左右區域同步滾輪設定 等功能,功能按鈕位於編輯區域與預覽區域中間;
- 增加了 檢查列表 功能。
功能快捷鍵
撤銷:Ctrl/Command + Z
重做:Ctrl/Command + Y
加粗:Ctrl/Command + B
斜體:Ctrl/Command + I
標題:Ctrl/Command + Shift + H
無序列表:Ctrl/Command + Shift + U
有序列表:Ctrl/Command + Shift + O
檢查列表:Ctrl/Command + Shift + C
插入程式碼:Ctrl/Command + Shift + K
插入連結:Ctrl/Command + Shift + L
插入圖片:Ctrl/Command + Shift + G
合理的建立標題,有助於目錄的生成
直接輸入1次#,並按下space後,將生成1級標題。
輸入2次#,並按下space後,將生成2級標題。
以此類推,我們支援6級標題。有助於使用TOC語法後生成一個完美的目錄。
如何改變文字的樣式
強調文字 強調文字
加粗文字 加粗文字
標記文字
刪除文字
引用文字
H2O is是液體。
210 運算結果是 1024.
插入連結與圖片
連結: link.
圖片: ![]()
帶尺寸的圖片: ![]()
當然,我們為了讓使用者更加便捷,我們增加了圖片拖拽功能。
如何插入一段漂亮的程式碼片
去部落格設定頁面,選擇一款你喜歡的程式碼片高亮樣式,下面展示同樣高亮的 程式碼片.
// An highlighted block var foo = 'bar'; 生成一個適合你的列表
- 專案
- 專案
- 專案
- 專案
- 專案1
- 專案2
- 專案3
- 計劃任務
- 完成任務
建立一個表格
一個簡單的表格是這麼建立的:
| 專案 | Value |
|---|---|
| 電腦 | $1600 |
| 手機 | $12 |
| 導管 | $1 |
設定內容居中、居左、居右
使用:---------:居中
使用:----------居左
使用----------:居右
| 第一列 | 第二列 | 第三列 |
|---|---|---|
| 第一列文字居中 | 第二列文字居右 | 第三列文字居左 |
SmartyPants
SmartyPants將ASCII標點字元轉換為“智慧”印刷標點HTML實體。例如:
| TYPE | ASCII | HTML |
|---|---|---|
| Single backticks | 'Isn't this fun?' |
‘Isn’t this fun?’ |
| Quotes | "Isn't this fun?" |
“Isn’t this fun?” |
| Dashes | -- is en-dash, --- is em-dash |
– is en-dash, — is em-dash |
建立一個自定義列表
- Markdown
- Text-to- HTML conversion tool
- Authors
- John
- Luke
如何建立一個註腳
一個具有註腳的文字。2
註釋也是必不可少的
Markdown將文字轉換為 HTML。
KaTeX數學公式
您可以使用渲染LaTeX數學表示式 KaTeX:
Gamma公式展示 是通過尤拉積分
你可以找到更多關於的資訊 LaTeX 數學表示式here.
新的甘特圖功能,豐富你的文章
gantt
        dateFormat  YYYY-MM-DD
        title Adding GANTT diagram functionality to mermaid
        section 現有任務
        已完成               :done,    des1, 2014-01-06,2014-01-08
        進行中               :active,  des2, 2014-01-09, 3d
        計劃一               :         des3, after des2, 5d
        計劃二               :         des4, after des3, 5d
- 關於 甘特圖 語法,參考 這兒,
UML 圖表
可以使用UML圖表進行渲染。 Mermaid. 例如下面產生的一個序列圖::
這將產生一個流程圖。:
- 關於 Mermaid 語法,參考 這兒,
FLowchart流程圖
我們依舊會支援flowchart的流程圖:
- 關於 Flowchart流程圖 語法,參考 這兒.
匯出與匯入
匯出
如果你想嘗試使用此編輯器, 你可以在此篇文章任意編輯。當你完成了一篇文章的寫作, 在上方工具欄找到 文章匯出 ,生成一個.md檔案或者.html檔案進行本地儲存。
匯入
如果你想載入一篇你寫過的.md檔案或者.html檔案,在上方工具欄可以選擇匯入功能進行對應副檔名的檔案匯入,
繼續你的創作。
註腳的解釋 ↩︎
