
Eclipse建立一個簡單的Springmvc程式(Maven工程)
阿新 • • 發佈:2018-11-19
一、建Maven(war)工程
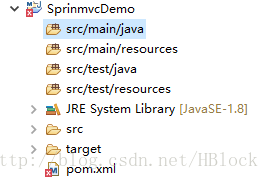
報錯是沒有配置web.xml
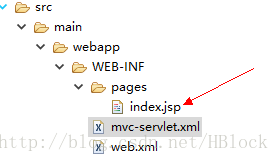
- 在src->main->webapp 下建WEB-INF資料夾
- 在該檔案下,建web.xml模板。
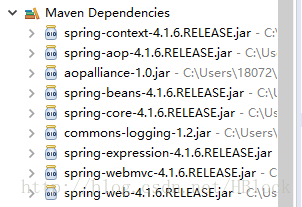
二、配置dom.xml(即匯入jar包。)
在maven倉庫中找spring context和spring web mvc,之所以只配置這兩個,是因為maven有傳遞依賴的功能。
<dependency>
<groupId>org.springframework</groupId>
<artifactId 配置成功後,在Maven Dependencies下會有對應的Jar包
三、配置web.xml
在web.xml配置前端控制器:DispatcherServlet
<?xml version="1.0" encoding="UTF-8"?>
<web-app xmlns:xsi="http://www.w3.org/2001/XMLSchema-instance" xmlns="http://xmlns.jcp.org/xml/ns/javaee" xsi:schemaLocation="http://xmlns.jcp.org/xml/ns/javaee http://xmlns.jcp.org/xml/ns/javaee/web-app_3_1.xsd" 四、配置mvc-servlet.xml
<?xml version="1.0" encoding="UTF-8"?>
<!--配置springmvc約束。其實和spring約束一樣  -->
<beans xmlns="http://www.springframework.org/schema/beans"
    xmlns:xsi="http://www.w3.org/2001/XMLSchema-instance"
    xmlns:p="http://www.springframework.org/schema/p"
    xmlns:context="http://www.springframework.org/schema/context"
    xmlns:util="http://www.springframework.org/schema/util"
    xmlns:mvc="http://www.springframework.org/schema/mvc"
    xmlns:tx="http://www.springframework.org/schema/tx"
    xmlns:aop="http://www.springframework.org/schema/aop"
    xsi:schemaLocation="http://www.springframework.org/schema/beans
       http://www.springframework.org/schema/beans/spring-beans-4.0.xsd
       http://www.springframework.org/schema/context
       http://www.springframework.org/schema/context/spring-context-4.0.xsd
       http://www.springframework.org/schema/util
       http://www.springframework.org/schema/util/spring-util-4.0.xsd
       http://www.springframework.org/schema/mvc
       http://www.springframework.org/schema/mvc/spring-mvc-4.0.xsd
       http://www.springframework.org/schema/tx
       http://www.springframework.org/schema/tx/spring-tx-4.0.xsd
        http://www.springframework.org/schema/aop
       http://www.springframework.org/schema/aop/spring-aop-4.0.xsd
">
    <!--配置註解處理器對映器
        功能:負責尋找執行類:Controller
    -->
    <bean class="org.springframework.web.servlet.mvc.method.annotation.RequestMappingHandlerMapping"></bean>
    <!-- 配置註解處理器介面卡
        功能:執行Controller
    -->
    <bean class="org.springframework.web.servlet.mvc.method.annotation.RequestMappingHandlerAdapter"></bean>
    <!--配置檢視解析器:InternalResourceViewResolver解析出真正的物理檢視
        後返回邏輯檢視:index  解析出真正的物理檢視:字首+邏輯檢視+字尾====/WEB-INF/pages/index.jsp
    -->
    <bean class="org.springframework.web.servlet.view.InternalResourceViewResolver">
        <property name="prefix" value="/WEB-INF/pages/"></property>
        <property name="suffix" value=".jsp"></property>
    </bean>
</beans>
五、自定義Controller類
package com.nenene;

import org.springframework.stereotype.Controller;
import org.springframework.web.bind.annotation.RequestMapping;

@Controller //相當於在mvc-servlet.xml配置<bean id="userController" class="UserController路徑">
public class UserController {
    @RequestMapping("index")
    public String myHello(){

        return "index";
    }

}
六、定義檢視頁面
根據檢視解析路徑:/WEB-INF/pages/
注意匯入Tomcat,否則建立的jsp檔案會報錯
七、將專案部署到Tomcat上
右鍵專案名稱->Build Path->Configure Build Path->Libraries->Add Library->Server Runtime->選擇繼配置好的Tomcat->OK