淺談支付寶小程式與微信小程式開發的區別
淺談支付寶小程式與微信小程式開發的區別
一、app.json
(1)設定小程式通用的的狀態列、導航條、標題、視窗背景色
支付寶小程式
  "window": {
    "defaultTitle": "病案到家",   //頁面標題
    "titleBarColor": "#1688FB"    //導航欄背景色
  },
微信小程式
  "window": {
    "backgroundTextStyle": "light",//視窗的背景色
    "navigationBarBackgroundColor": "#1688FB",//導航欄背景顏色
    "navigationBarTitleText": "病案到家",//導航欄標題文字內容
    "navigationBarTextStyle": "white"//導航欄標題顏色,僅支援 black/white
  },
(2)設定tabBar
支付寶小程式
"tabBar": {
    "textColor": "#333333",//預設顏色
    "selectedColor": "#1688FB",//選中顏色
    "backgroundColor": "#ffffff",//背景色
    "items": [
      {
        "icon": "/images/indexGrey.png",
        "activeIcon": "/images/indexWhite.png",
        "pagePath": "pages/homeIndex/homeIndex",
        "name": "首頁"
      },
      {
        "icon": "/images/personGrey.png",
        "activeIcon": "/images/personWhite.png",
        "pagePath": "pages/orderList/orderList",
        "name": "我的"
      }
    ]
  }
微信小程式
"tabBar": {
    "color": "#333333",
    "selectedColor": "#1688FB",
    "backgroundColor": "#ffffff",
    "borderStyle": "#e5e5e5",
    "list": [
      {
        "iconPath": "/images/indexGrey.png",
        "selectedIconPath": "/images/indexWhite.png",
        "pagePath": "pages/homeIndex/homeIndex",
        "text": "首頁"
      },
      {
        "iconPath": "/images/personGrey.png",
        "selectedIconPath": "/images/personWhite.png",
        "pagePath": "pages/orderList/orderList",
        "text": "我的"
      }
    ]
  }
二、pages
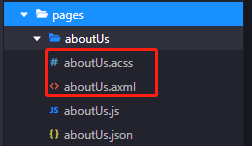
(1)檔案命名不同
支付寶小程式

微信小程式

我分別在微信小程式和支付寶小程式建立了頁面,區別在於:
1.支付寶小程式裡面的檢視層頁面檔案字尾是“axml”,樣式檔案字尾是“acss”;
2.微信小程式裡面的檢視層頁面檔案字尾是“wxml”,樣式檔案字尾是“wxss”。
(2)檢視層頁面axml以及wxml
1.冒泡事件和非冒泡事件
支付寶小程式
onTap, catchTap
on 事件繫結不會阻止冒泡事件向上冒泡,catch 事件繫結可以阻止冒泡事件向上冒泡。
<button class="weui-btn" onTap="login" type="primary">登入</button>微信小程式
bindtap、catchtouchstart
bind事件繫結不會阻止冒泡事件向上冒泡,catch事件繫結可以阻止冒泡事件向上冒泡。
<button class="weui-btn" bindtap='login' type="primary">登入</button>2.列表渲染
Page({
  data: {
    list: [{
      Title: '支付寶',
    }, {
      Title: '微信',
    }]
  }
})
支付寶小程式
<block a:for="{{list}}">
  <view key="item-{{index}}" index="{{index}}">{{item.Title}}</view>
</block>
微信小程式
<block wx:for="{{list}}">
  <view wx:key="this" wx:for-item="item">{{item.Title}}</view>
</block>
3.條件渲染
支付寶小程式
<view a:if="{{length > 5}}"> 1 </view>
<view a:elif="{{length > 2}}"> 2 </view>
<view a:else> 3 </view>
微信小程式
<view wx:if="{{length > 5}}"> 1 </view>
<view wx:elif="{{length > 2}}"> 2 </view>
<view wx:else> 3 </view>
三、開發過程中常用到的兩個小程式中元件的不同用法
(1)互動
1.訊息提示框
支付寶小程式
my.showToast({
  type: 'success',//預設 none,支援 success / fail / exception / none’。
  content: '操作成功',//文字內容
  duration: 3000,//顯示時長,單位為 ms,預設 2000
  success: () => {
    my.alert({
      title: 'toast 消失了',
    });
  },
});my.hideToast()//隱藏弱提示。微信小程式
wx.showToast({
  title: '成功',//提示的內容
  icon: 'success',//success	顯示成功圖示;loading	顯示載入圖示;none不顯示圖示
  duration: 2000
})

//icon為“success”“loading”時 title 文字最多顯示 7 個漢字長度
wx.hideToast() //隱藏2.訊息提示框
支付寶小程式
my.showLoading({
  content: '載入中...',
  delay: 1000,
});my.hideLoading();微信小程式
wx.showLoading({
  title: '載入中',
})wx.hideLoading()3.http 請求
支付寶小程式
my.httpRequest({
  url: 'http://httpbin.org/post',
  method: 'POST',
  data: {
    from: '支付寶',
    production: 'AlipayJSAPI',
  },
  headers:"",//預設 {'Content-Type': 'application/x-www-form-urlencoded'}
  dataType: 'json',
  success: function(res) {
    my.alert({content: 'success'});
  },
  fail: function(res) {
    my.alert({content: 'fail'});
  },
  complete: function(res) {
    my.hideLoading();
    my.alert({content: 'complete'});
  }
});
微信小程式
wx.request({
  url: 'test.php', //僅為示例,並非真實的介面地址
  data: {
    x: '',
    y: ''
  },
  header: {
    'content-type': 'application/json' // 預設值
  },
  success (res) {
    console.log(res.data)
  }
})
其實微信小程式和支付寶小程式提供的api方法大致相同,只是微信小程式是以“wx.”起頭,支付寶小程式是以“my.”起頭,其餘可能只是api方法裡面欄位“text、content、name、title”等命名不同。
(2)選擇器
1.時間選擇器
支付寶小程式
支付寶小程式提供了一個api,my.datePicker(object)
my.datePicker({
  format: 'yyyy-MM-dd',//返回的日期格式,
  currentDate: '2012-12-12',//初始選擇的日期時間,預設當前時間
  startDate: '2012-12-10',//最小日期時間
  endDate: '2012-12-15',//最大日期時間
  success: (res) => {
    my.alert({
	  content: res.date,
	});
  },
});
微信小程式
微信小程式是通過picker元件來實現的
<view class="section">
  <view class="section__title">日期選擇器</view>
  <picker mode="date" value="{{date}}" start="2015-09-01" end="2017-09-01" bindchange="bindDateChange">
    <view class="picker">
      當前選擇: {{date}}
    </view>
  </picker>
</view
Page({
  data: {
    date: '2016-09-01',
  },

  bindDateChange: function(e) {
    console.log('picker傳送選擇改變,攜帶值為', e.detail.value)
    this.setData({
      date: e.detail.value
    })
  },
})
2.省市區選擇器
支付寶小程式
支付寶小程式提供了一個api,my.multiLevelSelect(Object)
級聯選擇功能主要使用在於多級關聯資料選擇,比如說省市區的資訊選擇。
1.1、引入一個省市區的json格式檔案http://blog.shzhaoqi.com/uploads/js/city_json.zip
1.2、在js中引入這個檔案
1.3、使用my.multiLevelSelect(Object)
var citysJSON = require('../../utils/city.js');
Page({
  data: {
    provinces: '陝西省',
    city: '西安市',
    area: '碑林區'
  },
  chooseAddress: function () {
    my.multiLevelSelect({
      title: '選擇省市區',//級聯選擇標題
      list: citysJSON.citys,
      success: (res) => {
        this.setData({
          provinces: res.result[0].name,
          city: res.result[1].name,
          area: res.result[2].name,
        })
      }
    });
  },
})
微信小程式
微信小程式依然是通過picker元件來實現的
<view class="section">
  <view class="section__title">省市區選擇器</view>
  <picker mode="region" bindchange="bindRegionChange" value="{{region}}" custom-item="{{customItem}}">
    <view class="picker">
      當前選擇:{{region[0]}},{{region[1]}},{{region[2]}}
    </view>
  </picker>
</view>

//custom-item   可為每一列的頂部新增一個自定義的項,可為空
Page({
  data: {
    region: ['廣東省', '廣州市', '海珠區'],
    customItem: '全部'
  },

  bindRegionChange: function (e) {
    console.log('picker傳送選擇改變,攜帶值為', e.detail.value)
    this.setData({
      region: e.detail.value
    })
  }
})
(3)小程式喚起支付
支付寶小程式
my.tradePay({
  tradeNO: '201711152100110410533667792', // 呼叫統一收單交易建立介面(alipay.trade.create),獲得返回欄位支付寶交易號trade_no
  success: (res) => {
    my.alert({
	  content: JSON.stringify(res),
	});
  },
  fail: (res) => {
    my.alert({
	  content: JSON.stringify(res),
	});
  }
});
微信小程式
wx.requestPayment({
  timeStamp: '',//時間戳,從 1970 年 1 月 1 日 00:00:00 至今的秒數,即當前的時間
  nonceStr: '',//隨機字串,長度為32個字元以下
  package: '',//統一下單介面返回的 prepay_id 引數值,提交格式如:prepay_id=***
  signType: 'MD5',//簽名演算法
  paySign: '',//簽名
  success (res) { },
  fail (res) { }
})
(4)電話
支付寶小程式
my.makePhoneCall({
	number: '400-8097-114'
})
微信小程式
wx.makePhoneCall({
  phoneNumber: '400-8097-114'
})
支付寶小程式與微信小程式有很多相似之處,不論是元件還是api都會給你熟悉的感覺!
