Maven專案基礎上的SSM整合
Maven專案基礎上的SSM整合
SSM(Spring+SpringMVC+MyBatis)框架集由 **Spring ** 、**MyBatis **兩個開源框架整合而成(SpringMVC是Spring中的部分內容)。常作為資料來源較簡單的web專案的框架。
SSM內容
Spring
Spring就像是整個專案中 裝配bean的大工廠 ,在配置檔案中可以指定使用特定的引數去呼叫實體類的構造方法來例項化物件。
Spring的核心思想是 IoC(控制反轉),即不再需要程式設計師去顯式地new一個物件,而是讓Spring框架幫你來完成這一切。
SpringMVC
SpringMVC在專案中攔截使用者請求,它的核心Servlet即 DispatcherServlet 承擔中介或是前臺這樣的職責,將使用者請求通過 HandlerMapping 去匹配 Controller ,Controller就是具體對應請求所執行的操作。SpringMVC相當於SSH框架中struts。
mybatis
mybatis是對 jdbc的封裝,它讓資料庫底層操作變的透明。mybatis的操作都是圍繞一個 sqlSessionFactory 例項展開的。mybatis通過配置檔案關聯到各實體類的 Mapper 檔案,Mapper檔案中配置了每個類對資料庫所需進行的sql語句對映。在每次與資料庫互動時,通過sqlSessionFactory拿到一個sqlSession,再執行sql命令。
頁面傳送請求給控制器,控制器呼叫業務層處理邏輯,邏輯層向持久層傳送請求,持久層與資料庫互動,後將結果返回給業務層,業務層將處理邏輯傳送給控制器,控制器再呼叫檢視展現資料。
SSM框架的搭建
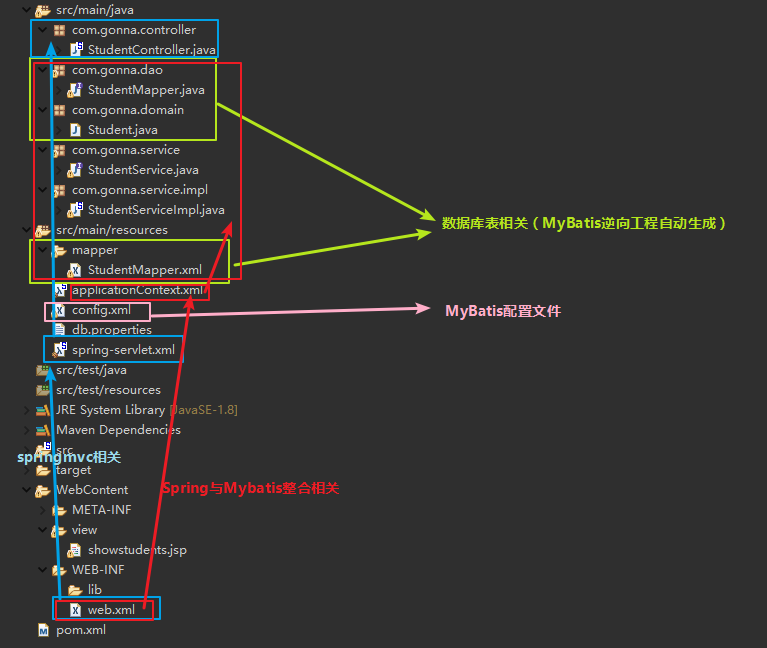
在第一章maven專案的基礎上,繼續配置spring和mybatis的相關內容,完成SSM的搭建
專案結構

web.xml的配置
<!-- spring的配置檔案 -->
<!-- The front controller of this Spring Web application, responsible for
handling all application requests --> SpringMVC的相關配置
	<!-- 開啟註解的掃描 -->
	<mvc:annotation-driven></mvc:annotation-driven>
	<!-- 掃描指定包內的controller部件 -->
	<context:component-scan
		base-package="com.gonna.controller">
	</context:component-scan>
	<!-- 檢視解析器 -->
	<bean
		class="org.springframework.web.servlet.view.InternalResourceViewResolver">
		<property name="prefix" value="view/"></property>
		<property name="suffix" value=".jsp"></property>
	</bean>
	<!-- 開啟預設的servlet -->
	<mvc:default-servlet-handler />
Spring和MyBatis的整合配置
為了提高程式碼的可維護性可以將資料庫資訊單獨寫在“字典檔案”1中,在applicationContext.xml中引用就好
	<!-- 掃描repository和service部件 -->
	<context:component-scan
		base-package="com.gonna.dao"></context:component-scan>
	<context:component-scan
		base-package="com.gonna.service"></context:component-scan>
	<!-- 另一種寫法(排除controller的包) -->
	<!-- <context:component-scan base-package="com.gonna"> -->
	<!-- <context:exclude-filter type="annotation" expression="org.springframework.stereotype.Controller"/> -->
	<!-- </context:component-scan> -->

	<!-- 使用c3p0構建連線池 -->
	<context:property-placeholder
		location="classpath:db.properties" /><!--“字典檔案”-->
	<!-- 由spring建立Connection類 -->
	<bean id="dataSource"
		class="com.mchange.v2.c3p0.ComboPooledDataSource">
		<property name="driverClass" value="${driver}"></property>
		<property name="jdbcUrl" value="${url}"></property>
		<property name="user" value="${user}"></property>
		<property name="password" value="${password}"></property>
		<!-- 其他屬性 -->
		<property name="maxPoolSize" value="100"></property>
	</bean>

	<!-- 整合spring和mybatis -->
	<bean id="sqlSessionFactory"
		class="org.mybatis.spring.SqlSessionFactoryBean">
		<property name="configLocation" value="classpath:config.xml"></property><!--指定MyBatis的配置檔案-->
		<property name="dataSource" ref="dataSource"></property>
		<property name="mapperLocations">
			<list>
				<value>classpath:mapper/*.xml</value><!--指定mapper檔案-->
			</list>
		</property>
	</bean>

	<!-- 讓mybatis掃面dao -->
	<bean id="scannerConfigurer"
		class="org.mybatis.spring.mapper.MapperScannerConfigurer">
		<property name="basePackage" value="com.gonna.dao"></property>
		<property name="sqlSessionFactoryBeanName"
			value="sqlSessionFactory"></property><!--解決無法依賴注入問題 -->
	</bean>

	<!-- 開啟spring事物管理 -->
	<bean id="transactionManager"
		class="org.springframework.jdbc.datasource.DataSourceTransactionManager">
		<property name="dataSource" ref="dataSource"></property>
	</bean>

	<!-- 開啟標籤 -->
	<tx:annotation-driven
		transaction-manager="transactionManager" />
MyBatis的配置檔案
<?xml version="1.0" encoding="UTF-8"?>
<!DOCTYPE configuration
PUBLIC "-//mybatis.org//DTD Config 3.0//EN"
"http://mybatis.org/dtd/mybatis-3-config.dtd">
<configuration>
    <!--暫時可以什麼都不寫-->
</configuration>
mapper
mybatis的逆向工程工具為我們自動生成了許多常用的sql語句,在這裡我們自己寫一個容易測試的
<mapper namespace="com.gonna.dao.StudentMapper">
	<resultMap id="BaseResultMap" type="com.gonna.domain.Student">
		<id column="sno" property="sno" jdbcType="INTEGER" />
		<result column="sname" property="sname" jdbcType="VARCHAR" />
		<result column="ssex" property="ssex" jdbcType="VARCHAR" />
		<result column="sage" property="sage" jdbcType="INTEGER" />
		<result column="stel" property="stel" jdbcType="VARCHAR" />
		<result column="shome" property="shome" jdbcType="VARCHAR" />
		<result column="pid" property="pid" jdbcType="INTEGER" />
		<result column="cid" property="cid" jdbcType="INTEGER" />
	</resultMap>
	<sql id="Base_Column_List">
		sno, sname, ssex, sage, stel, shome, pid, cid
	</sql>

	<select id="selectStudents" resultMap="BaseResultMap">
		select
		<include refid="Base_Column_List" />
		from student
	</select>
</mapper>
至此SSM的基本配置也就完成了,我們需要寫對應的測試類和頁面
SSM測試
實體類MyBatis generator已為我們建好,我們可以給它加一個toString()方法便於測試
StudentMapper.java
dao也已自動建好,在這裡做一點小改動
package com.gonna.dao;

import java.util.List;

import org.springframework.beans.factory.annotation.Autowired;
import org.springframework.stereotype.Repository;

import com.gonna.domain.Student;

@Repository
public interface StudentMapper {

//	@Autowired
	List<Student> selectStudents();//該方法必須和mapper中的select語句id一致!

    int deleteByPrimaryKey(Integer sno);

    int insert(Student record);

    int insertSelective(Student record);

    Student selectByPrimaryKey(Integer sno);

    int updateByPrimaryKeySelective(Student record);

    int updateByPrimaryKey(Student record);
}
StudentService.java
package com.gonna.service;

import java.util.List;

import org.springframework.beans.factory.annotation.Autowired;
import org.springframework.stereotype.Service;

import com.gonna.domain.Student;

@Service
public interface StudentService {

//	@Autowired
	List<Student> selectStudents();
}
StudentServiceImpl.java
package com.gonna.service.impl;

import java.util.List;

import javax.annotation.Resource;

import org.springframework.beans.factory.annotation.Autowired;
import org.springframework.stereotype.Service;

import com.gonna.dao.StudentMapper;
import com.gonna.domain.Student;
import com.gonna.service.StudentService;

@Service
public class StudentServiceImpl implements StudentService {

	@Autowired
//	@Resource  ----?有的博文裡是這麼寫的,回頭再嘗試下
	StudentMapper studentMapper;
//generator可以自動生成,自然在這裡也可以autowired

	@Override
	public List<Student> selectStudents() {

		return studentMapper.selectStudents();
	}

}
StudentController.java
package com.gonna.controller;

import java.util.List;

import org.springframework.beans.factory.annotation.Autowired;
import org.springframework.stereotype.Controller;
import org.springframework.ui.ModelMap;
import org.springframework.web.bind.annotation.RequestMapping;

import com.gonna.domain.Student;
import com.gonna.service.StudentService;

@Controller
public class StudentController {

	@Autowired
//	@Resource
	private StudentService studentService;

	@RequestMapping("getStudents")
	public String getStudents(ModelMap model) {
		List<Student> list = studentService.selectStudents();
		model.addAttribute("students", list);
		for (Student s : list) {
			System.out.println(s);
		}
        //控制檯看看Student物件是否拿到
		return "showstudents";
	}
}
showstudents.jsp
最後寫一個頁面顯示效果,為了方便以後加東西寫多了點
<%@ page language="java" contentType="text/html; charset=UTF-8"
	pageEncoding="UTF-8"%>
<%@ taglib prefix="c" uri="http://java.sun.com/jsp/jstl/core"%>
<!DOCTYPE html>
<html>
<head>
<meta charset="UTF-8">
<title>Insert title here</title>
</head>
<body>
	<table border="1" align="center">
		<tr>
			<td colspan="10" align="center">
				<form action="searchByName.do" method="get">
					<input type="text" name="sname" value="請輸入學生名"> <input
						type="submit" value="搜尋學生資訊">
				</form>
			</td>
		</tr>
		<tr>
			<td align="center">學號</td>
			<td align="center">姓名</td>
			<td align="center">性別</td>
			<td align="center">年齡</td>
			<td align="center">電話</td>
			<td align="center">家庭住址</td>
			<td colspan="2" align="center">操作</td>
		</tr>
        <!--關鍵程式碼:jstl標籤迴圈遍歷student的list-->
		<c:forEach items="${students}" var="student">
			<tr>
				<td align="center">${student.sno }</td>
				<td align="center">${student.sname }</td>
				<td align="center">${student.ssex }</td>
				<td align="center">${student.sage }</td>
				<td align="center">${student.stel }</td>
				<td align="center">${student.shome }</td>
				<td><form action="deleteone.do" method="get">
						<input type="hidden" name="sname" value="${student.sname }"> <input
							type="submit" value="刪除">
					</form></td>
				<td><form action="searchByName.do" method="get">
						<input type="hidden" name="sname" value="${student.sname }">
						<input type="submit" value="修改">
					</form></td>
			</tr>
		</c:forEach>
		<tr>
			<td colspan="10" align="center">
				<form action="insertone.do" method="get">
					<input type="submit" value="加入學生">
				</form>
			</td>
		</tr>
	</table>
</body>
</html>
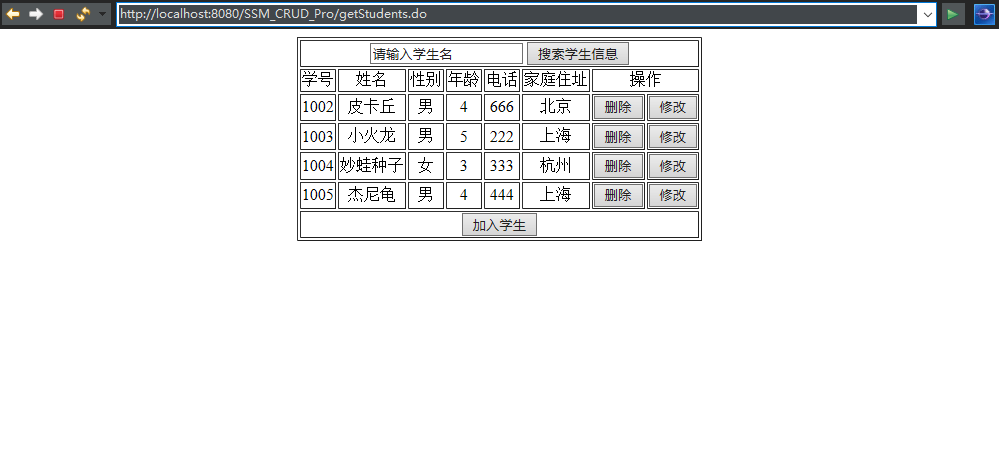
執行結果

大功告成!!!還有不足之處還請各位不吝賜教’’’ V ‘’’
參考:
[SSM框架理解]: https://www.cnblogs.com/verlen11/p/5349747.html
driver=com.mysql.jdbc.Driver url=jdbc:mysql://localhost:3306/test user=root password=root↩︎
