ConstraintLayout詳解與案例
我們在使用android studio的時候,發現Mainactivity的預設佈局從RelativeLayout變成了ConstraintLayout。什麼是ConstraintLayout呢?Constraint Layout是Google在2016年的Google I/O大會上提出的一個可以靈活控制子控制元件的位置和大小的新佈局。並且其號稱可以實現佈局最大程度的扁平化。
專案中的佈局巢狀問題對我們的專案效能有著不小的威脅。佈局能實現扁平化的話會讓軟體效能得到很大的提升。很多教程中都沒有提到ConstraintLayout的用法,在這裡我們來結合案例瞭解一下。
我們做一個播放展示介面,效果圖如下。
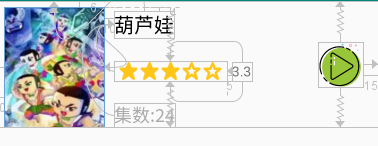
這是程式碼,程式碼中的圖片可以自行替換掉。看不懂沒關係,下面仔細講講。其中RatingBar我用了開原始碼https://github.com/FlyingPumba/SimpleRatingBar來進行實現,以解決自帶的RatingBar不可以改變星星大小的難題。我們可以在build.gradle(Module:app),也就是外層的那個裡面新增依賴。 implementation ‘com.iarcuschin:simpleratingbar:0.1.5’
<?xml version="1.0" encoding="utf-8"?>
<android.support.constraint.ConstraintLayout xmlns:android="http://schemas.android.com/apk/res/android"
xmlns:app="http://schemas.android.com/apk/res-auto"
android:layout_width="match_parent"
android:layout_height="wrap_content">
<ImageView
android:id="@+id/photo"
android:layout_width="100dp"
android:layout_height ="120dp"
android:layout_marginStart="10dp"
android:layout_marginTop="6dp"
android:scaleType="fitXY"
android:src="@drawable/fengmian"
app:layout_constraintLeft_toLeftOf="parent"
app:layout_constraintTop_toTopOf="parent" />
<TextView
android:id="@+id/item_title"
android:layout_width="wrap_content"
android:layout_height="wrap_content"
android:layout_marginStart="10dp"
android:layout_marginTop="4dp"
android:text="葫蘆娃"
android:textColor="#000"
android:textSize="20sp"
app:layout_constraintLeft_toRightOf="@+id/photo"
app:layout_constraintTop_toTopOf="@+id/photo" />
<com.iarcuschin.simpleratingbar.SimpleRatingBar
android:id="@+id/rating"
android:layout_width="113dp"
android:layout_height="20dp"
android:layout_marginTop="8dp"
app:srb_starSize="17dp"
app:srb_rating="3"
app:layout_constraintBottom_toBottomOf="parent"
app:layout_constraintLeft_toLeftOf="@+id/item_title"
app:layout_constraintTop_toTopOf="@+id/photo" />
<TextView
android:id="@+id/score"
android:layout_width="wrap_content"
android:layout_height="wrap_content"
android:layout_marginStart="5dp"
android:gravity="center"
android:text="3.3"
app:layout_constraintBottom_toBottomOf="@+id/rating"
app:layout_constraintLeft_toRightOf="@+id/rating"
app:layout_constraintTop_toTopOf="@+id/rating" />
<TextView
android:id="@+id/textView"
android:layout_width="wrap_content"
android:layout_height="wrap_content"
android:text="集數:24"
android:textColor="@android:color/darker_gray"
android:textSize="18sp"
app:layout_constraintBottom_toBottomOf="@+id/photo"
app:layout_constraintLeft_toLeftOf="@+id/item_title" />
<ImageView
android:layout_width="45dp"
android:layout_height="45dp"
android:layout_marginEnd="15dp"
android:src="@drawable/play"
app:layout_constraintBottom_toBottomOf="parent"
app:layout_constraintRight_toRightOf="parent"
app:layout_constraintTop_toTopOf="parent" />
</android.support.constraint.ConstraintLayout>
分析一下view id為item_title的TextView中使用。
app:layout_constraintLeft_toRightOf="@+id/photo"
app:layout_constraintTop_toTopOf="@+id/photo"
意思是約束控制元件的左邊在view id為photo的view的右邊,約束控制元件的上邊與view id為photo的view的上邊對齊。
類似的屬性還有很多:
layout_constraintLeft_toLeftOf
layout_constraintLeft_toRightOf
layout_constraintRight_toLeftOf
layout_constraintRight_toRightOf
layout_constraintTop_toTopOf
layout_constraintTop_toBottomOf
layout_constraintBottom_toTopOf
layout_constraintBottom_toBottomOf
layout_constraintBaseline_toBaselineOf
layout_constraintStart_toEndOf
layout_constraintStart_toStartOf
layout_constraintEnd_toStartOf
layout_constraintEnd_toEndOf
上文我們還提到了居中,上面程式碼最後一個控制元件,這個ImageView表示播放按鈕。
app:layout_constraintBottom_toBottomOf="parent"
app:layout_constraintTop_toTopOf="parent"
程式碼意思是約束控制元件的下邊和parent的下邊一致(注意我這裡的ConstraintLayout的height設定的是wrap_content),約束控制元件的上邊和parent的上邊一致。這可以形象的理解對於播放控制元件,在其上方,和下方有兩個相同,反向的力在拉扯他,就像彈簧似的。因為力是均衡的,這就使得他處於中心位置。如果想偏移,不居中了,就跟調整彈簧一樣,調整bias就可以了。
本文為學習整理,源自以下部落格,更詳細講解見下方,如果他的星星不好呼叫,可以按照我給的方法。
參考文件:https://blog.csdn.net/qq_34902522/article/details/78303211