selenium藉助AutoIt識別上傳(下載)詳解
From: http://www.cnblogs.com/fnng/p/4188162.html
AutoIt目前最新是v3版本,這是一個使用類似BASIC指令碼語言的免費軟體,它設計用於Windows GUI(圖形使用者介面)中進行自動化操作。它利用模擬鍵盤按鍵,滑鼠移動和視窗/控制元件的組合來實現自動化任務。
官方網站:https://www.autoitscript.com/site/
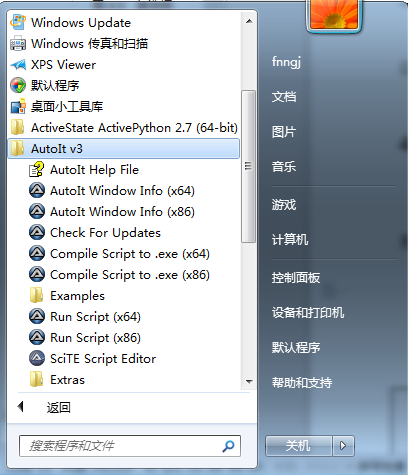
從網站上下載AutoIt並安裝,安裝完成在選單中會看到圖4.13的目錄:

圖4.13 AutoIt選單
AutoIt Windows Info 用於幫助我們識Windows控制元件資訊。
Compile Script to.exe 用於將AutoIt生成 exe 執行檔案。
Run Script 用於執行AutoIt指令碼。
SciTE Script Editor 用於編寫AutoIt指令碼。

<html>
<head> <meta http-equiv="content-type" content="text/html;charset=utf-8" /> <title>upload_file</title> <link href="http://cdn.bootcss.com/bootstrap/3.3.0/css/bootstrap.min.css" rel="stylesheet" /> </head> <body> <div class="row-fluid"> <div class="span6 well"> <h3>upload_file</h3> <input type="file" name="file" /> </div> </div> </body> <script src="http://cdn.bootcss.com/bootstrap/3.3.0/css/bootstrap.min.js"></script> </html>

將上面的html程式碼儲存為uplad.html檔案,通過瀏覽器開啟,效果如下:

下面以操作upload.html上傳彈出的視窗為例講解AutoIt實現上傳過程。
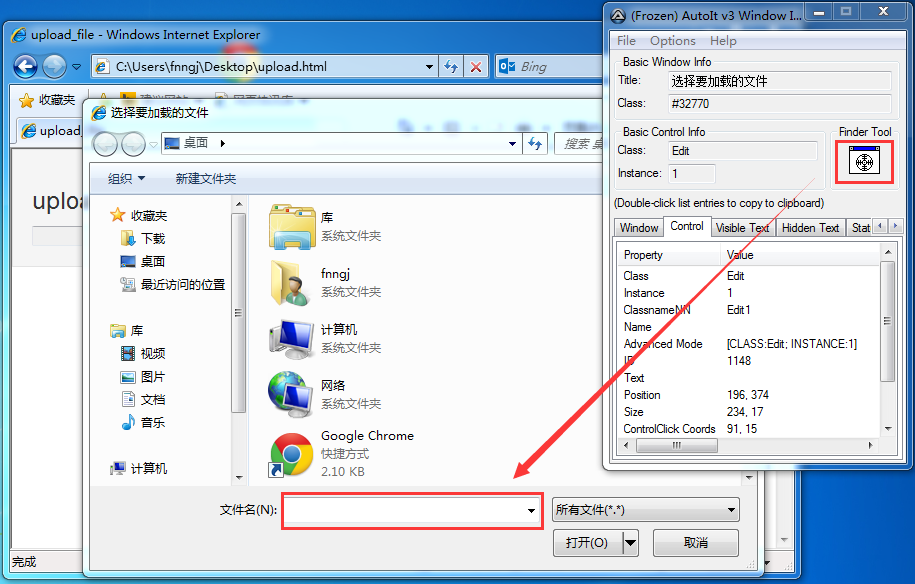
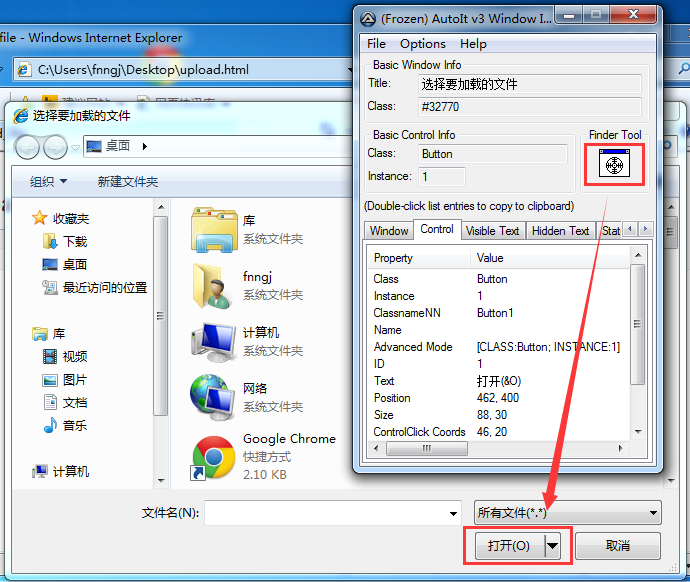
1、首先開啟AutoIt Windows Info 工具,滑鼠點選Finder Tool,滑鼠將變成一個小風扇形狀的圖示,按住滑鼠左鍵拖動到需要識別的控制元件上。

圖4.14 AutoIt Windows Info識別“檔名”輸入框控制元件

圖4.15 AutoIt Windows Info識別“開啟”按鈕控制元件
如圖4.14、4.15,通過AutoIt Windows Info 獲得以下資訊。
視窗的title為“選擇要載入的檔案”,標題的Class為“#32770”。
檔名輸入框的class 為“Edit”,Instance為“1” ,所以ClassnameNN為“Edit1”。
開啟按鈕的class 為“Button”,Instance為“1” ,所以ClassnameNN為“Button1”。
2、根據AutoIt Windows Info 所識別到的控制元件資訊開啟SciTE Script Editor編輯器,編寫指令碼。

;ControlFocus("title","text",controlID) Edit1=Edit instance 1
ControlFocus("選擇要載入的檔案", "","Edit1")


; Wait 10 seconds for the Upload window to appear
  WinWait("[CLASS:#32770]","",10)


; Set the File name text on the Edit field

  ControlSetText("選擇要載入的檔案", "", "Edit1", "D:\\upload_file.txt")

  Sleep(2000)

; Click on the Open button

  ControlClick("選擇要載入的檔案", "","Button1");

ControlFocus()方法用於識別Window視窗。WinWait()設定10秒鐘用於等待視窗的顯示,其用法與WebDriver 所提供的implicitly_wait()類似。ControlSetText()用於向“檔名”輸入框內輸入本地檔案的路徑。這裡的Sleep()方法與Python中time模組提供的Sleep()方法用法一樣,不過它是以毫秒為單位,Sleep(2000)表示固定休眠2000毫秒。ControlClick()用於點選上傳視窗中的“開啟”按鈕。
AutoIt的指令碼已經寫好了,可以通過選單欄“Tools”-->“Go” (或按鍵盤F5)來執行一個指令碼吧!注意在執行時上傳視窗當前處於開啟狀態。
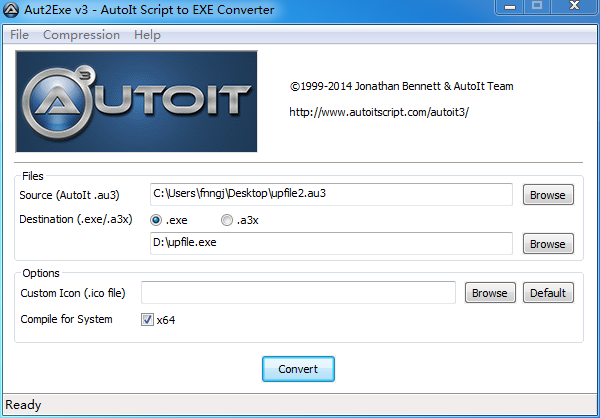
3、指令碼執行正常,將其儲存為upfile.au3,這裡儲存的指令碼可以通過Run Script 工具將其開啟執行,但我們的目的是希望這個指令碼被Python程式呼叫,那麼就需要將其生成exe程式。開啟Compile Script to.exe工具,將其生成為exe可執行檔案。如圖4.16,

圖4.16 Compile Script to.exe生成exe程式
點選“Browse”選擇upfile.au3檔案,點選“Convert”按鈕將其生成為upfile.exe程式。
4、下面就是通過自動化測試指令碼呼叫upfile.exe程式實現上傳了。

#coding=utf-8
from selenium import webdriver
import os driver = webdriver.Firefox() #開啟上傳功能頁面 file_path = 'file:///' + os.path.abspath('upfile.html') driver.get(file_path) #點選開啟上傳視窗 driver.find_element_by_name("file").click() #呼叫upfile.exe上傳程式 os.system("D:\\upfile.exe") driver.quit()

通過Python 的os模組的system()方法可以呼叫exe程式並執行。
瞭解了上傳的實現過程,那麼下載也是一樣的。
