使用AndroidStudio打包OpenCV和C++程式碼並在安卓上執行
使用AndroidStudio打包OpenCV和C++程式碼並在安卓上執行
在為伺服器部署OpenCV和C++的過程中嘗試了很多方法,這裡記錄一下在AndroidStudio上打包OpenCV和C++的過程。
1.準備開發環境
這裡我直接在mac上開發,沒有在虛擬機器中。
安裝AndroidStudio,jdk等,參考:https://blog.csdn.net/wu__di/article/details/78556724
opencv官網下載Android sdk:https://opencv.org/releases.html
cmake安裝:https://blog.csdn.net/baimafujinji/article/details/78588488
2.建立工程
建立一個空專案,注意勾選【Include C++ support】,參考:http://www.sohu.com/a/250633784_663371
3.準備檔案
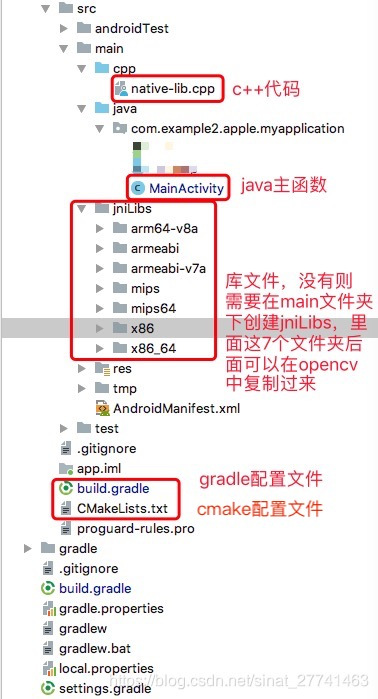
現在專案中有一些基礎的檔案。

其中,jniLibs檔名是固定的,不能自定義,這個是AndroidStudio的預設搜尋路徑。
將OpenCV-android-sdk/sdk/native/libs下的庫檔案拷貝到jniLibs目錄下,即圖上的7個資料夾。AndroidStudio匯入其他so檔案同理,將對應架構的so檔案拷貝到圖上資料夾對應的目錄中,AS會自動載入這些檔案,並在安裝時拷貝到APP的庫目錄下。
native-lib.cpp程式碼:
#include <jni.h>
#include <string>
#include <iostream>
#include <stdio.h>
#include <stdlib.h>
#include <opencv2/opencv.hpp>
using namespace cv;
using namespace std;
extern "C" {
// 注意這裡的函式名格式:Java_各級包名_類名_函式名(引數...),需嚴格按照這種格式,否則會出錯
JNIEXPORT jintArray JNICALL Java_com_example2_apple_myapplication_MainActivity_gray MainActivity程式碼:
package com.example2.apple.myapplication;

import android.graphics.Bitmap;
import android.graphics.drawable.BitmapDrawable;
import android.support.v7.app.AppCompatActivity;
import android.os.Bundle;
import android.widget.ImageView;


public class MainActivity extends AppCompatActivity {
    // Used to load the 'native-lib' library on application startup.
    static {
        System.loadLibrary("native-lib");
        System.out.println(System.getProperty("java.library.path"));
    }

    @Override protected void onCreate(Bundle savedInstanceState) {
        super.onCreate(savedInstanceState);
        setContentView(R.layout.activity_main);
        Bitmap bitmap = ((BitmapDrawable) getResources().getDrawable( R.drawable.pic)).getBitmap();
        int w = bitmap.getWidth(), h = bitmap.getHeight();
        int[] pix = new int[w * h];
        bitmap.getPixels(pix, 0, w, 0, 0, w, h);
        int [] resultPixes=gray(pix,w,h);
        Bitmap result = Bitmap.createBitmap(w,h, Bitmap.Config.RGB_565);
        result.setPixels(resultPixes, 0, w, 0, 0,w, h);
        ImageView img = (ImageView)findViewById(R.id.img2);
        img.setImageBitmap(result);
        System.out.println(stringFromJNI());
    }
    /** * A native method that is implemented by the 'native-lib' native library, * which is packaged with this application. */
    public native int[] gray(int[] buf, int w, int h);
    public native String stringFromJNI();
}
res/layout/activity_main.xml程式碼:
<?xml version="1.0" encoding="utf-8"?>
<LinearLayout xmlns:android="http://schemas.android.com/apk/res/android"
    xmlns:tools="http://schemas.android.com/tools"
    android:id="@+id/activity_main"
    android:layout_width="match_parent"
    android:layout_height="match_parent"
    android:paddingBottom="16dp"
    android:paddingLeft="16dp"
    android:paddingRight="16dp"
    android:paddingTop="16dp"
    android:orientation="vertical"
    tools:context="com.example2.apple.myapplication.MainActivity">

    <TextView android:id="@+id/txt"
        android:layout_width="wrap_content"
        android:layout_height="wrap_content"
        android:text="原圖:" />

    <ImageView android:id="@+id/img"
        android:layout_width="wrap_content"
        android:layout_height="wrap_content"
        android:src="@drawable/pic"/>
        <!--在res/drawable目錄下隨便放一張圖片pic.png並在此載入,圖片尺寸最好小些-->

    <TextView android:layout_width="wrap_content"
        android:layout_height="wrap_content"
        android:layout_marginTop="10dp"
        android:text="處理後的圖:" />

    <ImageView android:id="@+id/img2"
        android:layout_width="wrap_content"
        android:layout_height="wrap_content"/>
</LinearLayout>
build.gradle程式碼:
apply plugin: 'com.android.application'

android {
    compileSdkVersion 26 //根據自己的版本設定
    defaultConfig {
        applicationId "com.example2.apple.myapplication"
        minSdkVersion 15 //根據自己的版本設定
        targetSdkVersion 26 //根據自己的版本設定
        versionCode 1
        versionName "1.0"
        testInstrumentationRunner "android.support.test.runner.AndroidJUnitRunner"
        externalNativeBuild {
            cmake {
                cppFlags "-std=c++11 -frtti -fexceptions" // 根據情況設定
                abiFilters 'x86', 'x86_64', 'armeabi-v7a', 'arm64-v8a' // 根據情況設定
            }
        }
    }
    buildTypes {
        release {
            minifyEnabled false
            proguardFiles getDefaultProguardFile('proguard-android.txt'), 'proguard-rules.pro'
        }
    }
    externalNativeBuild {
        cmake {
            path "CMakeLists.txt"
        }
    }

// 這段程式碼功能是將工程打包為jar供第三方呼叫,還需一些其他改動,參考:
// https://blog.csdn.net/qq_24056881/article/details/81017450
// https://blog.csdn.net/xiayiye5/article/details/79639044
//    task makeJar(type: Copy) {
//        //刪除存在的
//        delete 'build/libs/myjar.jar'
//        //設定拷貝的檔案
//        from('build/intermediates/packaged-classes/debug/')
//        //打進jar包後的檔案目錄
//        into('build/libs/')
//        //將classes.jar放入build/libs/目錄下
//        //include ,exclude引數來設定過濾
//        //(我們只關心classes.jar這個檔案)
//        include('classes.jar')
//        //重新命名
//        rename('classes.jar', 'myjar.jar')
//    }
//    makeJar.dependsOn(build)
}

dependencies {
    implementation fileTree(dir: 'libs', include: ['*.jar'])
    implementation 'com.android.support:appcompat-v7:26.0.0'
    implementation 'com.android.support.constraint:constraint-layout:1.0.2'
    testImplementation 'junit:junit:4.12'
}
CMakeLists程式碼:
# For more information about using CMake with Android Studio, read the
# documentation: https://d.android.com/studio/projects/add-native-code.html

#設定OpenCv sdk的路徑變數
set(pathToOpenCv /Users/apple/Downloads/OpenCV-android-sdk/)

#cmake version 根據自己的情況設定
cmake_minimum_required(VERSION 3.4.1)

#支援-std=gnu++11
set(CMAKE_VERBOSE_MAKEFILE on)
set(CMAKE_CXX_FLAGS "${CMAKE_CXX_FLAGS} -std=gnu++11")

#配置載入native依賴
include_directories(${pathToOpenCv}/sdk/native/jni/include)

#動態方式載入
add_library(lib_opencv STATIC IMPORTED )

#引入libopencv_java3.so檔案
set_target_properties(lib_opencv PROPERTIES IMPORTED_LOCATION ${PROJECT_SOURCE_DIR}/src/main/jniLibs/${ANDROID_ABI}/libopencv_java3.so )

# 自己的原始檔
add_library(
	   # Sets the name of the library.
        native-lib

        # Sets the library as a shared library.
        SHARED

        # Provides a relative path to your source file(s).
        src/main/cpp/native-lib.cpp
        )

#查詢庫
find_library(
        # Sets the name of the path variable.
        log-lib

        # Specifies the name of the NDK library that
        # you want CMake to locate.
        log
)

#連結庫
target_link_libraries(
        # Specifies the target library.
        native-lib

        # Links the target library to the log library
        # included in the NDK.
        ${log-lib} android -ljnigraphics lib_opencv
)
通過這些設定opencv就可以在Android中運行了,編譯執行一下:
我這裡在模擬器中執行:

參考資料:
http://www.sohu.com/a/250633784_663371
https://www.cnblogs.com/xiaoxiaoqingyi/p/6676096.html
https://sriraghu.com/2017/03/11/opencv-in-android-an-introduction-part-1/
AndroidStudio專案CMakeLists解析:https://www.cnblogs.com/chenxibobo/p/7678389.html
https://blog.csdn.net/bailsong/article/details/77527773
