效能測試工具CPU profiler(gperftools)的使用心得
最近因為要研究一個演算法的優化問題,需要找一款工具對程式進行效能分析,於是想到了google的效能分析工具gperftools的CPU profiler,本文記錄CPU profiler的使用心得。
編譯安裝gperftools
gperftools是一個工具包,CPU profiler是其中的工具之一,用於程式效能分析。要使用CPU profiler就要先編譯安裝gperftools,下面是簡單的編譯安裝過程.
# 從github下載gperftools原始碼並解壓
wget https://github.com/gperftools/gperftools/archive/gperftools-2.7.tar.gz
tar 注意:在64位作業系統下需要libunwind支援,如果沒有安裝libunwind,還要先編譯安裝libunwind。
使用cpu profiler
根據CPU profiler的官方說明(https://gperftools.github.io/gperftools/cpuprofile.html
只要加上
-lprofiler對程式重新編譯一次,再執行程式就可以了,如下是官網給出簡單步驟:
# 加上-lprofiler編譯自己的程式
gcc [...] -o myprogram -lprofiler
# 設定環境變數CPUPROFILER指定生成的效能報告檔案,並執行自己的程式
CPUPROFILE=/tmp/profile ./myprogram
這個簡單辦法,不需要修改自己的程式,但我一直沒有嘗試成功,不能生成效能報告檔案(如果有朋友知道為什麼,請不吝賜教),最終還是通過修改自己的程式,在程式開始和結束位置分別加入ProfilerStart,ProfilerStop
#include <gperftools/profiler.h>
....
int main(int argc, const char* argv[])
{
	ProfilerStart("test_capture.prof");
	.....
	ProfilerStop();
}
因為在程式碼中加入了ProfilerStart函式指定了生成效能報告的檔名,所以在執行程式時就不一定需要CPUPROFILE=/tmp/profile再指定效能報告檔名。
程式執行結束會在當前資料夾生成名為test_capture.prof的效能報告。
效能報告
有了效能報告 ,就可以用gperftools提供的效能分析工具pprof生成直觀可讀的檔案形式。
browser
# 生成效能報告(層次呼叫節點有向圖)輸出到web瀏覽器顯示
# 第一個引數為你的可執行程式或動態庫檔名,第二個引數為上一步生成的效能報告檔案
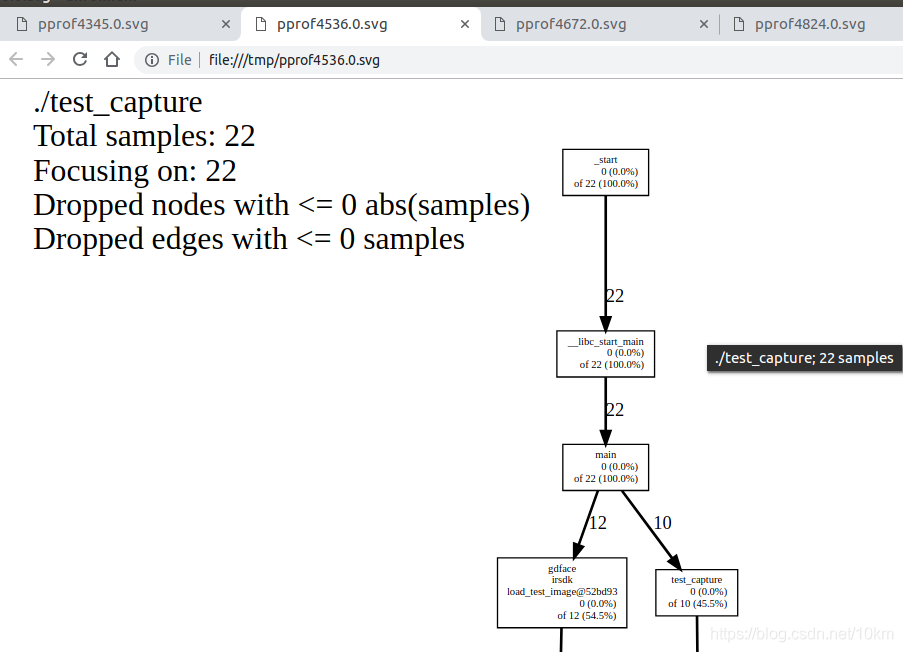
pprof  ./test_capture test_capture.prof --web
下面的圖形輸出報告中,大字型顯示的節點就是CPU使用率的’熱點’,一目瞭然。


節點資訊說明
圖形風格的效能報告由節點和有向邊組成, 每個節點代表一個函式,節點資料格式:
| 欄位名 | 描述 |
|---|---|
| Class Name | 類名,非類成員函式此項為空 |
| Method Name | 函式名 |
| local (percentage) | 當前函式直接執行的指令所消耗的CPU時間(包括行內函數)(百分比) |
| of cumulative (percentage) | 當前函式的local時間及其呼叫的函式的local時間總和(百分比),如果與local相同,則不顯示 |
有向邊:呼叫者指向被呼叫者,有向邊上的時間表示被呼叫者所消耗的CPU時間
效能分析通過抽樣方法完成,預設是1秒100個樣本,一個樣本是10毫秒,即時間單位是10毫秒;可以通過環境變數CPUPROFILE_FREQUENCY設定取樣頻率。
更多詳細說明參見 CPU profiler Node Information一節
# 生成pdf格式的效能報告(層次呼叫節點有向圖)
pprof  ./test_capture test_capture.prof --pdf > prof.pdf
text
# 生成文字格式的效能報告輸出到控制檯
./test_capture test_capture.prof --text
輸出內容如下,在CPU使用率降序輸出所有的函式名:
Using local file ./test_capture.
Using local file test_capture.prof.
Total: 20 samples
       4  20.0%  20.0%        4  20.0% CanFaceCcd
       4  20.0%  40.0%        4  20.0% cimg_library::CImg::RGBtoYUV
       3  15.0%  55.0%        5  25.0% cimg_library::CImg::CImg
       2  10.0%  65.0%        2  10.0% StepImageHalfNormal
       2  10.0%  75.0%        2  10.0% __nss_passwd_lookup
       2  10.0%  85.0%        2  10.0% decode_mcu
       1   5.0%  90.0%        1   5.0% GetIntegralOfIma
       1   5.0%  95.0%        1   5.0% RunCascade
關於上面各個欄位的意義參見 https://gperftools.github.io/gperftools/cpuprofile.html

more Output Type
pprof還支援更多輸出格式,參見 https://gperftools.github.io/gperftools/cpuprofile.html

執行pprof --help也可檢視所支援的輸出格式
Output type:
   --text              Generate text report
   --stacks            Generate stack traces similar to the heap profiler (requires --text)
   --callgrind         Generate callgrind format to stdout
   --gv                Generate Postscript and display
   --evince            Generate PDF and display
   --web               Generate SVG and display
   --list=<regexp>     Generate source listing of matching routines
   --disasm=<regexp>   Generate disassembly of matching routines
   --symbols           Print demangled symbol names found at given addresses
   --dot               Generate DOT file to stdout
   --ps                Generate Postcript to stdout
   --pdf               Generate PDF to stdout
   --svg               Generate SVG to stdout
   --gif               Generate GIF to stdout
   --raw               Generate symbolized pprof data (useful with remote fetch)
靜態連線profiler
有的時候我們需要靜態連線profiler庫(比如在嵌入式系統下做效能分析).根據gperftools的官方說明:README,靜態連線profiler不能使用profiler.a靜態庫,要用libtcmalloc_and_profiler.a替代。
EVERYTHING IN ONE
-----------------
If you want the CPU profiler, heap profiler, and heap leak-checker to
all be available for your application, you can do:
   gcc -o myapp ... -lprofiler -ltcmalloc

However, if you have a reason to use the static versions of the
library, this two-library linking won't work:
   gcc -o myapp ... /usr/lib/libprofiler.a /usr/lib/libtcmalloc.a  # errors!

Instead, use the special libtcmalloc_and_profiler library, which we
make for just this purpose:
   gcc -o myapp ... /usr/lib/libtcmalloc_and_profiler.a
關於取樣次數
CPU profiler是基於取樣工作的。所以取樣次數影響著效能報告的準確性。
如果取樣次數過少,則你會發現同樣的程式同樣的資料,每次輸出的效能報告中的熱點都不一樣。
所以在我的實際應用中,通過迴圈執行測試程式函式,大幅度提高取樣次數。這樣才能獲得一個穩定的準確的效能報告。
參考資料
https://github.com/gperftools/gperftools/blob/master/README
https://gperftools.github.io/gperftools/cpuprofile.html
https://github.com/gperftools/gperftools/wiki
https://blog.csdn.net/okiwilldoit/article/details/50884670
