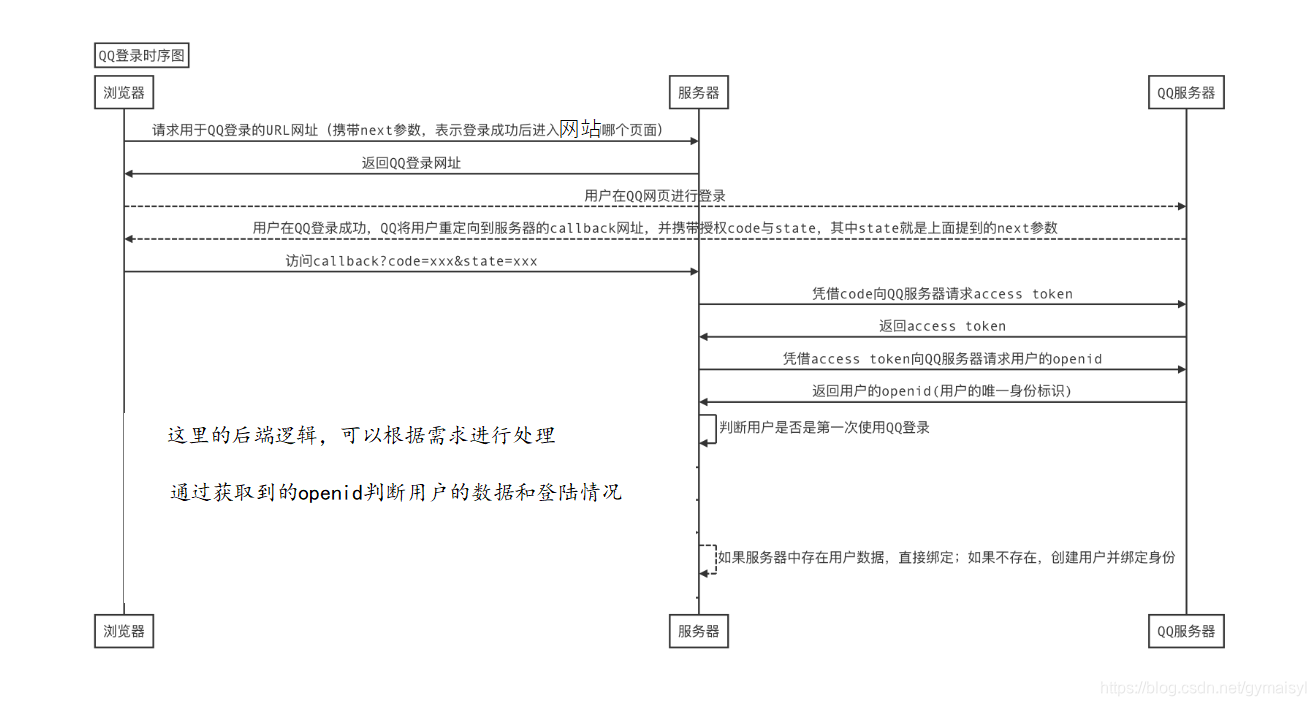
第三方登陸--QQ登陸
QQ登入,亦即我們所說的第三方登入,是指使用者可以不在本專案中輸入密碼,而直接通過第三方的驗證,成功登入網站/移動端。
在進行QQ登陸的實現之前,我們需要根據QQ互聯的要求,進行相關的操作:
1.成為開發者 參考連結 : http://wiki.connect.qq.com/成為開發者
2.應用建立 參考連結:http://wiki.connect.qq.com/__trashed-2
假設條件:
㈠:我的網站的域名是: http://iloveqq.com
㈡:使用者在訪問:http://iloveqq.com/like 介面時需要進行登陸
㈢:QQ認證的相關函式,我們放在一個類中,作為方法,在使用的時候,可以通過物件呼叫方法的方式來進行操作:
class OAuthQQ(object):
    """QQ認證輔助工具"""
    def __init__(self, client_id=None, redirect_uri=None, state=None, client_secret=None):
    #  settings中有client_id,redirect_uri,client_secret的值,如果在建立物件的時候不傳參,預設使用配置中的;

        self.client_id = client_id or settings.QQ_CLIENT_ID
        self.redirect_uri = redirect_uri or settings.QQ_REDIRECT_URI
        self.state = state or settings.QQ_STATE
        self.client_secret = client_secret or settings.QQ_CLIENT_SECRET
㈣: urllib使用說明
在後端介面中,我們需要向QQ伺服器傳送請求,查詢使用者的QQ資訊,Python提供了標準模組urllib可以幫助我們傳送http請求。
1.將query字典轉換為url路徑中的查詢字串
urllib.parse.urlencode(query)
2.將qs查詢字串格式資料轉換為python的字典
urllib.parse.parse_qs(qs)
3.傳送http請求,如果data為None,傳送GET請求,如果data不為None,傳送POST請求
urllib.request.urlopen(url, data=None)
返回response響應物件,可以通過read()讀取響應體資料,需要注意讀取出的響應體資料為bytes型別
現在來說一下,整個QQ登陸的過程:

Step1:獲取Authorization Code
1.使用者進行qq登陸 - - QQ伺服器生成code
使用者想進入like.html介面進行查閱,但是網站跳出登陸介面,顯示必須先登入才能繼續檢視;然後,使用者點選qq登陸的圖示,然後出現這樣的圖片:

使用者點選qq登陸的時候,我們需要將登陸qq的url返回給使用者,這個url必須是可以進行qq登陸,滿足qq互聯的要求:
如下圖所示,我們需要請求的網址是:https://graph.qq.com/oauth2.0/authorize; 同時,我們還需要將response_type,client_id, redirect_uri,state這幾個引數放在連結後面攜帶過去

後端生成登陸地址(生成login_url的方式如下):
def get_qq_login_url(self):
    """
    獲取qq登入的網址
    :return: url網址
    """
    params = {
        'response_type': 'code',
        'client_id': self.client_id,
        'redirect_uri': self.redirect_uri,
        'state': self.state
    }
    url = 'https://graph.qq.com/oauth2.0/authorize?' + urlencode(params)
    return url
注意,在qq登陸時序圖中,我們需要獲取到使用者想要訪問的介面,也就是本案例中的http://iloveqq.com/like 連結,此時前端是通過next=http://iloveqq.com/like 傳給後端的,然後後端在生成url時,通過獲取next引數並傳入get_qq_login_url(state)這個函式中,給state賦值:
login_url = get_qq_login_url(next)
然後再將login_url返回給前端,此時使用者通過掃描二維碼,進行授權登陸,使用者登陸成功。
2.登陸成功,伺服器獲取code
在使用者授權確認登陸的時候,QQ會將返回回撥頁面 redirect_uri.html,當然,此時,QQ返回的引數中,還攜帶了code和state引數(上面傳入的next引數的內容);
此時使用者需要訪問我們的回撥頁面 redirect_uri.html,當然請求的時候,除了回撥頁面,還會攜帶引數code和state:
訪問連結比如: GET /oauth/qq/user/?code=xxx;
此時,後端可以通過查詢字串的引數獲取方式,獲取到code資料
Step2:通過Authorization Code獲取Access Token
3.我的伺服器和QQ伺服器的糾纏-- Access Token
此時,後端是已經獲取到夢寐以求的code資料了,現在開始就是我們自己的伺服器和QQ伺服器之間的資料獲取了。
1.根據code,向QQ伺服器傳送請求獲取access_token:
    def get_access_token(self, code):
        """獲取access_token值"""
        params = {
            'grant_type': 'authorization_code',
            'client_id': self.client_id,
            'client_secret': self.client_secret,
            'code': code,
            'redirect_uri': self.redirect_uri
        }

        url = 'https://graph.qq.com/oauth2.0/token?' + urlencode(params)

        #向qq伺服器傳送GET請求,連結是url
        response = urlopen(url)

        #QQ返回的響應資料通過read()讀取,並且需要進行解碼
        resp_data = response.read().decode()

        # 將接收的resp_data查詢字串格式資料轉換為python的字典
        resp_dict = parse_qs(resp_data)

        # 通過字典取值的方式,獲取access_token的值
        access_token = resp_dict.get('access_token')

		# 獲取到的access_token是一個列表,類似['2334tf2rwfreytrhh'],所以需要通過索引access_token[0]取出字串資料
        return access_token[0]

Step3:通過Access Token 獲取獲取使用者OpenID_OAuth2.0
4.我的伺服器和QQ伺服器的糾纏-- OpenID

上一步已經通過code獲取到Access Token的值,現在可以通過Access Token獲取openid的值了:
    def get_openid(self, access_token):
        """openid的獲取"""
        url = 'https://graph.qq.com/oauth2.0/me?access_token=' + access_token

		# 訪問QQ伺服器
        response = urlopen(url)
        resp_data = response.read().decode()  # 字串

        try:
            # 返回的資料 ‘callback( {"client_id":"YOUR_APPID","openid":"YOUR_OPENID"} )\n’  取出資料,並將字串轉為字典
            data = json.loads(resp_data[10:-4])  # 也可以使用正則取出資料

        except Exception:
        	# 介面呼叫有錯誤時,會返回code和msg欄位
            data = parse_qs(resp_data)
            logger.error('code=%s msg=%s' % (data.get('code'), data.get('msg')))
            raise QQAPIError

        openid = data.get('openid', None)
        return openid
每一個openid會對應一個QQ號,在後端獲取到openid之後,可以根據後端的邏輯進行相關處理。
完整的參考程式碼----》這裡使用類的方式進行封裝
class OAuthQQ(object):
    """QQ認證輔助工具"""
    def __init__(self, client_id=None, redirect_uri=None, state=None, client_secret=None):
        self.client_id = client_id or settings.QQ_CLIENT_ID
        self.redirect_uri = redirect_uri or settings.QQ_REDIRECT_URI
        self.state = state or settings.QQ_STATE
        self.client_secret = client_secret or settings.QQ_CLIENT_SECRET

    def get_qq_login_url(self):
        """關於QQ登陸獲取url"""
        """Step1:獲取Authorization Code
            請求地址:
            PC網站:https://graph.qq.com/oauth2.0/authorize
            請求方法:GET
            引數	是否必須	含義
            response_type	此值固定為“code”。
            client_id	appid。
            redirect_uri
            state
        """

        params = {
            'response_type': 'code',
            'client_id': self.client_id,
            'redirect_uri': self.redirect_uri,
            'state': self.state
        }

        """urllib.parse.urlencode(query) 將query字典轉換為url路徑中的查詢字串"""

        # 字串url的拼接
        url = 'https://graph.qq.com/oauth2.0/authorize?' + urlencode(params)

        return url


    def get_access_token(self, code):
        """獲取access_token值"""

        """請求地址:
            PC網站:https://graph.qq.com/oauth2.0/token
            請求方法:GET
            grant_type	在本步驟中,此值為“authorization_code”。
            client_id	appid。
            client_secret	appkey。
            code	authorization code。
            redirect_uri
            """

        params = {
            'grant_type': 'authorization_code',
            'client_id': self.client_id,
            'client_secret': self.client_secret,
            'code': code,
            'redirect_uri': self.redirect_uri
        }

        url = 'https://graph.qq.com/oauth2.0/token?' + urlencode(params)

        """urllib.request.urlopen(url, data=None)
    傳送http請求,如果data為None,傳送GET請求,如果data不為None,傳送POST請求
    返回response響應物件,可以通過read()讀取響應體資料,需要注意讀取出的響應體資料為bytes型別"""

        response = urlopen(url)
        resp_data = response.read().decode()

        """urllib.parse.parse_qs(qs)將qs查詢字串格式資料轉換為python的字典"""

        resp_dict = parse_qs(resp_data)
        access_token = resp_dict.get('access_token')

        return access_token[0]


    def get_openid(self, access_token):
        """openid的獲取"""
        """1 請求地址
            PC網站:https://graph.qq.com/oauth2.0/me
            2 請求方法
            GET
            3 請求引數
            access_token
            """

        url = 'https://graph.qq.com/oauth2.0/me?access_token=' + access_token

        response = urlopen(url)
        resp_data = response.read().decode()  # 字串

        try:
            # 返回的資料 ‘callback( {"client_id":"YOUR_APPID","openid":"YOUR_OPENID"} )\n’ 取出資料,並將字串轉為字典
            data = json.loads(resp_data[10:-4])
            print('data:%s' % data)
        except Exception:
            data = parse_qs(resp_data)
            logger.error('code=%s msg=%s' % (data.get('code'), data.get('msg')))
            raise QQAPIError

        openid = data.get('openid', None)

        return openid
