mybatis 詳解(六)------通過mapper介面載入對映檔案
阿新 • • 發佈:2018-12-03
目錄
- 1、定義 userMapper 介面
- 2、在全域性配置檔案 mybatis-configuration.xml 檔案中載入 UserMapper 介面(單個載入對映檔案)
- 3、編寫UserMapper.xml 檔案
- 4、測試
- 5、批量載入對映檔案
- 6、注意
通過 mapper 介面載入對映檔案,這對於後面 ssm三大框架 的整合是非常重要的。那麼什麼是通過 mapper 介面載入對映檔案呢?
我們首先看以前的做法,在全域性配置檔案 mybatis-configuration.xml 通過 <mappers> 標籤來載入對映檔案,那麼如果我們專案足夠大,有很多對映檔案呢,難道我們每一個對映檔案都這樣載入嗎,這樣肯定是不行的,那麼我們就需要使用 mapper 介面來載入對映檔案
以前的做法:

改進做法:使用 mapper 介面來載入對映檔案
1、定義 userMapper 介面
package com.ys.mapper; import org.apache.ibatis.annotations.Delete; import org.apache.ibatis.annotations.Insert; import org.apache.ibatis.annotations.Select; import org.apache.ibatis.annotations.Update; import com.ys.po.User; publicinterface UserMapper { //根據 id 查詢 user 表資料 public User selectUserById(int id) throws Exception; //向 user 表插入一條資料 public void insertUser(User user) throws Exception; //根據 id 修改 user 表資料 public void updateUserById(User user) throws Exception; //根據 id 刪除 user 表資料 publicvoid deleteUserById(int id) throws Exception; }
2、在全域性配置檔案 mybatis-configuration.xml 檔案中載入 UserMapper 介面(單個載入對映檔案)

3、編寫UserMapper.xml 檔案
<?xml version="1.0" encoding="UTF-8" ?>
<!DOCTYPE mapper
  PUBLIC "-//mybatis.org//DTD Mapper 3.0//EN"
  "http://mybatis.org/dtd/mybatis-3-mapper.dtd">
<mapper namespace="com.ys.mapper.UserMapper">


    <!-- 根據 id 查詢 user 表中的資料
       id:唯一識別符號,此檔案中的id值不能重複
       resultType:返回值型別,一條資料庫記錄也就對應實體類的一個物件
       parameterType:引數型別,也就是查詢條件的型別
    -->
    <select id="selectUserById"
            resultType="com.ys.po.User" parameterType="int">
        <!-- 這裡和普通的sql 查詢語句差不多,後面的 #{id}表示佔位符,裡面不一定要寫id,寫啥都可以,但是不要空著 -->
        select * from user where id = #{id1}
    </select>


    <!-- 根據 id 更新 user 表的資料 -->
    <update id="updateUserById" parameterType="com.ys.po.User">
        update user u
            <!-- <set>
                <if test="username != null and username != ''">
                    u.username = #{username},
                </if>
                <if test="sex != null and sex != ''">
                    u.sex = #{sex}
                </if>
            </set> -->
            <trim prefix="set" suffixOverrides=",">
                <if test="username != null and username != ''">
                    u.username = #{username},
                </if>
                <if test="sex != null and sex != ''">
                    u.sex = #{sex},
                </if>
            </trim>

         where id=#{id}
    </update>


    <!-- 向 user 表插入一條資料 -->
    <insert id="insertUser" parameterType="com.ys.po.User">
        <!-- 將插入的資料主鍵返回到 user 物件中
             keyProperty:將查詢到的主鍵設定到parameterType 指定到物件的那個屬性
             select LAST_INSERT_ID():查詢上一次執行insert 操作返回的主鍵id值,只適用於自增主鍵
             resultType:指定 select LAST_INSERT_ID() 的結果型別
             order:AFTER,相對於 select LAST_INSERT_ID()操作的順序
         -->
        <selectKey keyProperty="id" resultType="int" order="AFTER">
            select LAST_INSERT_ID()
        </selectKey>
        insert into user(username,sex,birthday,address)
            value(#{username},#{sex},#{birthday},#{address})
    </insert>


    <!-- 根據 id 刪除 user 表的資料 -->
    <delete id="deleteUserById" parameterType="int">
        delete from user where id=#{id}
    </delete>

</mapper>
4、測試
//根據id查詢user表資料
    @Test
    public void testSelectUserById() throws Exception{
        //獲取mapper介面
        UserMapper userMapper = session.getMapper(UserMapper.class);
        User user = userMapper.selectUserById(1);
        System.out.println(user);
        session.close();
    }
5、批量載入對映檔案
<mappers>
       <!--批量載入mapper
          指定 mapper 介面的包名,mybatis自動掃描包下的mapper介面進行載入
         -->
       <package name="com.ys.mapper"/>
</mappers>
6、注意
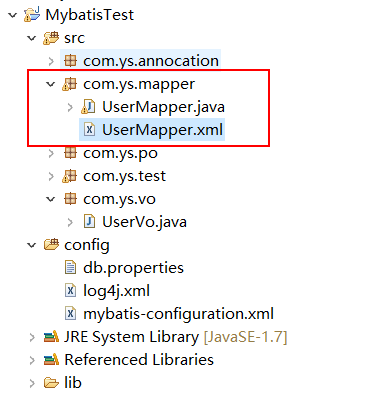
1、UserMapper 介面必須要和 UserMapper.xml 檔案同名且在同一個包下,也就是說 UserMapper.xml 檔案中的namespace是UserMapper介面的全類名

2、UserMapper介面中的方法名和 UserMapper.xml 檔案中定義的 id 一致
3、UserMapper介面輸入引數型別要和 UserMapper.xml 中定義的 parameterType 一致
4、UserMapper介面返回資料型別要和 UserMapper.xml 中定義的 resultType 一致
