wepy專案建立和打包
阿新 • • 發佈:2018-12-03
建立專案
1.全域性安裝
npm install wepy-cli -g
2.新建專案目錄,生成Demo開發專案
wepy new myproject
3.切換至專案目錄
cd myproject
4.安裝依賴
npm install
5.開啟實時編譯
wepy build --watch
生成如下的專案目錄:
├── dist                   小程式執行程式碼目錄(該目錄由WePY的build指令自動編譯生成,請不要直接修改該目錄下的檔案)
├── node_modules
├── src                    程式碼編寫的目錄(該目錄為使用WePY後的開發目錄)
|   ├── components         WePY元件目錄(元件不屬於完整頁面,僅供完整頁面或其他元件引用)
|   |   ├── com_a.wpy      可複用的WePY元件a
|   |   └── com_b.wpy      可複用的WePY元件b
|   ├── pages              WePY頁面目錄(屬於完整頁面)
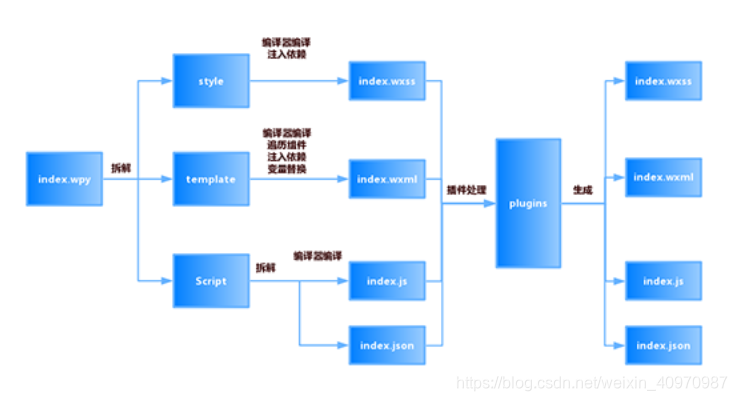
|   |   ├── index.wpy      index頁面(經build後,會在dist目錄下的pages目錄生成index.js、index.json、index.wxml和index.wxss檔案)
|   |   └── other.wpy      other頁面(經build後,會在dist目錄下的pages目錄生成other.js、other.json、other.wxml和other.wxss檔案)
|   └── app.wpy            小程式配置項(全域性資料、樣式、宣告鉤子等;經build後,會在dist目錄下生成app.js、app.json和app.wxss檔案)
└── package.json           專案的package配置
打包專案
類VUE
開發環境為
npm run dev 實時監聽檔案改動
正式環境為
npm run build
將開發的專案編譯打包到dist目錄釋出
具體編譯過程如下:

參考文章(小程式官方站點):https://tencent.github.io/wepy/document.html#/
