
影象顯示深入學習三:視窗機制分析
上一篇文章影象顯示深入學習一:Activity啟動過程中介紹了啟動一個Activity在整個Android系統中執行的流程,其中可以看到Window的建立,這篇文章就整理一下Window機制的實現過程吧。
吐個槽,今年大部分時間在公司一直在做SDK專案,UI方面的工作涉及的比較少,現在重新開始做UI了,發現自己對於View方面的知識有點模糊了,後悔以前沒有寫文章記錄下來呀,好記性真的不如爛筆頭。
重新回顧一下影象顯示深入學習一:Activity啟動過程文章中的Activity建立過程,應用層通過ApplicationThread.scheduleLaunchActivity(...)
ActivityThread.handleLaunchActivity(...)方法,從而開始了一系列Activity生命週期的回撥,而Window的建立顯示過程也包含其中,所以我們還是從.handleLaunchActivity(...)該方法開始看起,只摘取出跟Window有關的內容:
    private void handleLaunchActivity(ActivityClientRecord r, Intent customIntent, String reason) {
     ...
        WindowManagerGlobal.initialize();

        Activity a = performLaunchActivity(r, customIntent);

        if (a != null) {
         ...
            handleResumeActivity(r.token, false, r.isForward,
                    !r.activity.mFinished && !r.startsNotResumed, r.lastProcessedSeq, reason);

            if (!r.activity.mFinished && r.startsNotResumed) {
                performPauseActivityIfNeeded(r, reason);
		...
        }
    }
這裡呼叫了WindowManagerGlobal.initialize()方法, WindowManagerGlobal是與WindowManagerService溝通的橋樑,所以這裡我們先看下這個方法到底幹了什麼:
//WindowManagerGlobal.java
public static void initialize() {
        getWindowManagerService();
    }
public static IWindowManager getWindowManagerService() {
        synchronized (WindowManagerGlobal.class) {
            if (sWindowManagerService == null) {
                sWindowManagerService = IWindowManager.Stub.asInterface(
                        ServiceManager.getService("window"));
                try {
                    if (sWindowManagerService != null) {
                        ValueAnimator.setDurationScale(
                                sWindowManagerService.getCurrentAnimatorScale());
                    }
                } catch (RemoteException e) {
                    throw e.rethrowFromSystemServer();
                }
            }
            return sWindowManagerService;
        }
    }
initialize()方法中使用Binder通訊機制初始化了sWindowManagerService物件,比較簡單。回到handleLaunchActivity(...)中,繼續檢視performLaunchActivity(...):
   private Activity performLaunchActivity(ActivityClientRecord r, Intent customIntent) {
			//新建Activity
            activity = mInstrumentation.newActivity(
                    cl, component.getClassName(), r.intent);
            StrictMode.incrementExpectedActivityCount(activity.getClass());
            r.intent.setExtrasClassLoader(cl);
            r.intent.prepareToEnterProcess();
            if (r.state != null) {
                r.state.setClassLoader(cl);
            }
        } catch (Exception e) {
            if (!mInstrumentation.onException(activity, e)) {
                throw new RuntimeException(
                    "Unable to instantiate activity " + component
                    + ": " + e.toString(), e);
            }
        }

        try {
		...
            if (activity != null) {
               ...
                appContext.setOuterContext(activity);
				//呼叫attach初始化Activity相關引數
                activity.attach(appContext, this, getInstrumentation(), r.token,
                        r.ident, app, r.intent, r.activityInfo, title, r.parent,
                        r.embeddedID, r.lastNonConfigurationInstances, config,
                        r.referrer, r.voiceInteractor, window, r.configCallback);

				...
				//呼叫onCreate回撥
                if (r.isPersistable()) {
                    mInstrumentation.callActivityOnCreate(activity, r.state, r.persistentState);
                } else {
                    mInstrumentation.callActivityOnCreate(activity, r.state);
                }
             	...
				//呼叫onStart回撥
                if (!r.activity.mFinished) {
                    activity.performStart();
                    r.stopped = false;
                }
				//呼叫onRestoreInstanceState回撥
                if (!r.activity.mFinished) {
                    if (r.isPersistable()) {
                        if (r.state != null || r.persistentState != null) {
                            mInstrumentation.callActivityOnRestoreInstanceState(activity, r.state,
                                    r.persistentState);
                        }
                    } else if (r.state != null) {
                        mInstrumentation.callActivityOnRestoreInstanceState(activity, r.state);
                    }
                }
				//呼叫onPostCreate回撥
                if (!r.activity.mFinished) {
                    activity.mCalled = false;
                    if (r.isPersistable()) {
                        mInstrumentation.callActivityOnPostCreate(activity, r.state,
                                r.persistentState);
                    } else {
                        mInstrumentation.callActivityOnPostCreate(activity, r.state);
                    }
                    if (!activity.mCalled) {
                        throw new SuperNotCalledException(
                            "Activity " + r.intent.getComponent().toShortString() +
                            " did not call through to super.onPostCreate()");
                    }
                }
            }
          ...
        return activity;
    }
該方法設計到的Window操作不多,就一個activity.attach(...),為了方便,下面把原始碼貼出來一下:
 final void attach(Context context, ActivityThread aThread,
            Instrumentation instr, IBinder token, int ident,
            Application application, Intent intent, ActivityInfo info,
            CharSequence title, Activity parent, String id,
            NonConfigurationInstances lastNonConfigurationInstances,
            Configuration config, String referrer, IVoiceInteractor voiceInteractor,
            Window window, ActivityConfigCallback activityConfigCallback) {
 		...
        mWindow = new PhoneWindow(this, window, activityConfigCallback);
        mWindow.setWindowControllerCallback(this);
        mWindow.setCallback(this);
        mWindow.setOnWindowDismissedCallback(this);
        mWindow.getLayoutInflater().setPrivateFactory(this);
      	...
        mWindow.setWindowManager(
                (WindowManager)context.getSystemService(Context.WINDOW_SERVICE),
                mToken, mComponent.flattenToString(),
                (info.flags & ActivityInfo.FLAG_HARDWARE_ACCELERATED) != 0);
        if (mParent != null) {
            mWindow.setContainer(mParent.getWindow());
        }
        mWindowManager = mWindow.getWindowManager();
        mCurrentConfig = config;

        mWindow.setColorMode(info.colorMode);
    }
attach(...)方法中主要做了兩件事情:
- 初始化Window實現類PhoneWindow
- 設定關聯的WindowManager
mWindow.setWindowManager(....)會去例項化一個WindowManager實現類WindowManagerImpl:
//Window.java
  public void setWindowManager(WindowManager wm, IBinder appToken, String appName,
            boolean hardwareAccelerated) {
     ...
        mWindowManager = ((WindowManagerImpl)wm).createLocalWindowManager(this);
    }

//WindowManagerImpl.java

    public WindowManagerImpl createLocalWindowManager(Window parentWindow) {
        return new WindowManagerImpl(mContext, parentWindow);
    }
PhoneWindow是Window的繼承類,每一個Window行為都由PhoneWindow執行。好的,接著繼續往下看handleResumeActivity(...)方法:
 final void handleResumeActivity(IBinder token,
            boolean clearHide, boolean isForward, boolean reallyResume, int seq, String reason) {
			...
			//回撥onResume方法
      		...
            if (!willBeVisible) {
                try {
                    willBeVisible = ActivityManager.getService().willActivityBeVisible(
                            a.getActivityToken());
                } catch (RemoteException e) {
                    throw e.rethrowFromSystemServer();
                }
            }
            if (r.window == null && !a.mFinished && willBeVisible) {
				//1.
                r.window = r.activity.getWindow();
				//2.
                View decor = r.window.getDecorView();
				//首先設定DecorView不可見狀態
                decor.setVisibility(View.INVISIBLE);
                ViewManager wm = a.getWindowManager();
				//Window在初始化的時候也會初始化一個LayoutParams,該LayoutParams是一個
				//WindowManager.LayoutParams物件
                WindowManager.LayoutParams l = r.window.getAttributes();
                a.mDecor = decor;
                l.type = WindowManager.LayoutParams.TYPE_BASE_APPLICATION;
                l.softInputMode |= forwardBit;
            	...
                if (a.mVisibleFromClient) {
                    if (!a.mWindowAdded) {
                        a.mWindowAdded = true;
						//3
                        wm.addView(decor, l);
                    }
					...
                }
            }
			...
					//4
                    if (r.activity.mVisibleFromClient) {
                        ViewManager wm = a.getWindowManager();
                        View decor = r.window.getDecorView();
                        wm.updateViewLayout(decor, l);
                    }
                }

                r.activity.mVisibleFromServer = true;
                mNumVisibleActivities++;
				//5.
                if (r.activity.mVisibleFromClient) {
                    r.activity.makeVisible();
                }
            }

      ...
    }
上面桉序列依次解釋程式碼的邏輯:
- 獲取Window例項,即獲取PhoneWindow物件。
- 獲取DecorView,DecorView是我們在寫佈局中的頂層根佈局View。
- WindowManager呼叫addView(...)添加布局View。
- 呼叫WindowManager.updateViewLayout(...)方法更新View
- 設定DecorView可見。
其中需要解釋的是DecorView例項,關於Activity中佈局的示意圖如下: 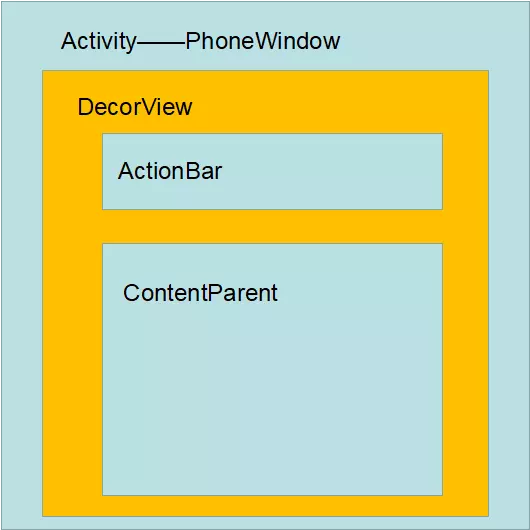
可以看到DecorView位於佈局的最上游,本質上是一個FrameLayout,那麼,DecorView是什麼時候新增進去的呢?答案就是在setContentView(...)呼叫的時候,通過在影象顯示深入學習二:setContentView(...)過程分析一文中瞭解到了DecoView會在setContentView(...)時候初始化,也就是在onCreate(...)方法回撥之後。
接下來就要著重講下WindowManager了,WindowManager本身是一個介面類,繼承了ViewManager介面,關於ViewManager的定義如下:
public interface ViewManager
{	//向視窗新增VIew
    public void addView(View view, ViewGroup.LayoutParams params);
	//更新視窗中的View
    public void updateViewLayout(View view, ViewGroup.LayoutParams params);
	//移除View
    public void removeView(View view);
}
在WindowManager內部中有一個內部靜態類LayoutParam,該類實現了Parcelable介面,也就是說提供了序列化的能力,這裡先猜測跟Binder通訊有關,下面再進行考證。
WindowManager的實現類為WindowManagerImpl,WindowManagerImpl內部持有了一個WindowManagerGlobal例項,在上面分析中我們知道WindowManagerGlobal持有了遠端WindowManagerService的Binder物件,那麼進行Binder通訊肯定就通過WindowManagerGlobal進行了,下面看下WindowManagerImpl的主要實現:
 public final class WindowManagerImpl implements WindowManager {
  ...
    @Override
    public void addView(@NonNull View view, @NonNull ViewGroup.LayoutParams params) {
        applyDefaultToken(params);
        mGlobal.addView(view, params, mContext.getDisplay(), mParentWindow);
    }

    @Override
    public void updateViewLayout(@NonNull View view, @NonNull ViewGroup.LayoutParams params) {
        applyDefaultToken(params);
        mGlobal.updateViewLayout(view, params);
    }

    @Override
    public void removeView(View view) {
        mGlobal.removeView(view, false);
    }
...
這裡的mGlobal就是WindowManagerGlobal物件,可以看到其實WindowManagerImpl也就只是一個代理類,呼叫ViewManager的方法,實際是呼叫到了WindowManagerGlobal(WMG)中。接下來就要著重挑一個addView(...)的研究,在研究之前,先整理一下上面的邏輯:
- 在
ApplicationThread.scheduleLaunchActivity(...)被AMS遠端回撥後,在會去初始化WindowManagerGlobal與WMS進行溝通的Binder物件。 - 接下來建立Activity,在呼叫
Activity.attach(...)時候會在內部建立一個PhoneWindow作為Window的實現類。然後回撥Activity的onCreate(...),onStart(...)等方法,在onCreate(...)時候會通過setContentView(...)建立DecorView。 - 接下來回調Activity的
onResume(...)方法,然後呼叫WindowManager的addView(...)以及updateViewLayout(...)方法。
在WMG中有三個變數需要注意一下:
//記錄所有Windowsd對應的View
    private final ArrayList<View> mViews = new ArrayList<View>();
	//記錄mViews中對應的ViewRootImpl
    private final ArrayList<ViewRootImpl> mRoots = new ArrayList<ViewRootImpl>();
	//記錄所有Window對應的Param
    private final ArrayList<WindowManager.LayoutParams> mParams =
            new ArrayList<WindowManager.LayoutParams>();
	//記錄正在被刪除的Views
    private final ArraySet<View> mDyingViews = new ArraySet<View>();
好的接下來看下WMG的addView(...)方法:
public void addView(View view, ViewGroup.LayoutParams params,
            Display display, Window parentWindow) {
			//判空
		...
        final WindowManager.LayoutParams wparams = (WindowManager.LayoutParams) params;
      ...
        ViewRootImpl root;
        View panelParentView = null;

        ...
		//新建ViewRootImpl類
            root = new ViewRootImpl(view.getContext(), display);

            view.setLayoutParams(wparams);
			//1
            mViews.add(view);
            mRoots.add(root);
            mParams.add(wparams);

            // do this last because it fires off messages to start doing things
            try {
				//2
                root.setView(view, wparams, panelParentView);
            } catch (RuntimeException e) {
                // BadTokenException or InvalidDisplayException, clean up.
                if (index >= 0) {
                    removeViewLocked(index, true);
                }
                throw e;
            }
        }
    }
上面程式碼首先在三個變數做新增對應DecorView變數的資訊,然後呼叫第2步程式碼(root是一個ViewRootImpl物件,該類掌管著View的測量,佈局以及繪圖的主要邏輯):
...
  mWindowSession = WindowManagerGlobal.getWindowSession();
...
  public void setView(View view, WindowManager.LayoutParams attrs, View panelParentView) {
        synchronized (this) {
            if (mView == null) {
                mView = view;
				...//1
				requestLayout();
               ...
				//2
                 res = mWindowSession.addToDisplay(mWindow, mSeq, mWindowAttributes,
                            getHostVisibility(), mDisplay.getDisplayId(),
                            mAttachInfo.mContentInsets, mAttachInfo.mStableInsets,
                            mAttachInfo.mOutsets, mInputChannel);
                } catch (RemoteException e) {
                    mAdded = false;
                    mView = null;
                    mAttachInfo.mRootView = null;
                    mInputChannel = null;
                    mFallbackEventHandler.setView(null);
                    unscheduleTraversals();
                    setAccessibilityFocus(null, null);
                    throw new RuntimeException("Adding window failed", e);
                } finally {
                  ...
    }
上面省略了大部分的程式碼,步驟1首先看呼叫了requestLayout()方法,我們在日常中使用的requestLayout()方法其實到最後就是呼叫ViewRootImpl的requestLayout()方法:
 @Override
    public void requestLayout() {
        if (!mHandlingLayoutInLayoutRequest) {
            checkThread();
            mLayoutRequested = true;
            scheduleTraversals();
        }
    }
 void scheduleTraversals() {
        if (!mTraversalScheduled) {
            mTraversalScheduled = true;
            mTraversalBarrier = mHandler.getLooper().getQueue().postSyncBarrier();
            mChoreographer.postCallback(
                    Choreographer.CALLBACK_TRAVERSAL, mTraversalRunnable, null);
            if (!mUnbufferedInputDispatch) {
                scheduleConsumeBatchedInput();
            }
            notifyRendererOfFramePending();
            pokeDrawLockIfNeeded();
        }
    }
這裡涉及到Choreographer(編舞者)類,簡單來就是使用Handler進行post(...)操作,由於Handler以及訊息佇列機制的原因,該post(...)需要在我們執行完ActivityThread.handleLaunchActivity(....)才能執行,也就是說視窗新增完畢了,post(...)才會呼叫,所以等我們下面分析完再回過頭了分析這個。
步驟2主要工作就是在於跟WMS進行通訊,通過呼叫mWindowSession.addToDisplay(...)方法,mWindowSession是一個IWindowSession,一般出現I字開頭的在系統層程式碼中都代表著有Binder支援的程序通訊能力,我們看下該類怎麼獲得到的:
//WindowManagerGlobal.java
    public static IWindowSession getWindowSession() {
        synchronized (WindowManagerGlobal.class) {
            if (sWindowSession == null) {
                try {
                    InputMethodManager imm = InputMethodManager.getInstance();
                    IWindowManager windowManager = getWindowManagerService();
                    sWindowSession = windowManager.openSession(
                            new IWindowSessionCallback.Stub() {
                                @Override
                                public void onAnimatorScaleChanged(float scale) {
                                    ValueAnimator.setDurationScale(scale);
                                }
                            },
                            imm.getClient(), imm.getInputContext());
                } catch (RemoteException e) {
                    throw e.rethrowFromSystemServer();
                }
            }
            return sWindowSession;
        }
    }
通過WMS物件開啟一個Session,每個Session是一個Window的Native的代理類,WMS通過掌管不同的Session與應用層的Window進行通訊:
//WindowManagerService.java
    @Override
    public IWindowSession openSession(IWindowSessionCallback callback, IInputMethodClient client,
            IInputContext inputContext) {
        if (client == null) throw new IllegalArgumentException("null client");
        if (inputContext == null) throw new IllegalArgumentException("null inputContext");
        Session session = new Session(this, callback, client, inputContext);
        return session;
    }
接下來繼續看mWindowSession.addToDisplay(...)方法在Native層的呼叫的:
//Session.java

@Override
    public int addToDisplay(IWindow window, int seq, WindowManager.LayoutParams attrs,
            int viewVisibility, int displayId, Rect outContentInsets, Rect outStableInsets,
            Rect outOutsets, InputChannel outInputChannel) {
        return mService.addWindow(this, window, seq, attrs, viewVisibility, displayId,
                outContentInsets, outStableInsets, outOutsets, outInputChannel);
    }
Seesion中重新調回WMS在addWindow(...)方法:
   public int addWindow(Session session, IWindow client, int seq,
            WindowManager.LayoutParams attrs, int viewVisibility, int displayId,
            Rect outContentInsets, Rect outStableInsets, Rect outOutsets,
            InputChannel outInputChannel) {
        int[] appOp = new int[1];
		//檢察許可權
        int res = mPolicy.checkAddPermission(attrs, appOp);
        if (res != WindowManagerGlobal.ADD_OKAY) {
            return res;
        }
		 ...
		 final DisplayContent displayContent = mRoot.getDisplayContentOrCreate(displayId);
			...
			//判斷Window合法性
			 ...
        ...
            res = WindowManagerGlobal.ADD_OKAY;
         ...
        return res;
    }
改程式碼中建立一個DisplayContent以及WindowState(真正表示一個Native Window與應用層對應),這些主要跟Surface有關,這裡就先不分析了,到時候寫一篇關於Surface的文章再做記錄。最終返回WindowManagerGlobal.ADD_OKAY。
ok到此Window在Native的新增已經完畢,那我們接著返回檢視ViewRootImpl.setView(...)方法中的requestLayout(...)方法。上面講到該方法最終呼叫到mTraversalRunnable例項中,那麼看下該Runnable物件幹了什麼東東:
final class TraversalRunnable implements Runnable {
        @Override
        public void run() {
            doTraversal();
        }
    }
這裡呼叫doTraversal()方法,該方法最終又呼叫performTraversals()方法,該方法就是最終管理View的測量,佈局,繪圖的最頂層方法:
private void performTraversals() {
        // cache mView since it is used so much below...
        final View host = mView;
		...
		//賦值系統Window的寬高
        int desiredWindowWidth;
        int desiredWindowHeight;
				...
                relayoutResult = relayoutWindow(params, viewVisibility, insetsPending);
				...
					//測量
            performMeasure(childWidthMeasureSpec, childHeightMeasureSpec);
...
			//佈局
            performLayout(lp, mWidth, mHeight);
...
			//繪圖
            performDraw();
       ...
    }
首先這裡有relayoutWindow(params, viewVisibility, insetsPending)操作,該方法內部會建立一個Surface物件與ViewRootImpl關聯起來,這裡做個筆記,下次對Surface分析的時候有用。下面方法主要就是測量,佈局,繪圖過程了,這裡不對測量,佈局,繪圖過程進行細究了,他們最終依次回撥onMeasure(...),onLayout(...),onDraw(...)方法。