
SpringBoot 啟動過程
SpringBoot 啟動過程
@SpringBootApplication
SpringApplication.run(SpringbootlearnApplication.class, args);
主啟動類, 一個SpringBootApplication 一個SpringApplication
發現SpringBootApplication可以拆分為三個annotation
@Configuration
@EnableAutoConfiguration
@ComponentScan
分別解釋:
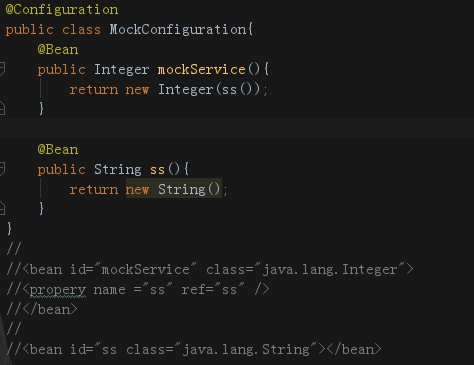
1、@Configuration
相當於JavaConfig格式的xml註解 ,可以看下列例子
一個javaBean一個xml形式
2、@ComponentScan
@ComponentScan這個註解在Spring中很重要,它對應XML配置中的元素,@ComponentScan的功能其實就是自動掃描並載入符合條件的元件(比如@Component和@Repository等)或者bean定義,最終將這些bean定義載入到IoC容器中。
我們可以通過basePackages等屬性來細粒度的定製@ComponentScan自動掃描的範圍,如果不指定,則預設
注:所以SpringBoot的啟動類最好是放在root package下,因為預設不指定basePackages。
3、@EnableAutoConfiguration
算是最重要的一個ANNOTATION了
@EnableAutoConfiguration的理念和做事方式其實一脈相承,簡單概括一下就是,藉助@Import的支援,收集和註冊特定場景相關的bean定義。
開啟 @EnableAutoCOnfiguration ,
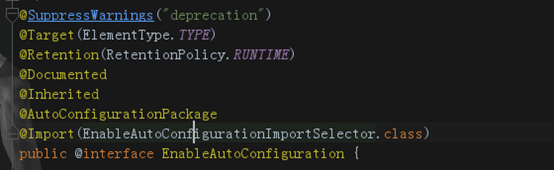
最終要的是 Import
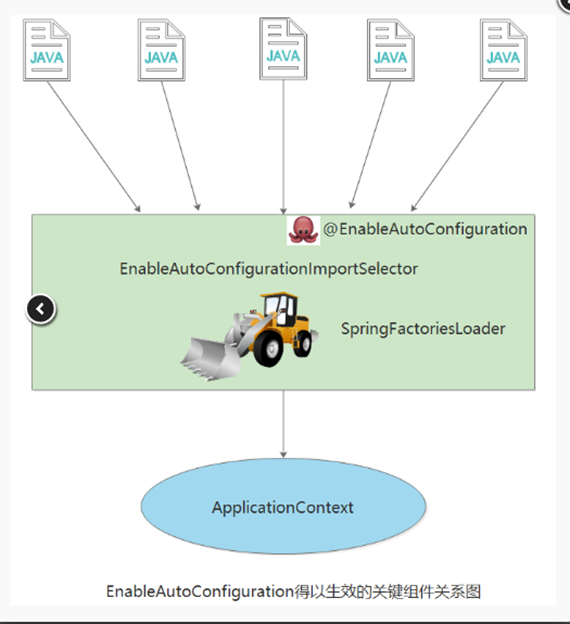
@Import(EnableAutoConfigurationImportSelector.class),藉助EnableAutoConfigurationImportSelector,@EnableAutoConfiguration可以幫助SpringBoot應用將所有符合條件的@Configuration配置都載入到當前SpringBoot建立並使用的IoC容器。就像一隻"八爪魚"一樣
1) 如果我們使用的是SpringApplication的靜態run方法,那麼,這個方法裡面首先要建立一個SpringApplication物件例項,然後呼叫這個建立好的SpringApplication的例項方法。在SpringApplication例項初始化的時候,它會提前做幾件事情:
- 根據classpath裡面是否存在某個特徵類(org.springframework.web.context.ConfigurableWebApplicationContext)來決定是否應該建立一個為Web應用使用的ApplicationContext型別。
- 使用SpringFactoriesLoader在應用的classpath中查詢並載入所有可用的ApplicationContextInitializer。
- 使用SpringFactoriesLoader在應用的classpath中查詢並載入所有可用的ApplicationListener。
- 推斷並設定main方法的定義類。
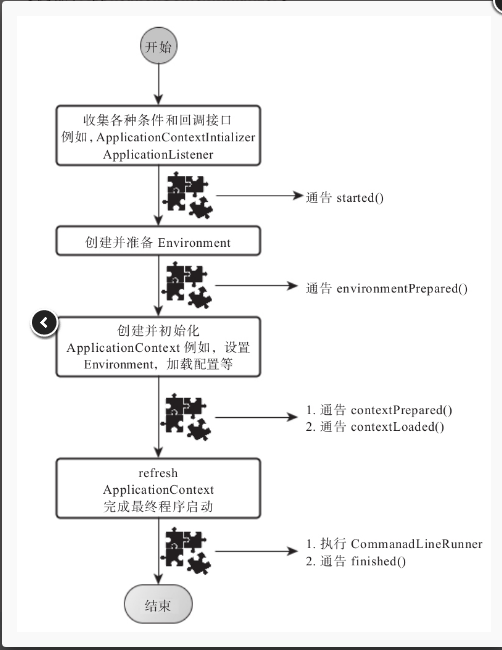
2) SpringApplication例項初始化完成並且完成設定後,就開始執行run方法的邏輯了,方法執行伊始,首先遍歷執行所有通過SpringFactoriesLoader可以查詢到並載入的SpringApplicationRunListener。呼叫它們的started()方法,告訴這些SpringApplicationRunListener,"嘿,SpringBoot應用要開始執行咯!"。
3) 建立並配置當前Spring Boot應用將要使用的Environment(包括配置要使用的PropertySource以及Profile)。
4) 遍歷呼叫所有SpringApplicationRunListener的environmentPrepared()的方法,告訴他們:"當前SpringBoot應用使用的Environment準備好了咯!"。
5) 如果SpringApplication的showBanner屬性被設定為true,則列印banner。
6) 根據使用者是否明確設定了applicationContextClass型別以及初始化階段的推斷結果,決定該為當前SpringBoot應用建立什麼型別的ApplicationContext並建立完成,然後根據條件決定是否新增ShutdownHook,決定是否使用自定義的BeanNameGenerator,決定是否使用自定義的ResourceLoader,當然,最重要的,將之前準備好的Environment設定給建立好的ApplicationContext使用。
7) ApplicationContext建立好之後,SpringApplication會再次藉助Spring-FactoriesLoader,查詢並載入classpath中所有可用的ApplicationContext-Initializer,然後遍歷呼叫這些ApplicationContextInitializer的initialize(applicationContext)方法來對已經建立好的ApplicationContext進行進一步的處理。
8) 遍歷呼叫所有SpringApplicationRunListener的contextPrepared()方法。
9) 最核心的一步,將之前通過@EnableAutoConfiguration獲取的所有配置以及其他形式的IoC容器配置載入到已經準備完畢的ApplicationContext。
10) 遍歷呼叫所有SpringApplicationRunListener的contextLoaded()方法。
11) 呼叫ApplicationContext的refresh()方法,完成IoC容器可用的最後一道工序。
12) 查詢當前ApplicationContext中是否註冊有CommandLineRunner,如果有,則遍歷執行它們。
13) 正常情況下,遍歷執行SpringApplicationRunListener的finished()方法、(如果整個過程出現異常,則依然呼叫所有SpringApplicationRunListener的finished()方法,只不過這種情況下會將異常資訊一併傳入處理)
Thymeleaf模板引擎
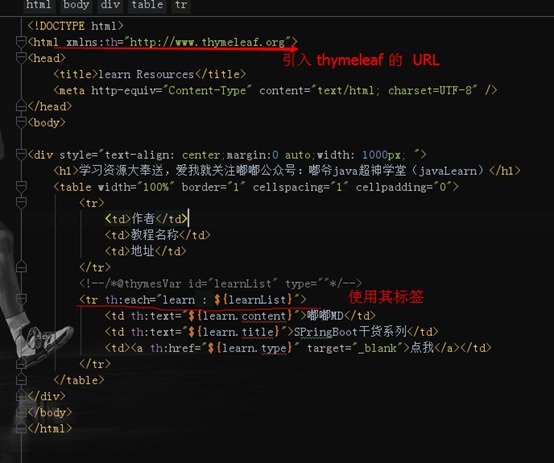
Thymeleaf是一款用於渲染XML/XHTML/HTML5內容的模板引擎。類似JSP,Velocity,FreeMaker等,它也可以輕易的與Spring MVC等Web框架進行整合作為Web應用的模板引擎。與其它模板引擎相比,Thymeleaf最大的特點是能夠直接在瀏覽器中開啟並正確顯示模板頁面,而不需要啟動整個Web應用。它的功能特性如下:
- Spring MVC中@Controller中的方法可以直接返回模板名稱,接下來Thymeleaf模板引擎會自動進行渲染
- 模板中的表示式支援Spring表示式語言(Spring EL)
- 表單支援,併兼容Spring MVC的資料繫結與驗證機制
- 國際化支援
Spring官方也推薦使用Thymeleaf,所以本篇程式碼整合就使用Thymeleaf來整合。
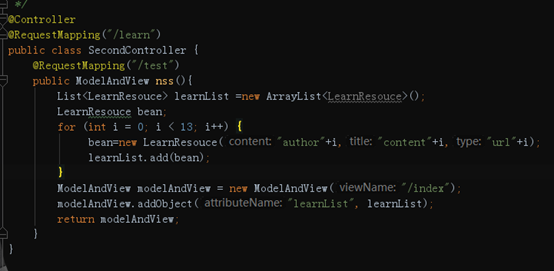
瀏覽器輸入http://localhost:8989/learn/test
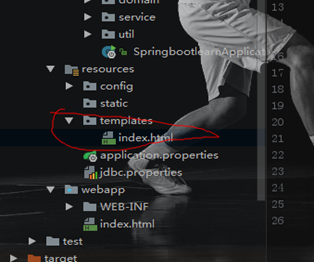
- templates 裡面的 controller可以自動跳轉
- webapp裡也可以
對於JSP渲染
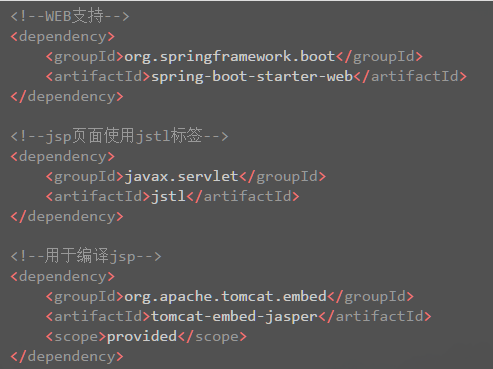
依賴的jar包