(四)Hive的連線3種連線方式
(四)Hive的連線3種連線方式
目錄
正文
一、CLI連線
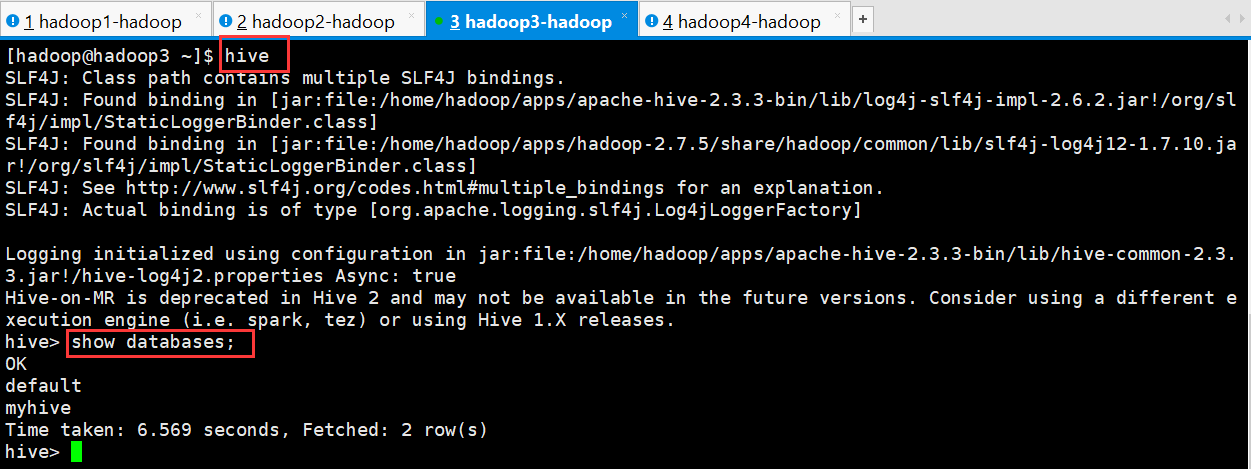
進入到 bin 目錄下,直接輸入命令:
[[email protected] ~]$ hive
SLF4J: Class path contains multiple SLF4J bindings.
SLF4J: Found binding in [jar:file:/home/hadoop/apps/apache-hive-2.3.3-bin/lib/log4j-slf4j-impl-2.6.2.jar!/org/slf4j/impl/StaticLoggerBinder.class]
SLF4J: Found binding in [jar:file:/home/hadoop/apps/hadoop-2.7.5/share/hadoop/common/lib/slf4j-log4j12-1.7.10.jar!/org/slf4j/impl/StaticLoggerBinder.class]
SLF4J: See http://www.slf4j.org/codes.html#multiple_bindings for an explanation.
SLF4J: Actual binding is of type [org.apache.logging.slf4j.Log4jLoggerFactory]

Logging initialized using configuration in jar:file:/home/hadoop/apps/apache-hive-2.3.3-bin/lib/hive-common-2.3.3.jar!/hive-log4j2.properties Async: true
Hive-on-MR is deprecated in Hive 2 and may not be available in the future versions. Consider using a different execution engine (i.e. spark, tez) or using Hive 1.X releases.
hive> show databases;
OK
default
myhive
Time taken: 6.569 seconds, Fetched: 2 row(s)
hive>

啟動成功的話如上圖所示,接下來便可以做 hive 相關操作
補充:
1、上面的 hive 命令相當於在啟動的時候執行:hive --service cli
2、使用 hive --help,可以檢視 hive 命令可以啟動那些服務
3、通過 hive --service serviceName --help 可以檢視某個具體命令的使用方式
二、HiveServer2/beeline
在現在使用的最新的 hive-2.3.3 版本中:都需要對 hadoop 叢集做如下改變,否則無法使用
1、修改 hadoop 叢集的 hdfs-site.xml 配置檔案
加入一條配置資訊,表示啟用 webhdfs
<property>
 <name>dfs.webhdfs.enabled</name>
 <value>true</value>
</property>
2、修改 hadoop 叢集的 core-site.xml 配置檔案
加入兩條配置資訊:表示設定 hadoop 的代理使用者
<property>
 <name>hadoop.proxyuser.hadoop.hosts</name>
 <value>*</value>
</property>
<property>
 <name>hadoop.proxyuser.hadoop.groups</name>
 <value>*</value>
</property>
配置解析:
hadoop.proxyuser.hadoop.hosts 配置成*的意義,表示任意節點使用 hadoop 叢集的代理使用者 hadoop 都能訪問 hdfs 叢集,hadoop.proxyuser.hadoop.groups 表示代理使用者的組所屬
以上操作做好了之後(最好重啟一下HDFS叢集),請繼續做如下兩步:
第一步:先啟動 hiveserver2 服務
啟動方式,(假如是在 hadoop3 上):
啟動為前臺:hiveserver2
[[email protected] ~]$ hiveserver2
2018-04-04 10:21:49: Starting HiveServer2
SLF4J: Class path contains multiple SLF4J bindings.
SLF4J: Found binding in [jar:file:/home/hadoop/apps/apache-hive-2.3.3-bin/lib/log4j-slf4j-impl-2.6.2.jar!/org/slf4j/impl/StaticLoggerBinder.class]
SLF4J: Found binding in [jar:file:/home/hadoop/apps/hadoop-2.7.5/share/hadoop/common/lib/slf4j-log4j12-1.7.10.jar!/org/slf4j/impl/StaticLoggerBinder.class]
SLF4J: See http://www.slf4j.org/codes.html#multiple_bindings for an explanation.
SLF4J: Actual binding is of type [org.apache.logging.slf4j.Log4jLoggerFactory]
啟動會多一個程序

啟動為後臺:
nohup hiveserver2 1>/home/hadoop/hiveserver.log 2>/home/hadoop/hiveserver.err &
或者:nohup hiveserver2 1>/dev/null 2>/dev/null &
或者:nohup hiveserver2 >/dev/null 2>&1 &
以上 3 個命令是等價的,第一個表示記錄日誌,第二個和第三個表示不記錄日誌
命令中的 1 和 2 的意義分別是:
1:表示標準日誌輸出
2:表示錯誤日誌輸出 如果我沒有配置日誌的輸出路徑,日誌會生成在當前工作目錄,預設的日誌名稱叫做: nohup.xxx
[[email protected] ~]$ nohup hiveserver2 1>/home/hadoop/log/hivelog/hiveserver.log 2>/home/hadoop/log/hivelog/hiveserver.err &
[1] 4352
[[email protected] ~]$ 
PS:nohup 命令:如果你正在執行一個程序,而且你覺得在退出帳戶時該程序還不會結束, 那麼可以使用 nohup 命令。該命令可以在你退出帳戶/關閉終端之後繼續執行相應的程序。 nohup 就是不掛起的意思(no hang up)。 該命令的一般形式為:nohup command &
第二步:然後啟動 beeline 客戶端去連線:
執行命令:
[[email protected] ~]$ beeline -u jdbc:hive2//hadoop3:10000 -n hadoop
SLF4J: Class path contains multiple SLF4J bindings.
SLF4J: Found binding in [jar:file:/home/hadoop/apps/apache-hive-2.3.3-bin/lib/log4j-slf4j-impl-2.6.2.jar!/org/slf4j/impl/StaticLoggerBinder.class]
SLF4J: Found binding in [jar:file:/home/hadoop/apps/hadoop-2.7.5/share/hadoop/common/lib/slf4j-log4j12-1.7.10.jar!/org/slf4j/impl/StaticLoggerBinder.class]
SLF4J: See http://www.slf4j.org/codes.html#multiple_bindings for an explanation.
SLF4J: Actual binding is of type [org.apache.logging.slf4j.Log4jLoggerFactory]
scan complete in 1ms
scan complete in 2374ms
No known driver to handle "jdbc:hive2//hadoop3:10000"
Beeline version 2.3.3 by Apache Hive
beeline> 
-u : 指定元資料庫的連結資訊
-n : 指定使用者名稱和密碼
另外還有一種方式也可以去連線:
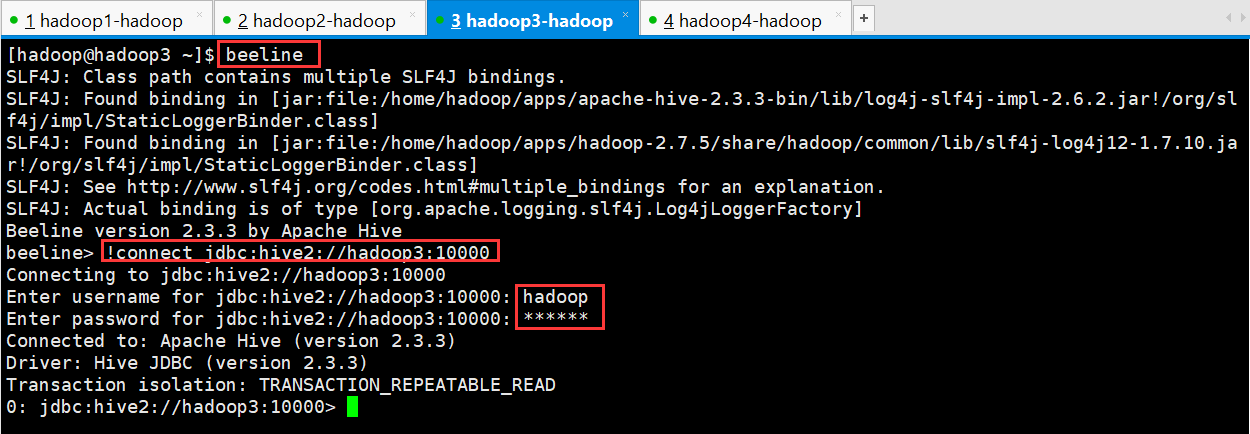
先執行 beeline
然後按圖所示輸入:!connect jdbc:hive2://hadoop02:10000
按回車,然後輸入使用者名稱,這個 使用者名稱就是安裝 hadoop 叢集的使用者名稱
[[email protected] ~]$ beeline
SLF4J: Class path contains multiple SLF4J bindings.
SLF4J: Found binding in [jar:file:/home/hadoop/apps/apache-hive-2.3.3-bin/lib/log4j-slf4j-impl-2.6.2.jar!/org/slf4j/impl/StaticLoggerBinder.class]
SLF4J: Found binding in [jar:file:/home/hadoop/apps/hadoop-2.7.5/share/hadoop/common/lib/slf4j-log4j12-1.7.10.jar!/org/slf4j/impl/StaticLoggerBinder.class]
SLF4J: See http://www.slf4j.org/codes.html#multiple_bindings for an explanation.
SLF4J: Actual binding is of type [org.apache.logging.slf4j.Log4jLoggerFactory]
Beeline version 2.3.3 by Apache Hive
beeline> !connect jdbc:hive2://hadoop3:10000
Connecting to jdbc:hive2://hadoop3:10000
Enter username for jdbc:hive2://hadoop3:10000: hadoop
Enter password for jdbc:hive2://hadoop3:10000: ******
Connected to: Apache Hive (version 2.3.3)
Driver: Hive JDBC (version 2.3.3)
Transaction isolation: TRANSACTION_REPEATABLE_READ
0: jdbc:hive2://hadoop3:10000> 
接下來便可以做 hive 操作
三、Web UI
1、 下載對應版本的 src 包:apache-hive-2.3.2-src.tar.gz
2、 上傳,解壓
tar -zxvf apache-hive-2.3.2-src.tar.gz
3、 然後進入目錄${HIVE_SRC_HOME}/hwi/web,執行打包命令:
jar -cvf hive-hwi-2.3.2.war *
在當前目錄會生成一個 hive-hwi-2.3.2.war
4、 得到 hive-hwi-2.3.2.war 檔案,複製到 hive 下的 lib 目錄中
cp hive-hwi-2.3.2.war ${HIVE_HOME}/lib/
5、 修改配置檔案 hive-site.xml
<property>
 <name>hive.hwi.listen.host</name>
 <value>0.0.0.0</value>
 <description>監聽的地址</description>
</property>
<property>
 <name>hive.hwi.listen.port</name>
 <value>9999</value>
 <description>監聽的埠號</description>
</property>
<property>
 <name>hive.hwi.war.file</name>
 <value>lib/hive-hwi-2.3.2.war</value>
 <description>war 包所在的地址</description>
</property>
6、 複製所需 jar 包
1、cp ${JAVA_HOME}/lib/tools.jar ${HIVE_HOME}/lib
2、再尋找三個 jar 包,都放入${HIVE_HOME}/lib 目錄:
commons-el-1.0.jar
jasper-compiler-5.5.23.jar
jasper-runtime-5.5.23.jar
不然啟動 hwi 服務的時候會報錯。
7、 安裝 ant
1、 上傳 ant 包:apache-ant-1.9.4-bin.tar.gz
2、 解壓 tar -zxvf apache-ant-1.9.4-bin.tar.gz -C ~/apps/
3、 配置環境變數 vi /etc/profile 在最後增加兩行: export ANT_HOME=/home/hadoop/apps/apache-ant-1.9.4 export PATH=$PATH:$ANT_HOME/bin 配置完環境變數別忘記執行:source /etc/profile
4、 驗證是否安裝成功
8、上面的步驟都配置完,基本就大功告成了。進入${HIVE_HOME}/bin 目錄:
${HIVE_HOME}/bin/hive --service hwi
或者讓在後臺執行: nohup bin/hive --service hwi > /dev/null 2> /dev/null &
9、 前面配置了埠號為 9999,所以這裡直接在瀏覽器中輸入: hadoop02:9999/hwi
10、至此大功告成


