
Android自定義view--簡單轉盤
阿新 • • 發佈:2018-12-05
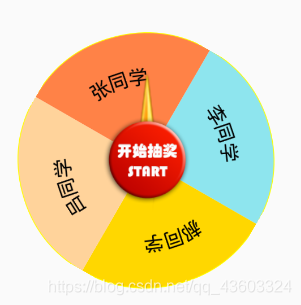
大概效果如下:
在activity_main.xml中引入該自定義佈局:
<?xml version="1.0" encoding="utf-8"?>
<RelativeLayout xmlns:android="http://schemas.android.com/apk/res/android"
    xmlns:app="http://schemas.android.com/apk/res-auto"
    xmlns:tools="http://schemas.android.com/tools"
    android:layout_width="match_parent"
    android:layout_height="match_parent"
    tools:context=".MainActivity">

    <com.example.day1.weight.MyLuckView
        android:layout_width="match_parent"
        android:layout_height="match_parent"
        android:layout_centerInParent="true" />

    <ImageView
        android:layout_width="wrap_content"
        android:layout_height="wrap_content"
        android:layout_centerInParent="true"
        android:src="@drawable/a" />
</RelativeLayout>
建立MyLuckView類,繼承View,實現OnClickListener介面:
import android.annotation.SuppressLint;
import android.content.Context;
import android.graphics.Canvas;
import android.graphics.Color;
import android.graphics.Paint;
import android.graphics.Path;
import android.graphics.RectF;
import android.support.annotation.NonNull;
import android.util.AttributeSet;
import android.util.Log;
import android.view.View;
import android.view.animation.RotateAnimation;

import java.util.Random;

public class MyLuckView extends View implements View.OnClickListener {
    private String[] contents = new String[]{"李  同  學", "郝  同  學", "呂  同  學", "張  同  學"};
    public int[] colors = new int[]{Color.parseColor("#8EE5EE"), Color.parseColor("#FFD700"), Color.parseColor("#FFD39B"), Color.parseColor("#FF8247")};
    private Context mContext;
    private Paint mPaint;
    private int mWidth;
    private String mStr = "start";
    private int startdj;

    public MyLuckView(Context context, AttributeSet attrs) {
        super(context, attrs);
        mContext = context;
        mPaint = new Paint();
        setOnClickListener(this);
    }

    //到從到外層寫到裡層 不然會發生覆蓋效果
    @SuppressLint("DrawAllocation")
    @Override
    protected void onDraw(Canvas canvas) {
        super.onDraw(canvas);
        //外面大圓  畫型 可不寫
        getBigCircle(canvas);

        //因為要畫扇形 裡面有個RectF
        //因為那個園其實是佔全屏的,所以我這個RectF的空間也是全屏
        RectF rectF = getPaintArc(canvas);
        //轉盤中的字型
        getPaintText(canvas, rectF);

        getCenter(canvas);
    }

    private void getCenter(Canvas canvas) {
        mPaint.setColor(Color.GREEN);
        canvas.drawCircle(mWidth / 2, mWidth / 2, 40, mPaint);
        //這是中心的圓中的文字  如果是插圖的話 文字可不寫
//        mPaint.setColor(Color.BLACK);
//        mPaint.setTextSize(24);
//        //咱們在最中心的位置畫一個start (150,150) 我們要得到我們寫的字的高和寬
//        Rect rect = new Rect();
//        mPaint.getTextBounds(mStr, 0, mStr.length(), rect);
//        int width = rect.width();
//        int height = rect.height();
//        canvas.drawText(mStr, mWidth / 2 - width / 2, mWidth / 2 + height / 2, mPaint);
    }

    private void getPaintText(Canvas canvas, RectF rectF) {
        mPaint.setColor(Color.BLACK);
        mPaint.setTextSize(35);
        for (int i = 0; i < contents.length; i++) {
            Path path = new Path();
            path.addArc(rectF, i * 90, 90);
            canvas.drawTextOnPath(contents[i], path, 70, 70, mPaint);
        }
    }

    @NonNull
    private RectF getPaintArc(Canvas canvas) {
        RectF rectF = new RectF(0, 0, mWidth, mWidth);
        //實心圓
        mPaint.setStyle(Paint.Style.FILL);
        for (int i = 0; i < colors.length; i++) {
            mPaint.setColor(colors[i]);
            canvas.drawArc(rectF, i * 90, 90, true, mPaint);
        }
        return rectF;
    }

    private void getBigCircle(Canvas canvas) {
        mPaint.setColor(Color.YELLOW);
        //空心圓
        mPaint.setStyle(Paint.Style.STROKE);
        //設定邊緣鋸齒
        mPaint.setAntiAlias(true);
        mPaint.setStrokeWidth(3);
        Log.e("width", mWidth + "");
        canvas.drawCircle(mWidth / 2, mWidth / 2, mWidth / 2, mPaint);
    }

    @Override
    protected void onMeasure(int widthMeasureSpec, int heightMeasureSpec) {
        setMeasuredDimension(400, 400);
        mWidth = getMeasuredWidth();
    }
  @Override
    public void onClick(View v) {
        int nextInt = new Random().nextInt(1000);
       int last= new Random().nextInt(500)+300;
        RotateAnimation rotateAnimation = new RotateAnimation(startdj, nextInt+last, mWidth / 2, mWidth / 2);
        rotateAnimation.setDuration(3000);
        //保留最後執行完的位置
        rotateAnimation.setFillAfter(true);
        startAnimation(rotateAnimation);
        //動畫結束後儲存結束的位置,在下次的時候不回來原來的位置
        startdj = ( nextInt+last )% 360;
   }
}
效果中有點小瑕疵
以上程式碼完成 學藝淺薄 如造成困擾很抱歉