
Spring Session簡介
Spring-Session介紹
- Spring-Session使用的場景?
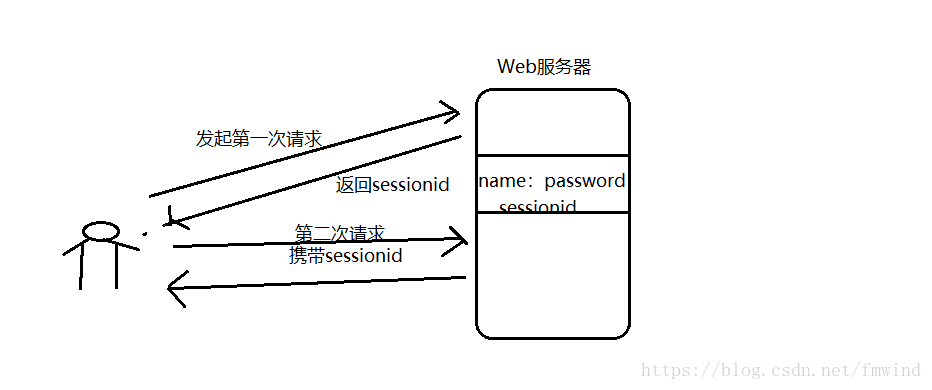
HttpSession是通過Servlet容器進行建立和管理的,在單機環境中。通過Http請求建立的Session資訊是儲存在Web伺服器記憶體中,如Tomcat/Jetty。
假如當用戶通過瀏覽器訪問應用伺服器,session資訊中儲存了使用者的登入資訊,並且session資訊沒有過期失,效那麼使用者就一直處於登入狀態,可以做一些登入狀態的業務操作!
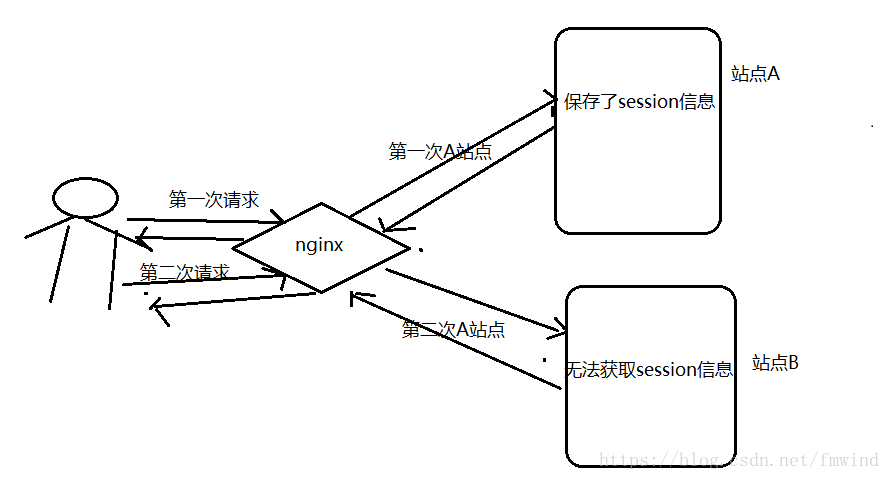
但是現在很多的伺服器都採用分散式叢集的方式進行部署,一個Web應用,可能部署在幾臺不同的伺服器上,通過LVS或者Nginx等進行負載均衡(一般使用Nginx+Tomcat實現負載均衡)。此時來自同一使用者的Http請求將有可能
假如使用者在發起第一次請求時候訪問了A站點,並在A站點的session中儲存了登入資訊,當用戶第二次發起請求,通過負載均衡請求分配到B站點了,那麼此時B站點能否獲取使用者儲存的登入的資訊呢?答案是不能的,因為上面說明,Session是儲存在對應Web伺服器的記憶體的,不能進行共享,此時Spring-session就出現了,來幫我們解決這個session共享的問題!
- 如何進行Session共享呢?
簡單點說就是請求http請求經過Filter職責鏈,根據配置資訊過濾器將建立session的權利由tomcat交給了Spring-session中的SessionRepository,通過Spring-session建立會話,並儲存到對應的地方。
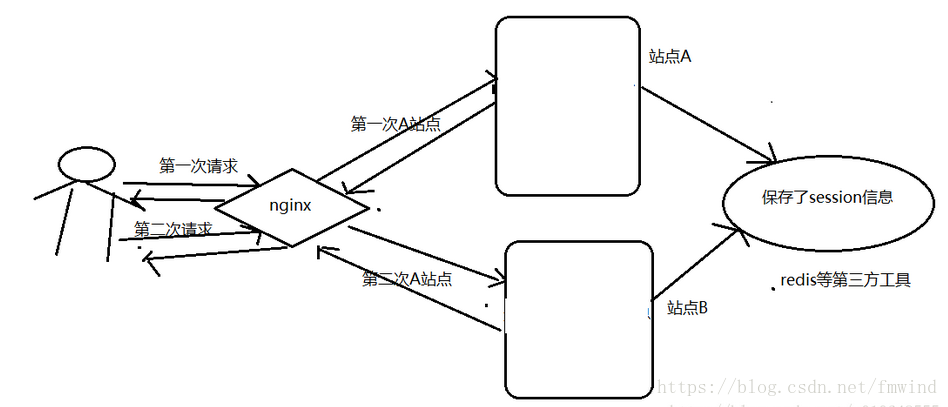
實際上實現Session共享的方案很多,其中一種常用的就是使用Tomcat、Jetty等伺服器提供的Session共享功能,將Session的內容統一儲存在一個數據庫(如MySQL)或快取(如Redis,Mongo)中,
而上面說的使用Nginx也可以,使用ip_hash策略。
在使用Nginx的ip_hash策略時候,每個請求按訪問ip的hash結果分配,這樣每個訪客固定訪問一個後端伺服器,也可以解決session的問題。
Spring官方介紹
Why Spring Session & HttpSession?
Spring會話提供了與HttpSession的透明整合,允許以應用程式容器(即Tomcat)中性的方式替換HttpSession,但是我們從中得到了什麼好處呢?
- 叢集會話——Spring會話使支援叢集會話變得微不足道,而不需要繫結到應用程式容器的特定解決方案。
- 多個瀏覽器會話——Spring會話支援在單個瀏覽器例項中管理多個使用者會話(也就是多個經過驗證的帳戶,類似於谷歌)。
-
RESTful api——Spring會話允許在header中提供會話id以使用RESTful api。
-
Spring Session & WebSockets的完美整合。
專案搭建
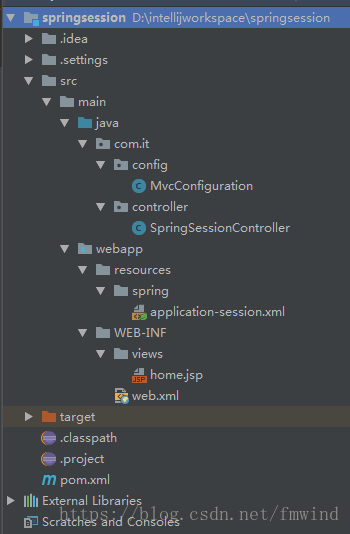
整個專案的整體骨架:
基於XML配置方式的Spring Session
本次只講解xml配置方式,javaConfig配置可以參考官方文件:Spring Java Configuration
環境說明
本次專案需要使用者Nginx和Redis,如果沒有配置Nginx的請看這裡: linux上Nginx的安裝教程詳解
沒有配置Redis的請看這裡:linux環境安裝Redis
配置好了上面的環境,後下面開始正式的Spring-session搭建過程了!
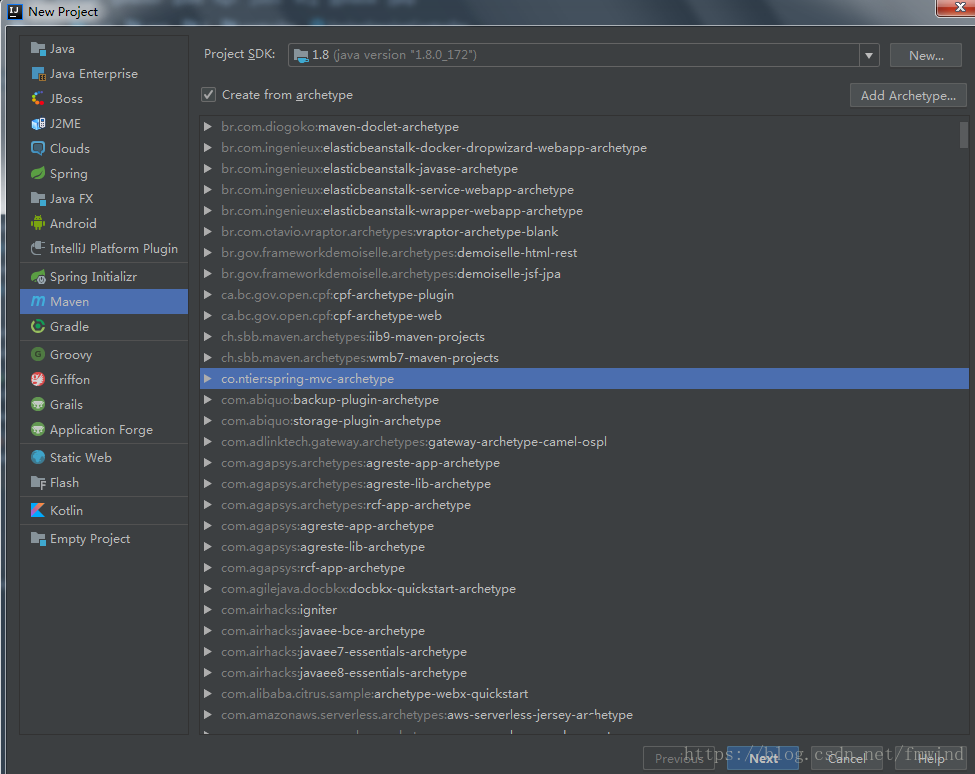
建立專案:
1.新增專案依賴
首先新建一個Maven的Web專案,新建好之後在pom檔案中新增下面的依賴:
<?xml version="1.0" encoding="UTF-8"?>
<project xmlns="http://maven.apache.org/POM/4.0.0"
         xmlns:xsi="http://www.w3.org/2001/XMLSchema-instance"
         xsi:schemaLocation="http://maven.apache.org/POM/4.0.0 http://maven.apache.org/xsd/maven-4.0.0.xsd">
    <modelVersion>4.0.0</modelVersion>

    <groupId>org.spring</groupId>
    <artifactId>learn-spring-session</artifactId>
    <version>1.0-SNAPSHOT</version>
    <packaging>war</packaging>
    <name>First Learn Spring Session</name>

    <properties>
      <jdk.version>1.8</jdk.version>
      <spring.version>4.3.4.RELEASE</spring.version>
      <spring-session.version>1.3.1.RELEASE</spring-session.version>
    </properties>

    <dependencies>
        <!-- https://mvnrepository.com/artifact/javax.servlet/servlet-api  -->
        <dependency>
            <groupId>javax.servlet</groupId>
            <artifactId>javax.servlet-api</artifactId>
            <version>3.0.1</version>
            <scope>provided</scope>
        </dependency>

        <dependency>
            <groupId>org.springframework.session</groupId>
            <artifactId>spring-session-data-redis</artifactId>
            <version>${spring-session.version}</version>
            <type>pom</type>
        </dependency>

       <dependency>
            <groupId>biz.paluch.redis</groupId>
            <artifactId>lettuce</artifactId>
            <version>3.5.0.Final</version>
        </dependency>
        <dependency>
            <groupId>org.springframework</groupId>
            <artifactId>spring-web</artifactId>
            <version>${spring.version}</version>
        </dependency>
    </dependencies>

</project>
2.web.xml配置
<?xml version="1.0" encoding="UTF-8"?>
<web-app version="2.4" xmlns="http://java.sun.com/xml/ns/j2ee"
	xmlns:xsi="http://www.w3.org/2001/XMLSchema-instance"
	xsi:schemaLocation="http://java.sun.com/xml/ns/j2ee http://java.sun.com/xml/ns/j2ee/web-app_2_4.xsd">
	<display-name>springsession</display-name>
	<context-param>
		<param-name>contextConfigLocation</param-name>
		<param-value>classpath*:spring/application-session.xml</param-value>
	</context-param>

	<listener>
		<listener-class>org.springframework.web.context.ContextLoaderListener</listener-class>
	</listener>

	<servlet>
		<servlet-name>SpringDispatcher</servlet-name>
		<servlet-class>org.springframework.web.servlet.DispatcherServlet</servlet-class>
		<init-param>
			<param-name>contextClass</param-name>
			<param-value>
				org.springframework.web.context.support.AnnotationConfigWebApplicationContext
			</param-value>
		</init-param>
		<init-param>
			<param-name>contextConfigLocation</param-name>
			<param-value>com.it</param-value>
		</init-param>
		<load-on-startup>1</load-on-startup>
	</servlet>
	<servlet-mapping>
		<servlet-name>SpringDispatcher</servlet-name>
		<url-pattern>/</url-pattern>
	</servlet-mapping>

	<filter>
		<filter-name>springSessionRepositoryFilter</filter-name>
		<filter-class>org.springframework.web.filter.DelegatingFilterProxy</filter-class>
	</filter>
	<filter-mapping>
		<filter-name>springSessionRepositoryFilter</filter-name>
		<url-pattern>/*</url-pattern>
		<dispatcher>REQUEST</dispatcher>
		<dispatcher>ERROR</dispatcher>
	</filter-mapping>
	<session-config>
		<session-timeout>30</session-timeout>
	</session-config>
</web-app>
DelegatingFilterProxy將通過springSessionRepositoryFilter的名稱查詢Bean並將其轉換為過濾器。對於呼叫DelegatingFilterProxy的每個請求,也將呼叫springSessionRepositoryFilter。
3.Xml的配置
添加了必要的依賴之後,我們需要建立相應的Spring配置。Spring配置是要建立一個Servlet過濾器,它用Spring Session支援的HttpSession實現來替換容器本身HttpSession實現。這一步也是Spring Session的核心。在resources 下面新建一個xml,名詞為 application-session.xml
<?xml version="1.0" encoding="UTF-8"?>
<beans xmlns="http://www.springframework.org/schema/beans"
       xmlns:xsi="http://www.w3.org/2001/XMLSchema-instance"
       xmlns:context="http://www.springframework.org/schema/context"
       xsi:schemaLocation="http://www.springframework.org/schema/beans
           http://www.springframework.org/schema/beans/spring-beans-4.3.xsd
           http://www.springframework.org/schema/context http://www.springframework.org/schema/context/spring-context-4.3.xsd">

    <context:annotation-config/>

    <bean class="org.springframework.session.data.redis.config.annotation.web.http.RedisHttpSessionConfiguration"/>

    <bean class="org.springframework.data.redis.connection.lettuce.LettuceConnectionFactory"/>

</beans>
上述程式碼註釋:

LettuceConnectionFactory例項是配置Redis的ConnectionFactory,檢視原始碼可以看到,預設的Redis連結配置為:

因此,如果有自己的Redis配置,請修改,例如下邊的配置:
<bean class="org.springframework.data.redis.connection.lettuce.LettuceConnectionFactory">
<property name="hostName" value="192.168.1.149"/>
<property name="port" value="6379"/>
<property name="password" value="123456"/>
</bean>
4、springmvc配置檔案
package com.it.config;

import org.springframework.context.annotation.Bean;
import org.springframework.context.annotation.ComponentScan;
import org.springframework.context.annotation.Configuration;
import org.springframework.web.servlet.ViewResolver;
import org.springframework.web.servlet.config.annotation.EnableWebMvc;
import org.springframework.web.servlet.config.annotation.ResourceHandlerRegistry;
import org.springframework.web.servlet.config.annotation.WebMvcConfigurerAdapter;
import org.springframework.web.servlet.view.InternalResourceViewResolver;

@Configuration
@ComponentScan(basePackages="com.it")
@EnableWebMvc
public class MvcConfiguration extends WebMvcConfigurerAdapter{

	@Bean
	public ViewResolver getViewResolver(){
		InternalResourceViewResolver resolver = new InternalResourceViewResolver();
		resolver.setPrefix("/WEB-INF/views/");
		resolver.setSuffix(".jsp");
		return resolver;
	}

	@Override
	public void addResourceHandlers(ResourceHandlerRegistry registry) {
		registry.addResourceHandler("/resources/**").addResourceLocations("/resources/");
	}


}
5.測試程式碼
新建 SpringSessionController.java
@Controller
@RequestMapping(value = "/spring/session")
public class SpringSessionController {

    @RequestMapping(value = "/")
    public ModelAndView test(HttpServletResponse response) throws IOException {
        return new ModelAndView("home");
    }

    @RequestMapping(value = "/setSession.do", method = RequestMethod.GET)
    public void setSession(HttpServletRequest request, HttpServletResponse response) {
        String name = request.getParameter("name");
        String value = request.getParameter("value");
        request.getSession().setAttribute(name, value);
    }

    @RequestMapping(value = "/getSession.do", method = RequestMethod.GET)
    public void getInterestPro(HttpServletRequest request, HttpServletResponse response) {
        String name = request.getParameter("name");
        System.out.println("------" + request.getSession().getAttribute(name));
    }

    @RequestMapping(value = "/removeSession.do", method = RequestMethod.GET)
    public void removeSession(HttpServletRequest request, HttpServletResponse response) {
        String name = request.getParameter("name");
        request.getSession().removeAttribute(name);
    }

}
效果演示
1.啟動Redis,預設埠6379就行!
2.配置Nginx,啟動Nginx
Nginx的配置,權重方式(或輪詢):
#user  nobody;
worker_processes  1;

events {
    worker_connections  1024;
}

http {
    include       mime.types;
    default_type  application/octet-stream;

    sendfile        on;

    keepalive_timeout  65;

    #gzip  on;
     upstream local_tomcat {
     server localhost:8080 weight=1;
     server localhost:8090 weight=1;
    }
    server {
        listen       80;
        server_name  localhost:8080;

        location / {
           proxy_pass http://local_tomcat;

        }
3.啟動Tomcat1和Tomcat2
將上面搭建好的專案放入兩個Tomcat中,分別啟動。
http://192.168.0.147:8090/springsession/spring/session/getSession
http://192.168.0.147:8080/springsession/spring/session/getSession
保證兩個tomcat能正常訪問
4、使用Nginx負載均衡均驗證Session是否共享成功,
直接訪問Nginx路徑:http://192.168.0.147/springsession/spring/session/getSession,
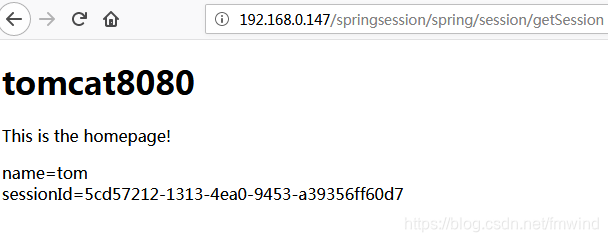
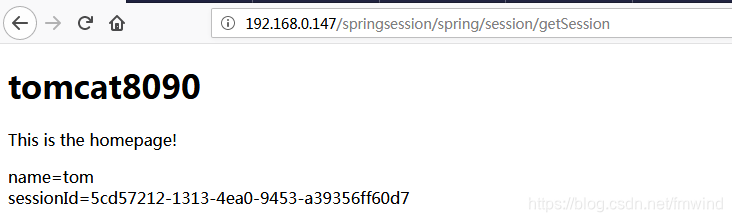
重新整理頁面,變成8090伺服器,值可以取到,sessionid值不變
如何在Redis中檢視Session資料,可以使用命令,或者在Windows的RedisDesktopManager中檢視!
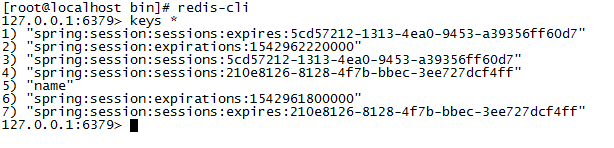
key的簡單介紹說明:
# 儲存 Session 資料,資料型別hash
Key:spring:session:sessions:XXXXXXX

# Redis TTL觸發Session 過期。(Redis 本身功能),資料型別:String
Key:spring:session:sessions:expires:XXXXX

#執行 TTL key ,檢視剩餘生存時間


#定時Job程式觸發Session 過期。(spring-session 功能),資料型別:Set
Key:spring:session:expirations:XXXXX
驗證成功!