Learn OpenGL (六):座標系統
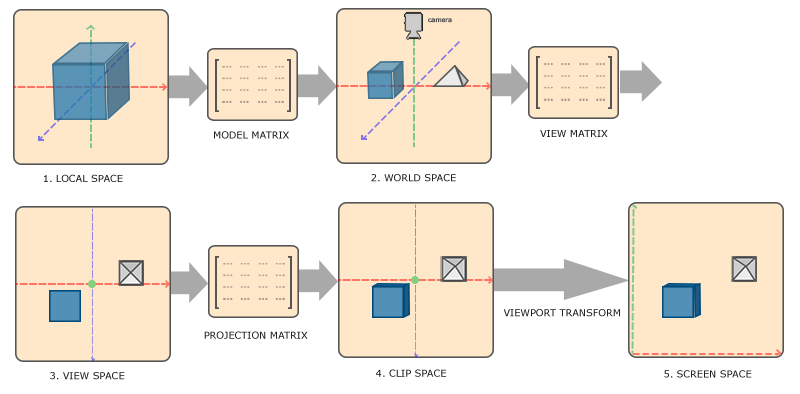
為了將座標從一個座標系變換到另一個座標系,我們需要用到幾個變換矩陣,最重要的幾個分別是模型(Model)、觀察(View)、投影(Projection)三個矩陣。我們的頂點座標起始於區域性空間(Local Space),在這裡它稱為區域性座標(Local Coordinate),它在之後會變為世界座標(World Coordinate),觀察座標(View Coordinate),裁剪座標(Clip Coordinate),並最後以螢幕座標(Screen Coordinate)的形式結束。下面的這張圖展示了整個流程以及各個變換過程做了什麼:

- 區域性座標是物件相對於區域性原點的座標,也是物體起始的座標。
- 下一步是將區域性座標變換為世界空間座標,世界空間座標是處於一個更大的空間範圍的。這些座標相對於世界的全域性原點,它們會和其它物體一起相對於世界的原點進行擺放。
- 接下來我們將世界座標變換為觀察空間座標,使得每個座標都是從攝像機或者說觀察者的角度進行觀察的。
- 座標到達觀察空間之後,我們需要將其投影到裁剪座標。裁剪座標會被處理至-1.0到1.0的範圍內,並判斷哪些頂點將會出現在螢幕上。
- 最後,我們將裁剪座標變換為螢幕座標,我們將使用一個叫做視口變換(Viewport Transform)的過程。視口變換將位於-1.0到1.0範圍的座標變換到由glViewport函式所定義的座標範圍內。最後變換出來的座標將會送到光柵器,將其轉化為片段。
裁剪空間
在一個頂點著色器執行的最後,OpenGL期望所有的座標都能落在一個特定的範圍內,且任何在這個範圍之外的點都應該被裁剪掉(Clipped)。被裁剪掉的座標就會被忽略,所以剩下的座標就將變為螢幕上可見的片段。這也就是裁剪空間(Clip Space)名字的由來。
因為將所有可見的座標都指定在-1.0到1.0的範圍內不是很直觀,所以我們會指定自己的座標集(Coordinate Set)並將它變換回標準化裝置座標系,就像OpenGL期望的那樣。
為了將頂點座標從觀察變換到裁剪空間,我們需要定義一個投影矩陣(Projection Matrix),它指定了一個範圍的座標,比如在每個維度上的-1000到1000。投影矩陣接著會將在這個指定的範圍內的座標變換為標準化裝置座標的範圍(-1.0, 1.0)。所有在範圍外的座標不會被對映到在-1.0到1.0的範圍之間,所以會被裁剪掉。在上面這個投影矩陣所指定的範圍內,座標(1250, 500, 750)將是不可見的,這是由於它的x座標超出了範圍,它被轉化為一個大於1.0的標準化裝置座標,所以被裁剪掉了。
如果只是圖元(Primitive),例如三角形,的一部分超出了裁剪體積(Clipping Volume),則OpenGL會重新構建這個三角形為一個或多個三角形讓其能夠適合這個裁剪範圍。
由投影矩陣建立的觀察箱(Viewing Box)被稱為平截頭體(Frustum),每個出現在平截頭體範圍內的座標都會最終出現在使用者的螢幕上。將特定範圍內的座標轉化到標準化裝置座標系的過程(而且它很容易被對映到2D觀察空間座標)被稱之為投影(Projection),因為使用投影矩陣能將3D座標投影(Project)到很容易對映到2D的標準化裝置座標系中。
一旦所有頂點被變換到裁剪空間,最終的操作——透視除法(Perspective Division)將會執行,在這個過程中我們將位置向量的x,y,z分量分別除以向量的齊次w分量;透視除法是將4D裁剪空間座標變換為3D標準化裝置座標的過程。這一步會在每一個頂點著色器執行的最後被自動執行。
在這一階段之後,最終的座標將會被對映到螢幕空間中(使用glViewport中的設定),並被變換成片段。
將觀察座標變換為裁剪座標的投影矩陣可以為兩種不同的形式,每種形式都定義了不同的平截頭體。我們可以選擇建立一個正射投影矩陣(Orthographic Projection Matrix)或一個透視投影矩陣(Perspective Projection Matrix)。
透視投影
這個投影矩陣將給定的平截頭體範圍對映到裁剪空間,除此之外還修改了每個頂點座標的w值,從而使得離觀察者越遠的頂點座標w分量越大。被變換到裁剪空間的座標都會在-w到w的範圍之間(任何大於這個範圍的座標都會被裁剪掉)。OpenGL要求所有可見的座標都落在-1.0到1.0範圍內,作為頂點著色器最後的輸出,因此,一旦座標在裁剪空間內之後,透視除法就會被應用到裁剪空間座標上:

在GLM中可以這樣建立一個透視投影矩陣:
glm::mat4 proj = glm::perspective(glm::radians(45.0f), (float)width/(float)height, 0.1f, 100.0f);
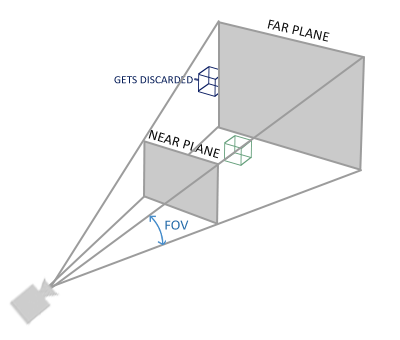
同樣,glm::perspective所做的其實就是建立了一個定義了可視空間的大平截頭體,任何在這個平截頭體以外的東西最後都不會出現在裁剪空間體積內,並且將會受到裁剪。一個透視平截頭體可以被看作一個不均勻形狀的箱子,在這個箱子內部的每個座標都會被對映到裁剪空間上的一個點。下面是一張透視平截頭體的圖片:

它的第一個引數定義了fov的值,它表示的是視野(Field of View),並且設定了觀察空間的大小。如果想要一個真實的觀察效果,它的值通常設定為45.0f,但想要一個末日風格的結果你可以將其設定一個更大的值。第二個引數設定了寬高比,由視口的寬除以高所得。第三和第四個引數設定了平截頭體的近和遠平面。我們通常設定近距離為0.1f,而遠距離設為100.0f。所有在近平面和遠平面內且處於平截頭體內的頂點都會被渲染。
MVP
我們為上述的每一個步驟都建立了一個變換矩陣:模型矩陣、觀察矩陣和投影矩陣。一個頂點座標將會根據以下過程被變換到裁剪座標:
Vclip=Mprojection⋅Mview⋅Mmodel⋅VlocalVclip=Mprojection⋅Mview⋅Mmodel⋅Vlocal
注意矩陣運算的順序是相反的(記住我們需要從右往左閱讀矩陣的乘法)。最後的頂點應該被賦值到頂點著色器中的gl_Position,OpenGL將會自動進行透視除法和裁剪。
OpenGL是一個右手座標系
觀察矩陣是這樣的:
glm::mat4 view;
// 注意,我們將矩陣向我們要進行移動場景的反方向移動。
view = glm::translate(view, glm::vec3(0.0f, 0.0f, -3.0f));
最後我們需要做的是定義一個投影矩陣。我們希望在場景中使用透視投影,所以像這樣宣告一個投影矩陣:
glm::mat4 projection;
projection = glm::perspective(glm::radians(45.0f), screenWidth / screenHeight, 0.1f, 100.0f);
既然我們已經建立了變換矩陣,我們應該將它們傳入著色器。首先,讓我們在頂點著色器中宣告一個uniform變換矩陣然後將它乘以頂點座標:
#version 330 core
layout (location = 0) in vec3 aPos;
...
uniform mat4 model;
uniform mat4 view;
uniform mat4 projection;

void main()
{
    // 注意乘法要從右向左讀
    gl_Position = projection * view * model * vec4(aPos, 1.0);
    ...
}
我們還應該將矩陣傳入著色器(這通常在每次的渲染迭代中進行,因為變換矩陣會經常變動):
int modelLoc = glGetUniformLocation(ourShader.ID, "model"));
glUniformMatrix4fv(modelLoc, 1, GL_FALSE, glm::value_ptr(model));
... // 觀察矩陣和投影矩陣與之類似
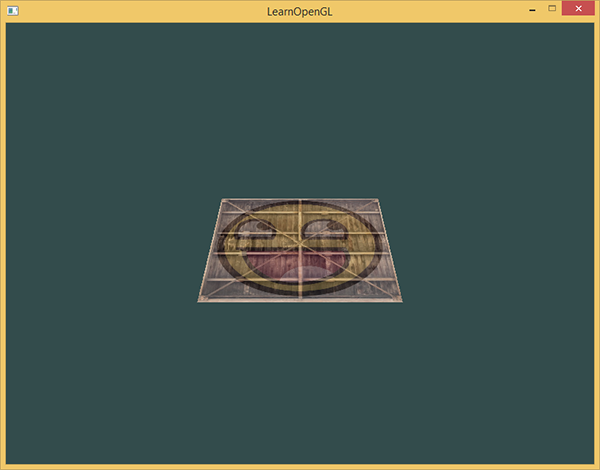
我們的頂點座標已經使用模型、觀察和投影矩陣進行變換了,最終的物體應該會:
- 稍微向後傾斜至地板方向。
- 離我們有一些距離。
- 有透視效果(頂點越遠,變得越小)。
讓我們檢查一下結果是否滿足這些要求:

注意:將mat4矩陣資訊傳遞給著色器的3種表達方式
// pass them to the shaders (3 different ways)
glUniformMatrix4fv(modelLoc, 1, GL_FALSE, glm::value_ptr(model));
glUniformMatrix4fv(viewLoc, 1, GL_FALSE, &view[0][0]);
ourShader.setMat4("projection", projection);
我們將讓立方體隨著時間旋轉:
model = glm::rotate(model, (float)glfwGetTime() * glm::radians(50.0f), glm::vec3(0.5f, 1.0f, 0.0f));
然後我們使用glDrawArrays來繪製立方體,但這一次總共有36個頂點。
glDrawArrays(GL_TRIANGLES, 0, 36);
Z緩衝
如果我們想要確定OpenGL真的執行了深度測試,首先我們要告訴OpenGL我們想要啟用深度測試;它預設是關閉的。我們可以通過glEnable函式來開啟深度測試。glEnable和glDisable函式允許我們啟用或禁用某個OpenGL功能。這個功能會一直保持啟用/禁用狀態,直到另一個呼叫來禁用/啟用它。現在我們想啟用深度測試,需要開啟GL_DEPTH_TEST:
glEnable(GL_DEPTH_TEST);
因為我們使用了深度測試,我們也想要在每次渲染迭代之前清除深度緩衝(否則前一幀的深度資訊仍然儲存在緩衝中)。就像清除顏色緩衝一樣,我們可以通過在glClear函式中指定DEPTH_BUFFER_BIT位來清除深度緩衝:
glClear(GL_COLOR_BUFFER_BIT | GL_DEPTH_BUFFER_BIT);
更多的立方體!
現在我們想在螢幕上顯示10個立方體。每個立方體看起來都是一樣的,區別在於它們在世界的位置及旋轉角度不同。立方體的圖形佈局已經定義好了,所以當渲染更多物體的時候我們不需要改變我們的緩衝陣列和屬性陣列,我們唯一需要做的只是改變每個物件的模型矩陣來將立方體變換到世界座標系中。
首先,讓我們為每個立方體定義一個位移向量來指定它在世界空間的位置。我們將在一個glm::vec3陣列中定義10個立方體位置:
glm::vec3 cubePositions[] = {
  glm::vec3( 0.0f,  0.0f,  0.0f),
  glm::vec3( 2.0f,  5.0f, -15.0f),
  glm::vec3(-1.5f, -2.2f, -2.5f),
  glm::vec3(-3.8f, -2.0f, -12.3f),
  glm::vec3( 2.4f, -0.4f, -3.5f),
  glm::vec3(-1.7f,  3.0f, -7.5f),
  glm::vec3( 1.3f, -2.0f, -2.5f),
  glm::vec3( 1.5f,  2.0f, -2.5f),
  glm::vec3( 1.5f,  0.2f, -1.5f),
  glm::vec3(-1.3f,  1.0f, -1.5f)
};
現在,在遊戲迴圈中,我們呼叫glDrawArrays 10次,但這次在我們渲染之前每次傳入一個不同的模型矩陣到頂點著色器中。我們將會在遊戲迴圈中建立一個小的迴圈用不同的模型矩陣渲染我們的物體10次。注意我們也對每個箱子加了一點旋轉:
glBindVertexArray(VAO);
for(unsigned int i = 0; i < 10; i++)
{
  glm::mat4 model;
  model = glm::translate(model, cubePositions[i]);
  float angle = 20.0f * i;
  model = glm::rotate(model, glm::radians(angle), glm::vec3(1.0f, 0.3f, 0.5f));
  ourShader.setMat4("model", model);

  glDrawArrays(GL_TRIANGLES, 0, 36);
}
這段程式碼將會在每次新立方體繪製出來的時候更新模型矩陣,如此總共重複10次。然後我們應該就能看到一個擁有10個正在奇葩地旋轉著的立方體的世界。
#include <glad/glad.h>
#include <GLFW/glfw3.h>
#include <stb_image.h>
#include <glm/glm.hpp>
#include <glm/gtc/matrix_transform.hpp>
#include <glm/gtc/type_ptr.hpp>
#include <learnopengl/filesystem.h>
#include <learnopengl/shader_m.h>
#include <iostream>

// settings
const unsigned int SCR_WIDTH = 800;
const unsigned int SCR_HEIGHT = 600;

// process all input: query GLFW whether relevant keys are pressed/released this frame and react accordingly
void processInput(GLFWwindow *window)
{
	if (glfwGetKey(window, GLFW_KEY_ESCAPE) == GLFW_PRESS)
		glfwSetWindowShouldClose(window, true);
}

// glfw: whenever the window size changed (by OS or user resize) this callback function executes
void framebuffer_size_callback(GLFWwindow* window, int width, int height)
{
	// make sure the viewport matches the new window dimensions; note that width and
	// height will be significantly larger than specified on retina displays.
	glViewport(0, 0, width, height);
}

int main()
{
    // glfw: initialize and configure
    glfwInit();
    glfwWindowHint(GLFW_CONTEXT_VERSION_MAJOR, 3);
    glfwWindowHint(GLFW_CONTEXT_VERSION_MINOR, 3);
    glfwWindowHint(GLFW_OPENGL_PROFILE, GLFW_OPENGL_CORE_PROFILE);

    // glfw window creation
    GLFWwindow* window = glfwCreateWindow(SCR_WIDTH, SCR_HEIGHT, "LearnOpenGL", NULL, NULL);
    if (window == NULL)
    {
        std::cout << "Failed to create GLFW window" << std::endl;
        glfwTerminate();
        return -1;
    }
    glfwMakeContextCurrent(window);
    glfwSetFramebufferSizeCallback(window, framebuffer_size_callback);

    // glad: load all OpenGL function pointers
    if (!gladLoadGLLoader((GLADloadproc)glfwGetProcAddress))
    {
        std::cout << "Failed to initialize GLAD" << std::endl;
        return -1;
    }

    // configure global opengl state
    glEnable(GL_DEPTH_TEST);

    // build and compile our shader zprogram
    Shader ourShader("6.3.coordinate_systems.vs", "6.3.coordinate_systems.fs");

    // set up vertex data (and buffer(s)) and configure vertex attributes
    float vertices[] = {
        -0.5f, -0.5f, -0.5f,  0.0f, 0.0f,
         0.5f, -0.5f, -0.5f,  1.0f, 0.0f,
         0.5f,  0.5f, -0.5f,  1.0f, 1.0f,
         0.5f,  0.5f, -0.5f,  1.0f, 1.0f,
        -0.5f,  0.5f, -0.5f,  0.0f, 1.0f,
        -0.5f, -0.5f, -0.5f,  0.0f, 0.0f,

        -0.5f, -0.5f,  0.5f,  0.0f, 0.0f,
         0.5f, -0.5f,  0.5f,  1.0f, 0.0f,
         0.5f,  0.5f,  0.5f,  1.0f, 1.0f,
         0.5f,  0.5f,  0.5f,  1.0f, 1.0f,
        -0.5f,  0.5f,  0.5f,  0.0f, 1.0f,
        -0.5f, -0.5f,  0.5f,  0.0f, 0.0f,

        -0.5f,  0.5f,  0.5f,  1.0f, 0.0f,
        -0.5f,  0.5f, -0.5f,  1.0f, 1.0f,
        -0.5f, -0.5f, -0.5f,  0.0f, 1.0f,
        -0.5f, -0.5f, -0.5f,  0.0f, 1.0f,
        -0.5f, -0.5f,  0.5f,  0.0f, 0.0f,
        -0.5f,  0.5f,  0.5f,  1.0f, 0.0f,

         0.5f,  0.5f,  0.5f,  1.0f, 0.0f,
         0.5f,  0.5f, -0.5f,  1.0f, 1.0f,
         0.5f, -0.5f, -0.5f,  0.0f, 1.0f,
         0.5f, -0.5f, -0.5f,  0.0f, 1.0f,
         0.5f, -0.5f,  0.5f,  0.0f, 0.0f,
         0.5f,  0.5f,  0.5f,  1.0f, 0.0f,

        -0.5f, -0.5f, -0.5f,  0.0f, 1.0f,
         0.5f, -0.5f, -0.5f,  1.0f, 1.0f,
         0.5f, -0.5f,  0.5f,  1.0f, 0.0f,
         0.5f, -0.5f,  0.5f,  1.0f, 0.0f,
        -0.5f, -0.5f,  0.5f,  0.0f, 0.0f,
        -0.5f, -0.5f, -0.5f,  0.0f, 1.0f,

        -0.5f,  0.5f, -0.5f,  0.0f, 1.0f,
         0.5f,  0.5f, -0.5f,  1.0f, 1.0f,
         0.5f,  0.5f,  0.5f,  1.0f, 0.0f,
         0.5f,  0.5f,  0.5f,  1.0f, 0.0f,
        -0.5f,  0.5f,  0.5f,  0.0f, 0.0f,
        -0.5f,  0.5f, -0.5f,  0.0f, 1.0f
    };
    // world space positions of our cubes
    glm::vec3 cubePositions[] = {
        glm::vec3( 0.0f,  0.0f,  0.0f),
        glm::vec3( 2.0f,  5.0f, -15.0f),
        glm::vec3(-1.5f, -2.2f, -2.5f),
        glm::vec3(-3.8f, -2.0f, -12.3f),
        glm::vec3( 2.4f, -0.4f, -3.5f),
        glm::vec3(-1.7f,  3.0f, -7.5f),
        glm::vec3( 1.3f, -2.0f, -2.5f),
        glm::vec3( 1.5f,  2.0f, -2.5f),
        glm::vec3( 1.5f,  0.2f, -1.5f),
        glm::vec3(-1.3f,  1.0f, -1.5f)
    };
    unsigned int VBO, VAO;
    glGenVertexArrays(1, &VAO);
    glGenBuffers(1, &VBO);

    glBindVertexArray(VAO);

    glBindBuffer(GL_ARRAY_BUFFER, VBO);
    glBufferData(GL_ARRAY_BUFFER, sizeof(vertices), vertices, GL_STATIC_DRAW);

    // position attribute
    glVertexAttribPointer(0, 3, GL_FLOAT, GL_FALSE, 5 * sizeof(float), (void*)0);
    glEnableVertexAttribArray(0);
    // texture coord attribute
    glVertexAttribPointer(1, 2, GL_FLOAT, GL_FALSE, 5 * sizeof(float), (void*)(3 * sizeof(float)));
    glEnableVertexAttribArray(1);


    // load and create a texture
    // -------------------------
    unsigned int texture1, texture2;
    // texture 1
    // ---------
    glGenTextures(1, &texture1);
    glBindTexture(GL_TEXTURE_2D, texture1);
    // set the texture wrapping parameters
    glTexParameteri(GL_TEXTURE_2D, GL_TEXTURE_WRAP_S, GL_REPEAT);
    glTexParameteri(GL_TEXTURE_2D, GL_TEXTURE_WRAP_T, GL_REPEAT);
    // set texture filtering parameters
    glTexParameteri(GL_TEXTURE_2D, GL_TEXTURE_MIN_FILTER, GL_LINEAR);
    glTexParameteri(GL_TEXTURE_2D, GL_TEXTURE_MAG_FILTER, GL_LINEAR);
    // load image, create texture and generate mipmaps
    int width, height, nrChannels;
    stbi_set_flip_vertically_on_load(true); // tell stb_image.h to flip loaded texture's on the y-axis.
    unsigned char *data = stbi_load(FileSystem::getPath("resources/textures/container.jpg").c_str(), &width, &height, &nrChannels, 0);
    if (data)
    {
        glTexImage2D(GL_TEXTURE_2D, 0, GL_RGB, width, height, 0, GL_RGB, GL_UNSIGNED_BYTE, data);
        glGenerateMipmap(GL_TEXTURE_2D);
    }
    else
    {
        std::cout << "Failed to load texture" << std::endl;
    }
    stbi_image_free(data);
    // texture 2
    // ---------
    glGenTextures(1, &texture2);
    glBindTexture(GL_TEXTURE_2D, texture2);
    // set the texture wrapping parameters
    glTexParameteri(GL_TEXTURE_2D, GL_TEXTURE_WRAP_S, GL_REPEAT);
    glTexParameteri(GL_TEXTURE_2D, GL_TEXTURE_WRAP_T, GL_REPEAT);
    // set texture filtering parameters
    glTexParameteri(GL_TEXTURE_2D, GL_TEXTURE_MIN_FILTER, GL_LINEAR);
    glTexParameteri(GL_TEXTURE_2D, GL_TEXTURE_MAG_FILTER, GL_LINEAR);
    // load image, create texture and generate mipmaps
    data = stbi_load(FileSystem::getPath("resources/textures/awesomeface.png").c_str(), &width, &height, &nrChannels, 0);
    if (data)
    {
        // note that the awesomeface.png has transparency and thus an alpha channel, so make sure to tell OpenGL the data type is of GL_RGBA
        glTexImage2D(GL_TEXTURE_2D, 0, GL_RGB, width, height, 0, GL_RGBA, GL_UNSIGNED_BYTE, data);
        glGenerateMipmap(GL_TEXTURE_2D);
    }
    else
    {
        std::cout << "Failed to load texture" << std::endl;
    }
    stbi_image_free(data);

    // tell opengl for each sampler to which texture unit it belongs to (only has to be done once)
    ourShader.use();
    ourShader.setInt("texture1", 0);
    ourShader.setInt("texture2", 1);

    // render loop
    while (!glfwWindowShouldClose(window))
    {
        // input
        processInput(window);

        // render
        glClearColor(0.2f, 0.3f, 0.3f, 1.0f);
        glClear(GL_COLOR_BUFFER_BIT | GL_DEPTH_BUFFER_BIT); // also clear the depth buffer now!

         // bind textures on corresponding texture units
        glActiveTexture(GL_TEXTURE0);
        glBindTexture(GL_TEXTURE_2D, texture1);
        glActiveTexture(GL_TEXTURE1);
        glBindTexture(GL_TEXTURE_2D, texture2);

        // activate shader
        ourShader.use();

        // create transformations
        glm::mat4 view;
        glm::mat4 projection;

		view = glm::translate(view, glm::vec3(0.0f, 0.0f, -3.0f));
        projection = glm::perspective(glm::radians(45.0f), (float)SCR_WIDTH / (float)SCR_HEIGHT, 0.1f, 100.0f);
        // pass transformation matrices to the shader
        ourShader.setMat4("projection", projection); // note: currently we set the projection matrix each frame, but since the projection matrix rarely changes it's often best practice to set it outside the main loop only once.
        ourShader.setMat4("view", view);

        // render boxes
        glBindVertexArray(VAO);
        for (unsigned int i = 0; i < 10; i++)
        {
            // calculate the model matrix for each object and pass it to shader before drawing
            glm::mat4 model;
            model = glm::translate(model, cubePositions[i]);
			float angle = 20.0f * i + 20;
            model = glm::rotate(model, glm::radians(angle)*(float)glfwGetTime()
				, glm::vec3(1.0f, 0.3f, 0.5f));
            ourShader.setMat4("model", model);

            glDrawArrays(GL_TRIANGLES, 0, 36);
        }

        // glfw: swap buffers and poll IO events (keys pressed/released, mouse moved etc.)
        glfwSwapBuffers(window);
        glfwPollEvents();
    }

    // optional: de-allocate all resources once they've outlived their purpose:
    glDeleteVertexArrays(1, &VAO);
    glDeleteBuffers(1, &VBO);

    // glfw: terminate, clearing all previously allocated GLFW resources.
    glfwTerminate();
    return 0;
}
