Android編寫一個登入介面,利用資料庫實現記住密碼,註冊賬號,強制下線,以及類似QQ的下拉列表登入功能
阿新 • • 發佈:2018-12-09
首先呢,看到這麼長的標題,是不是感覺這些功能有點難以實現呢,哈哈,其實並沒有想象中的那麼複雜,下面就跟著筆者來一起學習一下這些功能是怎麼實現的吧!
1.建立一個所有活動的父類,繼承自AppcompatAvtivity類,用來實現全域性廣播,與強制下線功能相關聯:
package com.example.pc_ly.dl;

import android.app.Activity;
import android.content.BroadcastReceiver;
import android.content.Context;
import android.content.DialogInterface;
import android.content.Intent;
import android.content.IntentFilter;
import android.os.Bundle;
import android.support.v7.app.AlertDialog;
import android.support.v7.app.AppCompatActivity;

/**
 * Created by pc_ly on 2018/10/29.
 */

public class BaseActivity extends AppCompatActivity {//所有活動繼承的一個類,用來實現全域性廣播,
    Intent aa=getIntent();
    private Focreof receiver;
    protected void onCreate(Bundle savedInstanceState) {
        super.onCreate(savedInstanceState);
        ActivityCollector.addAvtivity(this);
}
    protected void onResume(){
        super.onResume();
        IntentFilter intentFilter=new IntentFilter();
        intentFilter.addAction("com.example.office");
        receiver=new Focreof();
        registerReceiver(receiver,intentFilter);
    }
    protected void onPause(){
        super.onPause();
        if(receiver!=null){
            unregisterReceiver(receiver);
            receiver=null;
        }
    }
protected void onDestroy(){
super.onDestroy();
ActivityCollector.removeActivity(this);}
    class Focreof extends BroadcastReceiver{//當廣播成功響應時,彈出一個對話方塊,顯示一些資訊,並且之後會回到登入的介面
        public void onReceive(final Context context, final Intent intent){
       ;
            AlertDialog.Builder builder=new AlertDialog.Builder(context);
            builder.setTitle("警告");
            builder.setMessage("Dear:"+intent.getStringExtra("t")+"! You are forced to be offline. Please try to login again.");
            builder.setPositiveButton("OK",new DialogInterface.OnClickListener(){
                public void onClick(DialogInterface dialog,int which){
                    ActivityCollector.finishAll();
                    Intent intent=new Intent(context,MainActivity.class);
                    context.startActivity(intent);
                }
            });
            builder.show();
        }
    }
}
2.建立一個管理所有活動的類:
package com.example.pc_ly.dl;

import android.app.Activity;

import java.util.ArrayList;
import java.util.List;

/**
 * Created by pc_ly on 2018/10/29.
 */

public class ActivityCollector {//管理所有活動
    public static List<Activity> activities=new ArrayList<>();
    public static void addAvtivity(Activity activity){
        activities.add(activity);
    }
    public static void removeActivity(Activity activity){
        activities.remove(activity);
    }
    public static void finishAll(){
        for(Activity activity:activities){
            if(!activity.isFinishing()){
                activity.finish();
            }
        }
        activities.clear();
    }
}
3.建立一個初始化資料庫的類,並建立對應的表
package com.example.pc_ly.dl;


        import android.content.Context;
        import android.database.sqlite.SQLiteDatabase;
        import android.database.sqlite.SQLiteOpenHelper;
        import android.widget.Toast;

        import java.sql.SQLClientInfoException;

/**
 * Created by pc_ly on 2018/11/20.
 */

public class DateBaseHelper extends SQLiteOpenHelper {
    public static final String CREATE_BOOK="create table userData ("
            + "id text, "
            +"password text)";//建立表的語句
    private Context mContext;
    public DateBaseHelper(Context context, String name, SQLiteDatabase.CursorFactory factory,int version){//初始化一個數據庫
        super(context,name,factory,version);
        mContext=context;
    }
    public void onCreate(SQLiteDatabase db){
        db.execSQL(CREATE_BOOK);//執行建立表的語句
        Toast.makeText(mContext,"Create succeed",Toast.LENGTH_SHORT).show();
    }
    public  void onUpgrade(SQLiteDatabase db,int oldVersion,int newVersion){

    }
}
4.先將登入的介面通過程式碼寫出來,這個比較簡單,我就直接上程式碼了
<?xml version="1.0" encoding="utf-8"?>
<LinearLayout xmlns:android="http://schemas.android.com/apk/res/android"
    xmlns:tools="http://schemas.android.com/tools"
    android:orientation="vertical"
    android:id="@+id/activity_main"
    android:layout_width="match_parent"
    android:layout_height="match_parent"
   >
    <LinearLayout
        android:orientation="horizontal"
        android:layout_width="match_parent"
        android:layout_height="60dp">

    <TextView
        android:layout_width="90dp"
        android:layout_height="wrap_content"
        android:layout_gravity="center_vertical"
        android:textSize="18sp"
        android:text="Account:"
        />
    <EditText
        android:id="@+id/account"
        android:layout_width="0dp"
        android:layout_height="wrap_content"
        android:layout_weight="1"
        android:layout_gravity="center_vertical"
        android:drawableRight="@drawable/jiantou"/>
    </LinearLayout>
    <LinearLayout
        android:orientation="horizontal"
        android:layout_width="match_parent"
        android:layout_height="60dp">
        <TextView
            android:layout_width="90dp"
            android:layout_height="wrap_content"
            android:layout_gravity="center_vertical"
            android:textSize="18sp"
            android:text="Password: "/>
        <EditText
            android:id="@+id/password"
            android:layout_width="0dp"
            android:layout_height="wrap_content"
            android:layout_weight="1"
            android:layout_gravity="center_vertical"
            android:inputType="textPassword"/>
    </LinearLayout>
    <LinearLayout
        android:orientation="horizontal"
        android:layout_width="match_parent"
        android:layout_height="wrap_content">
        <CheckBox
            android:id="@+id/rember_1"
            android:layout_width="wrap_content"
            android:layout_height="wrap_content" />
        <TextView
            android:layout_width="wrap_content"
            android:layout_height="wrap_content"
            android:textSize="18sp"
            android:text="記住密碼"/>
    </LinearLayout>
    <Button
        android:id="@+id/button_1"
        android:layout_width="match_parent"
        android:layout_height="60sp"
        android:text="Login"/>
    <Button
        android:id="@+id/zhuce_"
        android:layout_width="match_parent"
        android:layout_height="60sp"
        android:text="註冊賬號"/>

</LinearLayout>
效果大致是這個樣子:

其中的記住密碼的複選框是有checkbox定義的,然後下拉箭頭是一張圖片,大家可以去網上下載,然後利用Drawableright屬性把它新增到賬號框裡面去,然後這個介面就做好啦。
5.這一步呢就是將登入介面要實現的功能的程式碼寫出來,程式碼如下:
package com.example.pc_ly.dl;

import android.content.Intent;
import android.content.SharedPreferences;
import android.database.Cursor;
import android.database.sqlite.SQLiteDatabase;
import android.preference.Preference;
import android.preference.PreferenceManager;
import android.support.v7.app.AppCompatActivity;
import android.os.Bundle;
import android.support.v7.widget.ListPopupWindow;
import android.view.MotionEvent;
import android.view.View;
import android.widget.AdapterView;
import android.widget.ArrayAdapter;
import android.widget.Button;
import android.widget.CheckBox;
import android.widget.EditText;
import android.widget.PopupWindow;
import android.widget.TextView;
import android.widget.Toast;

import java.util.ArrayList;

public class MainActivity extends BaseActivity{
    private SharedPreferences pref;//利用sharePREfreences來儲存資料
    private SharedPreferences.Editor editor;//用來儲存密碼的
    private DateBaseHelper dphelp;
   private ListPopupWindow listPopupWindow;
    private EditText accountEdit;
    private EditText passwordEdit;
    private Button login;
    private Button  zhuce;
    private CheckBox rember;
   private String list[];
    protected void onCreate(Bundle savedInstanceState) {
        super.onCreate(savedInstanceState);
        setContentView(R.layout.activity_main);
        dphelp=new DateBaseHelper(this,"Userss.db",null,1);//資料庫的初始化
        rember=(CheckBox)findViewById(R.id.rember_1) ;//這個是複選框,用來選擇是否選中密碼的
        login=(Button)findViewById(R.id.button_1);
        zhuce=(Button)findViewById(R.id.zhuce_);//初始化
        //list.add("li");
        listPopupWindow=new ListPopupWindow(MainActivity.this);
        accountEdit=(EditText)findViewById(R.id.account) ;
        passwordEdit=(EditText)findViewById(R.id.password) ;
        pref=PreferenceManager.getDefaultSharedPreferences(this);
        Boolean isrember=pref.getBoolean("rember_pass",false);//初始設定記住密碼為false
        DateBaseHelper database=new DateBaseHelper(this,"Userss.db",null,1);
        if(isrember){
            int username=perf.getInt("username",0)-1;
            String id=pref.getString("account"+username,"");
            String pass=pref.getString("password"+username,"");
            accountEdit.setText(id);
            passwordEdit.setText(pass);//把儲存的賬號和密碼讀取出來
            rember.setChecked(true);
        }
  zhuce.setOnClickListener(new View.OnClickListener() {
      @Override
      public void onClick(View view) {//點選註冊跳到註冊的頁面
          Intent intent=new Intent(MainActivity.this,Zhuche.class);
          startActivity(intent);
      }
  });


        login.setOnClickListener(new View.OnClickListener(){
            public void onClick(View v){
                accountEdit=(EditText)findViewById(R.id.account);//與相應的文字框對應起來
                passwordEdit=(EditText)findViewById(R.id.password);
                String userName=accountEdit.getText().toString();//獲取文字框的資料
                String passWord=passwordEdit.getText().toString();
                if (login(userName,passWord)) {
                    Toast.makeText(MainActivity.this, "登陸成功,歡迎來到新的世界", Toast.LENGTH_SHORT).show();//成功了彈出登陸成功
                    editor=pref.edit();
                    if(rember.isChecked()){//複選框是否被選中
                        int username=pref.getInt("username",0);
                        editor.putBoolean("rember_pass",true);//把記住密碼設定為true
                        editor.putString("account"+username,userName);
                        editor.putString("password"+username,passWord);//把密碼和賬號分別儲存到account和password裡面
                        editor.putInt("username",username+1);
                    }
                    else{
                        editor.clear();//清空editor儲存的東西
                    }
                    editor.apply();//啟用editoy
                    String data=userName;
                    Intent intent=new Intent(MainActivity.this,denglv.class);
                    intent.putExtra("ex",data);//把當前登陸成功的賬號的資料傳遞給下一個活動,用來顯示是誰登陸成功了
                    startActivity(intent);
                }
                else {
                    Toast.makeText(MainActivity.this, "登陸失敗", Toast.LENGTH_SHORT).show();//失敗,彈出登陸失敗
                }
            }});
        accountEdit.setOnTouchListener(new View.OnTouchListener() {
            @Override
            public boolean onTouch(View view, MotionEvent event) {//設定監聽事件
                final int DRAWABLE_LEFT = 0;
                final int DRAWABLE_TOP = 1;
                final int DRAWABLE_RIGHT = 2;
                final int DRAWABLE_BOTTOM = 3;
                if (event.getAction() == MotionEvent.ACTION_UP) {
                    if (event.getX() >= (accountEdit.getWidth() - accountEdit
                            .getCompoundDrawables()[DRAWABLE_RIGHT].getBounds().width())) {
     //當點選了箭頭位置的時候回撥用下面的函式,顯示出下拉框
                        accountEdit.setCompoundDrawablesWithIntrinsicBounds(null, null, getResources().getDrawable(R.drawable.jiantou), null);
                        showListPopulWindow();
                        return true;
                    }
                }
                return false;
            }

    });


        }
    public  void showListPopulWindow(){//用來顯示下拉框
                final String acc[]=new String[pref.getInt("username",0)];//定義一個賬號陣列,長度為選擇記住密碼的登入成功的賬號個數
                final String pas[]=new String[pref.getInt("username",0)];//定義一個密碼陣列,長度為選擇記住密碼的登入成功的賬號個數
                for(int a=0;a<pref.getInt("username",0);a++){
                    acc[a]=pref.getString("account"+a,"");//初始化賬號陣列,把已儲存的賬號放到數組裡面去
                    pas[a]=pref.getString("password"+a,"");//初始化密碼陣列,把已儲存的密碼放到數組裡面去
                }
        listPopupWindow = new ListPopupWindow(MainActivity.this);
        listPopupWindow.setAdapter(new ArrayAdapter<String>(this,
                android.R.layout.simple_list_item_1, acc));//把賬號的資料顯示到下拉列表裡面去
        listPopupWindow.setAnchorView(accountEdit);
        listPopupWindow.setModal(true);
        listPopupWindow.setOnItemClickListener(new AdapterView.OnItemClickListener() {//設定項點選監聽
            @Override
            public void onItemClick(AdapterView<?> adapterView, View view, int i, long l) {
                accountEdit.setText(acc[i]);//當選中下拉框的某一個選項的時候,把選擇的選項內容展示在EditText上
               passwordEdit.setText(pas[i]);//將選中的賬號的密碼顯示出來,顯示在面板上,
                listPopupWindow.dismiss();//如果已經選擇了,隱藏起來
            }
        });

        listPopupWindow.show();

}
    public boolean login(String username,String password) {//驗證此賬號密碼是否正確
        SQLiteDatabase db = dphelp.getWritableDatabase();
        String sql = "select * from userData where id=? and password=?";//將登入時填的賬號和密碼在資料庫裡面進行查詢,如果存在該資料,則返回true,否則返回false
        Cursor cursor = db.rawQuery(sql, new String[] {username, password});
        if (cursor.moveToFirst()) {
            cursor.close();
            return true;
        }
        return false;
    }


}
上面的註釋比較詳細,就不一一介紹啦
6.將註冊的介面通過程式碼寫出來:
<?xml version="1.0" encoding="utf-8"?>
<LinearLayout xmlns:android="http://schemas.android.com/apk/res/android"
    xmlns:tools="http://schemas.android.com/tools"
    android:orientation="vertical"
    android:id="@+id/activity_zhuche"
    android:layout_width="match_parent"
    android:layout_height="match_parent"
    android:paddingBottom="@dimen/activity_vertical_margin"
    android:paddingLeft="@dimen/activity_horizontal_margin"
    android:paddingRight="@dimen/activity_horizontal_margin"
    android:paddingTop="@dimen/activity_vertical_margin"
    tools:context="com.example.pc_ly.dl.Zhuche">
    <LinearLayout
        android:orientation="horizontal"
        android:layout_width="match_parent"
        android:layout_height="60dp">

        <TextView
            android:layout_width="90dp"
            android:layout_height="wrap_content"
            android:layout_gravity="center_vertical"
            android:textSize="18sp"
            android:text="Account:"
            />
        <EditText
            android:id="@+id/account111"
            android:layout_width="0dp"
            android:layout_height="wrap_content"
            android:layout_weight="1"
            android:layout_gravity="center_vertical"
            android:drawableRight="@drawable/jiantou"/>
    </LinearLayout>
    <LinearLayout
        android:orientation="horizontal"
        android:layout_width="match_parent"
        android:layout_height="60dp">
        <TextView
            android:layout_width="90dp"
            android:layout_height="wrap_content"
            android:layout_gravity="center_vertical"
            android:textSize="18sp"
            android:text="Password: "/>
        <EditText
            android:id="@+id/password111"
            android:layout_width="0dp"
            android:layout_height="wrap_content"
            android:layout_weight="1"
            android:layout_gravity="center_vertical"
            android:inputType="textPassword"/>
    </LinearLayout>
    <Button
        android:id="@+id/button_111"
        android:layout_width="match_parent"
        android:layout_height="60sp"
        android:text="註冊"/>
</LinearLayout>
7.將註冊介面要實現的功能通過程式碼寫出來:
package com.example.pc_ly.dl;

import android.content.ContentValues;
import android.content.Intent;
import android.content.SharedPreferences;
import android.database.Cursor;
import android.database.sqlite.SQLiteDatabase;
import android.support.v7.app.AppCompatActivity;
import android.os.Bundle;
import android.util.Log;
import android.view.View;
import android.widget.Button;
import android.widget.EditText;
import android.widget.Toast;

public class Zhuche extends BaseActivity {
private  DateBaseHelper dphelper;
    private EditText a,b;
    private Button an1;
    @Override
    protected void onCreate(Bundle savedInstanceState) {
        super.onCreate(savedInstanceState);
        setContentView(R.layout.activity_zhuche);
        dphelper=new DateBaseHelper(this,"Userss.db",null,1);
        an1=(Button)findViewById(R.id.button_111);

       an1.setOnClickListener(new View.OnClickListener() {
           @Override
           public void onClick(View view) {
              //dphelper.getWritableDatabase();
               a=(EditText)findViewById(R.id.account111);
               b=(EditText)findViewById(R.id.password111) ;
               String newname =a.getText().toString();
               String password=b.getText().toString();
               Log.d("Zhuche","sss");
               if (CheckIsDataAlreadyInDBorNot(newname)) {
                   Toast.makeText(Zhuche.this,"該使用者名稱已被註冊,註冊失敗",Toast.LENGTH_SHORT).show();
               }
               else {

                   if (register(newname, password)) {
                       Toast.makeText(Zhuche.this, "恭喜您 註冊成功,即將返回登入介面", Toast.LENGTH_SHORT).show();
                       Intent intent=new Intent(Zhuche.this,MainActivity.class);
                       startActivity(intent);
                   }}
           }
       });
    }
    //向資料庫插入資料
    public boolean register(String username,String password){
        SQLiteDatabase db= dphelper.getWritableDatabase();
        /*String sql = "insert into userData(name,password) value(?,?)";
        Object obj[]={username,password};
        db.execSQL(sql,obj);*/
        ContentValues values=new ContentValues();
        values.put("id",username);
        values.put("password",password);
        db.insert("userData",null,values);
        db.close();
        //db.execSQL("insert into userData (name,password) values (?,?)",new String[]{username,password});
        return true;
    }
    //檢驗使用者名稱是否已存在
    public boolean CheckIsDataAlreadyInDBorNot(String value){
        SQLiteDatabase db=dphelper.getWritableDatabase();
        String Query = "Select * from userData where id =?";
        Cursor cursor = db.rawQuery(Query,new String[] { value });
        if (cursor.getCount()>0){
            cursor.close();
            return  true;
        }
        cursor.close();
        return false;
    }

}
8.登入成功之後,會跳到一個新的介面,介面的佈局程式碼如下:
<?xml version="1.0" encoding="utf-8"?>
<LinearLayout xmlns:android="http://schemas.android.com/apk/res/android"
    android:orientation="vertical"
    xmlns:tools="http://schemas.android.com/tools"
    android:id="@+id/activity_denglv"
    android:layout_width="match_parent"
    android:layout_height="match_parent"
   >
    <TextView
        android:id="@+id/text_1"

        android:gravity="center"
        android:layout_gravity="center"
        android:layout_width="match_parent"
        android:layout_height="wrap_content"
        android:textSize="24sp"
        android:text="HI! haha"/>
<Button
    android:id="@+id/button_2"
    android:layout_width="match_parent"
    android:layout_height="wrap_content"
    android:text="強制下線"/>
</LinearLayout>
9.當點選按鈕之後,會實現強制下線的功能,程式碼如下:
package com.example.pc_ly.dl;

import android.content.Intent;
import android.support.v7.app.AppCompatActivity;
import android.os.Bundle;
import android.view.View;
import android.widget.Button;
import android.widget.TextView;

public class denglv extends BaseActivity{
    private DateBaseHelper hp;
private TextView textView;
    @Override
    protected void onCreate(Bundle savedInstanceState) {
        Intent intent=getIntent();
        super.onCreate(savedInstanceState);
        setContentView(R.layout.activity_denglv);
        Button force=(Button)findViewById(R.id.button_2);
        textView=(TextView)findViewById(R.id.text_1) ;

        textView.setText("Hi,"+intent.getStringExtra("ex"));//顯示你的名字出來
        force.setOnClickListener(new View.OnClickListener(){
            public void onClick(View v){
                Intent aa=getIntent();
                String data=aa.getStringExtra("ex");
                Intent intent=new Intent("com.example.office");
                intent.putExtra("t",data);
                sendBroadcast(intent);//點選按鈕會強制退出,並利用intent傳遞資料
            }
        });
    }
}
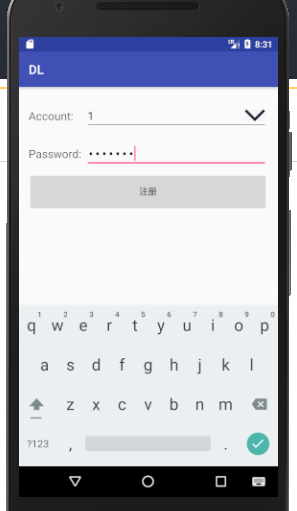
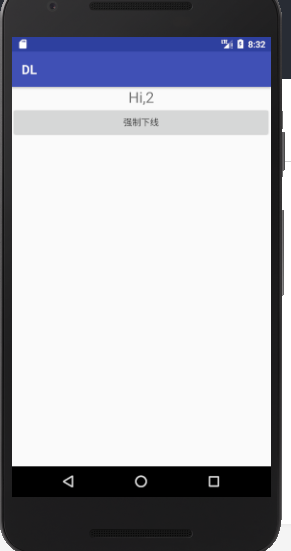
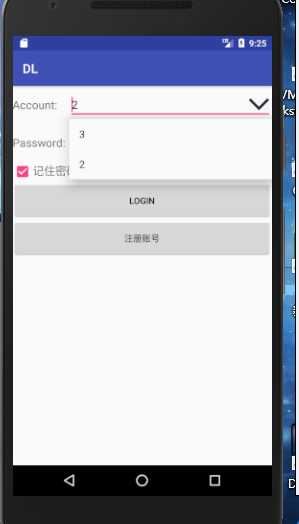
然後程式碼差不多就是這個樣子啦,最後再貼幾張效果圖:


有啥疑問的歡迎留言哦
其他部落格的連結:
歡迎各位訪問哦,這次就到這裡啦!
