Spring Cloud 入門教程(五): Ribbon實現客戶端的負載均衡
接上節,假如我們的Hello world服務的訪問量劇增,用一個服務已經無法承載, 我們可以把Hello World服務做成一個叢集。
很簡單,我們只需要複製Hello world服務,同時將原來的埠8762修改為8763。然後啟動這兩個Spring Boot應用, 就可以得到兩個Hello World服務。這兩個Hello world都註冊到了eureka服務中心。這時候再訪問http://localhost:8761, 可以看到兩個hello world服務已經註冊。(服務與註冊參見Spring Cloud 入門教程(一): 服務註冊)。

1. 客戶端的負載均衡
負載均衡可分為服務端負載均衡和客戶端負載均衡,服務端負載均衡完全由伺服器處理,客戶端不需要做任何事情。而客戶端負載均衡技術,客戶端需要維護一組伺服器引用,每次客戶端向服務端發請求的時候,會根據演算法主動選中一個服務節點。常用的負載均衡演算法有: Round Robbin, Random,Hash,StaticWeighted等。
Spring 提供兩輛種服務排程方式:Ribbon+restful和Feign。Ribbon就是一個基於客戶端的負載均衡器, Ribbon提供了很多在HTTP和TCP客戶端之上的控制.
Feign內部也已經使用了Ribbon, 所以只要使用了@FeignClient註解,那麼這一章的內容也都是適用的。
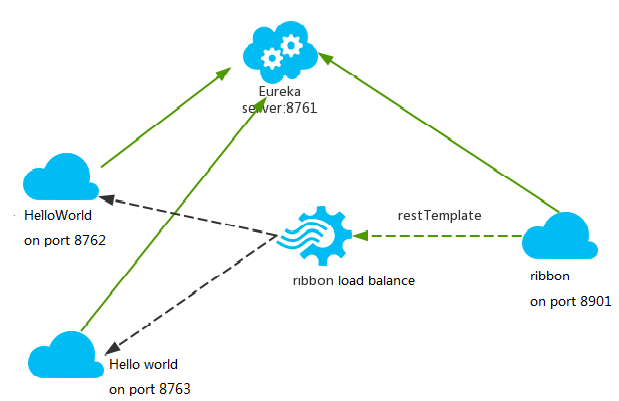
下面就看看如何Spring Cloud如何用Ribbon來實現兩個Hello World服務的負載均衡。以下是Spring cloud的ribbon客戶端負載均衡架構圖。

hello world服務和ribbon均註冊到服務中心
service-hi工程跑了兩個副本,埠分別為8762,8763,分別向服務註冊中心註冊, 當sercvice-ribbon通過restTemplate呼叫service-Hellowworld的介面時,利用用ribbon進行負載均衡,會輪流的呼叫處於兩個不同埠的Hello world服務
2. 建立一個Ribbon服務
1) 建立一個maven工程,取名叫service-ribbon, pom.xml檔案如下:
 pom.xml
2). 建立主類ServiceRibbonApplication
 1 package springcloud.helloworld.ribbon.service;
 2
 3 import org.springframework.boot.SpringApplication;
 4 import org.springframework.boot.autoconfigure.SpringBootApplication;
 5 import org.springframework.cloud.client.discovery.EnableDiscoveryClient;
 6 import org.springframework.cloud.client.loadbalancer.LoadBalanced;
 7 import org.springframework.context.annotation.Bean;
 8 import org.springframework.web.client.RestTemplate;
 9
10 @SpringBootApplication
11 @EnableDiscoveryClient
12 public class ServiceRibbonApplication {
13
14     public static void main(String[] args) {
15         SpringApplication.run(ServiceRibbonApplication.class, args);
16     }
17
18     @Bean
19     @LoadBalanced
20     RestTemplate restTemplate() {
21         return new RestTemplate();
22     }
23 }
@EnableDiscoveryClient向服務中心註冊,並且註冊了一個叫restTemplate的bean。
@ LoadBalanced登錄檔明,這個restRemplate是需要做負載均衡的。
3). 建立獲取一個獲取Hello內容的service類
 1 package springcloud.helloworld.ribbon.client;
 2
 3 import org.springframework.beans.factory.annotation.Autowired;
 4 import org.springframework.stereotype.Service;
 5 import org.springframework.web.client.RestTemplate;
 6
 7 @Service
 8 public class HelloService {
 9     @Autowired RestTemplate restTemplate;
10
11     public String getHelloContent() {
12         return restTemplate.getForObject("http://SERVICE-HELLOWORLD/",String.class);
13     }
14 }
這裡關鍵程式碼就是, restTemplate.getForObject方法會通過ribbon負載均衡機制, 自動選擇一個Hello word服務,
這裡的URL是“http://SERVICE-HELLOWORLD/",其中的SERVICE-HELLOWORLD是Hello world服務的名字,而註冊到服務中心的有兩個SERVICE-HELLOWORLD。 所以,這個呼叫本質是ribbon-service作為客戶端根據負載均衡演算法自主選擇了一個作為服務端的SERVICE-HELLOWORLD服務。然後再訪問選中的SERVICE-HELLOWORLD來執行真正的Hello world呼叫。
3. 啟動ribbon-service應用,我們就可以訪問http://localhost:8901/, 然後每次重新整理可以看到以下兩種結果交替出現,表明實際呼叫的是在不同埠的不同的SERVICE-HELLOWORLD。


