
基於Python庫Face_Recognition動手DIY人臉識別
阿新 • • 發佈:2018-12-10
0X00 前言
最近使用iPhone x,把人臉識別代入了我們的生活中。前段時間瞭解了一個Python的一個開元函式庫,並對其進行了分析、學習和實踐,那麼今天我們就來講解一下如何使用face_recognition這個庫來實現簡單的人臉識別。
注:以下文章的所有操作都是Windows下實現的。
0×01 正文
人臉識別主要步驟:
face_recognition 庫的安裝
安裝此庫,首先需要安裝編譯dlib,此處我們偷個懶,安裝軟體Anaconda(大牛繞過),此軟體預裝了dlib.
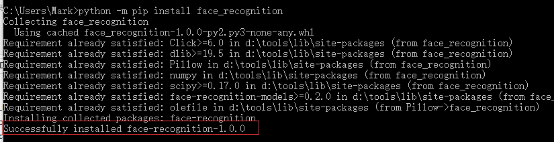
安裝好後,我們直接通過pip 安裝face_recognition庫,命令如下
python -m pip install face_recognition
呼叫一下庫,檢查是否成功匯入
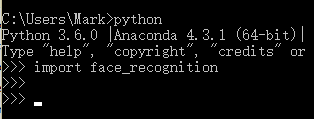
沒報錯,就是安裝成功了。
按照以上辦法在安裝numpy 和python-opencv 兩個庫就可以了
通過face_recognition庫實現人臉識別
程式碼如下
# -*- coding: UTF-8 -*-
import face_recognition
import cv2
import os
# 這是一個超級簡單(但很慢)的例子,在你的網路攝像頭上實時執行人臉識別
# PLEASE NOTE: This example requires OpenCV (the `cv2` library) to be installed only to read from your webcam.
# 請注意:這個例子需要安裝OpenCV
# 具體的演示。如果你安裝它有困難,試試其他不需要它的演示。
# 得到一個參考的攝像頭# 0(預設)
video_capture = cv2.VideoCapture(0)
# 載入示例圖片並學習如何識別它。
path ="images"#在同級目錄下的images檔案中放需要被識別出的人物圖
total_image=[]
total_image_name=[]
total_face_encoding=[]
for fn in os.listdir(path): #fn 表示的是檔名
  total_face_encoding.append(face_recognition.face_encodings(face_recognition.load_image_file(path+"/"+fn))[0])
  fn=fn[:(len(fn)-4)]#擷取圖片名(這裡應該把images檔案中的圖片名命名為為人物名)
  total_image_name.append(fn)#圖片名字列表
while True:
  # 抓取一幀視訊
  ret, frame = video_capture.read()
  # 發現在視訊幀所有的臉和face_enqcodings
  face_locations = face_recognition.face_locations(frame)
  face_encodings = face_recognition.face_encodings(frame, face_locations)
  # 在這個視訊幀中迴圈遍歷每個人臉
  for (top, right, bottom, left), face_encoding in zip(face_locations, face_encodings):
      # 看看面部是否與已知人臉相匹配。
      for i,v in enumerate(total_face_encoding):
          match = face_recognition.compare_faces([v], face_encoding,tolerance=0.5)
          name = "Unknown"
          if match[0]:
              name = total_image_name[i]
              break
      # 畫出一個框,框住臉
      cv2.rectangle(frame, (left, top), (right, bottom), (0, 0, 255), 2)
      # 畫出一個帶名字的標籤,放在框下
      cv2.rectangle(frame, (left, bottom - 35), (right, bottom), (0, 0, 255), cv2.FILLED)
      font = cv2.FONT_HERSHEY_DUPLEX
      cv2.putText(frame, name, (left + 6, bottom - 6), font, 1.0, (255, 255, 255), 1)
  # 顯示結果影象
  cv2.imshow('Video', frame)
  # 按q退出
  if cv2.waitKey(1) & 0xFF == ord('q'):
      break
# 釋放攝像頭中的流
video_capture.release()
cv2.destroyAllWindows()
其次還要準備一個images資料夾進行攝像頭的人臉比對

成功的效果圖我就不貼了。
原理如下:
1.遍歷images檔案中的圖片
2.提取特徵臉
3.攝像頭每幀提取圖片,提取特診臉
4.遍歷特徵列表,找出符合特徵臉
5.輸出名字
1、從特徵中找出圖片中的人臉
import face_recognition
image = face_recognition.load_image_file("your_file.jpg")
face_locations = face_recognition.face_locations(image)
2、找到並且控制影象中的臉部特徵
import face_recognition
image = face_recognition.load_image_file("your_file.jpg")
face_landmarks_list = face_recognition.face_landmarks(image)
3、識別照片中的人臉
import face_recognition
known_image = face_recognition.load_image_file("biden.jpg")
unknown_image = face_recognition.load_image_file("unknown.jpg")
biden_encoding = face_recognition.face_encodings(known_image)
[0]unknown_encoding = face_recognition.face_encodings(unknown_image)
[0]results = face_recognition.compare_faces([biden_encoding], unknown_encoding)