
ubuntu安裝後的配置
前言
研究生開學了,進入了實驗室,要養成寫部落格的好習慣。 整理記錄下ubuntu 18.04安裝後的配置吧。
系統
更改grub
sudo vim /etc/default/grub
sudo update-grub
更換阿里的源
統一Win10和Ubuntu18.04雙系統的時間
timedatectl set-local-rtc 1 --adjust-system-clock
為Ubuntu Dock啟用“最小化點選”
gsettings set org.gnome.shell.extensions.dash-to-dock click-action 'minimize'
使用’Tweaks’
sudo apt install gnome-tweak-tool
啟用“夜燈”以獲得更好的睡眠
GNOME擴充套件
sudo apt-get install gnome-shell-extensions -y  #安裝shell擴充套件
sudo apt install chrome-gnome-shell     #為了能在瀏覽器內安裝gnome外掛,火狐和谷歌都能用
- dash to dock
- Gsconnect
- Dash to panel&Dynamic panel transparency
支援exfat
sudo apt-get install exfat-fuse exfat-utils
NVIDIA驅動
安裝常用軟體
搜狗拼音法
安裝
sudo dpkg -i sogoupinyin*.deb
sudo apt-get install -f
配置輸入法
- 重啟後,在上述“Manage Installed Languages”(即Language Support設定視窗中),將“Keyboard input method system”設定為“fcitx”。
- 在系統中搜索fcitx configuration,點選左下角新增輸入法,在彈出的對話方塊中將Only Show Current Language取消,即可看到sogou Pinyin,選擇新增即可。
- 重啟完成,到此為止搜狗輸入法應該能夠正常使用。
刪除預設的輸入法
sudo apt remove ibus*
壓縮軟體
sudo apt-get install p7zip-full p7zip-rar rar unzip
音視訊
安裝解碼器
sudo apt-get install ubuntu-restricted-extras
安裝VLC視訊播放器
sudo apt-get install vlc browser-plugin-vlc
安裝FFmpeg
sudo add-apt-repository ppa:djcj/hybrid
sudo apt-get update
sudo apt-get install ffmpeg
安裝網易雲音樂
sudo dpkg -i netease-cloud-music*.deb
無法開啟的解決方案 將 /usr/share/applications/netease-cloud-music.desktop中的Exec=netease-cloud-music %U改為Exec=netease-cloud-music --no-sandbox %U
wps
下載libpng12-0_1.2.49-1+deb7u2_amd64.deb,wps-office-fonts_1.0_all.deb,symbol-fonts_1.2_all.deb,wps-office_10.1.0.6757_amd64.deb(從官網上下載最新的)
sudo dpkg -i libpng12-*.deb
sudo dpkg -i symbol-fonts_*.deb
sudo dpkg -i wps-office-fonts_*.deb
sudo dpkg -i wps-office_*.deb
堅果雲
谷歌瀏覽器
sudo apt install chromium-browser
科學上網
Shadowsocks
安裝與配置
sudo apt install shadowsocks-libev
vim ss.json
ss.json:
{
            "server": "sg1.lv2.hi404.top",
            "local_address": "127.0.0.1",
            "local_port": 1080,
            "timeout": 300,
            "workers": 1,
            "server_port": 32447,
            "password": "3b5J6x",
            "method": "aes-128-gcm",
            "plugin": ""
}
啟動
ss-local -c ss.json
使用SwitchyOmega設定Chrome代理
左側新建一個情景模式,名字命名隨便,然後代理協議選擇s5,代理伺服器填入”127.0.0.1”,代理埠填寫你的本地埠
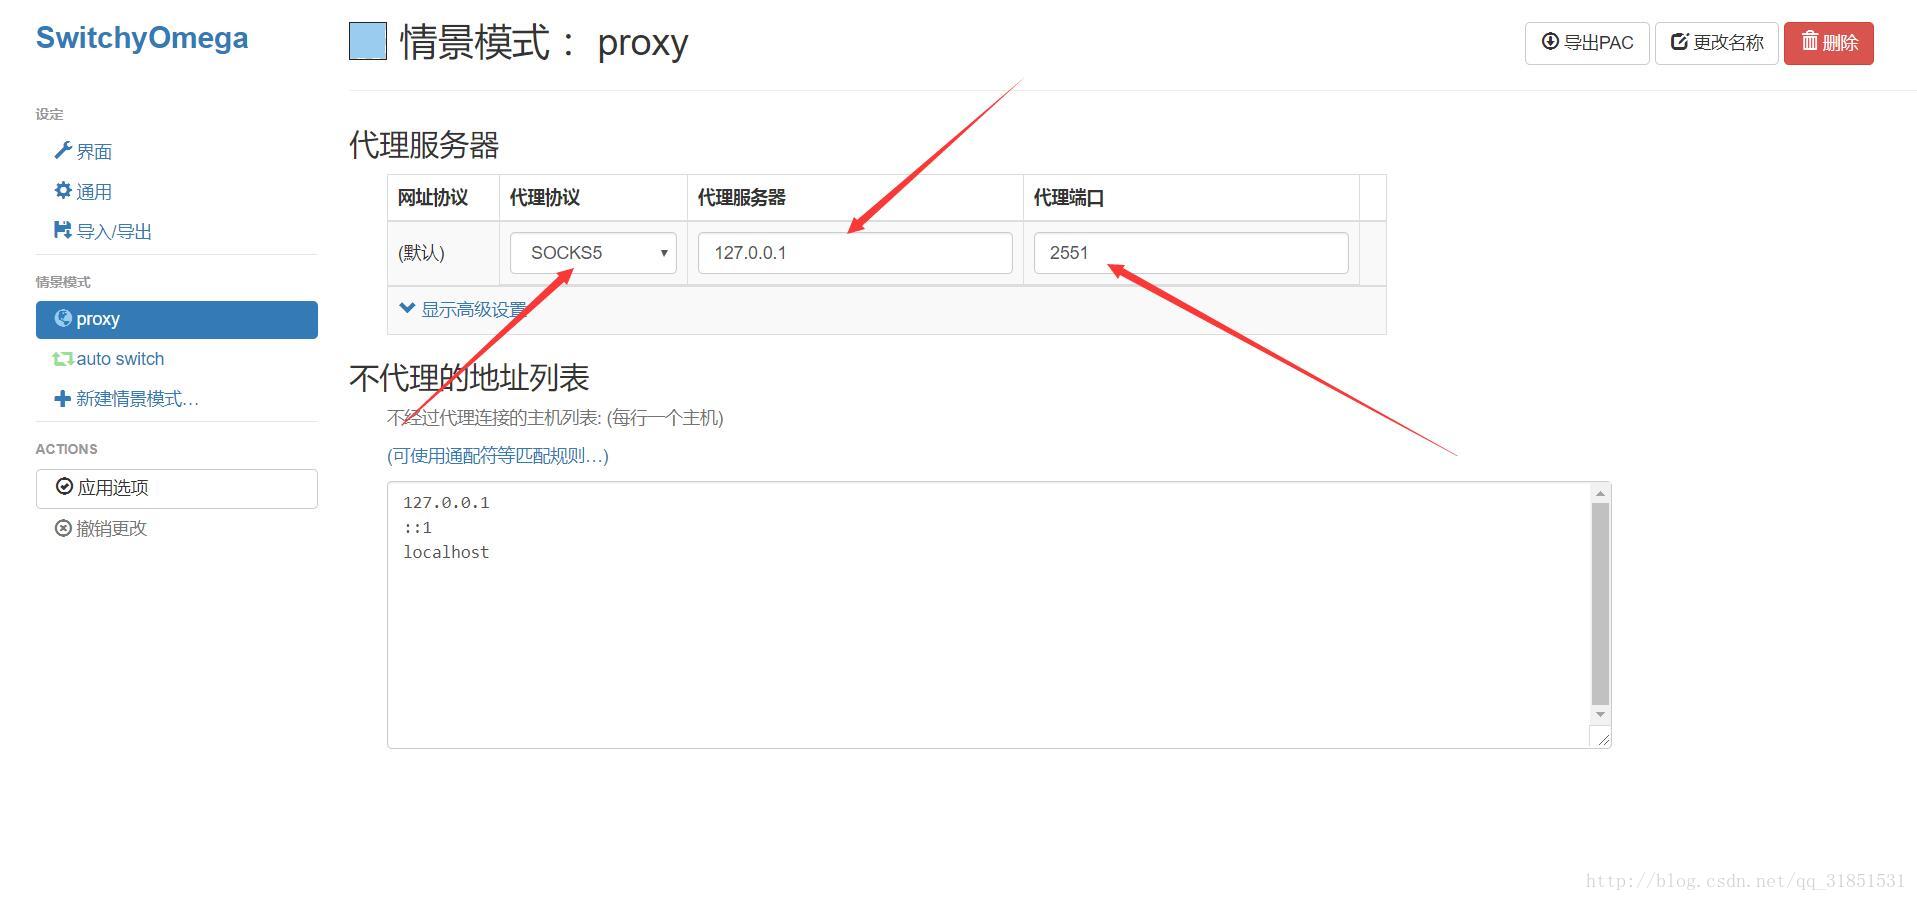
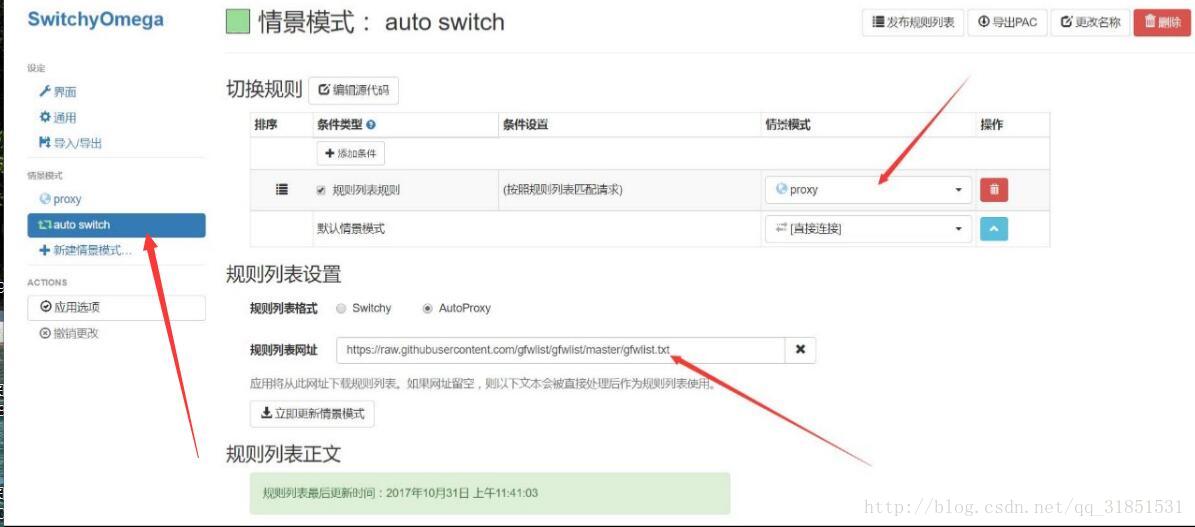
設定完成之後,在瀏覽器右上角就會出現這個玩意兒,記得選擇auto switch模式,然後就能科學上網了。
privoxy
proxychains
sudo apt install proxychains or sudo apt install proxychains4
將 /etc/proxychains4.conf中的socks4 127.0.0.1 9095改為socks5 127.0.0.1 1080
使用方法
proxychains4 cmd
程式設計環境
tmux
安裝
sudo apt install tmux
zsh & oh-my-zsh
安裝zsh
sudo apt-get install zsh
把預設的Shell改成zsh
chsh -s /bin/zsh
配置密碼檔案,解決chsh: PAM認證失敗的問題 把 /etc/passwd第一行的 /bin/bash改成 /bin/zsh,這個是root使用者的。
安裝oh-my-zsh
sudo wget https://github.com/robbyrussell/oh-my-zsh/raw/master/tools/install.sh -O - | sh
C/C++
sudo apt install gcc, g++
vim
安裝
sudo apt install vim, vim-gnome
安裝Vundle
git clone https://github.com/VundleVim/Vundle.vim.git ~/.vim/bundle/Vundle.vim
YouCompleteMe
安裝編譯工具
sudo apt install build-essential cmake python3-dev
編譯安裝
在此之前需要用Vundle下載外掛
cd ~/.vim/bundle/YouCompleteMe
python3 install.py --clang-completer
配置
cp ~/.vim/bundle/YouCompleteMe/third_party/ycmd/examples/.ycm_extra_conf.py ~/
配置檔案(同步)
~/ss.json
~/.vimrc
~/.zshrc
~/.bash_aliases
~/.tmux.conf
~/.ycm_extra_conf.py