
iOS Objective-C與Swift開發過程的詳細比較
阿新 • • 發佈:2018-12-11
前段時間,本人同時開發了兩個專案,一個用的OC,一個用的Swift。在使用中對兩種語言進行一次梳理與比較。
基礎檔案
OC
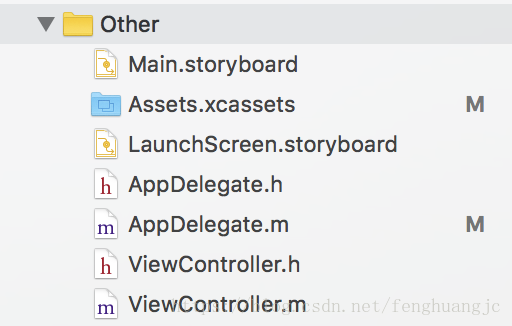
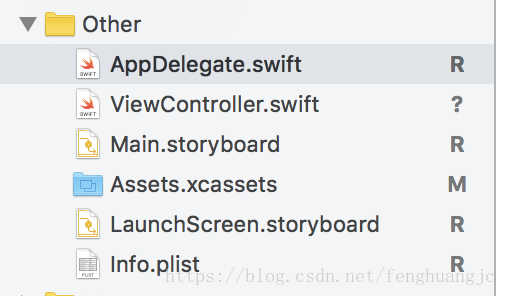
OC程式裡,一個類會有兩個檔案,.h和.m。.h可以寫屬性、方法宣告等,.m可以寫方法的具體實現。 Swift的類只有一個檔案,就是.swift方法宣告和實現是一起的
AppDelegate
OC
- (BOOL)application:(UIApplication *)application didFinishLaunchingWithOptions:(NSDictionary *)launchOptions {
	self.window = [[UIWindow alloc]initWithFrame:[UIScreen mainScreen].bounds];
    self.window.rootViewController = [[JCTabBarController alloc]init];
    [self.window makeKeyAndVisible];
。
。
。
return YES;
}
Swift
func application(_ application: UIApplication, didFinishLaunchingWithOptions launchOptions: [UIApplicationLaunchOptionsKey: Any]?) -> Bool {
window = UIWindow.init(frame: UIScreen.main.bounds)
window?.rootViewController = JCTabBarController()
window?.makeKeyAndVisible TabBarController
OC
- (void)viewDidLoad {
    [super viewDidLoad];
    self.delegate = self;
    UITabBar *tabbar = [UITabBar appearance];
    tabbar.tintColor = kTextColor;
    [tabbar setBackgroundColor:kRGBColor(210, 218, 218)];
    tabbar.translucent = NO;
    [self addChildViewControllers];
    [JCTool getInstance].tabbatController = self;
}

- (void)addChildViewControllers
{
    [self addChildViewController:[HomeViewController new] title:@"首頁" imageName:@"TabBar_home_23x23_" selectImageName:@"TabBar_home_23x23_selected"];
    [self addChildViewController:[LotteryViewController new] title:@"幸運" imageName:@"TabBar_win_23x23_" selectImageName:@"TabBar_win_23x23_selected"];
    [self addChildViewController:[MoneyViewController new] title:@"資金明細" imageName:@"TabBar_money_23x23_" selectImageName:@"TabBar_money_23x23_selected"];
    [self addChildViewController:[MyViewController new] title:@"我的" imageName:@"TabBar_my_23x23_" selectImageName:@"TabBar_my_23x23_selected"];
}

- (void)addChildViewController:(UIViewController *)childController title:(NSString *)title imageName:(NSString *)imageString selectImageName:(NSString *)selectImageName{
    childController.tabBarItem.image = [UIImage imageNamed:imageString];
    childController.tabBarItem.selectedImage = [[UIImage imageNamed:selectImageName] imageWithRenderingMode:UIImageRenderingModeAlwaysOriginal];
    childController.title = title;
    JCNavigationController *nav = [[JCNavigationController alloc]init];
    nav.title = title;
    [nav addChildViewController:childController];
    [self addChildViewController:nav];
}
Swift
	override func viewDidLoad() {
        super.viewDidLoad()
        self.delegate = self
        let tabbar = UITabBar.appearance()
        tabbar.tintColor = kMainColor
        tabbar.isTranslucent = true;
        addChildViewControllers()
    }

    func addChildViewControllers() -> Void {
        addChildViewController(childController: HomeViewController(), title: "首頁", imageName: "home", selectImageName: "home_select")
        addChildViewController(childController: MoneyViewController(), title: "充值", imageName: "money", selectImageName: "money_select")
        addChildViewController(childController: NotifactionViewController(), title: "動態", imageName: "notification", selectImageName: "notification_select")
        addChildViewController(childController: MyViewController(), title: "我的", imageName: "my", selectImageName: "my_select")
    }

    func addChildViewController(childController:UIViewController,title:String,imageName:String,selectImageName:String) -> Void {
        childController.tabBarItem.image = UIImage.init(named: imageName)
        childController.tabBarItem.selectedImage = UIImage.init(named: selectImageName)
        childController.title = title;
        let navC = JCNavigationController.init(rootViewController: childController)
        navC.title = title;
        addChildViewController(navC)
    }
TableView代理方法
OC
@interface TableViewController ()<UITableViewDelegate,UITableViewDataSource>
@property(nonatomic,strong)UITableView *tableView;
@end

@implementation TableView
- (NSInteger)tableView:(UITableView *)tableView numberOfRowsInSection:(NSInteger)section{
    return self.modelArray.count;
}

- (UITableViewCell *)tableView:(UITableView *)tableView cellForRowAtIndexPath:(NSIndexPath *)indexPath{
    ClongCell *cell = [tableView dequeueReusableCellWithIdentifier:@"ClongCell" forIndexPath:indexPath];
    [cell setSelectionStyle:UITableViewCellSelectionStyleNone];
    ClongModel *model = self.modelArray[indexPath.row];
    cell.model = model;
    return cell;
}
-(void)tableView:(UITableView *)tableView didSelectRowAtIndexPath:(NSIndexPath *)indexPath{
    NSLog(@"點選了");
}
@end
Swift
import UIKit

class TableViewController: UIViewController {
    var modelArray: [HomeModel]
    override func viewDidLoad() {
        super.viewDidLoad()
    }
}

//代理方法
extension TableViewController:UITableViewDataSource,UITableViewDelegate {
    func tableView(_ tableView: UITableView, numberOfRowsInSection section: Int) -> Int {
        return modelArray.count;
    }

    func tableView(_ tableView: UITableView, cellForRowAt indexPath: IndexPath) -> UITableViewCell {
        let message = self.modelArray[indexPath.row];
        let cell = tableView.dequeueReusableCell(withIdentifier: "message", for: indexPath)
        cell.textLabel?.text = message.title
        cell.detailTextLabel?.text = message.content
        return cell
    }

    func tableView(tableView: UITableView, didSelectRowAtIndexPath indexPath: NSIndexPath) {
        print("點選了\(indexPath.row)")
    }
}