深度學習資料增廣庫imgaug——Bounding Boxes變換
阿新 • • 發佈:2018-12-11
imgaug在影象變換的同時變換影象中的bound box。
- bounding的支援包括: 將bounding box封裝成物件
- 對bounding box進行變換
- 將bounding box畫在影象上
- 移動bounding box的位置,將變換後的bounding box對映到影象上,計算bounding box的IoU。
1、 基本變換
例子:
import imgaug as ia
from imgaug import augmenters as iaa

ia.seed(1)

image = ia.quokka(size=(256, 256))

# 定義2個bounding box
bbs = ia.BoundingBoxesOnImage([
    ia.BoundingBox(x1=65, y1=100, x2=200, y2=150),
    ia.BoundingBox(x1=150, y1=80, x2=200, y2=130)
], shape=image.shape)

seq = iaa.Sequential([
    iaa.Multiply((1.2, 1.5)), # 改變亮度, 不影響bounding box
    iaa.Affine(
        translate_px={"x": 40, "y": 60},
        scale=(0.5, 0.7)
    ) # 平移後縮放,會影響bounding box
])

# 固定變換
seq_det = seq.to_deterministic()

# 變換影象和bounding box
image_aug = seq_det.augment_images([image])[0]
bbs_aug = seq_det.augment_bounding_boxes([bbs])[0]

# 列印座標
# use .x1_int, .y_int, ... to get integer coordinates
for i in range(len(bbs.bounding_boxes)):
    before = bbs.bounding_boxes[i]
    after = bbs_aug.bounding_boxes[i]
    print("BB %d: (%.4f, %.4f, %.4f, %.4f) -> (%.4f, %.4f, %.4f, %.4f)" % (
        i,
        before.x1, before.y1, before.x2, before.y2,
        after.x1, after.y1, after.x2, after.y2)
    )
# 輸出
# BB 0: (65.0000, 100.0000, 200.0000, 150.0000) -> (130.7524, 171.3311, 210.1272, 200.7291)
# BB 1: (150.0000, 80.0000, 200.0000, 130.0000) -> (180.7291, 159.5718, 210.1272, 188.9699)

# image with BBs before/after augmentation (shown below)
image_before = bbs.draw_on_image(image, thickness=2)
image_after = bbs_aug.draw_on_image(image_aug, thickness=2, color=[0, 0, 255])

fig, axes = plt.subplots(2, 1, figsize=(20, 15))
plt.subplots_adjust(left=0.2, bottom=0.2, right=0.8, top=0.8, hspace=0.3, wspace=0.0)
axes[0].set_title("image before")
axes[0].imshow(image_before)
axes[1].set_title("image after augmentation")
axes[1].imshow(image_after)

plt.show()
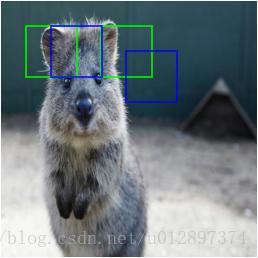
2、平移bounding box
呼叫shift函式即可。例子:
import imgaug as ia
from imgaug import augmenters as iaa

ia.seed(1)

# Define image and two bounding boxes
image = ia.quokka(size=(256, 256))
bbs = ia.BoundingBoxesOnImage([
    ia.BoundingBox(x1=25, x2=75, y1=25, y2=75),
    ia.BoundingBox(x1=100, x2=150, y1=25, y2=75)
], shape=image.shape)

# 兩個box先右移動25畫素,然後第2個box再向下移動25畫素
bbs_shifted = bbs.shift(left=25)
bbs_shifted.bounding_boxes[1] = bbs_shifted.bounding_boxes[1].shift(top=25)

# Draw images before/after moving BBs
image = bbs.draw_on_image(image, color=[0, 255, 0], thickness=2, alpha=0.75)
image = bbs_shifted.draw_on_image(image, color=[0, 0, 255], thickness=2, alpha=0.75)
得到結果:
3、影象有縮放時bounding box的對映
呼叫on函式即可。例子:
import imgaug as ia
from imgaug import augmenters as iaa

ia.seed(1)

# Define image with two bounding boxes
image = ia.quokka(size=(256, 256))
bbs = ia.BoundingBoxesOnImage([
    ia.BoundingBox(x1=25, x2=75, y1=25, y2=75),
    ia.BoundingBox(x1=100, x2=150, y1=25, y2=75)
], shape=image.shape)

# Rescale image and bounding boxes
image_rescaled = ia.imresize_single_image(image, (512, 512))
bbs_rescaled = bbs.on(image_rescaled)

# Draw image before/after rescaling and with rescaled bounding boxes
image_bbs = bbs.draw_on_image(image, thickness=2)
image_rescaled_bbs = bbs_rescaled.draw_on_image(image_rescaled, thickness=2)
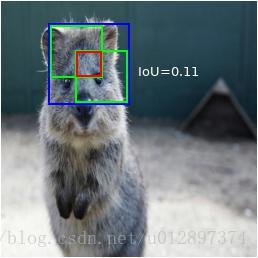
4、計算Intersections, Unions和IoU
import imgaug as ia
from imgaug import augmenters as iaa
import numpy as np

ia.seed(1)

# Define image with two bounding boxes.
image = ia.quokka(size=(256, 256))
bb1 = ia.BoundingBox(x1=50, x2=100, y1=25, y2=75)
bb2 = ia.BoundingBox(x1=75, x2=125, y1=50, y2=100)

# Compute intersection, union and IoU value
# Intersection and union are both bounding boxes. They are here
# decreased/increased in size purely for better visualization.
bb_inters = bb1.intersection(bb2).extend(all_sides=-1)
bb_union = bb1.union(bb2).extend(all_sides=2)
iou = bb1.iou(bb2)

# Draw bounding boxes, intersection, union and IoU value on image.
image_bbs = np.copy(image)
image_bbs = bb1.draw_on_image(image_bbs, thickness=2, color=[0, 255, 0])
image_bbs = bb2.draw_on_image(image_bbs, thickness=2, color=[0, 255, 0])
image_bbs = bb_inters.draw_on_image(image_bbs, thickness=2, color=[255, 0, 0])
image_bbs = bb_union.draw_on_image(image_bbs, thickness=2, color=[0, 0, 255])
image_bbs = ia.draw_text(
    image_bbs, text="IoU=%.2f" % (iou,),
    x=bb_union.x2+10, y=bb_union.y1+bb_union.height//2,
    color=[255, 255, 255], size=13
得到結果: