
ffmpeg filter過濾器 基礎例項及全面解析
目錄
1. 什麼是ffmpeg filter?
首先是名字:中文名,就稱為ffmpeg過濾器,當然也有人稱為ffmpeg 濾鏡。(用濾鏡聽起來好像是給video用的,所以不太好,因為audio也可以用)
ffmpeg目錄下,有個資料夾叫libavfilter,它可以單獨編譯為一個庫。幹嘛用的呢?用於音視訊過濾。
比如,我有一個mp4,想把它縮小一半,輸出一個新的mp4,那麼,做縮小動作的,就是libavfilter。
是不是想檢視ffmpeg有多少filter?用下面的命令。./ffmpeg -filters
2. 如何使用ffmpeg filter
filter的使用很簡單。下面就舉兩個例子。
2.1 將輸入的1920x1080縮小到960x540輸出:
./ffmpeg -i input.mp4 -vf scale=960:540 output.mp4
//ps: 如果540不寫,寫成-1,即scale=960:-1, 那也是可以的,ffmpeg會通知縮放濾鏡在輸出時保持原始的寬高比。
2.2 為視訊新增logo
比如,我有這麼一個圖片
./ffmpeg -i input.mp4 -i iQIYI_logo.png -filter_complex overlay output.mp4
結果如下所示:
./ffmpeg -i input.mp4 -i logo.png -filter_complex overlay=W-w output.mp4
./ffmpeg -i input.mp4 -i logo.png -filter_complex overlay=0:H-h output.mp4
右下角:./ffmpeg -i input.mp4 -i logo.png -filter_complex overlay=W-w:H-h output.mp4
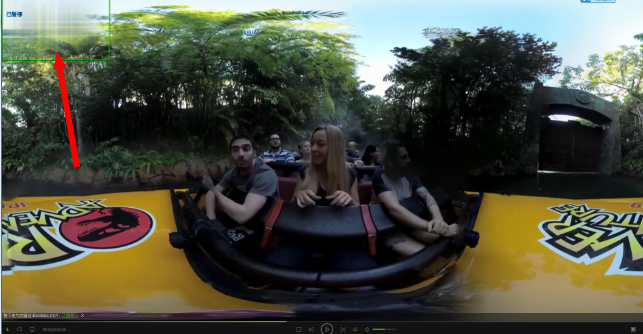
2.3 去掉視訊的logo
有時候,下載了某個網站的視訊,但是有logo很煩,咋辦?有辦法,用ffmpeg的delogo過濾器。 語法:-vf delogo=x:y:w:h[:t[:show]] x:y 離左上角的座標 w:h logo的寬和高 t: 矩形邊緣的厚度預設值4 show:若設定為1有一個綠色的矩形,預設值0。
./ffmpeg -i input.mp4 -vf delogo=0:0:220:90:100:1 output.mp4
結果如下所示:
3. 自己寫一個過濾器
既然過濾器這麼好,那如何自己實現一個呢? 很簡單,做3件事: a). 自己寫一個XXX.c檔案,比如vf_transform.c,放在libavfilter目錄下。程式碼可以參考其他filter; b) 在libavfilter/allfilters.c新增一行: REGISTER_FILTER(TRANSFORM, transform, vf); c) 修改libavfilter/Makefile,新增一行: OBJS-$(CONFIG_TRANSFORM_FILTER) += vf_transform.o
步驟知道了,現在就做第一步,開始coding一個C檔案吧,名字就為vf_transform.c,給出程式碼如下所示。
#include "libavutil/opt.h"
#include "libavutil/imgutils.h"
#include "libavutil/avassert.h"
#include "avfilter.h"
#include "formats.h"
#include "internal.h"
#include "video.h"


typedef struct TransformContext {
    const AVClass *class;
    int backUp;
    //add some private data if you want
} TransformContext;

typedef struct ThreadData {
    AVFrame *in, *out;
} ThreadData;

static void image_copy_plane(uint8_t *dst, int dst_linesize,
                         const uint8_t *src, int src_linesize,
                         int bytewidth, int height)
{
    if (!dst || !src)
        return;
    av_assert0(abs(src_linesize) >= bytewidth);
    av_assert0(abs(dst_linesize) >= bytewidth);
    for (;height > 0; height--) {
        memcpy(dst, src, bytewidth);
        dst += dst_linesize;
        src += src_linesize;
    }
}

//for YUV data, frame->data[0] save Y, frame->data[1] save U, frame->data[2] save V
static int frame_copy_video(AVFrame *dst, const AVFrame *src)
{
    int i, planes;

    if (dst->width  > src->width ||
        dst->height > src->height)
        return AVERROR(EINVAL);

    planes = av_pix_fmt_count_planes(dst->format);
    //make sure data is valid
    for (i = 0; i < planes; i++)
        if (!dst->data[i] || !src->data[i])
            return AVERROR(EINVAL);

    const AVPixFmtDescriptor *desc = av_pix_fmt_desc_get(dst->format);
    int planes_nb = 0;
    for (i = 0; i < desc->nb_components; i++)
        planes_nb = FFMAX(planes_nb, desc->comp[i].plane + 1);

    for (i = 0; i < planes_nb; i++) {
        int h = dst->height;
        int bwidth = av_image_get_linesize(dst->format, dst->width, i);
        if (bwidth < 0) {
            av_log(NULL, AV_LOG_ERROR, "av_image_get_linesize failed\n");
            return;
        }
        if (i == 1 || i == 2) {
            h = AV_CEIL_RSHIFT(dst->height, desc->log2_chroma_h);
        }
        image_copy_plane(dst->data[i], dst->linesize[i],
                            src->data[i], src->linesize[i],
                            bwidth, h);
    }
    return 0;
}

/**************************************************************************
* you can modify this function, do what you want here. use src frame, and blend to dst frame.
* for this demo, we just copy some part of src frame to dst frame(out_w = in_w/2, out_h = in_h/2)
***************************************************************************/
static int do_conversion(AVFilterContext *ctx, void *arg, int jobnr,
                        int nb_jobs)
{
    TransformContext *privCtx = ctx->priv;
    ThreadData *td = arg;
    AVFrame *dst = td->out;
    AVFrame *src = td->in;

    frame_copy_video(dst, src);
    return 0;
}

static int filter_frame(AVFilterLink *link, AVFrame *in)
{
    av_log(NULL, AV_LOG_WARNING, "### chenxf filter_frame, link %x, frame %x \n", link, in);
    AVFilterContext *avctx = link->dst;
    AVFilterLink *outlink = avctx->outputs[0];
    AVFrame *out;

    //allocate a new buffer, data is null
    out = ff_get_video_buffer(outlink, outlink->w, outlink->h);
    if (!out) {
        av_frame_free(&in);
        return AVERROR(ENOMEM);
    }

    //the new output frame, property is the same as input frame, only width/height is different
    av_frame_copy_props(out, in);
    out->width  = outlink->w;
    out->height = outlink->h;

    ThreadData td;
    td.in = in;
    td.out = out;
    int res;
    if(res = avctx->internal->execute(avctx, do_conversion, &td, NULL, FFMIN(outlink->h, avctx->graph->nb_threads))) {
        return res;
    }

    av_frame_free(&in);

    return ff_filter_frame(outlink, out);
}

static av_cold int config_output(AVFilterLink *outlink)
{
    AVFilterContext *ctx = outlink->src;
    TransformContext *privCtx = ctx->priv;

    //you can modify output width/height here
    outlink->w = ctx->inputs[0]->w/2;
    outlink->h = ctx->inputs[0]->h/2;
    av_log(NULL, AV_LOG_DEBUG, "configure output, w h = (%d %d), format %d \n", outlink->w, outlink->h, outlink->format);

    return 0;
}

static av_cold int init(AVFilterContext *ctx)
{
    av_log(NULL, AV_LOG_DEBUG, "init \n");
    TransformContext *privCtx = ctx->priv;
    //init something here if you want
    return 0;
}

static av_cold void uninit(AVFilterContext *ctx)
{
    av_log(NULL, AV_LOG_DEBUG, "uninit \n");
    TransformContext *privCtx = ctx->priv;
    //uninit something here if you want
}

//currently we just support the most common YUV420, can add more if needed
static int query_formats(AVFilterContext *ctx)
{
    static const enum AVPixelFormat pix_fmts[] = {
        AV_PIX_FMT_YUV420P,
        AV_PIX_FMT_NONE
    };
    AVFilterFormats *fmts_list = ff_make_format_list(pix_fmts);
    if (!fmts_list)
        return AVERROR(ENOMEM);
    return ff_set_common_formats(ctx, fmts_list);
}


//*************
#define OFFSET(x) offsetof(TransformContext, x)
#define FLAGS AV_OPT_FLAG_VIDEO_PARAM|AV_OPT_FLAG_FILTERING_PARAM

static const AVOption transform_options[] = {
    { "backUp",         "a backup parameters, NOT use so far",          OFFSET(backUp),    AV_OPT_TYPE_STRING, {.str = "0"}, CHAR_MIN, CHAR_MAX, FLAGS },
    { NULL }

};// TODO: add something if needed

static const AVClass transform_class = {
    .class_name       = "transform",
    .item_name        = av_default_item_name,
    .option           = transform_options,
    .version          = LIBAVUTIL_VERSION_INT,
    .category         = AV_CLASS_CATEGORY_FILTER,
};

static const AVFilterPad avfilter_vf_transform_inputs[] = {
    {
        .name         = "transform_inputpad",
        .type         = AVMEDIA_TYPE_VIDEO,
        .filter_frame = filter_frame,
    },
    { NULL }
};

static const AVFilterPad avfilter_vf_transform_outputs[] = {
    {
        .name = "transform_outputpad",
        .type = AVMEDIA_TYPE_VIDEO,
        .config_props = config_output,
    },
    { NULL }
};

AVFilter ff_vf_transform = {
    .name           = "transform",
    .description    = NULL_IF_CONFIG_SMALL("cut a part of video"),
    .priv_size      = sizeof(TransformContext),
    .priv_class     = &transform_class,
    .init          = init,
    .uninit        = uninit,
    .query_formats = query_formats,
    .inputs         = avfilter_vf_transform_inputs,
    .outputs        = avfilter_vf_transform_outputs,
};
- 1
- 2
- 3
- 4
- 5
- 6
- 7
- 8
- 9
- 10
- 11
- 12
- 13
- 14
- 15
- 16
- 17
- 18
- 19
- 20
- 21
- 22
- 23
- 24
- 25
- 26
- 27
- 28
- 29
- 30
- 31
- 32
- 33
- 34
- 35
- 36
- 37
- 38
- 39
- 40
- 41
- 42
- 43
- 44
- 45
- 46
- 47
- 48
- 49
- 50
- 51
- 52
- 53
- 54
- 55
- 56
- 57
- 58
- 59
- 60
- 61
- 62
- 63
- 64
- 65
- 66
- 67
- 68
- 69
- 70
- 71
- 72
- 73
- 74
- 75
- 76
- 77
- 78
- 79
- 80
- 81
- 82
- 83
- 84
- 85
- 86
- 87
- 88
- 89
- 90
- 91
- 92
- 93
- 94
- 95
- 96
- 97
- 98
- 99
- 100
- 101
- 102
- 103
- 104
- 105
- 106
- 107
- 108
- 109
- 110
- 111
- 112
- 113
- 114
- 115
- 116
- 117
- 118
- 119
- 120
- 121
- 122
- 123
- 124
- 125
- 126
- 127
- 128
- 129
- 130
- 131
- 132
- 133
- 134
- 135
- 136
- 137
- 138
- 139
- 140
- 141
- 142
- 143
- 144
- 145
- 146
- 147
- 148
- 149
- 150
- 151
- 152
- 153
- 154
- 155
- 156
- 157
- 158
- 159
- 160
- 161
- 162
- 163
- 164
- 165
- 166
- 167
- 168
- 169
- 170
- 171
- 172
- 173
- 174
- 175
- 176
- 177
- 178
- 179
- 180
- 181
- 182
- 183
- 184
- 185
- 186
- 187
- 188
- 189
- 190
- 191
- 192
- 193
- 194
- 195
- 196
- 197
- 198
- 199
- 200
- 201
- 202
- 203
- 204
- 205
- 206
- 207
- 208
- 209
要寫一個filter,基本上按著上面的模板就可以了,最關鍵的函式就是filter_frame。你可以通過修改filter_frame,來做想要的變換。 當然啦,我還是要友情介紹一下上面的程式碼。 從下往上看,我們要寫的首先是AVFilter,其中的名字就是對外宣稱的名字,和命令列要使用的”-vf transform” 是一樣的。 priv——size初始化了TransformContext,這個是你自己寫的filter的私有上下文,你可以把各種需要的本地全域性變數放在這,挺好的。 接著就是init和uninit,這個是看情況的,如果你的私有上下文,有什麼內容要初始化,那就放在init,如果沒有,那可以把這兩句刪掉。init/uninit函式也可以不寫。 接著就是query_formats,這個就是宣稱你的filter支援什麼格式的frame。本例只寫著YUV420,當然你可以根據需要新增支援。 接著就是AVFilterPad inputs/outputs,這個你可以認為是filter和外面互動的橋樑。 比如AVFilterPad avfilter_vf_transform_inputs,就聲明瞭結構體的函式指標filter_frame,將會指向本檔案的filter_frame(…)函式,這時候,其他filter可以通過這個函式指標,間接呼叫filter_frame(…)。 同理AVFilterPad avfilter_vf_transform_outputs,聲明瞭結構體的函式指標config_props,將會指向本檔案的config_output(…)函式,這時候,其他filter可以通過這個函式指標,間接呼叫config_output(…)。 filter_frame(…)是最關鍵的函式,我們要做的變換,必須在該函式實現。 config_output(…)幹嘛用呢?用於配置輸出的frame的大小。比如輸入一個1920x1080的幀,我們想要變換一下,並以960x540輸出,那麼,這個960x540就得在該函式設定。
說完這些,好像你基本上就懂了。本例就在filter_frame函式裡,把輸入的一幀,的左上部分,剪下的dst frame,然後輸出。
好了,重新編譯ffmpeg,然後就可以跑起來了。./ffmpeg -loglevel warning -i input.mp4 -vf transform output.mp4
4. filter的結構體
程式碼寫好了,但是是不是雲裡霧裡,不知道為啥那麼寫,不知道那些結構體到底是啥關係?別怕,接下來就為你揭開各種結構體關係的神祕面紗。
filter涉及的結構體,主要包括:
InputStream, OutputStream
FilterGraph,
AVFilterGraph, AVFilterContext, AVFilterLink, AVFilterPad。
要理清它們之間錯綜複雜的關係,單看程式碼是很難記憶深刻的,為此我特地花了一張圖,如下所示。(以上面的例子為背景)
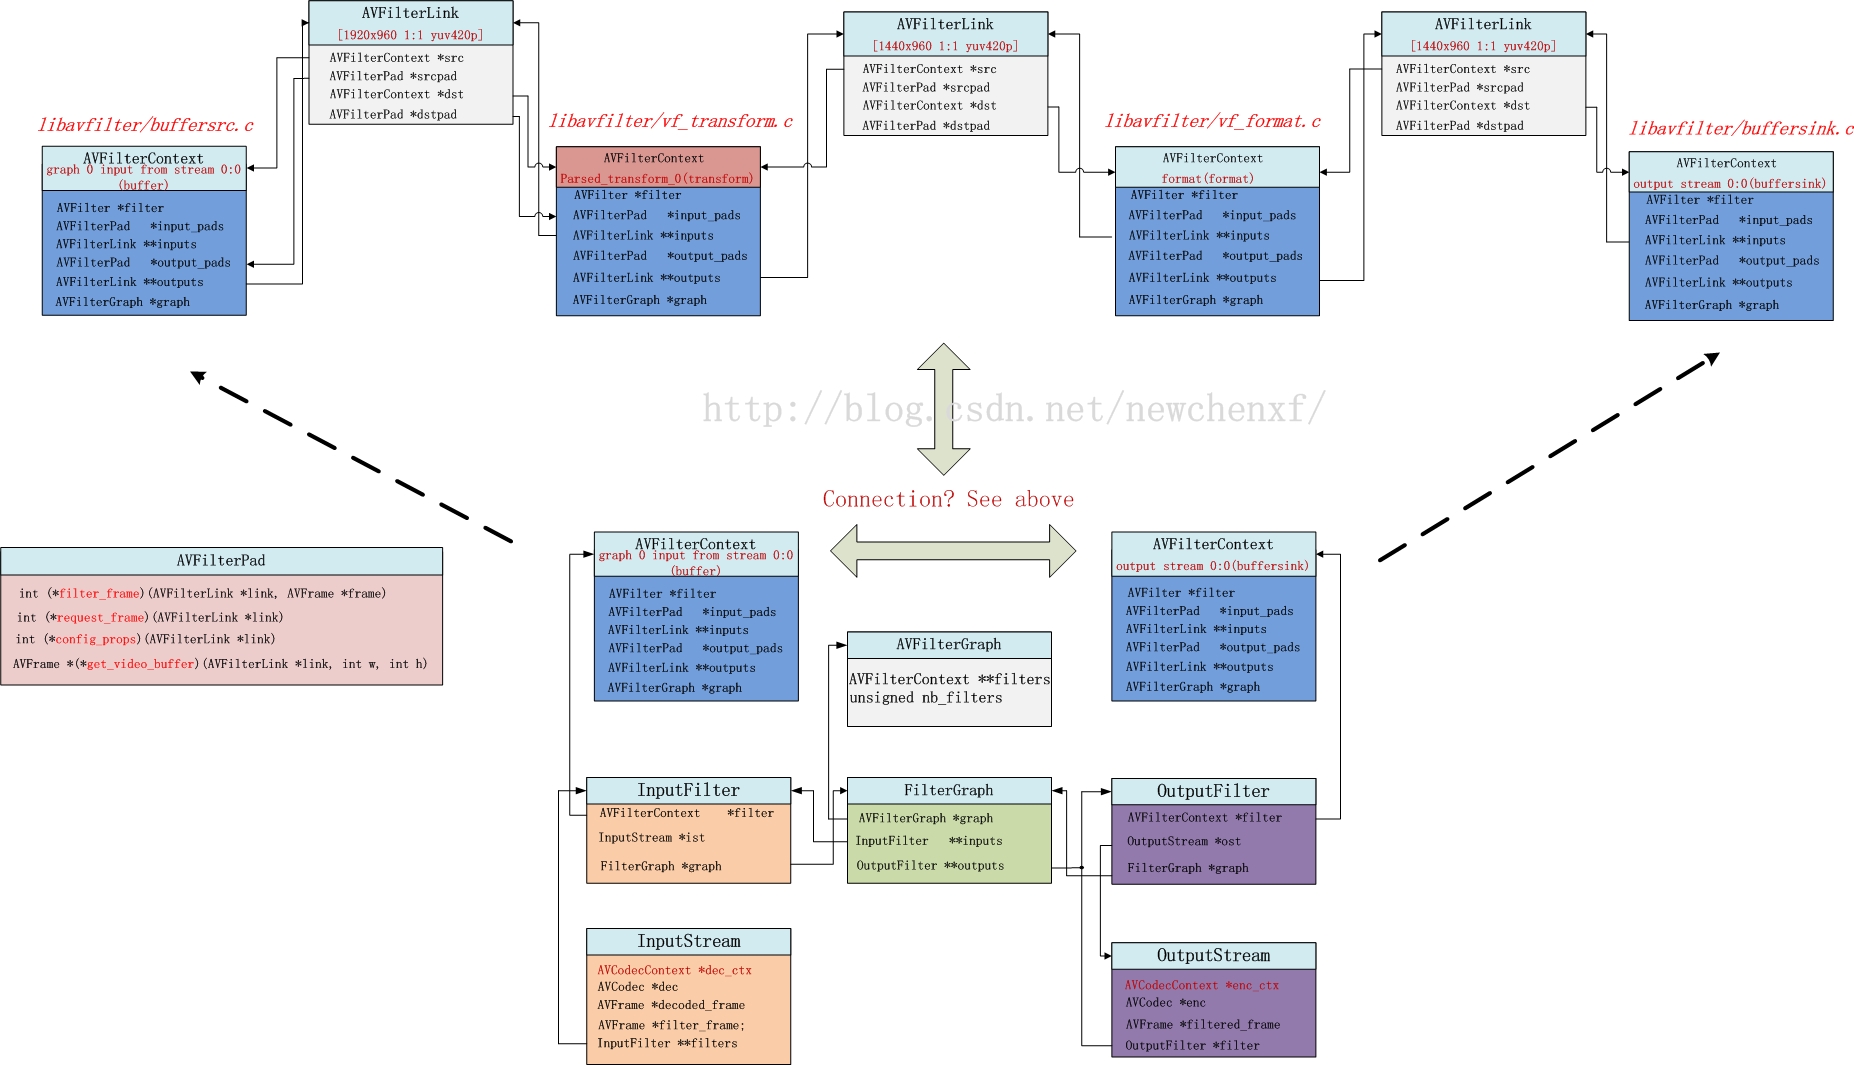
上面的例子,用了命令:./ffmpeg -loglevel warning -i input.mp4 -vf transform output.mp4
即用了我們寫的transform filter。
假設源視訊input.mp4,有一路video和一路audio,那麼,audio和video各自有1個InputStream和1個OutputStream。
以video為例,共一個InputStream & OutputStream。那麼,video所涉及的結構體正如上圖所示。
一般,一個InputStream對應一個Inputfilter,一個OutputStream對應一個OutputFilter。 FilterGraph管理Inputfilter和OutputFilter(當然,Inputfilter和OutputFilter的指標*graph都可以找到管理者FilterGraph)。此外,FilterGraph還管理一個AVFilterGraph。 AVFilterGraph是幹嘛的?它內部有個雙指標,**filters,明顯就是一個指標陣列,存一堆的AVFilterContext指標。 AVFilterContext對應啥?它其實就對應一個filter!!!!!也就是說,一個filter的上下文就是AVFilterContext。所以對上圖來說,AVFilterGraph的**filters其實就指向4個AVFilterContext。
你是不是疑問,為啥我們自己就寫了一個filter,怎麼會涉及到4個filter? 其實ffmpeg預設是有3個filter的!名字叫“buffer”, “format”, “buffersink”,就在上圖上半部分的第一,第三,和第四個AVFilterContext。
AVFilterLink是幹嘛的?它是建立AVFilterContext之間的聯絡。所以,若有4個AVFilterContext,那就需要3個AVFilterLink。 AVFilterLink的src指標,指向上一個AVFilterContext,dst指標,指向下一個AVFilterContext。 AVFilterPad幹嘛的?它用於AVFilterContext之間的callback(回撥)。 怎麼個回撥法? 很簡單,第一個AVFilterContext的outputs[0]指標,指向第一個AVFilterLink,這個AVFilterLink的dst指標,指向第二個AVFilterContext。 如果我在前一個AVFilterContext呼叫 outputs[0]->dstpad->filter_frame(Frame* input_frame1), 那其實就意味著,第一個過濾器,可以把處理好的一個frame(名字為input_frame1),可以通過這個呼叫,傳遞給第二個過濾器的input_pads的filter_frame函式。而我們實現的vf_transform.c,就是我說的第二個過濾器,裡面就實現了filter_frame().
5. filter_frame()呼叫流程
既然說,filter_frame是最關鍵的函式,也是我們自己寫filter必須自定義的函式,那麼,我們就來理一理這個函式從哪裡來,又將到哪裡去!
5.1. decode_video //ffmpeg.c
最初的源頭,是ffmpeg.c的decode_video函式。 將核心程式碼抽取出來,如下所示:
static int decode_video(InputStream *ist, AVPacket *pkt, int *got_output)
{
    AVFrame* decoded_frame, f;
    //解碼
    ret = avcodec_decode_video2(ist->dec_ctx,
                                decoded_frame, got_output, pkt);
    //......
    //送給濾鏡
    for (i = 0; i < ist->nb_filters; i++) {
        f = decodec_frame;
        ret = av_buffersrc_add_frame_flags(ist->filters[i]->filter, f, AV_BUFFERSRC_FLAG_PUSH);
    }
}
- 1
- 2
- 3
- 4
- 5
- 6
- 7
- 8
- 9
- 10
- 11
- 12
- 13
- 14
可見,最重要做2件事,一個解碼,一個送給濾鏡。 送給哪個濾鏡呢?InputStream *ist的nb_filters為1,其實就是指向名字為“buffer”的filter(原始檔:buffersrc.c)。這個filter與其他filter不同的是,它是所有filter的第一個入口。解碼完,都先給它,它再傳遞給下一個。為啥先給他呢?很簡單,它是一個FIFO,快取資料用的。
5.2. av_buffersrc_add_frame_flags//buffersrc.c
該函式直接走到av_buffersrc_add_frame_internal //buffersrc.c
5.3. av_buffersrc_add_frame_internal //buffersrc.c
static int av_buffersrc_add_frame_internal(AVFilterContext *ctx,
AVFrame *frame, int flags)
{
//寫FIFO
av_fifo_generic_write(s->fifo, ©, sizeof(copy), NULL);
if ((flags & AV_BUFFERSRC_FLAG_PUSH))
if ((ret = ctx->output_pads[0].request_frame(ctx->outputs[0])) < 0)
return ret;
return 0;
}
- 1
- 2
- 3
- 4
- 5
- 6
- 7
- 8
- 9
- 10
- 11
- 12
抽出核心程式碼,可見,顯示把frame寫到FIFO,然後調了自己的output_pads[0]的request_frame。
5.4. request_frame //buffersrc.c
static int request_frame(AVFilterLink *link)
{
    BufferSourceContext *c = link->src->priv;
    AVFrame *frame;
    int ret;
    //省略......
    av_fifo_generic_read(c->fifo, &frame, sizeof(frame), NULL);
    av_log(NULL, AV_LOG_WARNING, "request_frame, frame-pts %lld \n", frame->pts);
    //這個link,是第一個link,連結當前的AVFilterContext和下一個AVFilterContext,也就是我們自己寫的vf_transform.c
    ret = ff_filter_frame(link, frame);

    return ret;
}
- 1
- 2
- 3
- 4
- 5
- 6
- 7
- 8
- 9
- 10
- 11
- 12
- 13
- 14
抽出核心程式碼,可見它從FIFO讀取一幀資料。然後呼叫ff_filter_frame。此時輸入的link是第一個AVFilterLink。
5.5. ff_filter_frame // avfilter.c
該函式做了一些基本檢查,走到ff_filter_frame_framed
5.6. ff_filter_frame_framed //avfilter.c
static int ff_filter_frame_framed(AVFilterLink *link, AVFrame *frame)
{
    //定義一個函式指標filter_frame。所指向的函式,引數為AVFilterLink *, AVFrame *,返回值為int
    int (*filter_frame)(AVFilterLink *, AVFrame *);
    AVFilterContext *dstctx = link->dst;//下一個AVFilterContext,對本例來說,就是我們自己寫的transform 濾鏡,原始碼在vf_transform.c
    AVFilterPad *dst = link->dstpad;
    AVFrame *out = NULL;
    int ret;

    if (!(filter_frame = dst->filter_frame))//函式指標filter_frame,link->dstpad其實就是dstctx->input_pads,也就是transform濾鏡定義的
        filter_frame = default_filter_frame;
    //省略300字

    ret = filter_frame(link, out);
    link->frame_count++;
    ff_update_link_current_pts(link, pts);
    return ret;
}
- 1
- 2
- 3
- 4
- 5
- 6
- 7
- 8
- 9
- 10
- 11
- 12
- 13
- 14
- 15
- 16
- 17
- 18
- 19
抽出核心程式碼。 定義一個函式指標filter_frame。所指向的函式,必須是引數為AVFilterLink , AVFrame ,返回值為int filter_frame = dst->filter_frame dst = link->dstpad,而link->dstpad其實就是dstctx->input_pads,也就是transform過濾器定義的input_pads
static const AVFilterPad avfilter_vf_transform_inputs[] = {
    {
        .name         = "default",
        .type         = AVMEDIA_TYPE_VIDEO,
        .filter_frame = filter_frame,
    },
    { NULL }
};
- 1
- 2
- 3
- 4
- 5
- 6
- 7
- 8
- 9
所以,filter_frame函式指標,指向的就是vf_transform.c實現的filter_frame函式。
5.7. filter_frame //vf_transform.c,當然啦,ffmpeg定義的各種filter,比如vf_colorbalance.c,vf_scale.c等,也有這個函式,流程一樣的
static int filter_frame(AVFilterLink *link, AVFrame *in)
{
    AVFilterContext *avctx = link->dst;//第一個link的dst AVFilterContext,其實就是當前的filter的AVFilterContext
    AVFilterLink *outlink = avctx->outputs[0];//當前的AVFilterContext,outputs[0]指向第二個AVFilterLink
    AVFrame *out;

    //分配一個空的AVFrame。
    out = ff_get_video_buffer(outlink, outlink->w, outlink->h);
    if (!out) {
        av_frame_free(&in);
        return AVERROR(ENOMEM);
    }

    //分配的空buffer的引數和上一個基本一致,但修改寬高。當然啦,如果你願意,不修改寬高,那就不需要下面2句。
    av_frame_copy_props(out, in);
    out->width  = outlink->w;
    out->height = outlink->h;
    out->format = outlink->format;

    ThreadData td;
    td.in = in;
    td.out = out;
    int res;
    if(res = avctx->internal->execute(avctx, do_conversion, &td, NULL, FFMIN(outlink->h, avctx->graph->nb_threads))) {
        return res;
    }//啟用一個子執行緒,執行比較耗時的變換。do_conversion是我們要做的變換。

    av_frame_free(&in);

    return ff_filter_frame(outlink, out);//此時的ff_filter_frame,輸入引數和前面buffersrc.c呼叫的已經不一樣。outlink是第二個AVFilterLink,buffer也是做了變換的新的buffer
}
- 1
- 2
- 3
- 4
- 5
- 6
- 7
- 8
- 9
- 10
- 11
- 12
- 13
- 14
- 15
- 16
- 17
- 18
- 19
- 20
- 21
- 22
- 23
- 24
- 25
- 26
- 27
- 28
- 29
- 30
- 31
- 32
抽出關鍵程式碼,抽象,通過ff_get_video_buffer,分配一個空buffer,該buffer用於儲存變換的結果,並會通過ff_filter_frame傳遞到下一個filter。 do_conversion是一個真正做變換的函式,但其實如果要做的處理並不耗時,也不一定要用另一個執行緒來處理。直接在該filter_frame做也行。 處理好的新的資料,放在out,呼叫ff_filter_frame,傳遞給下一個filter。注意,ff_filter_frame的oulink,對應上圖的第二個AVFilterLink。
5.8. 再次走進ff_filter_frame // avfilter.c
如上已知,ff_filter_frame只做了一些基本檢查,走到ff_filter_frame_framed。故而我們直接看ff_filter_frame_framed
static int ff_filter_frame_framed(AVFilterLink *link, AVFrame *frame)
{
    //定義一個函式指標filter_frame。所指向的函式,引數為AVFilterLink *, AVFrame *,返回值為int
    int (*filter_frame)(AVFilterLink *, AVFrame *);
    AVFilterContext *dstctx = link->dst;//下一個AVFilterContext,對本例來說,就是系統預設的第三個濾鏡,名字叫"format",原始碼在vf_format.c
    AVFilterPad *dst = link->dstpad;
    AVFrame *out = NULL;
    int ret;

    if (!(filter_frame = dst->filter_frame))//vf_format.c沒有實現filter函式,因為返回為空
        filter_frame = default_filter_frame;//所以函式會走到這,函式指標filter_frame 將指向default_filter_frame
    //省略300字

    ret = filter_frame(link, out);
    link->frame_count++;
    ff_update_link_current_pts(link, pts);
    return ret;
}
- 1
- 2
- 3
- 4
- 5
- 6
- 7
- 8
- 9
- 10
- 11
- 12
- 13
- 14
- 15
- 16
- 17
- 18
- 19
- 20
如註釋所說,由於vf_format.c沒有實現filter函式,所以此時的filter_frame指標,指向的是defalut_filter_frame。
5.9. default_filter_frame //avfilter.c
static int default_filter_frame(AVFilterLink *link, AVFrame *frame)
{
    //該函式沒幹啥,又呼叫ff_filter_frame了,第一個引數,換成第三個AVFilterLink了,第二個引數不變,frame默默的傳遞出去
    return ff_filter_frame(link->dst->outputs[0], frame);
}
- 1
- 2
- 3
- 4
- 5
- 6
此時link->dst->outputs[0]對應上圖第三個AVFilterLink。
5.10. 第三次走進ff_filter_frame // avfilter.c
static int ff_filter_frame_framed(AVFilterLink *link, AVFrame *frame)
{
    //定義一個函式指標filter_frame。所指向的函式,引數為AVFilterLink *, AVFrame *,返回值為int
    int (*filter_frame)(AVFilterLink *, AVFrame *);
    AVFilterContext *dstctx = link->dst;//下一個AVFilterContext,對本例來說,就是系統預設的最後一個濾鏡,名字叫"buffersink",原始碼在bufffersink.c
    AVFilterPad *dst = link->dstpad;
    AVFrame *out = NULL;
    int ret;

    if (!(filter_frame = dst->filter_frame))//指向buffersink.c實現的filte_frame函式
        filter_frame = default_filter_frame;
    //省略300字

    ret = filter_frame(link, out);
    link->frame_count++;
    ff_update_link_current_pts(link, pts);
    return ret;
}
- 1
- 2
- 3
- 4
- 5
- 6
- 7
- 8
- 9
- 10
- 11
- 12
- 13
- 14
- 15
- 16
- 17
- 18
- 19
此時的filter_frame指標,指向buffersink.c實現的filter_frame函式
5.11. filter_frame //buffersink.c
static int filter_frame(AVFilterLink *link, AVFrame *frame)
{
    AVFilterContext *ctx = link->dst;
    BufferSinkContext *buf = link->dst->priv;
    int ret;

    if ((ret = add_buffer_ref(ctx, frame)) < 0)
        return ret;
    //省略300字
    return 0;
}

static int add_buffer_ref(AVFilterContext *ctx, AVFrame *ref)
{
    BufferSinkContext *buf = ctx->priv;

    /* cache frame */
    //把buffer存到FIFO
    av_fifo_generic_write(buf->fifo, &ref, FIFO_INIT_ELEMENT_SIZE, NULL);
    return 0;
}
- 1
- 2
- 3
- 4
- 5
- 6
- 7
- 8
- 9
- 10
- 11
- 12
- 13
- 14
- 15
- 16
- 17
- 18
- 19
- 20
- 21
- 22
- 23
抽出關鍵程式碼。很清晰的看到,其實就是把buffer存到FIFO。
至此,把filter_frame的來龍去脈搞清楚啦!!歐耶
6. filter之後,ffmpeg如何編碼
當我們寫了一個filter,把視訊做處理後,ffmpeg是如何把它編碼的呢? 通過研究,發現編碼的源頭函式是reap_filters(…),它會被transcode_step(…)函式呼叫。
6.1. reap_filters //ffmpeg.c
static int reap_filters(int flush)
{
    AVFrame *filtered_frame = NULL;//該指標將儲存一個經過濾鏡處理後的buffer,並送給encoder
    int i;

    /* Reap all buffers present in the buffer sinks */
    for (i = 0; i < nb_output_streams; i++) {//一路video,一路audio,那麼nb_output_streams = 2
        OutputStream *ost = output_streams[i];
        OutputFile    *of = output_files[ost->file_index];
        AVFilterContext *filter;
        AVCodecContext *enc = ost->enc_ctx;
        int ret = 0;

        if (!ost->filter)
            continue;
        filter = ost->filter->filter;//OutputStream的filter指標指向buffersink.c定義的AVFilterContext。也就是本文討論的,最後一個AVFilterContext

        if (!ost->filtered_frame && !(ost->filtered_frame = av_frame_alloc())) {
            return AVERROR(ENOMEM);
        }
        filtered_frame = ost->filtered_frame;

        while (1) {
            double float_pts = AV_NOPTS_VALUE; // this is identical to filtered_frame.pts but with higher precision
            //av_buffersink_get_frame_flags定義在buffersink.c,用於從FIFO讀出一幀
            ret = av_buffersink_get_frame_flags(filter, filtered_frame,
                                               AV_BUFFERSINK_FLAG_NO_REQUEST);
            if (ret < 0) {
                //省略,檢查ret
                //如果ret<0,不是別的錯誤,那認為還沒有資料,跳出迴圈
                break;
            }
            switch (filter->inputs[0]->type) {
            case AVMEDIA_TYPE_VIDEO:
                //do_video_out函式將會做video編碼
                do_video_out(of->ctx, ost, filtered_frame, float_pts);
                break;
            case AVMEDIA_TYPE_AUDIO:
                //do_audio_out函式將會做audioo編碼
                do_audio_out(of->ctx, ost, filtered_frame);
                break;
            default:
                // TODO support subtitle filters
                av_assert0(0);
            }

            av_frame_unref(filtered_frame);
        }
    }

    return 0;
}
- 1
- 2
- 3
- 4
- 5
- 6
- 7
- 8
- 9
- 10
- 11
- 12
- 13
- 14
- 15
- 16
- 17
- 18
- 19
- 20
- 21
- 22
- 23
- 24
- 25
- 26
- 27
- 28
- 29
- 30
- 31
- 32
- 33
- 34
- 35
- 36
- 37
- 38
- 39
- 40
- 41
- 42
- 43
- 44
- 45
- 46
- 47
- 48
- 49
- 50
- 51
- 52
- 53
前一節說了,filter_frame(…)的最終結果是,把buffer存在了buffersink.c的FIFO裡。 那麼,這一節,說的其實就是一個從buffersink的FIFO讀資料,並編碼的過程。 從上面可知,av_buffersink_get_frame_flags函式,從buffersink讀取一幀資料,放到filtered_frame。
6.2. do_video_out //ffmpeg.c
static void do_video_out(AVFormatContext *s,
                         OutputStream *ost,
                         AVFrame *next_picture,
                         double sync_ipts)
{
    int ret;
    AVCodecContext *enc = ost->enc_ctx;
    int nb_frames, nb0_frames, i;
    //省略300字
    for (i = 0; i < nb_frames; i++) {
        AVFrame *in_picture;
        if (i < nb0_frames && ost->last_frame) {
            in_picture = ost->last_frame;
        } else
            in_picture = next_picture;
        //省略300字
        ost->frames_encoded++;
        //開始編碼
        ret = avcodec_encode_video2(enc, &pkt, in_picture, &got_packet);
    }
    ///省略300字
}
- 1
- 2
- 3
- 4
- 5
- 6
- 7
- 8
- 9
- 10
- 11
- 12
- 13
- 14
- 15
- 16
- 17
- 18
- 19
- 20
- 21
- 22
- 23
該函式很長,做了很多雜事,但關鍵程式碼就是呼叫編碼函式avcodec_encode_video2
7. 函式流程圖
說了那麼久,得來個大招了!下面給出ffmpeg使用filter時的函式流程圖,主要把和filter相關的函式拉出來!
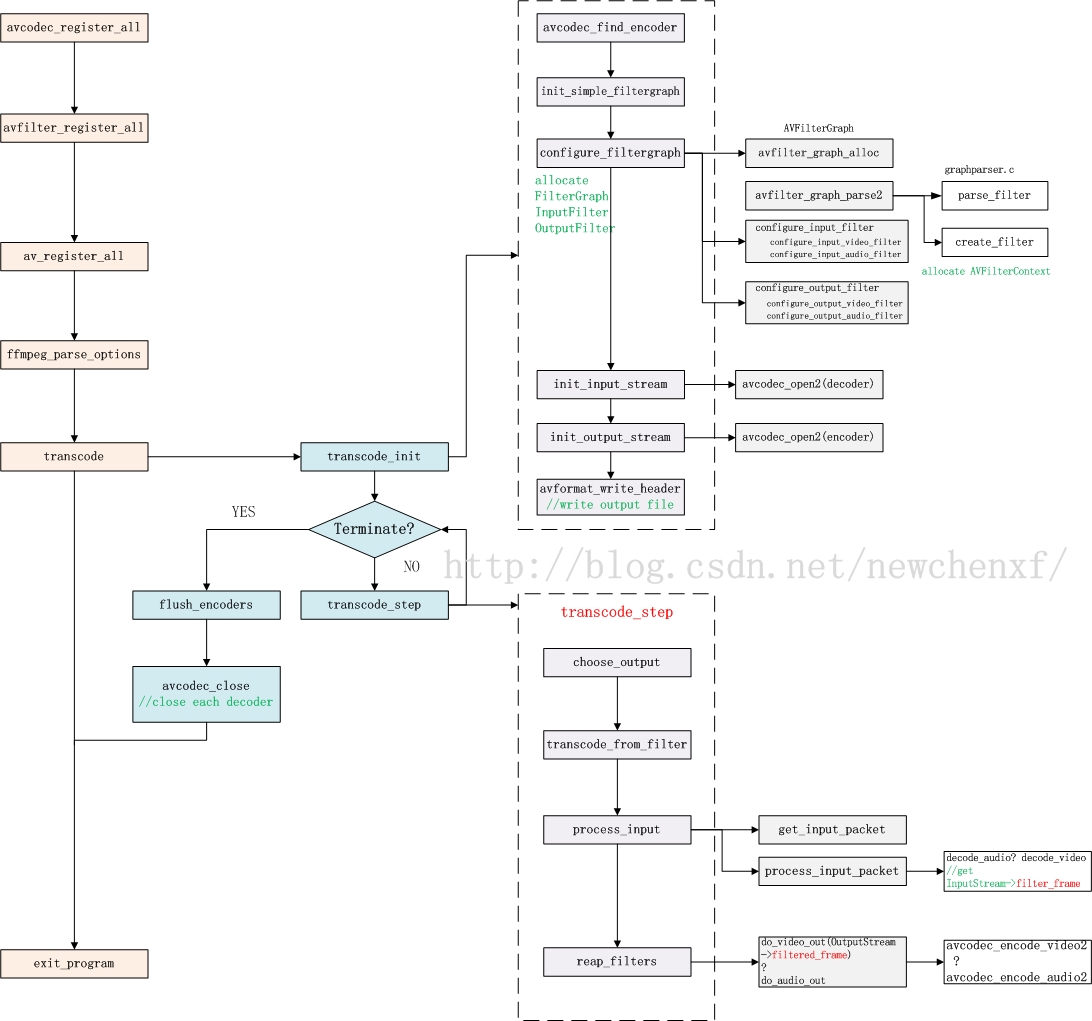
對於ffmpeg常規的avcodec_register_all(…), avfilter_register_all(…), av_register_all(…)等函式,我就不說啦。各種CSDN大牛說了很多了!!
transcode_init()主要用於初始化前文提到的各種結構體。 transcode_step主要工作: 解碼->送filter過濾->編碼->繼續解碼….
>choose_output()函式用於選擇一個OutputStream。比如有一個audio,一個video,那要根據pts策略,比如誰的pts比較小,就挑哪個OutputStream先幹活。
transcode_frome_filter()函式用於選個一個InputStream,用於下一步的process_input()。
process_input()函式主要是解碼,並把解碼的buffer送往filter處理。
reap_filters()函式主要是,從filter的FIFO拿出buffer,並編碼。
- 1
- 2
- 3
- 4
8. 參考資料
--------------------- 本文來自 長江很多號 的CSDN 部落格 ,全文地址請點選:https://blog.csdn.net/newchenxf/article/details/51364105?utm_source=copy