
Tensorflow的c++介面載入模型推理單張圖片
tensorflow的官網上提供很詳細的python教程,也確實很好用。但是,應用軟體產品大多用c/c++寫的。所以,大部分的應用都是用python來訓練模型,得到訓練好的模型後. 用c++呼叫tensorflow模型進行推理。通過收集資料,總結了方法.
1. 使用python訓練模型,並儲存模型
a.訓練並儲存模型
sess = tf.Session(config=config) #session
saver = tf.train.Saver() #需要新增的程式碼,在初始化變數前。
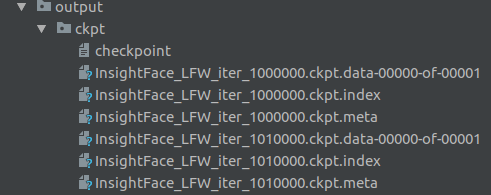
sess.run(tf.initialize_all_variables( 可以看到,ckpt儲存路徑下,有如下的內容:
- model.ckpt.data-00000-of-00001 包含所有變數的值,沒有結構。
- model.ckpt.index 對映表,將data對映到meta的計算圖中。
- model.ckpt.meta 包含元圖,即計算圖的結構,沒有變數的值(基本上可以在tensorboard / graph中看到)。
b.模型整合
呼叫tensorflow自帶的freeze_graph.py工具, 輸入為格式.pb或.pbtxt的protobuf檔案和.ckpt的引數檔案,輸出為一個新的同時包含圖定義和引數的.pb檔案;這個步驟的作用是把checkpoint中.ckpt檔案中的引數轉化為常量const operator後和之前的tensor定義繫結在一起。
得到一個可以用於推理的、包含權重的計算圖結構pb檔案。
python freeze_graph.py --input_checkpoint=../ckpt/InsightFace..._1000000.ckpt -- output_graph=../model/model_frozen.pb --output_node_names=output_node
現在,我們得到model_frozen.pb,這是在C++中常用的模型格式。
2.使用c++載入模型
a.標頭檔案
如下,可以看出,必須要包含"tensorflow/core/platform/env.h"和"tensorflow/core/public/session.h"
...
#ifndef CONVERT_FACE_H
#define CONVERT_FACE_H
#include <iostream>
#include <vector>
#include <algorithm>
#include "tensorflow/cc/client/client_session.h"
#include "tensorflow/cc/ops/standard_ops.h"
#include "tensorflow/cc/ops/image_ops.h"
#include "tensorflow/core/framework/tensor.h"
#include "tensorflow/core/platform/env.h"
#include "tensorflow/core/public/session.h"
#include <opencv2/opencv.hpp>
#include <opencv2/core/core.hpp>
#include <opencv2/highgui/highgui.hpp>
#include "common/constant.h"
#include "common/face.h"
...
b.tensorflow模型初始化
    // 建立graph
    tensorflow::GraphDef graph;
    // pb模型載入到graph裡
    tensorflow::Status ret = tensorflow::ReadBinaryProto(tensorflow::Env::Default(), model_path, &graph);
    if (!ret.ok()) {
        log->error("fail to load pb model");
        return 1;
    }

    // 配置session
    tensorflow::Session *p_session;
    tensorflow::SessionOptions options;
    options.config.mutable_gpu_options()->set_allow_growth(true);
    options.config.mutable_gpu_options()->set_visible_device_list("0"); // single gpu
    NewSession(options, &p_session);

    // graph 載入到 session
    ret = p_session->Create(graph);
    if (!ret.ok()) {
        log->error("fail to load graph");
        return 1;
    }
c.模型預測(單張圖片)
相較於一些例子只是對MLP進行推理,在實際應用中並不常見。這裡貼出一個實際應用中常見的例子 : 預測單張圖片, 對其進行分類判別 :
    // 輸入影象
    cv::Mat &face_data;
    // 輸入tensor NHWC
    // 並定義輸入張量,包括資料型別和大小。
    tensorflow::Tensor input_tensor(tensorflow::DT_FLOAT, tensorflow::TensorShape({1, m_height, m_width, m_channel}));

    // 根據輸入資料face_data的情況,進行調整
    cv::Mat input_mat = cv::Mat(m_height, m_width, CV_32FC3);
    face_data.convertTo(input_mat, CV_32FC3);

	// Mat to Tensor
	int data_size = m_height * m_width * m_channel * 1 * sizeof(float);
    std::copy_n((float*)input_mat, data_size, (input_tensor.flat<float>()).data());

    // 定義模型輸入
    std::vector<std::pair<std::string, tensorflow::Tensor>> inputs = {
        	{ "input", input_tensor}
        };

    // 定義模型輸出
    std::vector<tensorflow::Tensor> outputs;
    tensorflow::Status status = p_session->Run(inputs, {"output"}, {}, &outputs);  //呼叫模型,
    // 輸出節點名為softmax,結果儲存在output中。
    if (!status.ok()) {
        cout << status.ToString() << "\n";
        return 1;
    }
    std::cout << "input"  << input_tensor.DebugString() << std::endl;
    std::cout << "output" << outputs[0].DebugString() << std::endl;
3. 當模型有多個輸入/輸出時候的處理策略
3.1 多個輸入
3.1.1 建圖
多層感知機MLP模型定義如下, 其中x和y都需要輸入。
with tf.Session() as sess:
    x = tf.placeholder(tf.float32, [None, 32], name="x")
    y = tf.placeholder(tf.float32, [None, 8], name="y")

    w1 = tf.Variable(tf.truncated_normal([32, 16], stddev=0.1))
    b1 = tf.Variable(tf.constant(0.0, shape=[16]))

    w2 = tf.Variable(tf.truncated_normal([16, 8], stddev=0.1))
    b2 = tf.Variable(tf.constant(0.0, shape=[8]))

    a = tf.nn.tanh(tf.nn.bias_add(tf.matmul(x, w1), b1))
    y_out = tf.nn.tanh(tf.nn.bias_add(tf.matmul(a, w2), b2), name="y_out")
    cost = tf.reduce_sum(tf.square(y-y_out), name="cost")
    optimizer = tf.train.AdamOptimizer().minimize(cost, name="train")

    init = tf.initialize_variables(tf.all_variables(), name='init_all_vars_op')
    tf.train.write_graph(sess.graph_def,
                         './',
                         'mlp.pb', as_text=False)
3.1.2 c++中載入&使用模型
下面是在C++中載入上一節定義的計算圖並執行的程式碼,分為如下幾個步驟:
- 建立Session
- 初始化計算圖
- 執行
#include "tensorflow/core/public/session.h"
#include "tensorflow/core/graph/default_device.h"
using namespace tensorflow;

int main(int argc, char* argv[]) {

    std::string graph_definition = "mlp.pb";
    Session* session;
    GraphDef graph_def;
    SessionOptions opts;
    std::vector<Tensor> outputs; // Store outputs
    TF_CHECK_OK(ReadBinaryProto(Env::Default(), graph_definition, &graph_def));

    // Set GPU options
    graph::SetDefaultDevice("/gpu:0", &graph_def);
    opts.config.mutable_gpu_options()->set_per_process_gpu_memory_fraction(0.5);
    opts.config.mutable_gpu_options()->set_allow_growth(true);

    // create a new session
    TF_CHECK_OK(NewSession(opts, &session));

    // Load graph into session
    TF_CHECK_OK(session->Create(graph_def));

    // Initialize our variables
    TF_CHECK_OK(session->Run({}, {}, {"init_all_vars_op"}, nullptr));

    Tensor x(DT_FLOAT, TensorShape({100, 32}));
    Tensor y(DT_FLOAT, TensorShape({100, 8}));
    auto _XTensor = x.matrix<float>();
    auto _YTensor = y.matrix<float>();

    _XTensor.setRandom();
    _YTensor.setRandom();

    for (int i = 0; i < 10; ++i) {

        TF_CHECK_OK(session->Run({{"x", x}, {"y", y}}, {"cost"}, {}, &outputs)); // Get cost
        float cost = outputs[0].scalar<float>()(0);
        std::cout << "Cost: " <<  cost << std::endl;
        TF_CHECK_OK(session->Run({{"x", x}, {"y", y}}, {}, {"train"}, nullptr)); // Train
        outputs.clear();
    }


    session->Close();
    delete session;
    return 0;
}
ps: 下面是程式碼的英文說明,不難搞懂,就不翻譯了。
If we examine the code we will see many similarities with running the Python code. Lines 15-17 set GPU options for the graph definition. We set the default device as “/gpu:0”, set the memory fraction as 0.5 and allow growth on the GPU memory usage. These settings are the same when initializing a session with a tf.config in python.
Lines 20 create a new session with the options we specified. Line 23 loads the graph definition into the session so we can use it. Line 26 we initialize all our variables like we would in any tensorflow session.
Lines 28-31 we initialize a tensor as our inputs and outputs. TensorFlow’s tensors are underlying Eigen tensors. Essentially, we call x.matrix() to get a pointer to Eigen’s tensor and hence the underlying data. We can similarly call x.vector, x.scalar and so on… See Eigen’s Tensor Documentation and TensorFlow’s Tensor Documentation for more details. Lines 33-34 generates some random data.
Lines 36-43 is where the real computation happens. Recall in our graph definition we explicitly named some variables and operations. Here we reference them by name as a string and providing the necessary inputs. The output is obtained by passing a vector that is populated when the graph is run (Lines 38-40). Lastly, Line 41 performs the training for the neural network. The remaining lines close the session and clean up our pointer.
可以看出,輸入為session --> Run({{"x", x}, {"y", y}, ... {}}, ...),即對每個輸入佔位符,都要設定一個形如{"x", x}的格式。
3.2 多個輸出
// 2018, Patrick Wieschollek <[email protected]>
#include <tensorflow/core/protobuf/meta_graph.pb.h>
#include <tensorflow/core/public/session.h>
#include <tensorflow/core/public/session_options.h>
#include <iostream>
#include <string>

typedef std::vector<std::pair<std::string, tensorflow::Tensor>> tensor_dict;

/**
 * @brief load a previous store model
 * @details [long description]
 *
 * in Python run:
 *
 *    saver = tf.train.Saver(tf.global_variables())
 *    saver.save(sess, './exported/my_model')
 *    tf.train.write_graph(sess.graph, '.', './exported/graph.pb, as_text=False)
 *
 * this relies on a graph which has an operation called `init` responsible to
 * initialize all variables, eg.
 *
 *    sess.run(tf.global_variables_initializer())  # somewhere in the python
 * file
 *
 * @param sess active tensorflow session
 * @param graph_fn path to graph file (eg. "./exported/graph.pb")
 * @param checkpoint_fn path to checkpoint file (eg. "./exported/my_model",
 * optional)
 * @return status of reloading
 */
tensorflow::Status LoadModel(tensorflow::Session *sess, std::string graph_fn,
                             std::string checkpoint_fn = "") {
  tensorflow::Status status;

  // Read in the protobuf graph we exported
  tensorflow::MetaGraphDef graph_def;
  status = ReadBinaryProto(tensorflow::Env::Default(), graph_fn, &graph_def);
  if (status != tensorflow::Status::OK()) return status;

  // create the graph in the current session
  status = sess->Create(graph_def.graph_def());
  if (status != tensorflow::Status::OK()) return status;

  // restore model from checkpoint, iff checkpoint is given
  if (checkpoint_fn != "") {
    const std::string restore_op_name = graph_def.saver_def().restore_op_name();
    const std::string filename_tensor_name =
        graph_def.saver_def().filename_tensor_name();

    tensorflow::Tensor filename_tensor(tensorflow::DT_STRING,
                                       tensorflow::TensorShape());
    filename_tensor.scalar<std::string>()() = checkpoint_fn;

    tensor_dict feed_dict = {{filename_tensor_name, filename_tensor}};
    status = sess->Run(feed_dict, {}, {restore_op_name}, nullptr);
    if (status != tensorflow::Status::OK()) return status;
  } else {
    // virtual Status Run(const std::vector<std::pair<string, Tensor> >& inputs,
    //                  const std::vector<string>& output_tensor_names,
    //                  const std::vector<string>& target_node_names,
    //                  std::vector<Tensor>* outputs) = 0;
    status = sess->Run({}, {}, {"init"}, nullptr);
    if (status != tensorflow::Status::OK()) return status;
  }

  return tensorflow::Status::OK();
}

int main(int argc, char const *argv[]) {
  const std::string graph_fn = "./exported/my_model.meta";
  const std::string checkpoint_fn = "./exported/my_model";

  // prepare session
  tensorflow::Session *sess;
  tensorflow::SessionOptions options;
  TF_CHECK_OK(tensorflow::NewSession(options, &sess));
  TF_CHECK_OK(LoadModel(sess, graph_fn, checkpoint_fn));

  // prepare inputs
  tensorflow::TensorShape data_shape({1, 2});
  tensorflow::Tensor data(tensorflow::DT_FLOAT, data_shape);

  // same as in python file
  auto data_ = data.flat<float>().data();
  for (int i = 0; i < 2; ++i) data_[i] = 1;

  tensor_dict feed_dict = {
      {"input", data},
  };

  std::vector<tensorflow::Tensor> outputs;
  TF_CHECK_OK(sess->Run(feed_dict, {"output", "dense/kernel:0", "dense/bias:0"},
                        {}, &outputs));

  std::cout << "input           " << data.DebugString() << std::endl;
  std::cout << "output          " << outputs[0].DebugString() << std::endl;
  std::cout << "dense/kernel:0  " << outputs[1].DebugString() << std::endl;
  std::cout << "dense/bias:0    " << outputs[2].DebugString() << std::endl;

  return 0;
}
同樣地,可以看到在sess->Run(xx, {"output", "dense/kernel:0", "dense/bias:0"}, {}, &outputs)將輸出的節點放在sess->Run()的第2個引數的位置,並把經過計算圖計算出來的結果放在第4個引數的位置處outputs處,對應進行解析就可以了。
參考資料:
- Tensorflow C++ 編譯和呼叫圖模型 :即講了安裝tensorflow c++過程,又講了使用過程。
- Tensorflow CPP API demo :第一個參考資料的原始碼,很詳細。
- Loading a TensorFlow graph with the C++ API :一個非常好的載入tensorflow模型教程,常被引用。
- tensorflow c++ 載入模型 總結的很細