
『計算機視覺』Mask-RCNN_從服裝關鍵點檢測看KeyPoints分支(待續)
下圖Github地址:Mask_RCNN
Mask_RCNN_KeyPoints
『計算機視覺』Mask-RCNN_論文學習
『計算機視覺』Mask-RCNN_專案文件翻譯
『計算機視覺』Mask-RCNN_推斷網路其一:總覽
『計算機視覺』Mask-RCNN_推斷網路其二:基於ReNet101的FPN共享網路
『計算機視覺』Mask-RCNN_推斷網路其三:RPN錨框處理和Proposal生成
『計算機視覺』Mask-RCNN_推斷網路其四:FPN和ROIAlign的耦合
『計算機視覺』Mask-RCNN_推斷網路其五:目標檢測結果精煉
『計算機視覺』Mask-RCNN_推斷網路其六:Mask生成
『計算機視覺』Mask-RCNN_錨框生成
『計算機視覺』Mask-RCNN_訓練網路其一:資料集與Dataset類
『計算機視覺』Mask-RCNN_訓練網路其二:train網路結構&損失函式
『計算機視覺』Mask-RCNN_訓練網路其三:訓練Model
原論文中提到過Mask_RCNN是可以進行關鍵點檢測的,不過我們學習的這個工程並沒有新增關鍵點檢測分支,而有人基於本工程進行了完善Mask_RCNN_Humanpose,本文我們將簡要的瞭解如何將關鍵點識別分支新增進模型,更進一步的,我們將嘗試使用Mask_RCNN對實際資料進行識別。
一、資料類建立
1、關鍵點標註形式
回顧一下之前的資料集介紹,在非關鍵點檢測任務中,我們需要的資料有兩種:1、原始的圖片檔案;2、圖片上每個instance的掩碼;但是由於Mask_RCNN會對掩碼進行一次加工,獲取每個instance的座標框,即實際上還需要:3、每個instance的座標框。
既然這裡要檢測關鍵點,那我們就需要:4、影象的關鍵點標註。
key_points: num_keypoints coordinates and visibility (x,y,v) [num_person,num_keypoints,3] of num_person
首先我們需要明確,keypoints從屬於某個instance,即上面的num_person的由來(人體關鍵點檢測為例,一個instance就是一個人),而一個instance有num_keypoints個關鍵點,每一個點由3個值組成:橫座標,縱座標,狀態。其中狀態有三種:該類不存在此關鍵點,被遮擋,可見
在不同的資料集上,可能有不同的數字來表達這三個點,但是在此框架訓練中,建議統一到COCO的標準,避免過多的修改model程式碼(主要是避免修改關鍵點損失函式中的程式碼,帶來不必要的意外)。
2、服裝關鍵點標註
有了這些基礎,我們以天池的服飾關鍵點定位資料為例,看一看如何設計Dataset class。
具體資料說明自行查閱上面說明,本節重點在介紹Mask RCNN關鍵點加測思路而非資料本身,其文件如下,我們設計的Dataset class(見『計算機視覺』Mask-RCNN_訓練網路其一:資料集與Dataset類)目的就是基於文件資訊為網路結構輸送資料。

a、服裝類別和Mask RCNN
值得注意的是,Mask RCNN的分類、檢測、Mask生成任務都是多分類,但是關鍵點識別由於其本身難度更高(一個類別有眾多關鍵點,不同類別關鍵點型別之間關係不大甚至完全不同),所以建議每一個大類單獨訓練一個model檢測其關鍵點,實際上pose關鍵點檢測對應過來就是:檢測person這一個類的框、Mask,以及每一個instance(每一個人)的不同部位的關鍵點,實際的class分類值有person和背景兩個類。對應到服飾資料集,我們需要訓練5次,對框應五種服裝。
b、服裝檢測框
服裝資料標註僅有關鍵點,但是檢測框對於Mask RCNN來說是必要的,因為RPN網路需要它(RPN之後的迴歸網路分支可以註釋掉,但是RPN是網路的主幹部分,不能註釋),所以我們採取Mask RCNN工程的檢測框生成思路,利用關鍵點生成檢測框,由於關鍵點未必在服裝邊緣(一般是在的),我們的檢測框取大一點,儘量完全包含服裝,下面的函式見utils.py指令碼(暫不涉及這個函式,只是說到了貼上來而已)。
def extract_keypoint_bboxes(keypoints, image_size):
    """
    :param keypoints: [instances, keypoints_per_instance, 3]
    :param image_size: [w, h]
    :return:
    """
    bboxes = np.zeros([keypoints.shape[0], 4], dtype=np.int32)
    for i in range(keypoints.shape[0]):
        x = keypoints[i, :, 0][keypoints[i, :, 0]>0]
        y = keypoints[i, :, 1][keypoints[i, :, 1]>0]
        x1 = x.min()-10 if x.min()-10>0 else 0
        y1 = y.min()-10 if y.min()-10>0 else 0
        x2 = x.max()+11 if x.max()+11<image_size[0] else image_size[0]
        y2 = y.max()+11 if y.max()+11<image_size[1] else image_size[1]
        bboxes[i] = np.array([y1, x1, y2, x2], np.int32)
    return bboxes
c、Mask說明
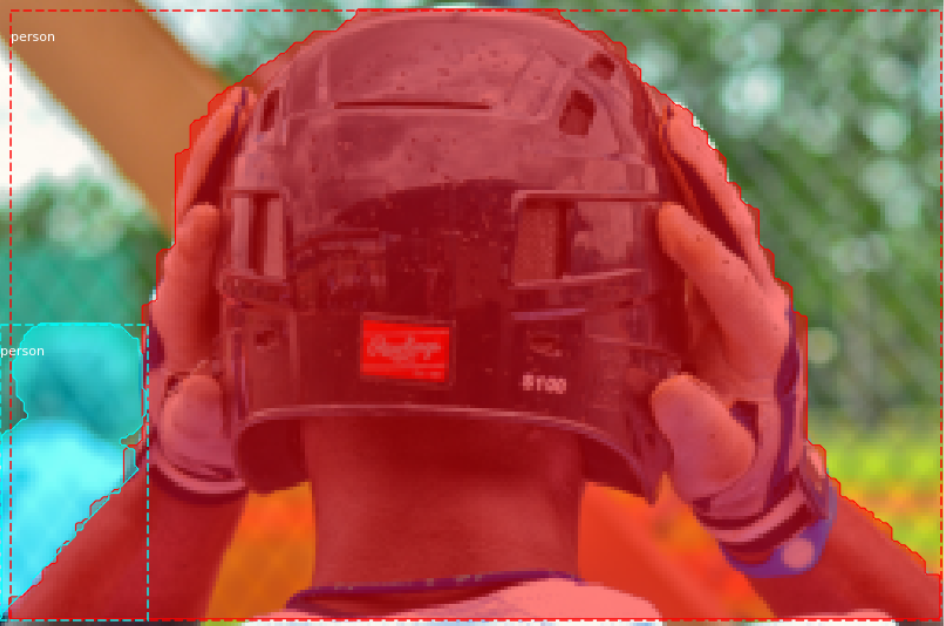
服裝資料是沒有Mask資訊的,按照Mask RCNN論文的說法,掩碼使用關鍵點位置為1其他位置為0的形式即可,感覺不太靠譜,而在COCO資料集裡(即本文參考工程Mask_RCNN_Humanpose),掩碼資訊使用的是人的掩碼(見下圖),
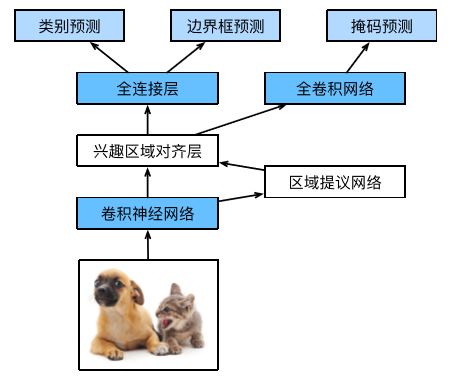
我在Dataset class中生成了掩碼資訊作為演示,在build網路中取消了Mask分支,下圖摘自李沐博士的《手動學習深度學習》,可以很直觀的理解我們為什麼可以把Mask分支取消掉。
3、class FIDataset
正如Dataset註釋所說,要想執行自己的資料集,我們首先要實現一個方法(load_shapes,根據資料集取名即可)收集原始影象、類別資訊,然後實現兩個方法(load_image、load_mask)分別實現獲取單張圖片資料、獲取單張圖片對應的objs的masks和classes,這樣基本完成了資料集類的構建。
對於本資料集,
- 我們使用load_FI方法代替load_shapes,呼叫self.add_class和self.add_image,記錄圖片、類別資訊
- 父類的load_image會去讀取self.image_info中每張圖片的"path"路徑,載入圖片,我們不必重寫,保證在load_FI中錄入了即可
- load_mask被load_keupoints取代(Mask_RCNN_Humanpose做了這個改動,並已經捋順了相關呼叫),其註釋如下,我們不需要mask資訊,返回None佔位即可,後面需要將網路中有關Mask資訊的呼叫註釋處理掉,這裡先不介紹:
"""
Returns:
key_points: num_keypoints coordinates and visibility (x,y,v)  [num_person,num_keypoints,3] of num_person
masks: A bool array of shape [height, width, instance count] with
    one mask per instance.
class_ids: a 1D array of class IDs of the instance masks, here is always equal to [num_person, 1]
"""
至此我們介紹了Dataset class的目的,下面給出實現見FI_train.py ,由於訓練時需要驗證集,而我截至撰文時沒有實現驗證集劃分(用訓練集冒充驗證集),所以load_FI的引數train_data沒有意義,更新會在github上進行,後續本文不予修改:
class FIDataset(utils.Dataset):
    """Generates the shapes synthetic dataset. The dataset consists of simple
    shapes (triangles, squares, circles) placed randomly on a blank surface.
    The images are generated on the fly. No file access required.
    """
    def load_FI(self, train_data=True):
        """Generate the requested number of synthetic images.
        count: number of images to generate.
        height, width: the size of the generated images.
        """
        if train_data:
            csv_data = pd.concat([pd.read_csv('../keypoint_data/train1.csv'),
                                  pd.read_csv('../keypoint_data/train2.csv')],
                                 axis=0,
                                 ignore_index=True  # 忽略索引表示不會直接拼接索引,會重新計算行數索引
                                )
            class_data = csv_data[csv_data.image_category.isin(['blouse'])]

        # Add classes
        self.add_class(source="FI", class_id=1, class_name='blouse')

        # Add images
        for i in range(class_data.shape[0]):
            annotation = class_data.iloc[i]
            img_path = os.path.join("../keypoint_data", annotation.image_id)
            keypoints = np.array([p.split('_')
                                  for p in class_data.iloc[i][2:]], dtype=int)[PART_INDEX[IMAGE_CATEGORY], :]
            keypoints[:, -1] += 1
            self.add_image(source="FI",
                           image_id=i,
                           path=img_path,
                           annotations=keypoints)

    def load_keypoints(self, image_id, with_mask=True):
        """
        Returns:
        key_points: num_keypoints coordinates and visibility (x,y,v)  [num_person,num_keypoints,3] of num_person
        masks: A bool array of shape [height, width, instance count] with
            one mask per instance.
        class_ids: a 1D array of class IDs of the instance masks, here is always equal to [num_person, 1]
        """
        key_points = np.expand_dims(self.image_info[image_id]["annotations"], 0)  # 已知圖中僅有一個物件
        class_ids = np.array([1])

        if with_mask:
            annotations = self.image_info[image_id]["annotations"]
            w, h = image_size(self.image_info[image_id]["path"])
            mask = np.zeros([w, h], dtype=int)
            mask[annotations[:, 1], annotations[:, 0]] = 1
            return key_points.copy(), np.expand_dims(mask, -1), class_ids
        return key_points.copy(), None, class_ids
二、資料類讀取