執行緒通訊實現方式
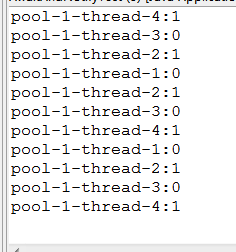
第一種方式是wait和(notify)notifyAll的方式,一個執行緒負責變數的新增,一個執行緒負責變數的相減,一個執行緒操作完,另一個執行緒等待,具體操作請看下面的程式碼
這裡需要注意的是一定儘量要用while判斷,不要用if判斷
第一消除notifyAll() 引起的併發問題,第二在while迴圈裡而不是if語句下使用wait。這樣,迴圈會線上程睡眠前後都檢查wait的條件,並在條件實際上並未改變的情況下處理喚醒通知。
/**
 *
 */
package demo2;

import java.util.concurrent.ExecutorService;
import java.util.concurrent.Executors;

/**
 * @author liuchaojun
 * @date 2018-12-13 下午06:50:25
 */
public class AwaitAndNotifyTest {
	private int i;

	public void end() {
		System.out.println(Thread.currentThread().getName() + ":所有執行緒執行完畢!");
	}

	public synchronized void add() {
		try {
			while(i==1){
				wait();// 做完本執行緒等待
				Thread.sleep(10);
			}
		} catch (InterruptedException e) {
			e.printStackTrace();
		}
		System.out.println(Thread.currentThread().getName() + ":" + (i++));
		notifyAll();// 釋放其他執行緒
	}

	public synchronized void remove() {

		try {
			while(i==0){
				wait();// 做完本執行緒等待
				Thread.sleep(10);
			}
		} catch (InterruptedException e) {
			e.printStackTrace();
		}
		System.out.println(Thread.currentThread().getName() + ":" + (i--));
		notifyAll();// 釋放其他執行緒
	}

	public static void main(String[] args) {
		AwaitAndNotifyTest c = new AwaitAndNotifyTest();
		ExecutorService t = Executors.newFixedThreadPool(4);
		for (int i = 0; i < 25; i++) {
			t.execute(new Task1(c));
			t.execute(new Task2(c));
		}
	}
}

class Task1 implements Runnable {

	private AwaitAndNotifyTest awaitAndNotifyTest;

	public Task1(AwaitAndNotifyTest awaitAndNotifyTest) {
		super();
		this.awaitAndNotifyTest = awaitAndNotifyTest;

	}

	/*
	 * (non-Javadoc)
	 *
	 * @see java.lang.Runnable#run()
	 */
	@Override
	public void run() {
		awaitAndNotifyTest.add();
	}

}

class Task2 implements Runnable {
	private AwaitAndNotifyTest awaitAndNotifyTest;

	public Task2(AwaitAndNotifyTest awaitAndNotifyTest) {
		super();
		this.awaitAndNotifyTest = awaitAndNotifyTest;

	}

	/*
	 * (non-Javadoc)
	 *
	 * @see java.lang.Runnable#run()
	 */
	@Override
	public void run() {
		awaitAndNotifyTest.remove();
	}

}

第二種方式使用ReentrantLock的鎖,Condition等待和釋放,具體操作看下面程式碼
這裡excute和submit的方法在於
1. 接收的引數不一樣;
2.submit有返回值,而execute沒有(返回一個future。可以用這個future來判斷任務是否成功完成)
例如,有個validation的task,希望該task執行完後告訴我它的執行結果,是成功還是失敗,然後繼續下面的操作。
3.submit方便Exception處理
例如,如果task裡會丟擲checked或者unchecked exception,而你又希望外面的呼叫者能夠感知這些exception並做出及時的處理,那麼就需要用到submit,通過對Future.get()進行丟擲異常的捕獲,然後對其進行處理。
/**
 *
 */
package demo2;

import java.util.concurrent.ExecutorService;
import java.util.concurrent.Executors;
import java.util.concurrent.locks.Condition;
import java.util.concurrent.locks.ReentrantLock;

/**
 * @author liuchaojun
 * @date 2018-12-14 上午08:34:09
 */
public class ReentrantLockAndConditionTest {

	private int i;
	private ReentrantLock reentrantLock = new ReentrantLock();
	private Condition condition = reentrantLock.newCondition();

	public void end() {
		System.out.println(Thread.currentThread().getName() + ":所有執行緒執行完畢!");
	}

	public  void add() {
		try {
			reentrantLock.lock();
			while (i != 0) {
				condition.await();
			}
			System.out.println(Thread.currentThread().getName() + ":" + (i++));
			condition.signalAll();
		} catch (InterruptedException e) {
			e.printStackTrace();
		} finally {
			reentrantLock.unlock();
		}
	}

	public  void remove() {
		try {
			reentrantLock.lock();
			while (i != 1) {
				condition.await();

			}
			System.out.println(Thread.currentThread().getName() + ":" + (i--));
			condition.signalAll();
		} catch (InterruptedException e) {
			e.printStackTrace();
		} finally {
			reentrantLock.unlock();
		}

	}

	public static void main(String[] args) {
		ReentrantLockAndConditionTest c = new ReentrantLockAndConditionTest();
		ExecutorService t = Executors.newFixedThreadPool(4);
		for (int i = 0; i < 5; i++) {
			t.execute(new Task3(c));
			t.execute(new Task4(c));
		}
		t.shutdown();
	}
}

class Task3 implements Runnable {

	private ReentrantLockAndConditionTest reentrantLockAndConditionTest;

	public Task3(ReentrantLockAndConditionTest reentrantLockAndConditionTest) {
		super();
		this.reentrantLockAndConditionTest = reentrantLockAndConditionTest;

	}

	/*
	 * (non-Javadoc)
	 *
	 * @see java.lang.Runnable#run()
	 */
	@Override
	public void run() {
		reentrantLockAndConditionTest.add();
	}

}

class Task4 implements Runnable {
	private ReentrantLockAndConditionTest reentrantLockAndConditionTest;

	public Task4(ReentrantLockAndConditionTest reentrantLockAndConditionTest) {
		super();
		this.reentrantLockAndConditionTest = reentrantLockAndConditionTest;

	}

	/*
	 * (non-Javadoc)
	 *
	 * @see java.lang.Runnable#run()
	 */
	@Override
	public void run() {
		reentrantLockAndConditionTest.remove();
	}

}
第三種方式使用佇列LinkedBlockingQueue
java.util.concurrent包下的新類。LinkedBlockingQueue就是其中之一,是一個阻塞的執行緒安全的佇列,底層採用連結串列實現。
LinkedBlockingQueue構造的時候若沒有指定大小,則預設大小為Integer.MAX_VALUE,當然也可以在建構函式的引數中指定大小。LinkedBlockingQueue不接受null。
新增元素的方法有三個:add,put,offer,且這三個元素都是向佇列尾部新增元素的意思。
區別:
add方法在新增元素的時候,若超出了度列的長度會直接丟擲異常:
put方法,若向隊尾新增元素的時候發現佇列已經滿了會發生阻塞一直等待空間,以加入元素。
offer方法在新增元素時,如果發現佇列已滿無法新增的話,會直接返回false。
從佇列中取出並移除頭元素的方法有:poll,remove,take。
poll: 若佇列為空,返回null。
remove:若佇列為空,丟擲NoSuchElementException異常。
take:若佇列為空,發生阻塞,等待有元素。
我們這裡使用的是put和take方法,下面就是實現的程式碼。
/**
 *
 */
package demo2;

import java.util.concurrent.ExecutorService;
import java.util.concurrent.Executors;
import java.util.concurrent.LinkedBlockingQueue;
import java.util.concurrent.TimeUnit;

/**
 * @author liuchaojun
 * @date 2018-12-14 上午09:01:48
 */
public class LinkedBlockingQueueTest {

	public static void main(String[] args) {
		LinkedBlockingQueue<String> blockingQueue = new LinkedBlockingQueue<String>();
		ExecutorService t = Executors.newFixedThreadPool(4);
		for (int i = 0; i < 5; i++) {
			t.execute(new Task5(blockingQueue));
			t.execute(new Task6(blockingQueue));
		}
		if (!t.isShutdown()) {
			t.shutdown();
			System.out.println("執行緒池停止接收外部任務!");
			try {
				boolean flag = t.awaitTermination(300, TimeUnit.SECONDS);
				if (flag) {
					System.out.println("執行緒池已經停止!");
				}
			} catch (InterruptedException e) {
				e.printStackTrace();
			}
		}

	}
}

class Task5 implements Runnable {

	private LinkedBlockingQueue blockingQueue;

	public Task5(LinkedBlockingQueue blockingQueue) {
		super();
		this.blockingQueue = blockingQueue;

	}

	/*
	 * (non-Javadoc)
	 *
	 * @see java.lang.Runnable#run()
	 */
	@Override
	public void run() {
		try {
			while (blockingQueue.size() < 1) {
				System.out.println(Thread.currentThread().getName()
						+ ":生產者生產元素");
				blockingQueue.put("元素");
			}
		} catch (InterruptedException e) {
			e.printStackTrace();
		}
	}

}

class Task6 implements Runnable {
	private LinkedBlockingQueue blockingQueue;

	public Task6(LinkedBlockingQueue blockingQueue) {
		super();
		this.blockingQueue = blockingQueue;

	}

	/*
	 * (non-Javadoc)
	 *
	 * @see java.lang.Runnable#run()
	 */
	@Override
	public void run() {
		try {
			while (true) {
				System.out.println(Thread.currentThread().getName() + "消費者"
						+ "消費:" + blockingQueue.take());

			}
		} catch (InterruptedException e) {
			e.printStackTrace();
		}
	}

}


