
Android Service元件深入解析
花了週末兩天的時間,整理了一下作為Android四大元件之一的Service的基礎知識,通過這篇文章,應該可以明白:對Service的理解、在什麼地方使用、怎麼使用、要注意哪些問題等。
【本文主要內容】
一、Service的基本概念(四大元件之一)二、定義(啟動)一個Service
- 1、如何定義(啟動)一個Service:
- 2、停止一個started服務有兩種方法
- 3、onStartCommand方法的返回值
三、IntentService
- 1、IntentService的引入
- 2、IntentService的作用
- 3、IntentService的用法
- 4、Service和Thread的關係
四、使用Bind Service完成Service和Activity之間的通訊
- 1、Bind Service的介紹
- 2、實現Service和Activity之間通訊步驟
- 3、started服務與bind服務的區別
- 4、Service的生命週期
五、使用Bind Service完成IPC程序間通訊:(在同一個APP內模擬)
- 1、Bind Service的介紹
- 2、在客戶端繫結一個服務的步驟
- 3、IPC(Inter-Process Communication)程序間通訊機制
- 4、AIDL(Android Interface Definition Language)Android介面定義語言
- 5、IPC(程序間通訊)具體的步驟如下
- 6、讓Activity與一個遠端Service建立關聯的步驟:(在同一個APP內模擬)
- 7、AIDL支援的自定義資料型別
六、使用Bind Service完成IPC程序間通訊:(兩個APP之間) 七、Messenger的使用
【正文】
一、Service的基本概念(四大元件之一)
Service是Android中實現程式後臺執行的解決方案,非常適合用於去執行哪些不需要和使用者互動而且還要求長期執行的任務。不能執行在一個獨立的程序當中,而是依賴與建立服務時所在的應用程式程序。只能在後臺執行,並且可以和其他元件進行互動。
Service可以在很多場合使用,比如播放多媒體的時候使用者啟動了其他Activity,此時要在後臺繼續播放;比如檢測SD卡上檔案的變化;比如在後臺記錄你的地理資訊位置的改變等等,總之服務是藏在後臺的。
服務不會自動開啟執行緒,我們需要在服務的內部手動建立子執行緒,並在這裡執行具體的任務。關於多執行緒的知識:可以參考另外一篇文章:Android多執行緒----非同步訊息處理機制之Handler詳解
二、定義(啟動)一個Service:
1、如何定義(啟動)一個Service:
核心步驟如下:
- 建立一個類繼承android.app.Service類,實現抽象方法onBind(),重寫onCreate()、onStartCommand()、onDestry();
- 在清單檔案中配置Service。
新建一個Android專案ServiceTest,具體步驟如下:
(1)新建一個MyService類,繼承自Service,並重寫父類的onCreate()、onStartCommand()和onDestroy()方法,程式碼如下:

 1 package com.example.servicetest;
 2
 3 import android.app.Service;
 4 import android.content.Intent;
 5 import android.os.IBinder;
 6 import android.util.Log;
 7
 8 public class MyService extends Service {
 9
10     public static final String TAG = "MyService";
11
12     //建立服務時呼叫
13     @Override
14     public void onCreate() {
15         super.onCreate();
16         Log.d(TAG, "onCreate");
17     }
18
19     //服務執行的操作
20     @Override
21     public int onStartCommand(Intent intent, int flags, int startId) {
22         Log.d(TAG, "onStartCommand");
23         return super.onStartCommand(intent, flags, startId);
24     }
25
26     //銷燬服務時呼叫
27     @Override
28     public void onDestroy() {
29         super.onDestroy();
30         Log.d(TAG, "onDestroy");
31     }
32
33     @Override
34     public IBinder onBind(Intent intent) {
35         return null;
36     }
37 }
可以看到,我們只是在onCreate()、onStartCommand()和onDestroy()方法中分別列印了一句話,並沒有進行其它任何的操作,注意程式碼註釋中這三個方法的作用。
onBind()方法是Service中唯一的一個抽象方法,所以必須要在子類裡實現。我們知道,Service可以有兩種啟動方式:一種是startService(),另一種是bindService()。第二種啟動方式才會用到onBind()方法。我們這先用第一種方式啟動Service,所以暫時忽略onBind()方法。
(2)在清單檔案中宣告:(和Activity標籤並列)
<service android:name=".MyService"> </service>
(3)修改activity_main.xml程式碼,如下:
<LinearLayout xmlns:android="http://schemas.android.com/apk/res/android"
    android:layout_width="match_parent"
    android:layout_height="match_parent"
    android:orientation="vertical" >

    <Button
        android:id="@+id/button1_start_service"
        android:layout_width="match_parent"
        android:layout_height="wrap_content"
        android:text="Start Service" />

    <Button
        android:id="@+id/button2_stop_service"
        android:layout_width="match_parent"
        android:layout_height="wrap_content"
        android:text="Stop Service" />

</LinearLayout>
我們在佈局檔案中加入了兩個按鈕,一個用於啟動Service,一個用於停止Service。
(4)在MainActivity作為程式的主Activity,在裡面加入啟動Service和停止Service的邏輯,程式碼如下:
 1 package com.example.servicetest;
 2
 3 import android.app.Activity;
 4 import android.content.Intent;
 5 import android.os.Bundle;
 6 import android.view.View;
 7 import android.view.View.OnClickListener;
 8 import android.widget.Button;
 9
10
11 public class MainActivity extends Activity implements OnClickListener {
12
13     private Button button1_start_service;
14
15     private Button button2_stop_service;
16
17     @Override
18     protected void onCreate(Bundle savedInstanceState) {
19         super.onCreate(savedInstanceState);
20         setContentView(R.layout.activity_main);
21         button1_start_service = (Button) findViewById(R.id.button1_start_service);
22         button2_stop_service = (Button) findViewById(R.id.button2_stop_service);
23         button1_start_service.setOnClickListener(this);
24         button2_stop_service.setOnClickListener(this);
25     }
26
27     @Override
28     public void onClick(View v) {
29         switch (v.getId()) {
30         case R.id.button1_start_service:
31             Intent startIntent = new Intent(this, MyService.class);
32             startService(startIntent);
33             break;
34         case R.id.button2_stop_service:
35             Intent stopIntent = new Intent(this, MyService.class);
36             stopService(stopIntent);
37             break;
38         default:
39             break;
40         }
41     }
42
43 }
核心程式碼:31行至32行、35行至36行。
可以看到,在Start Service按鈕的點選事件裡,我們構建出了一個Intent物件,並呼叫startService()方法來啟動MyService。然後在Stop Serivce按鈕的點選事件裡,我們同樣構建出了一個Intent物件,並呼叫stopService()方法來停止MyService。程式碼的邏輯非常簡單。
這樣的話,一個簡單的帶有Service功能的程式就寫好了。
啟動和停止服務:
定義好服務之後,接下來看一下如何啟動和停止一個服務,這主要是藉助Intent來實現的。注意startService()和stopService()方法都是定義在Context類當中的,所以可以在MainActivity中直接呼叫這兩個方法。
執行上面的程式,點選button1_start_service按鈕,啟動服務,後臺列印日誌如下:

說明服務啟動成功。
那麼如果我再連續點三次button1_start_service按鈕,後臺增加的日誌如下:

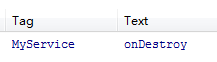
事實上,onCreate()方法只會在Service第一次被建立的時候呼叫,而onStartCommand()方法在每次啟動服務的時候都會呼叫。
我們還可以在正在“設定--應用---執行”中找到這個服務,如下圖所示:
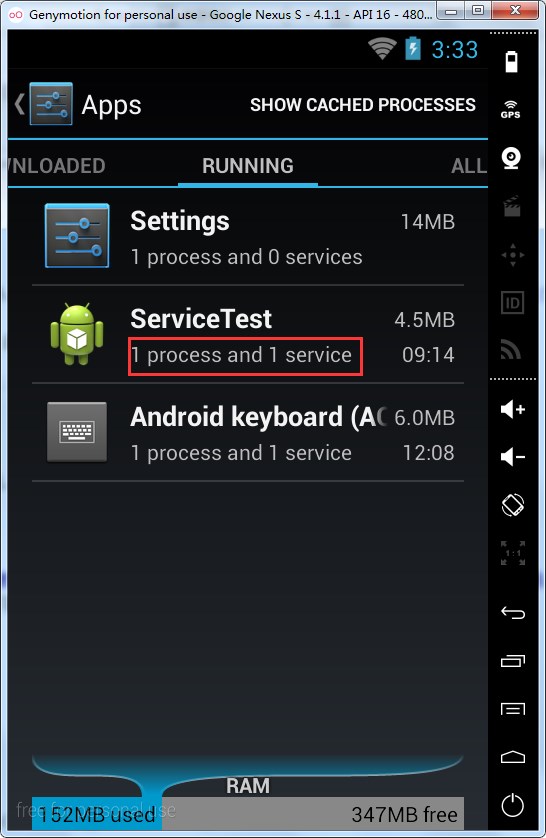
點開上圖中的紅框部分,可以看到:
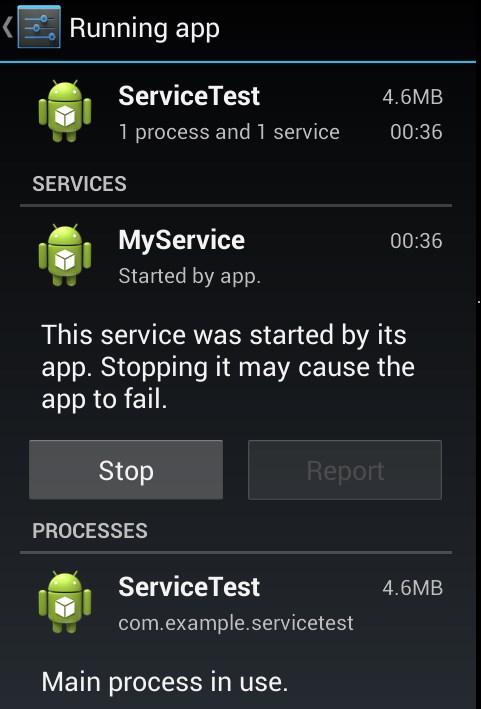
如果我們再點選button2_stop_service按鈕或者點選上圖中的“Stop”,MyService服務就停止掉了:
需要注意的是:
- 服務物件同時只會有一個
- 預設情況下,一個started的Service與啟動他的元件在同一個執行緒中。上面的例項中,服務就是在主執行緒中執行的,如果是在服務中完成耗時操作的話,容易造成主執行緒阻塞。
2、停止一個started服務有兩種方法:
(1)在外部使用stopService()
(2)在服務內部(onStartCommand方法內部)使用stopSelf()方法。
3、onStartCommand方法的返回值:
onStartCommand方法執行時,返回的是一個int型。這個整型可以有三個返回值:START_NOT_STICKY、START_STICKY、START_REDELIVER_INTENT
- START_NOT_STICKY:“非粘性的”。使用這個返回值時,如果在執行完onStartCommand方法後,服務被異常kill掉,系統不會自動重啟該服務。
- START_STICKY:如果Service程序被kill掉,保留Service的狀態為開始狀態,但不保留遞送的intent物件。隨後系統會嘗試重新建立Service,由於服務狀態為開始狀態,所以建立服務後一定會呼叫onStartCommand(Intent,int,int)方法。如果在此期間沒有任何啟動命令被傳遞到Service,那麼引數Intent將為null。
- START_REDELIVER_INTENT:重傳Intent。使用這個返回值時,系統會自動重啟該服務,並將Intent的值傳入。
三、IntentService
1、IntentService的引入:
我們在第一段中就已經說了,服務中的程式碼預設執行在主執行緒中,如果直接在服務裡執行一些耗時操作,容易造成ANR(Application Not Responding)異常,所以就需要用到多執行緒的知識了。
因此一個比較標準的服務可以這樣寫:
 1 package com.example.servicetest;
 2
 3 import android.app.Service;
 4 import android.content.Intent;
 5 import android.os.IBinder;
 6
 7 public class MyService extends Service {
 8
 9     public static final String TAG = "MyService";
10
11     //服務執行的操作
12     @Override
13     public int onStartCommand(Intent intent, int flags, int startId) {
14         new Thread(new Runnable() {
15             public void run() {
16                 //處理具體的邏輯
17                 stopSelf();  //服務執行完畢後自動停止
18             }
19         }).start();
20         return super.onStartCommand(intent, flags, startId);
21     }
22
23     @Override
24     public IBinder onBind(Intent intent) {
25         // TODO Auto-generated method stub
26         return null;
27     }
28
29 }
核心程式碼:14至19行,在子執行緒中處理具體的邏輯。
需要注意的是,如果沒有第17行的stopSelf(),服務一旦啟動後,就會一直處於執行狀態,必須呼叫stopService()或者stopSelf()方法才能讓服務停止下來;所以我們添加了17行的stopSelf(),服務執行完畢後會自動停止。
雖說上面的這種寫法並不複雜,但總會有一些程式猿忘記開啟執行緒,或者忘記呼叫stopSelf()方法。為了可以簡單地建立一個非同步的、會自動停止的服務,Android專門提供了一個IntentService類,這個類就很好的解決了上面所提到的兩種尷尬。另外,可以啟動IntentService多次,而每一個耗時操作會以工作佇列的方式在IntentService的onHandleIntent()回撥方法中執行,並且每次只會執行一個工作執行緒,執行完第一個後,再執行第二個,以此類推。
2、IntentService的作用:
當我們需要這樣一次性完成的任務時,就可以使用IntentService來完成。
3、IntentService的用法:
我們在上面的專案ServiceTest基礎上進行修改,步驟如下:
(1)新建一個MyIntentService類,繼承自IntentService,並重寫父類的onHandleIntent()方法,程式碼如下:
 1 package com.example.servicetest;
 2
 3 import android.app.IntentService;
 4 import android.content.Intent;
 5 import android.util.Log;
 6
 7 public class MyIntentService extends IntentService{
 8
 9     public MyIntentService() {
10         super("MyIntentService");//呼叫父類有參建構函式。這裡我們手動給服務起個名字為:MyIntentService
11         // TODO Auto-generated constructor stub
12     }
13
14     //該方法在會在一個單獨的執行緒中執行,來完成工作任務。任務結束後,該Service自動停止
15     @Override
16     protected void onHandleIntent(Intent intent) {
17         // TODO Auto-generated method stub
18         for(int i = 0;i<3;i++) {
19             //列印當前執行緒的id
20             Log.d("MyIntentService","IntentService執行緒的id是:"+Thread.currentThread().getId());
21             try {
22                 Thread.sleep(1000);
23             } catch (InterruptedException e) {
24                 // TODO Auto-generated catch block
25                 e.printStackTrace();
26             }
27         }
28     }
29
30     @Override
31     public void onDestroy() {
32         // TODO Auto-generated method stub
33         super.onDestroy();
34         Log.d("MyIntentService","onDestroy");
35     }
36 }
這裡首先要提供一個無參的構造方法,並且必須在其內部呼叫父類的有參構造方法(9至12行),我們在第10行手動將服務的名字改為“MyIntentService”。
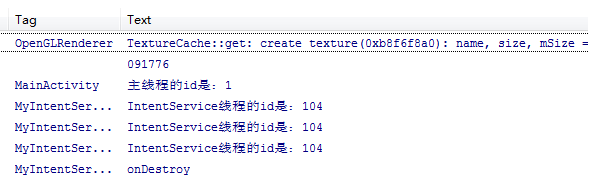
然後在子類中實現onHandleIntent()這個抽象方法,可以在這個方法裡去處理一些具體的邏輯,我們就用三次for迴圈,列印當前執行緒的id,每次延時1秒。
因為這個服務在執行結束後會自動停止,所以我們在onDestroy()方法中列印日誌驗證一下。
(2)在清單檔案中對服務進行註冊服務:
<service android:name=".MyIntentService"> </service>
(3)在activity_main.xml中新增一個按鈕button3_stop_intentservice,用於啟動MyIntentService服務,程式碼略。
(4)在MainActivity裡面加入啟動IntentService的邏輯,核心程式碼如下:
1       case R.id.button3_stop_intentservice:
2             Log.d("MainActivity","主執行緒的id是:"+Thread.currentThread().getId());
3             Intent intentService = new Intent(this,MyIntentService.class);
4             startService(intentService);
5         default:
我們在第02行中,列印主執行緒的id。
執行程式,點選按鈕button3_stop_intentservice,顯示如下:
由此可見,啟動一個IntentService和啟動一個普通的Service,步驟是一樣的。
4、Service和Thread的關係:
不少Android初學者都可能會有這樣的疑惑,Service和Thread到底有什麼關係呢?什麼時候應該用Service,什麼時候又應該用Thread?答案可能會有點讓你吃驚,因為Service和Thread之間沒有任何關係!
之所以有不少人會把它們聯絡起來,主要就是因為Service的後臺概念。Thread我們大家都知道,是用於開啟一個子執行緒,在這裡去執行一些耗時操作就不會阻塞主執行緒的執行。而Service我們最初理解的時候,總會覺得它是用來處理一些後臺任務的,一些比較耗時的操作也可以放在這裡執行,這就會讓人產生混淆了。但是,如果我告訴你Service其實是執行在主執行緒裡的,你還會覺得它和Thread有什麼關係嗎?
其實,後臺和子執行緒是兩個完全不同的概念:
Android的後臺就是指,它的執行是完全不依賴UI的。即使Activity被銷燬,或者程式被關閉,只要程序還在,Service就可以繼續執行。比如說一些應用程式,始終需要與伺服器之間始終保持著心跳連線,就可以使用Service來實現。你可能又會問,Service既然是執行在主執行緒裡,在這裡一直執行著心跳連線,難道就不會阻塞主執行緒的執行嗎?當然會,但是我們可以在Service中再建立一個子執行緒,然後在這裡去處理耗時邏輯就沒問題了。
既然在Service裡也要建立一個子執行緒,那為什麼不直接在Activity裡建立呢?這是因為Activity很難對Thread進行控制,當Activity被銷燬之後,就沒有任何其它的辦法可以再重新獲取到之前建立的子執行緒的例項;而且在一個Activity中建立的子執行緒,另一個Activity無法對其進行操作。但是Service就不同了,所有的Activity都可以與Service進行關聯,然後可以很方便地操作其中的方法,即使Activity被銷燬了,之後只要重新與Service建立關聯,就又能夠獲取到原有的Service中Binder的例項。因此,使用Service來處理後臺任務,Activity就可以放心地finish,完全不需要擔心無法對後臺任務進行控制的情況。
所以說,一個比較標準的Service,就可以寫成本段中第1節的樣子。
四、使用Bind Service完成Service和Activity之間的通訊
有沒有什麼辦法能讓它們倆的關聯更多一些呢?比如說在Activity中指揮Service去幹什麼,Service就去幹什麼。當然可以,只需要讓Activity和Service建立關聯就好了。
1、Bind Service的介紹:
應用程式元件(客戶端)通過呼叫bindService()方法能夠繫結服務,然後Android系統會呼叫服務的onBind()回撥方法,則個方法會返回一個跟伺服器端互動的Binder物件。
這個繫結是非同步的,bindService()方法立即返回,並且不給客戶端返回IBinder物件。要接收IBinder物件,客戶端必須建立一個ServiceConnection類的例項,並且把這個例項傳遞給bindService()方法。ServiceConnection物件包含了一個系統呼叫的傳遞IBinder物件的回撥方法。
注意:只有Activity、Service、Content Provider能夠繫結服務;BroadcastReceiver廣播接收器不能繫結服務。
2、實現Service和Activity之間通訊步驟:
我們依然在第二段中的專案ServiceTest基礎上進行修改。
觀察上面第二段中MyService中的程式碼,你會發現一直有一個onBind()方法我們都沒有使用到,這個方法其實就是用於和Activity建立關聯的,修改MyService中的程式碼,如下所示:
 1 package com.example.servicetest;
 2
 3 import android.app.Service;
 4 import android.content.Intent;
 5 import android.os.Binder;
 6 import android.os.IBinder;
 7 import android.util.Log;
 8
 9 public class MyService extends Service {
10
11     public static final String TAG = "MyService";
12
13     private MyBinder mBinder = new MyBinder();
14
15     @Override
16     public void onCreate() {
17         super.onCreate();
18         Log.d(TAG, "onCreate");
19     }
20
21     @Override
22     public int onStartCommand(Intent intent, int flags, int startId) {
23         Log.d(TAG, "onStartCommand");
24         return super.onStartCommand(intent, flags, startId);
25     }
26
27     @Override
28     public void onDestroy() {
29         super.onDestroy();
30         Log.d(TAG, "onDestroy");
31     }
32
33     @Override
34     public IBinder onBind(Intent intent) {
35         return mBinder;  //在這裡返回新建的MyBinder類
36     }
37
38     //MyBinder類,繼承Binder:讓裡面的方法執行下載任務,並獲取下載進度
39     class MyBinder extends Binder {
40
41         public void startDownload() {
42             Log.d("TAG", "startDownload() executed");
43             // 執行具體的下載任務
44         }
45         public int getProgress(){
46             Log.d("TAG", "getProgress() executed");
47             return 0;
48         }
49
50     }
51
52 }
38至50行:新建一個MyBinder類,繼承Binder:讓裡面的方法執行下載任務,並獲取下載進度。當然,這裡只是兩個模擬方法,並沒有實現真正的功能,我們通過列印日誌的形式來體現。
接著建立MyBinder的例項(13行),然後在onBind()方法裡返回這個例項(35行)。
核心程式碼是35行,返回這個mBinder,是一個IBinder型別,就可以把這個IBinder型別傳遞到MainActivity中,從而呼叫Service裡面的方法。下面就要看一看,在MainActivity是如何呼叫Service裡面的兩個方法的。
(2)檢查清單檔案,是否已經對Service進行註冊:
<service android:name=".MyService" > </service>
(3)在activity_main.xml中繼續新增兩個按鈕button3_bind_service和button4_unbind_service,用於繫結服務和取消繫結服務。最終,activity_main.xml的完整程式碼如下:
<LinearLayout xmlns:android="http://schemas.android.com/apk/res/android"
    android:layout_width="match_parent"
    android:layout_height="match_parent"
    android:orientation="vertical" >

    <Button
        android:id="@+id/button1_start_service"
        android:layout_width="match_parent"
        android:layout_height="wrap_content"
        android:text="Start Service" />

    <Button
        android:id="@+id/button2_stop_service"
        android:layout_width="match_parent"
        android:layout_height="wrap_content"
        android:text="Stop Service" />

    <Button
        android:id="@+id/button3_bind_service"
        android:layout_width="match_parent"
        android:layout_height="wrap_content"
        android:text="bind Service" />

    <Button
        android:id="@+id/button4_unbind_service"
        android:layout_width="match_parent"
        android:layout_height="wrap_content"
        android:text="unbind Service" />

</LinearLayout>
(4)接下來再修改MainActivity中的程式碼,讓MainActivity和MyService之間建立關聯,程式碼如下所示:
 1 package com.example.servicetest;
 2
 3 import android.app.Activity;
 4 import android.content.ComponentName;
 5 import android.content.Intent;
 6 import android.content.ServiceConnection;
 7 import android.os.Bundle;
 8 import android.os.IBinder;
 9 import android.util.Log;
10 import android.view.View;
11 import android.view.View.OnClickListener;
12 import android.widget.Button;
13
14 public class MainActivity extends Activity implements OnClickListener {
15
16     private Button button1_start_service;
17     private Button button2_stop_service;
18     private Button button3_bind_service;
19     private Button button4_unbind_service;
20
21     private MyService.MyBinder myBinder;
22
23     //匿名內部類:服務連線物件
24     private ServiceConnection connection = new ServiceConnection() {
25
26         //當服務異常終止時會呼叫。注意,解除繫結服務時不會呼叫
27         @Override
28         public void onServiceDisconnected(ComponentName name) {
29         }
30
31         //和服務繫結成功後,服務會回撥該方法
32         @Override
33         public void onServiceConnected(ComponentName name, IBinder service) {
34             myBinder = (MyService.MyBinder) service;
35             //在Activity中呼叫Service裡面的方法
36             myBinder.startDownload();
37             myBinder.getProgress();
38         }
39     };
40
41     @Override
42     protected void onCreate(Bundle savedInstanceState) {
43         super.onCreate(savedInstanceState);
44         setContentView(R.layout.activity_main);
45         button1_start_service = (Button) findViewById(R.id.button1_start_service);
46         button2_stop_service = (Button) findViewById(R.id.button2_stop_service);
47         button3_bind_service = (Button) findViewById(R.id.button3_bind_service);
48         button4_unbind_service = (Button) findViewById(R.id.button4_unbind_service);
49
50         button1_start_service.setOnClickListener(this);
51         button2_stop_service.setOnClickListener(this);
52         button3_bind_service.setOnClickListener(this);
53         button4_unbind_service.setOnClickListener(this);
54     }
55
56     @Override
57     public void onClick(View v) {
58         switch (v.getId()) {
59         case R.id.button1_start_service:
60             Intent startIntent = new Intent(this, MyService.class);
61             startService(startIntent);
62             break;
63         case R.id.button2_stop_service:
64             Intent stopIntent = new Intent(this, MyService.class);
65             stopService(stopIntent);
66             break;
67         case R.id.button3_bind_service:
68             Intent bindIntent = new Intent(this, MyService.class);
69             bindService(bindIntent, connection, BIND_AUTO_CREATE);
70             break;
71         case R.id.button4_unbind_service:
72             unbindService(connection);
73             break;
74
75         default:
76             break;
77         }
78     }
79
80 }
可以看到,這裡我們首先建立了一個ServiceConnection的匿名類(24行),在裡面重寫了onServiceConnected()方法和onServiceDisconnected()方法,如果當前Activity與服務連線成功後,服務會回撥onServiceConnected()方法,
在onServiceConnected()方法中,我們又通過向下轉型得到了MyBinder的例項(34行),有了這個例項,Activity和Service之間的關係就變得非常緊密了。現在我們可以在Activity中根據具體的場景來呼叫MyBinder中的任何public方法(36、37行),即實現了Activity指揮Service幹什麼Service就去幹什麼的功能。
當然,現在Activity和Service其實還沒關聯起來了呢,這個功能是在Bind Service按鈕的點選事件裡完成的。可以看到,這裡我們仍然是構建出了一個Intent物件,然後呼叫bindService()方法將Activity和Service進行繫結。bindService()方法接收三個引數,第一個引數就是剛剛構建出的Intent物件,第二個引數是前面創建出的ServiceConnection的例項,第三個引數是一個標誌位,這裡傳入BIND_AUTO_CREATE表示在Activity和Service建立關聯後會自動建立Service(即使之前沒有建立Service也沒有關係),這會使得MyService中的onCreate()方法得到執行,但onStartCommand()方法不會執行。
然後如何我們想解除Activity和Service之間的關聯怎麼辦呢?呼叫一下unbindService()方法就可以了,這也是Unbind Service按鈕的點選事件裡實現的邏輯。
現在讓我們重新執行一下程式吧,在MainActivity中點選一下Bind Service按鈕,LogCat裡的列印日誌如下圖所示:
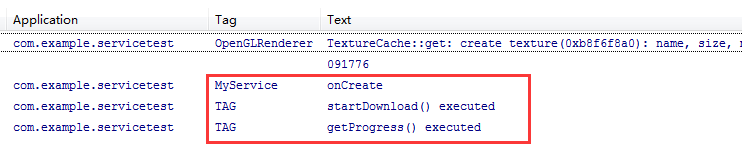
可以看到,只點擊了Bind Service按鈕,但是oncreate()方法得到了執行,而onStartCommand()方法不會執行。
另外需要注意,任何一個Service在整個應用程式範圍內都是通用的,即MyService不僅可以和MainActivity建立關聯,還可以和任何一個Activity建立關聯,而且在建立關聯時它們都可以獲取到相同的MyBinder例項。
如何銷燬Service:
根據上面第一段的知識,我們介紹了銷燬Service最簡單的一種情況:現在解除安裝程式,重新執行程式,點選Start Service按鈕啟動Service,再點選Stop Service按鈕停止Service,這樣MyService就被銷燬了:

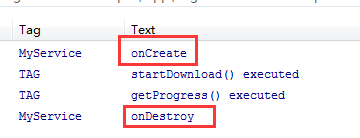
現在回到本段內容。解除安裝程式,重新開始。那麼如果我們只點擊的Bind Service按鈕呢?由於在繫結Service的時候指定的標誌位是BIND_AUTO_CREATE,說明點選Bind Service按鈕的時候Service也會被建立,這時應該怎麼銷燬Service呢?其實也很簡單,點選一下Unbind Service按鈕,將Activity和Service的關聯解除就可以了:
以上這兩種銷燬的方式都很好理解。那麼如果我們既點選了Start Service按鈕,又點選了Bind Service按鈕會怎麼樣呢?這個時候你會發現,不管你是單獨點選Stop Service按鈕還是Unbind Service按鈕,Service都不會被銷燬,必要將Unbind Service按鈕和Stop Service按鈕都點選一下(沒有先後順序),Service才會被銷燬。也就是說,點選Stop Service按鈕只會讓Service停止,點選Unbind Service按鈕只會讓Service和Activity解除關聯,一個Service必須要在既沒有和任何Activity關聯又處理停止狀態的時候才會被銷燬。
點選Unbind Service按鈕後,再次點選Unbind Service按鈕按鈕引發的問題:
假設現在Service和Activity已經相關聯了,點選Unbind Service按鈕能夠解除繫結,如果繼續點選Unbind Service按鈕,程式會異常退出,這說明程式碼不夠完善,我們需要在程式碼中加一個判斷是否繫結的標記mBound。在改MainActivity中增加一部分程式碼,最終改MainActivity的完整程式碼如下:(加粗字型是新增的內容)
 1 package com.example.servicetest02;
 2
 3 import android.app.Activity;
 4 import android.content.ComponentName;
 5 import android.content.Intent;
 6 import android.content.ServiceConnection;
 7 import android.os.Bundle;
 8 import android.os.IBinder;
 9 import android.util.Log;
10 import android.view.View;
11 import android.view.View.OnClickListener;
12 import android.widget.Button;
13
14 public class MainActivity extends Activity implements OnClickListener {
15     private Button button1_start_service;
16     private Button button2_stop_service;
17     private Button button3_bind_service;
18     private Button button4_unbind_service;
19     private MyService.MyBinder myBinder;
20
21     boolean mBound = false; //一開始,並沒有和Service繫結.這個引數是用來顯示繫結狀態
22
23     //匿名內部類:服務連線物件
24     private ServiceConnection connection = new ServiceConnection() {
25
26         //當服務異常終止時會呼叫。注意,解除繫結服務時不會呼叫
27         @Override
28         public void onServiceDisconnected(ComponentName name) {
29             mBound = false; //服務異常終止時,狀態為未繫結
30         }
31
32         //和服務繫結成功後,服務會回撥該方法
33         @Override
34         public void onServiceConnected(ComponentName name, IBinder service) {
35             myBinder = (MyService.MyBinder) service;
36             //在Activity中呼叫Service裡面的方法
37             myBinder.startDownload();
38             myBinder.getProgress();
39             mBound = true; //true說明是繫結狀態
40         }
41     };
42     @Override
43     protected void onCreate(Bundle savedInstanceState) {
44         super.onCreate(savedInstanceState);
45         setContentView(R.layout.activity_main);
46         button1_start_service = (Button) findViewById(R.id.button1_start_service);
47         button2_stop_service = (Button) findViewById(R.id.button2_stop_service);
48         button3_bind_service = (Button) findViewById(R.id.button3_bind_service);
49         button4_unbind_service = (Button) findViewById(R.id.button4_unbind_service);
50         button1_start_service.setOnClickListener(this);
51         button2_stop_service.setOnClickListener(this);
52         button3_bind_service.setOnClickListener(this);
53         button4_unbind_service.setOnClickListener(this);
54     }
55     @Override
56     public void onClick(View v) {
57         switch (v.getId()) {
58         case R.id.button1_start_service:
59             Intent startIntent = new Intent(this, MyService.class);
60             startService(startIntent);
61             break;
62         case R.id.button2_stop_service:
63             Intent stopIntent = new Intent(this, MyService.class);
64             stopService(stopIntent);
65             break;
66         case R.id.button3_bind_service:
67             Intent bindIntent = new Intent(this, MyService.class);
68             bindService(bindIntent, connection, BIND_AUTO_CREATE);
69             break;
70         case R.id.button4_unbind_service:
71             //如果和Service是繫結的狀態,就解除繫結。
72             if(mBound){
73                 unbindService(connection);
74                 mBound=false;
75             }
76             break;
77
78         default:
79             break;
80         }
81     }
82 }
新增的程式碼是第21行、29行、72行至74行。
這樣的話,連續點選Unbind Service按鈕,就不會使程式出現異常。
3、started服務與bind服務的區別:
區別一:生命週期
- 通過started方式的服務會一直執行在後臺,需要由元件本身或外部元件來停止服務才會以結束執行
- bind方式的服務,生命週期就要依賴繫結的元件
區別二:引數傳遞
- started服務可以給啟動的服務物件傳遞引數,但無法獲取服務中方法的返回值
- bind服務可以給啟動的服務物件傳遞引數,也可以通過繫結的業務物件獲取返回結果
實際開發中的技巧;
- 第一次先使用started方式來啟動一個服務
- 之後可以使用bind的方式繫結服務,從而可以直接呼叫業務方法獲取返回值
4、Service的生命週期:

一旦在專案的任何位置呼叫了Context的startService()方法,相應的服務就會啟動起來,並回調onstartCommand()方法。如果這個服務之前還沒有建立過,onCreate()方法會先於onstartCommand()方法執行。服務啟動過後,會一直保持執行狀態,直到stopService()或stopself()方法被呼叫。注意雖然每次呼叫一次startService()方法,onstartCommand()方法就會以執行一次,但實際上每個服務都只會存在一個例項。所以不管你呼叫了多少次startService()方法,只需呼叫一次stopService()或stopself()方法,服務就會停止。
另外,還可以呼叫Context的bindService()來獲取一個服務的持久連線,這時就會回撥服務中的onBind()方法。類似地,如果這個服務之前還沒有建立過,onCreate()方法會先於onBind()方法執行。之後呼叫方可以獲取到onBind()方法裡返回的IBinder物件的例項,這樣,就能自由地和服務進行通訊了。只要呼叫方和服務之間的連線沒有斷開,服務就會一直保持執行狀態。
五、使用Bind Service完成IPC程序間通訊:(在同一個APP內模擬)
既然是在在同一個APP內模擬程序間通訊,其實就是完成程序內通訊,但是原理都是一樣的嘛。
也就是說,要實現:讓Activity與一個遠端Service建立關聯,這就要使用AIDL來進行跨程序通訊了(IPC)。這裡把Bind Service及其他的概念再重複一下:
1、Bind Service的介紹:
應用程式元件(客戶端)通過呼叫bindService()方法能夠繫結服務,然後Android系統會呼叫服務的onBind()回撥方法,則個方法會返回一個跟伺服器端互動的Binder物件。
這個繫結是非同步的,bindService()方法立即返回,並且不給客戶端返回IBinder物件。要接收IBinder物件,客戶端必須建立一個ServiceConnection類的例項,並且把這個例項傳遞給bindService()方法。ServiceConnection物件包含了一個系統呼叫的傳遞IBinder物件的回撥方法。
注意:只有Activity、Service、Content Provider能夠繫結服務;BroadcastReceiver廣播接收器不能繫結服務。
2、在客戶端繫結一個服務的步驟:
(1)實現ServiceConnection抽象類。實現過程中,必須重寫一下兩個回撥方法:
- onServiceConnected() 和服務繫結成功後,系統會呼叫這個方法來發送由服務的onBind()方法返回的IBinder物件
- onServiceDisconnected() 當服務異常終止時會呼叫(如服務崩潰或被殺死時)。注意,在客戶端解除繫結時不會呼叫該方法。
(2)呼叫bindService()方法來傳遞ServiceConnection類的實現;
(3)當系統呼叫你的onServiceConnected()回撥方法時,你就可以開始使用介面中定義的方法來呼叫服務了
(4)呼叫unbindService()方法斷開與服務的連結。
注:bindService()和unbindService()方法都是Context類中的方法。
3、IPC(Inter-Process Communication)程序間通訊機制:
在同一程序中,各個元件進行通訊是十分方便的,普通的函式呼叫就可以解決;但是對於不同的程序中的元件來說,要進行通訊,就需要用到Android的IPC機制了。
對應用開發者來說,Android的IBinder/Binder框架實現了Android的IPC通訊。當然,IBinder/Binder框架也可以用來實現程序內通訊(本地通訊),也可以實現程序間通訊(遠端通訊)
從Android SDK中對IBinder/Binder的解釋可知,IBinder/Binder是Android遠端物件的基本介面,它是Android用於提供高效能IPC通訊而設計的一套輕量級遠端呼叫機制的核心部分。該介面描述了與一個遠端物件進行通訊的抽象協議。
4、AIDL(Android Interface Definition Language)Android介面定義語言:
AIDL它可以用於讓某個Service與多個應用程式元件之間進行跨程序通訊,從而可以實現多個應用程式共享同一個Service的功能。
AIDL支援的型別:八大基本資料型別、String型別、CharSequence、List、Map、自定義。
來看下面的這張原理圖:
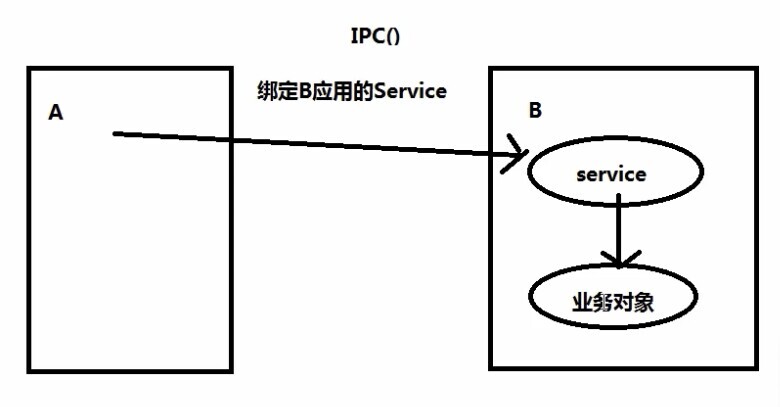
上圖中,如果A應用程式想訪問B應用程式中的業務物件,可以先讓A繫結B應用中的Service,然後通過Service去訪問B中的業務物件。我們可以用AIDL來描述需要被別人呼叫的介面(即B中的業務物件)。
5、IPC(程序間通訊)具體的步驟如下:
- 使用AIDL定義業務介面,通過ADT工具來生成一個java類,此類實現了程序間遠端通訊的代理
- 編寫自己的業務類(繼承生成的類中的Stub)來實現業務介面功能
- 再通過繫結Service的方式來暴露此業務物件,給其它元件提供功能
- 呼叫者元件通過bindService方法繫結服務,從而獲取繫結成功後的遠端業務物件或本地業務物件,然後就可以呼叫相關功能。
- 注意:一般在使用完繫結服務後,需要解除繫結。
下面就通過程式碼來實現。
6、讓Activity與一個遠端Service建立關聯的步驟:(在同一個APP內模擬)
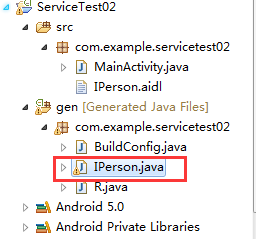
新建一個全新的Android工程ServiceTest02。
(1)新建IPerson.aidl檔案,程式碼如下所示:
1 package com.example.servicetest02;
2 interface IPerson{
3     void setName(String name);
4     void setSex(String sex);
5     void setAge(int age);
6     String getPerson();
7 }
這個檔案裡,新增我們需要的業務方法。第01行是包名。注意不要寫public等修飾符。(如果這個檔案寫錯了,程式會報錯,後面的Java檔案也不會自從生成)
檔案儲存之後,ADT會在gen目錄下自動生成一個對應的Java檔案,如下圖所示:
之後,程式執行的時候使用的是這個Java檔案,與aidl檔案就沒有關係了。
我們來大致分析一下這個自動生成的Java檔案。完整版程式碼如下:
 IPerson.java
分析:
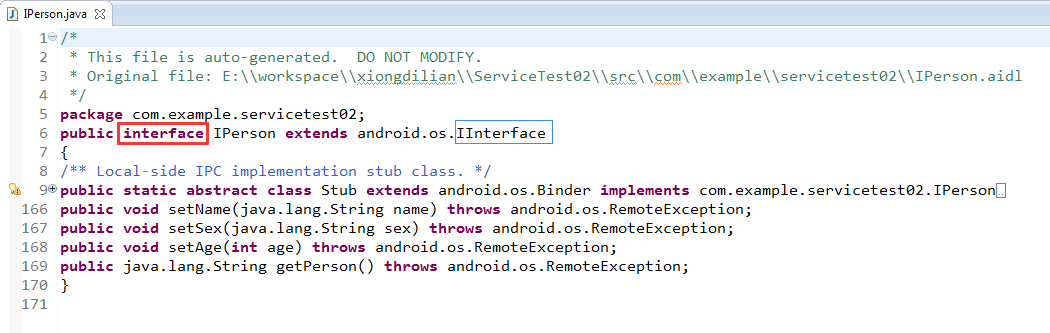
這個Java檔案實際上是一個介面,同時生成了在aidl檔案中定義的四個方法,並丟擲了遠端呼叫的異常。我們按住Ctrl鍵,點開上圖中藍框部分的IInterface,檢視一下原始碼:
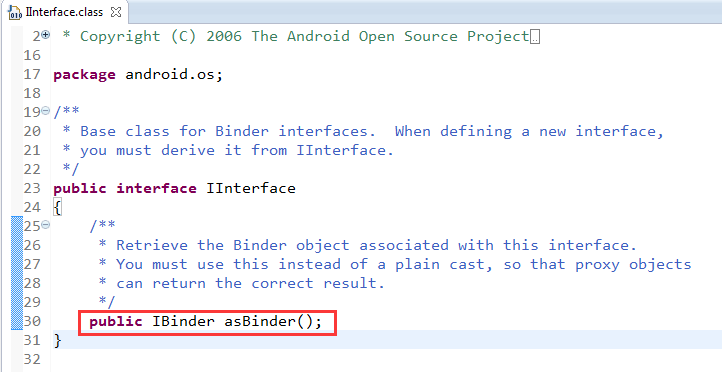
可以看到,在IInterface接口裡,定義了一個介面IBinder,這是IPC機制的核心介面。
再回來看IPerson.java檔案的第9行定義了這樣一個抽象類:

上圖中的Stub類可以比作存根。Stub類繼承了Binder類,同時實現了IPerson介面(沒有實現IPerson裡的方法)。所以進一步理解為:Stub既是IPerson裡的內部類,也是一個IPerson。
(2)新建PersonImpl類,繼承IPerson.Stub類,重寫父類裡的方法。程式碼如下:(也就是說,根據上面的java類,生成業務物件,即原理圖中B應用的業務物件)
 1 package com.example.servicetest02;
 2
 3 import android.os.RemoteException;
 4
 5 public class PersonImpl extends IPerson.Stub{
 6
 7     private String name;
 8     private String sex;
 9     private int age;
10
11     @Override
12     public void setName(String name) throws RemoteException {
13         // TODO Auto-generated method stub
14         this.name = name;
15
16     }
17
18     @Override
19     public void setSex(String sex) throws RemoteException {
20         // TODO Auto-generated method stub
21         this.sex = sex;
22
23     }
24     @Override
25     public void setAge(int age) throws RemoteException {
26         // TODO Auto-generated method stub
27         this.age = age;
28
29     }
30
31     @Override
32     public String getPerson() throws RemoteException {
33         // TODO Auto-generated method stub
34         return "name="+name+",sex="+sex+",age="+age;
35     }
36 }
(3)新建類MyService,程式碼如下:
 1 package com.example.servicetest02;
 2
 3 import android.app.Service;
 4 import android.content.Intent;
 5 import android.os.IBinder;
 6 import android.util.Log;
 7
 8 public class MyService extends Service {
 9
10     public static final String TAG = "MyService";
11
12      PersonImpl mBinder = new PersonImpl();
13
14     @Override
15     public void onCreate() {
16         super.onCreate();
17         Log.d(TAG, "onCreate");
18     }
19
20     @Override
21     public int onStartCommand(Intent intent, int flags, int startId) {
22         Log.d(TAG, "onStartCommand");
23         return super.onStartCommand(intent, flags, startId);
24     }
25
26     @Override
27     public void onDestroy() {
28         super.onDestroy();
29         Log.d(TAG, "onDestroy");
30     }
31
32     @Override
33     public IBinder onBind(Intent intent) {
34         Log.d("MyService", "onBind");
35         return mBinder;  //在這裡返回新建的MyBinder類
36     }
37
38 }
核心程式碼:12行和35行。
因為PersonImpl類繼承了IPerson.Stub,而Stub繼承了Binder,Binder又實現了IBinder。所以,PersonImpl可以理解為一個IBinder。於是可以在第35行返回PersonImpl的例項。
(4)在清單檔案中新增許可權:
<service android:name=".MyService"> </service>
現在,B應用的業務物件和服務建立好了。B應用的業務物件通過與Service繫結,讓Service把業務物件暴露給了A應用或者其他的應用。也就是說,Service最終並沒有實現業務功能。
如果要讓A應用來訪問,該怎麼做呢?
(5)在activity_main.xml中新增兩個按鈕button_bind_service和button_unbind_service,用於繫結遠端服務和取消繫結。activity_main.xml的程式碼如下:
<LinearLayout xmlns:android="http://schemas.android.com/apk/res/android"
    android:layout_width="match_parent"
    android:layout_height="match_parent"
    android:orientation="vertical" >

    <Button
        android:id="@+id/button_bind_service"
        android:layout_width="match_parent"
        android:layout_height="wrap_content"
        android:text="bind Service" />

    <Button
        android:id="@+id/button_unbind_service"
        android:layout_width="match_parent"
        android:layout_height="wrap_content"
        android:text="unbind Service" />

</LinearLayout>
(6)MainActivity中的程式碼,如下所示:
 1 package com.example.servicetest02;
 2
 3 import android.app.Activity;
 4 import android.content.ComponentName;
 5 import android.content.Intent;
 6 import android.content.ServiceConnection;
 7 import android.os.Bundle;
 8 import android.os.IBinder;
 9 import android.os.RemoteException;
10 import android.util.Log;
11 import android.view.View;
12 import android.view.View.OnClickListener;
13 import android.widget.Button;
14
15 public class MainActivity extends Activity implements OnClickListener {
16
17     public static final String TAG = "MainActivity";
18     private Button button_bind_service;
19     private Button button_unbind_service;
20
21     private IPerson person;
22
23     boolean mBound = false; // 一開始,並沒有和Service繫結.這個引數是用來判斷繫結狀態
24
25     // 匿名內部類:服務連線物件
26     private ServiceConnection connection = new ServiceConnection() {
27
28         // 當服務異常終止時會呼叫。注意,解除繫結服務時不會呼叫
29         @Override
30         public void onServiceDisconnected(ComponentName name) {
31             mBound = false; // 服務異常終止時,狀態為未繫結
32         }
33
34         // 和服務繫結成功後,服務會回撥該方法。在這個方法裡呼叫的業務物件中的內容
35         @Override
36         public void onServiceConnected(ComponentName name, IBinder service) {
37             Log.d(TAG, "onServiceConnected");
38             person = IPerson.Stub.asInterface(service); // 得到person物件
39             Log.d("person", "person物件的記憶體地址是" + person); // 打印出person物件的記憶體地址
40             try {
41                 person.setName("生命壹號");
42                 person.setAge(22);
43                 person.setSex("男");
44                 String p = person.getPerson();
45                 Log.d("person", "person的資訊是" + p);
46             } catch (RemoteException e) {
47                 // TODO Auto-generated catch block
48                 e.printStackTrace();
49             }
50             mBound = true; //true說明是繫結狀態
51
52         }
53     };
54
55     @Override
56     protected void onCreate(Bundle savedInstanceState) {
57         super.onCreate(savedInstanceState);
58         setContentView(R.layout.activity_main);
59         button_bind_service = (Button) findViewById(R.id.button_bind_service);
60         button_unbind_service = (Button) findViewById(R.id.button_unbind_service);
61         button_bind_service.setOnClickListener(this);
62         button_unbind_service.setOnClickListener(this);
63
64     }
65
66     @Override
67     public void onClick(View v) {
68         switch (v.getId()) {
69         case R.id.button_bind_service:
70             Intent bindIntent = new Intent(this, MyService.class);
71             bindService(bindIntent, connection, BIND_AUTO_CREATE);
72             break;
73         case R.id.button_unbind_service:
74             // 如果和Service是繫結的狀態,就解除繫結。
75             if (mBound) {
76                 unbindService(connection);
77                 mBound = false;
78             }
79             break;
80
81         default:
82             break;
83         }
84     }
85
86 }
核心程式碼是第38行:可以看到,這裡首先使用了MyAIDLService.Stub.asInterface()方法將傳入的IBinder物件傳換成了IPerson物件,接下來就可以呼叫在IPerson.aidl檔案中定義的所有介面了(41至44行)。呼叫之後,我們在後臺列印輸出。
執行程式,點選按鈕,效果如下:
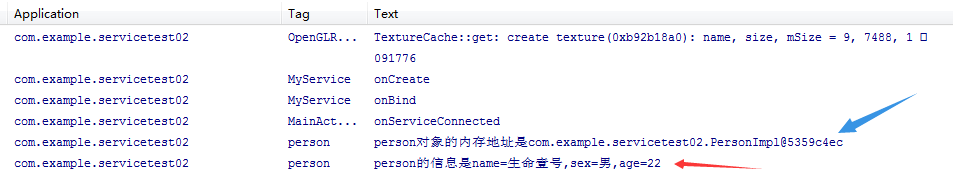
由此可見,我們確實已經成功實現跨程序通訊了,在一個程序中訪問到了另外一個程序中的方法。 注意,這個Service是執行在主執行緒當中的,畢竟我們是在本地模擬的嘛。
另外注意藍色箭頭處,可以看出,這個person其實就是personImpl,因為是在本地呼叫。所以說,目前的跨程序通訊其實並沒有什麼實質上的作用,因為這只是在一個Activity裡呼叫了同一個應用程式的Service裡的方法。而跨程序通訊的真正意義是為了讓一個應用程式去訪問另一個應用程式中的Service,以實現共享Service的功能。那麼下面我們自然要學習一下,如何才能在其它的應用程式中呼叫到MyService裡的方法。
繼續回顧第(1)步中自動生成的IPerson.java檔案,擷取第22至32行,摘抄如下:
 1         public static com.example.servicetest02.IPerson asInterface(
 2                 android.os.IBinder obj) {
 3             if ((obj == null)) {
 4                 return null;
 5             }
 6             android.os.IInterface iin = obj.queryLocalInterface(DESCRIPTOR);
 7             if (((iin != null) && (iin instanceof com.example.servicetest.IPerson))) {
 8                 return ((com.example.servicetest.IPerson) iin);
 9             }
10             return new com.example.servicetest.IPerson.Stub.Proxy(obj);
11         }
程式碼解釋:
上方第06行的iin代表的是,查詢本地物件返回的結果。
07行:如果iin不為空,並且iin為IPerson,那就將iin強制轉換為IPerson(08行)。很顯然,這裡是程序內通訊(本地通訊)要用到的。也就是本段中的例子。
10行:代表的是程序間通訊(遠端通訊),此時第07行的if語句不成立,於是返回第10行的代理物件Proxy(obj)。
實現程序間通訊的兩個辦法:
如果要實現程序間通訊,就必須讓MainActivity和Service相互獨立。有兩個辦法:
(1)辦法一:將本地的Service設定為遠端。只需要在清單檔案中註冊Service的時候將它的android:process屬性指定成:remote就可以了,程式碼如下所示:
<service android:name=".MyService" android:process=":remote"> </service>
後臺列印日誌如下:
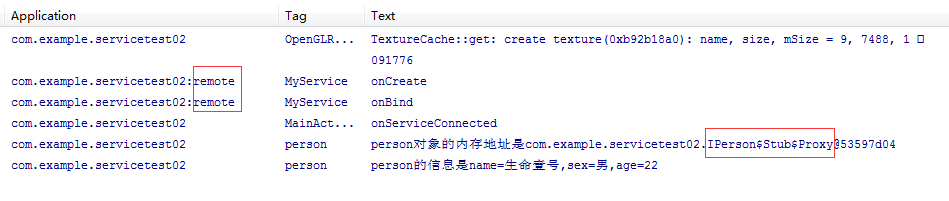
上圖的紅框部分顯示,Service和Activity並非在同一個執行緒內,連包名都不一樣。而IPeron也並非是本地的IPeron。
如果將這種方法應用到上面的第四段中,情形是這樣的:
點選button1_start_service,服務啟動。既然已經將Service的android:process屬性指定成:remote,此時Service和Activity不在同一個執行緒內,那麼即使在Service的onStartCommand()方法中執行耗時操作而不重新開啟子執行緒,程式也不會阻塞。
但是,如果點選button3_bind_service按鈕繫結服務,程式會崩潰的。這是因為,目前MyService已經是一個遠端Service了,Activity和Service執行在兩個不同的程序當中,這時就不能再使用傳統的建立關聯的方式,程式也就崩潰了。
現在我們總結一下:
第四段中使用的是傳統的方式和Service建立關聯,預設MainActivity和MyService在同一個執行緒內,如果將Service的android:process屬性指定成:remote,此時MainActivity和MyService將在不同的執行緒內,但是無法繫結服務。
本段中(第五段)使用的是IPC跨程序通訊,MainActivity和MyService在不同的程序中,可以繫結遠端服務。
(2)辦法二:新建另外一個工程,真正實現遠端通訊。這就是我們下一段(第六段)要講的內容。
我們還是先回過頭來再鞏固一下本段中AIDL的知識吧。
7、AIDL支援的自定義資料型別:
我們在本段中的第4小結講到,AIDL支援的型別:八大基本資料型別、String型別、CharSequence、List、Map、自定義,那我們就來詳細說下這個自定義資料型別。
由於這是在不同的程序之間傳遞資料,Android對這類資料的格式支援是非常有限的,基本上只能傳遞Java的基本資料型別、字串、List或Map等。那麼如果我想傳遞一個自定義的類該怎麼辦呢?這就必須要讓這個類去實現Parcelable介面,並且要給這個類也定義一個同名的AIDL檔案進行宣告。這部分內容並不複雜,而且和Service關係不大。具體操作如下:
重新建一個工程ServiceTest03。步驟如下:
(1)新建一個Student類去實現Parcelable介面。Student類是作為傳遞的自定義類:
 1 package com.example.servicetest;
 2
 3 import android.os.Parcel;
 4 import android.os.Parcelable;
 5
 6 public class Student implements Parcelable {
 7     private String name;
 8     private String sex;
 9
10     public Student() {
11         super();
12     }
13
14     public String getName() {
15         return name;
16     }
17
18     public void setName(String name) {
19         this.name = name;
20     }
21
22     public String getSex() {
23         return sex;
24     }
25
26     public void setSex(String sex) {
27         this.sex = sex;
28     }
29
30     @Override
31     public int describeContents() {
32         // TODO Auto-generated method stub
33         return 0;
34     }
35
36     // 重寫父類的方法:將需要傳送的資料放進來
37     @Override
38     public void writeToParcel(Parcel dest, int flags) {
39         // TODO Auto-generated method stub
40         dest.writeString(name);
41         dest.writeString(name);
42     }
43
44     public static final Parcelable.Creator<Student> CREATOR = new Parcelable.Creator<Student>() {
45         public Student createFromParcel(Parcel in) {
46             Student s = new Student();
47             s.setName(in.readString());
48             s.setSex(in.readString());
49             return s;
50         }
51
52         public Student[] newArray(int size) {
53             return new Student[size];
54         }
55     };
56
57 }
我們在這個類中放入