
Android快速整合極光推送,內含自定義通知,通知推送物件到某一個人,或者某一群人
整合極光推送 使用jcenter 自動整合步驟 說明 : 使用 jcenter 自動整合,不需要在專案中新增 jar 和 so,jcenter 會自動完成依賴;在 AndroidManifest.xml 中不需要新增任何 JPush SDK 相關的配置,jcenter 會自動匯入。
- 確認 android studio 的 Project 根目錄的主 gradle 中配置了 jcenter 支援。(新建 project 預設配置就支援)
buildscript {
    repositories {
        jcenter()
    }
    ......
}

allprojets {
    repositories {
        jcenter()
    }
}
- 在 module 的 gradle 中新增依賴和 AndroidManifest 的替換變數。
android {
    ......
    defaultConfig {
        applicationId "com.xxx.xxx" //JPush 上註冊的包名.
        ......

        ndk {
            //選擇要新增的對應 cpu 型別的 .so 庫。
            abiFilters 'armeabi', 'armeabi-v7a', 'arm64-v8a'
            // 還可以新增 'x86', 'x86_64', 'mips', 'mips64'
        }

        manifestPlaceholders = [
            JPUSH_PKGNAME : applicationId,
            JPUSH_APPKEY : "你的 Appkey ", //JPush 上註冊的包名對應的 Appkey.
            JPUSH_CHANNEL : "developer-default", //暫時填寫預設值即可.
        ]
        ......
    }
    ......
}

dependencies {
    ......

    compile 'cn.jiguang.sdk:jpush:3.1.6'  // 此處以JPush 3.1.6 版本為例。
    compile 'cn.jiguang.sdk:jcore:1.2.5'  // 此處以JCore 1.2.5 版本為例。
    ......
}
我的Demo中的build.gradle
apply plugin: 'com.android.application'

android {
    compileSdkVersion 28
    defaultConfig {
        applicationId "com.maigu.yang.jiguangdemo"
        minSdkVersion 15
        targetSdkVersion 28
        versionCode 1
        versionName "1.0"
        testInstrumentationRunner "android.support.test.runner.AndroidJUnitRunner"

        manifestPlaceholders = [
                JPUSH_PKGNAME: applicationId,
                JPUSH_APPKEY : "979910224deebd360a0c497b", //JPush上註冊的包名對應的appkey.
                JPUSH_CHANNEL: "developer-default", //暫時填寫預設值即可.
        ]

    }
    buildTypes {
        release {
            minifyEnabled false
            proguardFiles getDefaultProguardFile('proguard-android.txt'), 'proguard-rules.pro'
        }
    }
}

dependencies {
    implementation fileTree(dir: 'libs', include: ['*.jar'])
    implementation 'com.android.support:appcompat-v7:28.0.0'
    implementation 'com.android.support.constraint:constraint-layout:1.1.3'
    testImplementation 'junit:junit:4.12'
    androidTestImplementation 'com.android.support.test:runner:1.0.2'
    androidTestImplementation 'com.android.support.test.espresso:espresso-core:3.0.2'

    implementation 'cn.jiguang.sdk:jpush:3.1.1'
    implementation 'cn.jiguang.sdk:jcore:1.1.9'

}
配置 AndroidManifest.xml
<?xml version="1.0" encoding="utf-8"?>
<manifest xmlns:android="http://schemas.android.com/apk/res/android"
package="com.maigu.yang.jiguangdemo">
<uses-permission android:name="android.permission.INTERNET" />
<uses-permission android:name="android.permission.CAMERA" />
<!-- Required -->
<permission
android:name="com.maigu.yang.jiguangdemo.permission.JPUSH_MESSAGE"
android:protectionLevel="signature" />
<!-- Required -->
<uses-permission android:name="com.maigu.yang.jiguangdemo.permission.JPUSH_MESSAGE" />
<uses-permission android:name="android.permission.RECEIVE_USER_PRESENT" />
<uses-permission android:name="android.permission.WAKE_LOCK" />
<uses-permission android:name="android.permission.READ_PHONE_STATE" />
<uses-permission android:name="android.permission.CAMERA" />
<uses-permission android:name="android.permission.WRITE_EXTERNAL_STORAGE" />
<uses-permission android:name="android.permission.READ_EXTERNAL_STORAGE" />
<uses-permission android:name="android.permission.VIBRATE" />
<uses-permission android:name="android.permission.MOUNT_UNMOUNT_FILESYSTEMS" />
<uses-permission android:name="android.permission.ACCESS_NETWORK_STATE" />
<uses-permission android:name="android.permission.WRITE_SETTINGS" />
<uses-permission android:name="android.permission.ACCESS_WIFI_STATE" />
<uses-permission android:name="android.permission.CALL_PHONE" />
<uses-permission android:name="android.permission.REQUEST_INSTALL_PACKAGES" />
<!-- Optional. Required for location feature -->
<!-- 用於開啟 debug 版本的應用在6.0 系統上 層疊視窗許可權 -->
<uses-permission android:name="android.permission.SYSTEM_ALERT_WINDOW" />
<!-- <uses-permission android:name="android.permission.ACCESS_COARSE_LOCATION" /> -->
<uses-permission android:name="android.permission.CHANGE_WIFI_STATE" />
<!-- <uses-permission android:name="android.permission.ACCESS_FINE_LOCATION" /> -->
<!-- <uses-permission android:name="android.permission.ACCESS_LOCATION_EXTRA_COMMANDS" /> -->
<uses-permission android:name="android.permission.CHANGE_NETWORK_STATE" />
<uses-permission android:name="android.permission.GET_TASKS" />
<application
android:name=".App"
android:allowBackup="true"
android:icon="@mipmap/ic_launcher"
android:label="@string/app_name"
android:roundIcon="@mipmap/ic_launcher_round"
android:supportsRtl="true"
android:theme="@style/AppTheme">
<activity android:name=".MainActivity">
<intent-filter>
<action android:name="android.intent.action.MAIN" />
<category android:name="android.intent.category.LAUNCHER" />
</intent-filter>
</activity>
<!-- jpush sdk begin -->
<!-- Required SDK 核心功能 -->
<!-- 可配置android:process引數將PushService放在其他程序中 -->
<service
android:name="cn.jpush.android.service.PushService"
android:enabled="true"
android:exported="false">
<intent-filter>
<action android:name="cn.jpush.android.intent.REGISTER" />
<action android:name="cn.jpush.android.intent.REPORT" />
<action android:name="cn.jpush.android.intent.PushService" />
<action android:name="cn.jpush.android.intent.PUSH_TIME" />
</intent-filter>
</service>
<!-- since 3.0.9 Required SDK 核心功能 -->
<!-- <provider -->
<!-- android:authorities="com.maigu.yang.jiguangdemo.DataProvider" -->
<!-- android:name="cn.jpush.android.service.DataProvider" -->
<!-- android:exported="true" -->
<!-- /> -->
<!-- since 1.8.0 option 可選項。用於同一裝置中不同應用的JPush服務相互拉起的功能。 -->
<!-- 若不啟用該功能可刪除該元件,將不拉起其他應用也不能被其他應用拉起 -->
<service
android:name="cn.jpush.android.service.DaemonService"
android:enabled="true"
android:exported="true">
<intent-filter>
<action android:name="cn.jpush.android.intent.DaemonService" />
<category android:name="com.maigu.yang.jiguangdemo" />
</intent-filter>
</service>
<!-- Required SDK核心功能 -->
<receiver
android:name="cn.jpush.android.service.PushReceiver"
android:enabled="true">
<intent-filter android:priority="1000">
<action android:name="cn.jpush.android.intent.NOTIFICATION_RECEIVED_PROXY" />
<category android:name="com.maigu.yang.jiguangdemo" />
</intent-filter>
<intent-filter>
<action android:name="android.intent.action.USER_PRESENT" />
<action android:name="android.net.conn.CONNECTIVITY_CHANGE" />
</intent-filter>
<!-- Optional -->
<intent-filter>
<action android:name="android.intent.action.PACKAGE_ADDED" />
<action android:name="android.intent.action.PACKAGE_REMOVED" />
<data android:scheme="package" />
</intent-filter>
</receiver>
<!-- Required SDK核心功能 -->
<activity
android:name="cn.jpush.android.ui.PushActivity"
android:configChanges="orientation|keyboardHidden"
android:exported="false"
android:theme="@android:style/Theme.NoTitleBar">
<intent-filter>
<action android:name="cn.jpush.android.ui.PushActivity" />
<category android:name="android.intent.category.DEFAULT" />
<category android:name="com.maigu.yang.jiguangdemo" />
</intent-filter>
</activity>
<!-- SDK核心功能 -->
<activity
android:name="cn.jpush.android.ui.PopWinActivity"
android:configChanges="orientation|keyboardHidden"
android:exported="false"
android:theme="@style/MyDialogStyle">
<intent-filter>
<category android:name="android.intent.category.DEFAULT" />
<category android:name="com.maigu.yang.jiguangdemo" />
</intent-filter>
</activity>
<!-- Required SDK核心功能 -->
<service
android:name="cn.jpush.android.service.DownloadService"
android:enabled="true"
android:exported="false" />
<!-- Required SDK核心功能 -->
<receiver android:name="cn.jpush.android.service.AlarmReceiver" />
<!-- Required since 3.0.7 -->
<!-- 新的tag/alias介面結果返回需要開發者配置一個自定的廣播 -->
<!-- 該廣播需要繼承JPush提供的JPushMessageReceiver類, 並如下新增一個 Intent-Filter -->
<!-- <receiver -->
<!-- android:name=".jpush.MyReceiver" -->
<!-- android:enabled="true" > -->
<!-- <intent-filter> -->
<!-- <action android:name="cn.jpush.android.intent.RECEIVE_MESSAGE" /> -->
<!-- <category android:name="com.maigu.yang.jiguangdemo" /> -->
<!-- </intent-filter> -->
<!-- </receiver> -->
<!-- <!– User defined. 使用者自定義的廣播接收器–> -->
<receiver
android:name=".MyReceiver"
android:enabled="true">
<intent-filter>
<!-- Required 使用者註冊SDK的intent -->
<action android:name="cn.jpush.android.intent.REGISTRATION" />
<!-- Required 使用者接收SDK訊息的intent -->
<action android:name="cn.jpush.android.intent.MESSAGE_RECEIVED" />
<!-- Required 使用者接收SDK通知欄資訊的intent -->
<action android:name="cn.jpush.android.intent.NOTIFICATION_RECEIVED" />
<!-- Required 使用者開啟自定義通知欄的intent -->
<action android:name="cn.jpush.android.intent.NOTIFICATION_OPENED" />
<!-- 接收網路變化 連線/斷開 since 1.6.3 -->
<action android:name="cn.jpush.android.intent.CONNECTION" />
<category android:name="com.maigu.yang.jiguangdemo" />
</intent-filter>
</receiver>
<!-- Required. For publish channel feature -->
<!-- JPUSH_CHANNEL 是為了方便開發者統計APK分發渠道。 -->
<!-- 例如: -->
<!-- 發到 Google Play 的APK可以設定為 google-play; -->
<!-- 發到其他市場的 APK 可以設定為 xxx-market。 -->
<meta-data
android:name="JPUSH_CHANNEL"
android:value="developer-default" />
<!-- Required. AppKey copied from Portal -->
<meta-data
android:name="JPUSH_APPKEY"
android:value="979910224deebd360a0c497b" />
<!-- jpush sdk end -->
</application>
</manifest>
小帖士
如果使用 android studio,可在 AndroidManifest 中引用 applicationId 的值,在 build.gradle 配置中 defaultConfig 節點下配置,如:
defaultConfig {
      applicationId "cn.jpush.example" // <--您應用的包名
      ……
 }
在 AndroidManifest 中使用 ${applicationId} 引用 gradle 中定義的包名
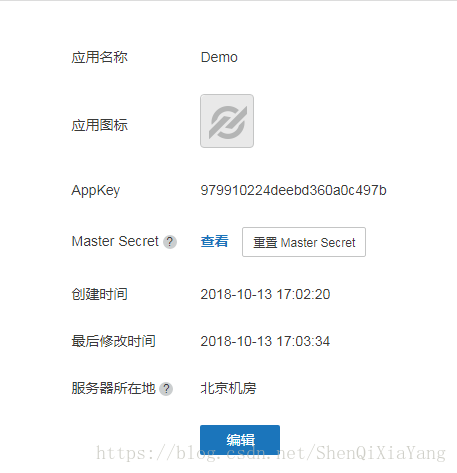
在極光推送哪裡建立賬戶,建立應用,如下圖:
App.java檔案
package com.maigu.yang.jiguangdemo;

import android.app.Application;
import android.app.Notification;
import android.content.Context;

import cn.jpush.android.api.BasicPushNotificationBuilder;
import cn.jpush.android.api.CustomPushNotificationBuilder;
import cn.jpush.android.api.JPushInterface;

public class App extends Application {

    public static Context applicationContext;

    @Override
    public void onCreate() {
        super.onCreate();
        applicationContext = getApplicationContext();
        JPushInterface.init(this);
        jpushSet();
    }

    /**
     * 獲取全域性上下文
     */
    public static Context getContext() {
        return applicationContext;
    }

    private void jpushSet() {
        BasicPushNotificationBuilder builder = new BasicPushNotificationBuilder(this);
        builder.statusBarDrawable = R.mipmap.shenqi;
        builder.notificationDefaults = Notification.DEFAULT_SOUND
                | Notification.DEFAULT_VIBRATE
                | Notification.DEFAULT_LIGHTS;  // 設定為鈴聲、震動、呼吸燈閃爍都要
        JPushInterface.setPushNotificationBuilder(1, builder);

        /**
         * 設定通知欄樣式 - 定義通知欄Layout
         */

        CustomPushNotificationBuilder builder1 =
                new CustomPushNotificationBuilder(this, R.layout.customer_notitfication_layout,
                        R.id.icon, R.id.title, R.id.text);
        builder1.layoutIconDrawable = R.mipmap.shenqi;
        builder.developerArg0 = "developerArg2";
        JPushInterface.setPushNotificationBuilder(2, builder1);
    }
}
關於自定義通知欄樣式 JPush 通知推送到客戶端時,預設使用手機的預設設定來顯示通知欄,包括鈴聲、震動等效果。
如果開發者想要達到如下的效果,則需要使用“自定義通知欄樣式”功能:
通知欄樣式使用與預設不一樣的設定,比如想要控制: 鈴聲、震動 顯示圖示 替換預設的通知欄樣式。 推送訊息指定通知欄樣式編號 通知欄樣式在伺服器端向下推送時,只體現為一個編號(數字)。
推送通知的樣式編號,應該是在客戶端做了自定義通知欄樣式設定的。 如果通知上的樣式編號,在客戶端檢查不存在,則使用預設的通知欄樣式。
不使用自定義通知欄樣式時,此編號預設為 0。如需使用自定義的通知欄樣式,編號應大於 0 小於 1000。先在客戶端調 API 設定通知欄樣式,推送設定 Builder ID 值即可在收到訊息時得到對應的樣式效果。
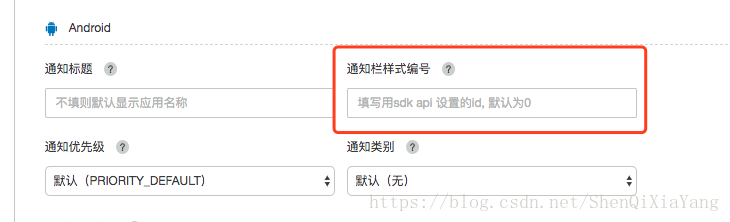
調 API 進行推送時,在 Notification - Android 屬性下設定 builder_id 值
在 Portal 上傳送通知時,首先選擇推送平臺為 Android,然後展開“可選設定”,開發者可指定當前要推送的通知的樣式編號。如下圖所示:
自定義通知欄樣式設計 有個 PushNotificationBuilder 概念,開發者使用 setPushNotificationBuilder 方法為某種型別的 PushNotificationBuilder 指定編號。 setPushNotificationBuilder 可以在 JPushInterface.init() 之後任何地方呼叫,可以是開發者應用的邏輯來觸發呼叫,或者初始化時呼叫。 只需要設定一次,JPush SDK 會記住這個設定。在下次收到推送通知時,就根據通知裡指定的編號來找到 PushNotificationBuilder 來展現、執行。 API - setDefaultPushNotificationBuilder 設定預設 此 API 改變預設的編號為 0 的通知欄樣式。
API - setPushNotificationBuilder 指定編號 此 API 為開發者指定的編號,設定一個自定義的 PushNotificationBuilder(通知樣式構建器)。
App.java檔案中使用到到customer_notitfication_layout.xml檔案,以及(通知)到小圖示。

<?xml version="1.0" encoding="utf-8"?>
<LinearLayout xmlns:android="http://schemas.android.com/apk/res/android"
    android:layout_width="fill_parent"
    android:layout_height="fill_parent"
    android:gravity="center_vertical"
    android:orientation="horizontal">

    <ImageView
        android:id="@+id/icon"
        android:layout_width="wrap_content"
        android:layout_height="wrap_content"
        android:src="@mipmap/shenqi" />

    <LinearLayout
        android:layout_width="wrap_content"
        android:layout_height="wrap_content"
        android:layout_marginLeft="10dip"
        android:orientation="vertical">

        <TextView
            android:id="@+id/title"
            android:layout_width="wrap_content"
            android:layout_height="wrap_content"
            android:textColor="#286CA6"
            android:textSize="16sp" />

        <TextView
            android:id="@+id/text"
            android:layout_width="wrap_content"
            android:layout_height="wrap_content"
            android:textColor="#6FA45E"
            android:textSize="14sp" />
    </LinearLayout>

    <DateTimeView
        android:id=<