
nginx+tomcat+memcache
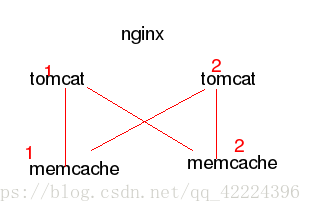
1.原理:tomcat1將session儲存在memcache2上面,tomcat2將session儲存在memcache1上面。當tomcat1掛掉後,由tomcat2接管,剛好session儲存在memcache2上面,session資料也不會丟失。同樣,當tomcat2掛掉後,由tomcat1接管,剛好session儲存在memcache1上面,session資料也不會丟失。兩個memcache之間資料不互動。如圖:
2.配置
說明:用server1和server2分別做tomcat1和tomcat2,以及server1和server2配置memcache1和memcache2。server1配置nginx服務。
[[email protected] ~]# nginx #開啟nginx,具體nginx的原始碼安裝,請參考本人其他文章。 [[email protected] ~]# cd /usr/local/tomcat/ #切換到tomcat所在目錄,tomcat的安裝參見下面server2 tomcat的安裝 [[email protected] tomcat]# bin/startup.sh #開啟tomcat Using CATALINA_BASE: /usr/local/tomcat Using CATALINA_HOME: /usr/local/tomcat Using CATALINA_TMPDIR: /usr/local/tomcat/temp Using JRE_HOME: /usr/local/java Using CLASSPATH: /usr/local/tomcat/bin/bootstrap.jar:/usr/local/tomcat/bin/tomcat-juli.jar [
[email protected] ~]# scp apache-tomcat-7.0.37.tar.gz jdk-7u79-linux-x64.tar.gz server2: 將jdk和apache軟體包傳給server2,在server2上配置tomcat,jdk,用來當server1的隨時替補,在server2上面安裝 [[email protected] ~]# cd /usr/local/lnmp/nginx/conf/ [[email protected] conf]# vim nginx.confhttp { upstream tomcat { sticky; 設定此值,不進行輪詢,一臺主機tomcat掛掉後,另一臺接管。 server 172.25.39.1:8080; 設定nginx後臺的兩個tomcat,分別為server1和server2 server 172.25.39.2:8080; } location ~ \.jsp { proxy_pass http://tomcat; 設定為tomcat,而不針對某個ip }[[email protected] conf]# nginx -t 檢查nginx配置檔案的語法 nginx: the configuration file /usr/local/lnmp/nginx/conf/nginx.conf syntax is ok nginx: configuration file /usr/local/lnmp/nginx/conf/nginx.conf test is successful [[email protected] conf]# nginx -s reload 重新載入 [[email protected] local]# cd /usr/local/tomcat/webapps/ROOT/ [[email protected] ROOT]# vim test.jsp 測試頁面
<html><head><title>Cluster App Test</title></head>
    <body>
    Server Info:
    <%
    out.println(request.getLocalAddr() + " : " + request.getLocalPort()+"<br>");%>
    <%
    out.println("<br> ID " + session.getId()+"<br>");
    String dataName = request.getParameter("dataName");
    if (dataName != null && dataName.length() > 0) {
    String dataValue = request.getParameter("dataValue");
    session.setAttribute(dataName, dataValue);
    }
    out.print("<b>Session list</b>");
    Enumeration e = session.getAttributeNames();
    while (e.hasMoreElements()) {
    String name = (String)e.nextElement();
    String value = session.getAttribute(name).toString();
    out.println( name + " = " + value+"<br>");
    System.out.println( name + " = " + value);
    }
    %>
    <form action="test.jsp" method="POST">
    name:<input type=text size=20 name="dataName">
    <br>
    key:<input type=text size=20 name="dataValue">
    <br>
    <input type=submit>
</form>[[email protected] ROOT]# scp test.jsp server2:/usr/local/tomcat/webapps/ROOT/ 將server1配置好的測試jsp頁面傳到server2上 [email protected]'s password: test.jsp 100% 40 0.0KB/s 00:00 100% 970 1.0KB/s 00:00 server2安裝tomcat和jdk,提前準備好安裝包,若需要可以留言: [[email protected] ~]# tar zxf apache-tomcat-7.0.37.tar.gz -C /usr/local/ 解壓apache安裝包到指定目錄 [[email protected] ~]# tar zxf jdk-7u79-linux-x64.tar.gz -C /usr/local/ 解壓jdk安裝包到指定目錄 [[email protected] ~]# cd /usr/local/ [[email protected] local]# ln -s jdk1.7.0_79/ java 製作jdk軟連結 [[email protected] local]# ln -s apache-tomcat-7.0.37/ tomcat 製作apache軟連結 [[email protected] local]# vim /etc/profile 更改環境變數的值,新增具體路徑 export JAVA_HOME=/usr/local/java export CLASSPATH=.:$JAVA_HOME/lib:$JAVA_HOME/jre/lib export PATH=$PATH:$JAVA_HOME/bin [[email protected] local]# source /etc/profile 重新整理更改
測試:關閉server1的tomcat1,由server2的tomcat2接管,session不會消失。 [[email protected] tomcat]# bin/shutdown.sh Using CATALINA_BASE: /usr/local/tomcat Using CATALINA_HOME: /usr/local/tomcat Using CATALINA_TMPDIR: /usr/local/tomcat/temp Using JRE_HOME: /usr/local/java Using CLASSPATH: /usr/local/tomcat/bin/bootstrap.jar:/usr/local/tomcat/bin/tomcat-juli.jar 網址上輸入:172.25.39.1:/test.jsp 分別給server1和server2安裝memcache並且做配置: [[email protected] ROOT]# yum install memcached -y 安裝memcached [[email protected] ROOT]# /etc/init.d/memcached start 開啟memcached服務 Starting memcached: [ OK ] [[email protected] ~]# cd /usr/local/tomcat/conf [[email protected] conf]# vim content.xml
<Manager className="de.javakaffee.web.msm.MemcachedBackupSessionManager" memcachedNodes="n1:172.25.39.1:11211,n2:172.25.39.2:11211" failoverNodes="n1" #在 server1上此項設定為“n1,在server2上設定此項為n2” #意思就是自己的tomcat出錯了,就找自己的memcache。 requestUriIgnorePattern=".*\.(ico|png|gif|jpg|css|js)$" transcoderFactoryClass="de.javakaffee.web.msm.serializer.kryo.KryoTranscoderFactory" />[[email protected] conf]# cd /usr/local/tomcat/lib [[email protected] lib]# 將jar包裡面所有的包移到此路徑下面 jar包內容:
asm-3.2.jar memcached-session-manager-tc7-1.6.3.jar kryo-1.04.jar minlog-1.2.jar kryo-serializers-0.10.jar msm-kryo-serializer-1.6.3.jar memcached-session-manager-1.6.3.jar reflectasm-1.01.jar (刪掉memcached-session-manager-tc6-1.6.3.jar要和tomcat版本相同) spymemcached-2.7.3.jar [[email protected] conf]# cd /usr/local/tomcat/ [[email protected] tomcat]# bin/shutdown.sh 關閉之前的tomcat,然後重新啟動 [[email protected] tomcat]# bin/startup.sh [[email protected] tomcat]# cat logs/catalina.out 日誌中出現此句話表明mem配置正確 INFO: MemcachedSessionService finished initialization, sticky true, operation timeout 1000, with node ids [n2] and failover node ids [n1] 測試頁面: 172.25.39.1/test.jsp 當server1裡面tomcat壞掉時,快取不會消失,因為server1的資料被存在server2的mem裡,所以server1的tomcat壞掉,由server2的tomcat接管,剛好讀取server2裡面快取的資料。