OVLS線上學習平臺spring+boot+ssm+crud+ajax+zuul+redis+mysql+ribbon+feign(一.使用者服務.註冊功能+登入功能)前端頁面
(一.使用者服務.註冊功能+登入功能)前端頁面
1.註冊功能
一.建立一個ovls-ui前端專案

報錯,把描述生成下

二.導包
tomcat-embed-jasper(Jasper引擎解析JSP檔案jsp支援配置)
<project xmlns="http://maven.apache.org/POM/4.0.0" xmlns:xsi="http://www.w3.org/2001/XMLSchema-instance" xsi:schemaLocation="http://maven.apache.org/POM/4.0.0 http://maven.apache.org/xsd/maven-4.0.0.xsd">
  <modelVersion>4.0.0</modelVersion>
  <groupId>cn.xdl</groupId>
  <artifactId>ovls-ui</artifactId>
  <version>0.0.1-SNAPSHOT</version>
  <packaging>war</packaging>
  <dependencies>
  	<dependency>
  		<groupId>org.springframework.boot</groupId>
  		<artifactId>spring-boot-starter-web</artifactId>
  		<version>2.0.5.RELEASE</version>
  	</dependency>
  	<dependency>
  		<groupId>org.apache.tomcat.embed</groupId>
  		<artifactId>tomcat-embed-jasper</artifactId>
  		<version>8.5.29</version>
  	</dependency>
  </dependencies>
</project>
三.新增配置檔案application.properties
server.port=8888
//訪問jsp靜態頁面,找study目錄下的.jsp
spring.mvc.view.prefix=/study/
spring.mvc.view.suffix=.jsp
四.新增啟動類WebBootApplication
package cn.xdl.ovls;
import org.springframework.boot.SpringApplication;
import org.springframework.boot.autoconfigure.SpringBootApplication;
@SpringBootApplication
public class WebBootApplication {
	public static void main(String[] args) {
		SpringApplication.run(WebBootApplication.class, args);
	}
}
五.啟動
http://localhost:8888/study/index.jsp
六.新增控制器WebController
處理動態設定靜態訪問
http://localhost:8888/study/index.html
package cn.xdl.ovls.controller;

import org.springframework.stereotype.Controller;
import org.springframework.web.bind.annotation.RequestMapping;

@Controller
public class WebController {

	//設定首頁靜態訪問
	@RequestMapping("/study/index.html")
	public String index(){
		return "index";
	}

	//設定學科靜態訪問
	@RequestMapping("/study/course.html")
	public String course(){
		return "course";
	}
}
七.通過ajax完成註冊功能

流程:
1.index.jsp–>
在body裡面
<!-- 頭部引用相對路徑 -->
	<%@include file="head.jsp"%>
2.head.jsp–>
		<!-- 頂部右邊 -->
		<div class="float_r">
			<div class="float_l top_input">
				<input class="posi_relative" type="text" name="" id="search_id" placeholder="請輸入...">
				<img class="img_sousuo bianshou" src="img/uiz4.png" onclick="javascript:window.location='search.jsp'">
			</div>
				<div id="log_reg">
				<a href="#" id="example1">註冊</a>
				<a href="#" id="example2">登入</a>
				</div>
		</div>
	</div>
</div>

<!-- 這裡匯入彈出層外掛 -->
<script type="text/javascript" src="layer/layer.js"></script>
<script type="text/javascript">
/*
 *註冊彈出層事件函式
 */
$(document).on('click', '#example1', function() {
	 layer.open({
        type : 2,
        border : [1 , 1 , 'gray', true],
        shade : [0.5 , '#000' , true],
        shadeClose:true,
        title : false,
        content:'regist.jsp',
        area : ['450px' , '450px'],
        offset : ['100px',''],
    });
	});
</script>
八.修改regist.jsp頁面
<script type="text/javascript">
function register(){
	//獲取登錄檔單資訊
	var name = $("#username").val();
	var password = $("#password").val();
	var password2 = $("#password2").val();
	//清空原有提示資訊
	$("#username_error").html("");
	$("#password_error").html("");
	$("#password2_error").html("");
	//檢測表單資訊格式
	var ok = true;
	if(name==""){
		$("#username_error").html("使用者名稱不能為空");
		ok = false;
	}
	if(password==""){
		$("#password_error").html("密碼不能為空");
		ok = false;
	}
	if(password2==""){
		$("#password2_error").html("確認密碼不能為空");
		ok = false;
	}else if(password2 != password){
		$("#password2_error").html("兩次密碼不一致");
		ok = false;
	}
	//通過檢測呼叫/user/regist註冊服務
	if(ok){
		$.ajax({
			//請求地址完整
			url:"http://localhost:7001/user/regist",
			//提交方式
			type:"post",
			//請求引數必須和controller的key一致
			data:{"name":name,"password":password},
			//返回格式
			dataType:"json",
			//返回結果根據條件判斷
			success:function(result){
				if(result.status==0){//註冊成功
					//提示註冊成功
					alert(result.msg);
					//TODO 切換成登入狀態
				}else if(result.status==1){//使用者名稱被佔用
					$("#username_error").html(result.msg);
				}else{//其他錯誤
					alert(result.msg);
				}
			}
		});
	}
}
</script>
先啟動這兩個服務

效果如圖
localhost:8888/study/index.html

UI和註冊服務互動
採用ajax模式傳送請求呼叫後臺服務處理.
AJAX請求跨域問題的三種解決方案:
1.jsonp方案
該方式只適合get請求的跨域,基本原理是將返回的JSON結果封裝成js函式程式碼.js程式碼資源和圖片是允許跨域訪問的.
單獨訪問
/hello-->
{"msg":"hello json"}
跨域訪問
jsonp模式
 /hello-->
生成一個函式名,把{"msg":"hello json"}作為函式引數
函式名({"msg":"hello json"});
2.1Cors方案(跨域資源共享)(專案採用方案)
在UserController前面加這個標記,表示這個請求的來源域,星號代表這個請求下的所有來源域
@CrossOrigin(origins={"*"})
輸入原來有的賬號.提示被佔用

輸入新的賬號密碼,註冊成功

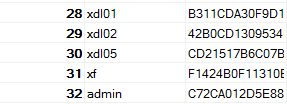
資料庫查詢結果

2.2Cors基於底層技術方法
在user專案裡建立一個CrosFilter類繼承Filter介面

程式碼
package cn.xdl.ovls.util;
import java.io.IOException;
import javax.servlet.Filter;
import javax.servlet.FilterChain;
import javax.servlet.FilterConfig;
import javax.servlet.ServletException;
import javax.servlet.ServletRequest;
import javax.servlet.ServletResponse;
import javax.servlet.annotation.WebFilter;
import javax.servlet.http.HttpServletResponse;
//過濾器攔截指定過濾器將應用於哪些 Servlet。dispatcherServlet(spring分發器)
@WebFilter(servletNames={"dispatcherServlet"})
public class CrosFilter implements Filter {
	public void destroy() {
		// TODO Auto-generated method stub
	}
	public void doFilter(ServletRequest request, ServletResponse response, FilterChain chain)
			throws IOException, ServletException {
		//允許ajax資源跨域訪問
		System.out.println("允許ajax跨域資源訪問");
		//轉型轉成HttpResponse,響應頭裡加配置方法
		HttpServletResponse httpResponse =(HttpServletResponse)response;
		//如果設定 Access-Control-Allow-Origin:*,則允許所有域名的指令碼訪問該資源。
		httpResponse.setHeader("Access-Control-Allow-Origin", "*");
		//新增請求提交方式
		httpResponse.setHeader("Access-Control-Allow-Methods", "GET,POST,PUT,DELETE");
		//將請求轉發給過濾器鏈上下一個物件。這裡的下一個指的是下一個filter,如果沒有filter那就是你請求的資源。
		chain.doFilter(request, response);
	}
	public void init(FilterConfig arg0) throws ServletException {
		// TODO Auto-generated method stub
	}
}
在伺服器響應客戶端的時候,帶上Access-Control-Allow-Origin頭資訊。
如果設定 Access-Control-Allow-Origin:*,則允許所有域名的指令碼訪問該資源。
Access-Control-Allow-Origin:http://www.phpddt.com.com,允許特定的域名訪問。
注意必須在UserRunBoot方法上加上啟動掃描
@ServletComponentScan
程式碼:
package cn.xdl.ovls;
import org.mybatis.spring.annotation.MapperScan;
import org.springframework.boot.SpringApplication;
import org.springframework.boot.autoconfigure.SpringBootApplication;
import org.springframework.boot.web.servlet.ServletComponentScan;
@SpringBootApplication//啟動程式
@MapperScan(basePackages={"cn.xdl.ovls.dao"})
@ServletComponentScan//過濾器的掃描器
public class UserRunBoot {
	public static void main(String[] args) {
		SpringApplication.run(UserRunBoot.class, args);
	}
}
實現功能一樣

3.代理方案一般用於呼叫第三方平臺
如果呼叫第三方服務,不能使用前兩種情況,可以寫代理專案.在代理專案中用Java訪問服務,不涉及資源跨域問題.
Ajax–>
代理工程–>
java/設定cors引數–>
微信服務
2.登入功能
一.
herd.jsp
		<!-- 頂部右邊 -->
		<div class="float_r">
			<div class="float_l top_input">
				<input class="posi_relative" type="text" name="" id="search_id" placeholder="請輸入...">
				<img class="img_sousuo bianshou" src="img/uiz4.png" onclick="javascript:window.location='search.jsp'">
			</div>
				<div id="log_reg">
				<a href="#" id="example1">註冊</a>
				<a href="#" id="example2">登入</a>
			</div>
		</div>
<!-- 這裡匯入彈出層外掛 -->
<script type="text/javascript" src="layer/layer.js"></script>
<script type="text/javascript">
/*
 *登入彈出層事件函式
 */
$(document).on('click', '#example2', function() {
	 layer.open({
       type : 2,
       border : [1 , 1 , 'gray', true],
       shade : [0.5 , '#000' , true],
       shadeClose:true,
       title : false,
       content:'login.jsp',
       area : ['450px' , '450px'],
       offset : ['100px',''],
   });
	});
</script>
二.login.jsp
新增點選事件
<%@ page language="java" contentType="text/html; charset=UTF-8"
    pageEncoding="UTF-8"%>
<html>
<head>
<meta http-equiv="Content-Type" content="text/html; charset=utf-8" />
<link href="css/login2.css" rel="stylesheet" type="text/css" />
</head>
<body>
<div class="login" style="margin-top:50px;">

    <div class="header">
        <div class="switch" id="switch">
        <a class="switch_btn_focus" id="switch_qlogin" href="javascript:void(0);" tabindex="7">快速登入</a>
			<a class="switch_btn" id="switch_login" href="javascript:void(0);" tabindex="8" >快速註冊</a>
			<div class="switch_bottom" id="switch_bottom" style="position: absolute; width: 64px; left: 0px;"></div>
        </div>
    </div>


    <div class="web_qr_login" id="web_qr_login" style="display: block; height: 235px;">

            <!--登入-->
            <div class="web_login" id="web_login">
               <div class="login-box">
			<div class="login_form">
				<input type="hidden" name="did" value="0"/>
               <input type="hidden" name="to" value="log"/>
                <div class="uinArea" id="uinArea">
                <label class="input-tips" for="u">帳號:</label>
                <div class="inputOuter" id="uArea">

                    <input type="text" id="username" name="username"  class="inputstyle"/>
                    <span id="username_error" style="color: red"></span>
                </div>
                </div>
                <div class="pwdArea" id="pwdArea">
               <label class="input-tips" for="p">密碼:</label>
               <div class="inputOuter" id="pArea">

                    <input type="password" id="password" name="password" class="inputstyle"/>
                    <span id="password_error" style="color: red"></span>
                </div>
                </div>

                <div style="padding-left:50px;margin-top:20px;">
                <!-- 開啟jQuery事件繫結-->
                <input id="login_form" type="button" value="登 錄" style="width:150px;" class="button_blue" /></div>
           </div>
         </div>
      </div>
      <!--登入end-->
  </div>
</div>
<!-- 引用js -->
<script type="text/javascript" src="js/jquery.min.js"></script>
<script type="text/javascript">
/* $("按鈕繫結事件ID").click(function(){//獲取登入表單}); */
$("#login_form").click(function(){
	//獲取登入表單資訊
	var name = $("#username").val();
	var password = $("#password").val();
	//清空提示
	$("#username_error").html("");
	$("#password_error").html("");
	//效驗表單資訊
	var ok = true;
	if(name == ""){
		ok = false;
		$("#username_error").html("使用者名稱不能為空");
	}
	if(password == ""){
		ok = false;
		$("#password_error").html("密碼不能為空");
	}
	//傳送AJAX五步走請求呼叫/user/login服務
    //1.使用Get請求時,引數在URL中顯示,而使用Post方式,則不會顯示出來
    //2.使用Get請求傳送資料量小,Post請求傳送資料量大
    //3.get請求需注意快取問題,post請求不需擔心這個問題
    //4.Get請求的目的是給予伺服器一些引數,以便從伺服器獲取列表.例如:list.aspx?page=1,表示獲取第一頁的資料
	//5.Post請求的目的是向伺服器傳送一些引數,例如form中的內容.

	if(ok){
		$.ajax({
			//1傳送登入請求地址
			url:"http://localhost:7001/user/login",
			//2提交請求方法型別
			type:"post",
			//3提交請求的內容資料、請求主體等
			data:{"name":name,"password":password},
			//4接收響應回來的內容
			dataType:"json",
			//4獲取返回結果
			success:function(result){
				if(result.status==0){//成功
					window.parent.location.reload();//重新整理主頁
				}else if(result.status==1){//使用者名稱錯誤
					$("#username_error").html(result.msg);
				}else if(result.status==2){//密碼錯誤
					$("#password_error").html(result.msg);
				}else{
					alert(result.msg);
				}
			}
		});
	}
});

</script>
</body>
</html>
效果
不輸入賬號密碼

使用者名稱不存在

密碼不正確

登入成功直接跳轉到主頁

