
Android中XML的名稱空間、自定義屬性
基本概念介紹
名稱空間(namespace)
XML 名稱空間提供避免元素命名衝突的方法。
打個比方,A學校有名學生叫做林小明,B學校也有名學生叫林小明,那我們如何識別這兩名擁有相同名字的同學呢?這時候名稱空間就派上用場了。A和B此時就可以被當成是名稱空間了。也就是說,名稱空間裡面存放的是特定屬性的集合,
Android中常見的名稱空間
下面分別介紹android、tools、app(自定義名稱空間)這幾個常見的名稱空間
1、android
在Android佈局檔案中我們都必須在根元素上定義這樣一個名稱空間,接下來對這行程式碼進行逐一講解: xmlns:即xml namespace,
有了他,就會提示你輸入什麼,也可以理解為語法檔案。
使用這行程式碼,我們就可以引用名稱空間中的屬性,如:
<LinearLayout xmlns:android="http://schemas.android.com/apk/res/android"
             android:layout_width="match_parent" android:layout_height="match_parent">
            <TextView android:layout_width="wrap_content"
                      android:layout_height="wrap_content"
                      android:layout_gravity="center"
                      android:text="New Text"
                      android:id="@+id/textView" />
 </LinearLayout>
在這個佈局中,只要以android:開頭的屬性便是引用了名稱空間中的屬性,
android是賦予名稱空間一個名字,就跟我們平時在定義變數一樣,比如我把它取成myns,那麼上面的程式碼我們也可以寫成:
<LinearLayout xmlns:myns="http://schemas.android.com/apk/res/android"
    myns:layout_width="match_parent"
    myns:layout_height="match_parent" >
    <TextView
        myns:layout_width="wrap_content"
        myns:layout_height="wrap_content"
        myns:layout_gravity="center"
        myns:text="New Text"
        myns:id="@+id/textView" />
</LinearLayout>
2、tools
接下來會介紹,關於tools的三種使用方法吧,也算是他的特性。
2.1、tools只作用於開發階段
我們可以把他理解為一個工具(tools)的名稱空間,它的只作用於開發階段,當app被打包時,所有關於tools屬性將都會被摒棄掉!
例如,基本上在android名稱空間內的屬性,我們想在編寫程式碼階段測試某個元件在螢幕上的效果,而當app安裝到手機上時,摒棄掉這條程式碼,那麼我們就可以用tools名稱空間來代替掉android:
<?xml version="1.0" encoding="utf-8"?>
<LinearLayout xmlns:android="http://schemas.android.com/apk/res/android"
xmlns:tools="http://schemas.android.com/tools"
android:orientation="vertical"
android:layout_width="match_parent"
android:layout_height="match_parent">
<TextView
tools:layout_gravity="center"
android:layout_width="wrap_content"
android:layout_height="wrap_content"
android:text="Hello,World"/>
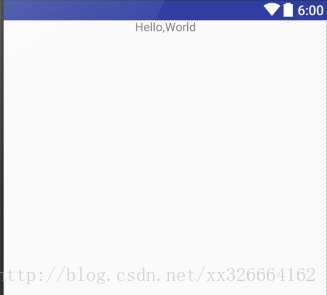
</LinearLayout>以上是在layout中的佈局,當我們切換到檢視視窗(Design)中檢視時,看到的是標籤頂部居中顯示:
然後,當我們執行到手機上時,確是這樣的:
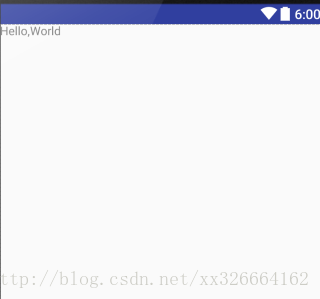
如上所示,tools:layoutgravity= “center”確實在執行後背拋棄掉了!
2.2、tools:context開發中檢視Activity佈局效果
context的用法,在後面跟一個Activtiy的完整包名,它有什麼作用呢?
當我們設定一個Activity主題時,是在AndroidManifest.xml中設定中,而主題的效果又只能在執行後在Activtiy中顯示
使用context屬性, 可以在開發階段中看到設定在Activity中的主題效果
tools:context=”com.littlehan.myapplication.MainActivity”
在佈局中加入這行程式碼,就可以在design檢視中看到與MainActivity繫結主題的效果。
2.3、tools:layout開發中檢視fragment佈局效果
當我們在Activity上載入一個fragment時,是需要在執行後才可以看到載入後的效果,有沒有方法在測試階段就在佈局預覽視窗上顯示呢?
答案是有的,藉助layout屬性,例如,在佈局中加入這樣一行程式碼: tools:[email protected]/yourfragmentlayoutname 這樣你的編寫的fragment佈局就會預覽在指定主佈局上了
3、自定義名稱空間
如果使用DataBinding 會在xml用到 app屬性,其實這是個自定義名稱空間。
有朋友可能會問了,這裡哪裡體現出是自定義的??
實際上也可以這麼寫: 在res/後面填寫包名即可。但是,在Android Studio2.0上,是不推薦這麼寫的,所以建議大家還是用第一種的命名方法。
通常自定義名稱空間往往是和自定義View分不開的,當Android自帶的控制元件不能滿足需求時,可以自己去繪製一些View,而要為自定義View加上自定義的屬性時,就需要建立自定義名稱空間。
名稱空間裡面存放的是特定屬性的集合,這樣一來,思路就很清晰,也就是說自定義名稱空間的實際過程就是自定義屬性。
我們通過一個簡單的自定義TextView來學習下自定義名稱空間是怎麼一回事,自定義View的過程可以分成以下幾個步驟:
3.1、繼承View類
建立一個類名為CustomTextView繼承View(View是所有檢視的父類)並實現它三個構造方法
public class CustomTextView extends View {
    private Paint mPaint = new Paint(Paint.ANTI_ALIAS_FLAG);//畫筆
    public CustomTextView(Context context) {
        super(context);
    }
    public CustomTextView(Context context, AttributeSet attrs){
        this(context, attrs, 0);//注意不是super(context,attrs,0);
    }
    public CustomTextView(Context context, AttributeSet attrs, int defStyleAttr){
        super(context,attrs,defStyleAttr);
    }

    @Override
    protected void onDraw(Canvas canvas) {
        super.onDraw(canvas);
        canvas.drawText("I am a CustomTextView",100, 100, mPaint);
    }
}
3.2、 使用自定義佈局
將自定義的控制元件引入佈局
<?xml version="1.0" encoding="utf-8"?>
<RelativeLayout xmlns:android="http://schemas.android.com/apk/res/android"
    android:layout_width="match_parent"
    android:layout_height="match_parent"
    android:background="#ffffff"
    >
    <com.littlehan.customtextview.CustomTextView
        android:layout_width="wrap_content"
        android:layout_height="wrap_content" />
</RelativeLayout>
到了這裡,一個自定義的控制元件就被引入佈局使用了,我們可以切換到檢視視窗看看效果
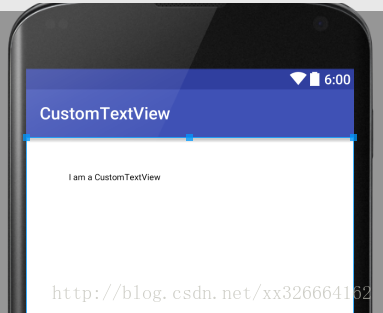
但是這個自定義控制元件,並不能在xml中去改變字型顏色,字型大小、自定義文字等。這個功能的實現,需要XML建立自定義屬性和在自定義View中解析屬性
3.3、自定義屬性
在values根目錄下新建一個名為attrs的xml檔案來自定義屬性(自定義的屬性便是自定義名稱空間裡面的屬性)
<?xml version="1.0" encoding="utf-8"?>
<resources>
    <declare-styleable name="CustomTextView">
       <attr name="customColor" format="color"/>
       <attr name="customText" format="string"/>
    </declare-styleable>
</resources>
name定義的是屬性的名字 format定義的是屬性的型別
自定義屬性也可以不使用declare-styleable,參考這裡
3.4、解析屬性
在CustomeTextView中解析這些屬性
public class CustomTextView extends View {
    private int mColor = Color.RED;//預設為紅色
    private String mText="I am a Custom TextView";//預設顯示該文字
    private Paint mPaint = new Paint(Paint.ANTI_ALIAS_FLAG);//畫筆
    public CustomTextView(Context context) {
        super(context);
//        init();
    }
    public CustomTextView(Context context, AttributeSet attrs){
        this(context, attrs, 0);//注意不是super(context,attrs,0);
        init();
    }
    public CustomTextView(Context context, AttributeSet attrs, int defStyleAttr){//解析自定義屬性
        super(context,attrs,defStyleAttr);
        TypedArray typedArray = context.obtainStyledAttributes(attrs,R.styleable.CustomTextView);
        mColor = typedArray.getColor(R.styleable.CustomTextView_customColor, Color.RED);
//        如果沒有判斷,當沒有指定該屬性而去載入該屬性app便會崩潰掉
        if(typedArray.getText(R.styleable.CustomTextView_customText) != null ){
            mText = typedArray.getText(R.styleable.CustomTextView_customText).toString();
        }
        typedArray.recycle();//釋放資源
        init();
    }
    private void init(){
        mPaint.setColor(mColor);// 為畫筆新增顏色
    }

    @Override
    protected void onDraw(Canvas canvas) {
        super.onDraw(canvas);
        canvas.drawText(mText, 100, 100, mPaint);
    }
}
3.5、使用自定義屬性
於是就可以使用自定義屬性了:
<?xml version="1.0" encoding="utf-8"?>
<RelativeLayout xmlns:android="http://schemas.android.com/apk/res/android"
xmlns:app="http://schemas.android.com/apk/res-auto"
android:layout_width="match_parent"
android:layout_height="match_parent"
android:background="#ffffff"
>
<com.littlehan.customtextview.CustomTextView
app:customColor="@color/colorAccent"
app:customText="Test Message"
android:layout_width="wrap_content"
android:layout_height="wrap_content" />
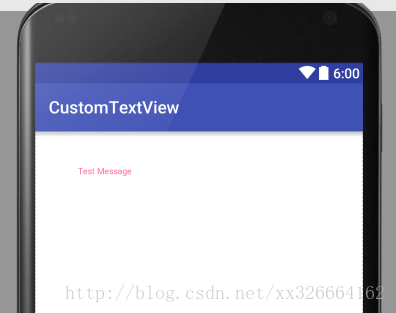
</RelativeLayout>切換到檢視預覽視窗,可以看到自定義的屬性已經生效了:
總結
在Android中,名稱空間可分為3種:
其中,1和2名稱空間裡的屬性是系統封裝好的,第3種名稱空間裡的屬性是使用者自定義的