01) idea+springboot入門
1.建立SpringBoot專案
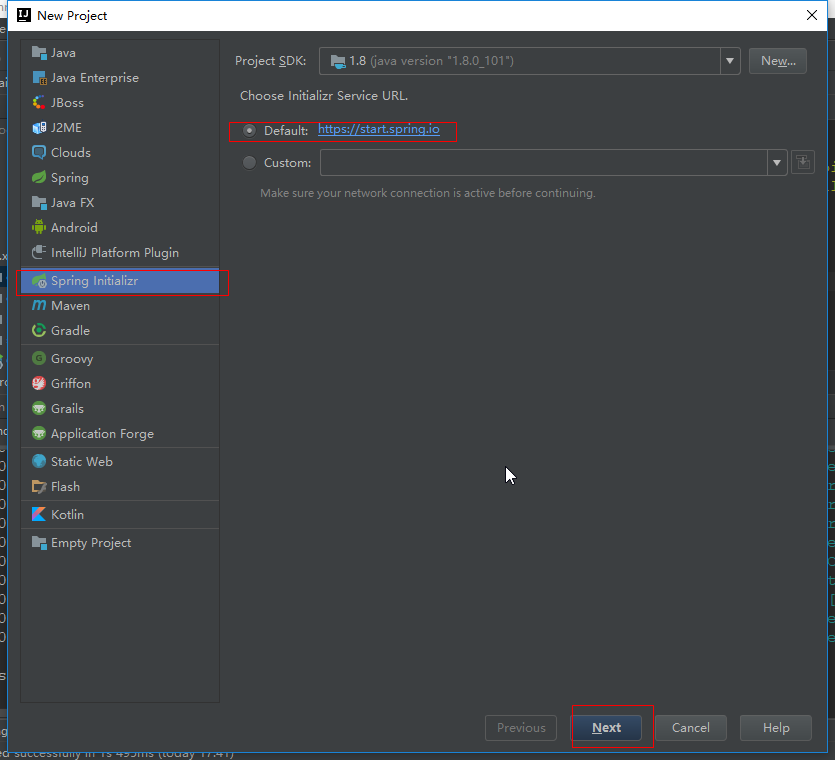
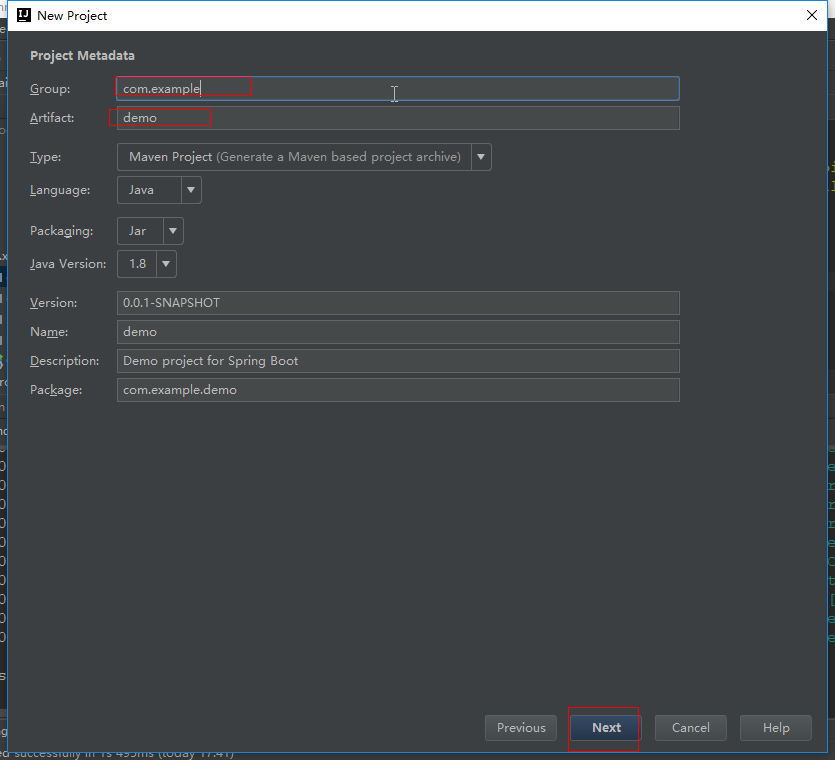
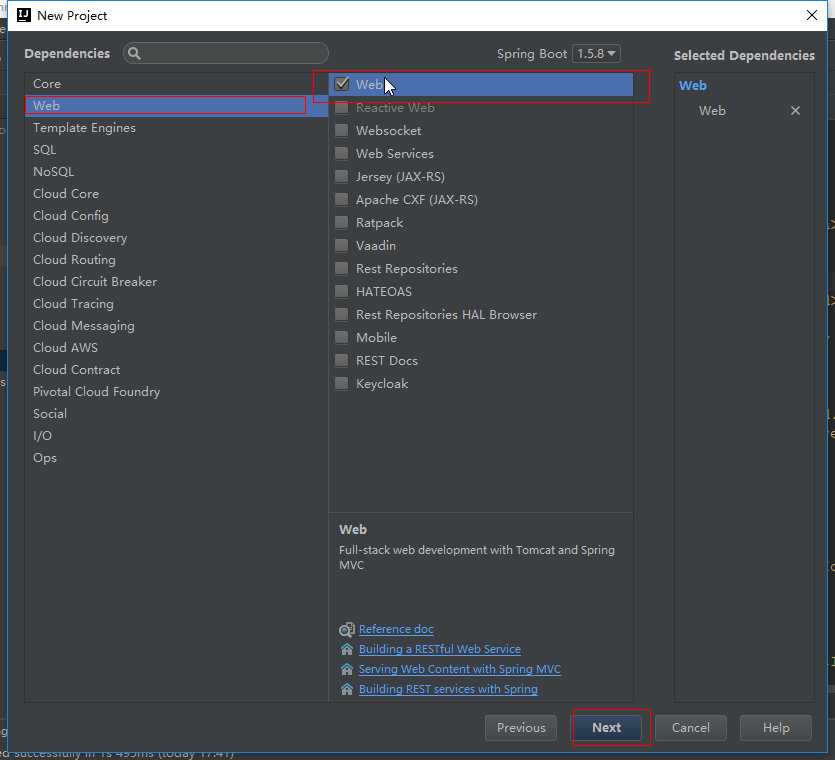
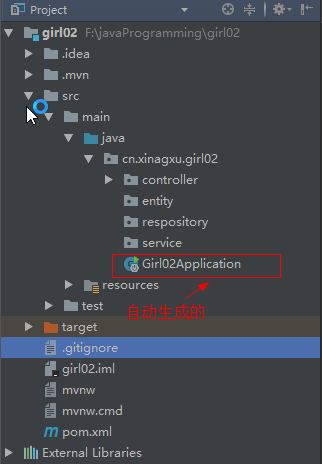
注意:會自動生成一個包含main函式的應用入口類
package cn.xinagxu.girl02;

import org.springframework.boot.SpringApplication;
import org.springframework.boot.autoconfigure.SpringBootApplication;

@SpringBootApplication
public class Girl02Application {

    public static void main(String[] args) {
        SpringApplication.run(Girl02Application.class, args);
    }
}
注意:建立好的springboot專案的pom.xml檔案已經自動引入了兩個依賴和一個外掛
<?xml version="1.0" encoding="UTF-8"?>
<project xmlns="http://maven.apache.org/POM/4.0.0" xmlns:xsi="http://www.w3.org/2001/XMLSchema-instance"
    xsi:schemaLocation="http://maven.apache.org/POM/4.0.0 http://maven.apache.org/xsd/maven-4.0.0.xsd">
    <modelVersion>4.0.0</modelVersion>

    <groupId>cn.xinagxu</groupId>
    <artifactId>girl02</artifactId>
    <version>0.0.1-SNAPSHOT</version>
    <packaging>jar</packaging>

    <name>girl02</name>
    <description>Demo project for Spring Boot</description>

    <parent>
        <groupId>org.springframework.boot</groupId>
        <artifactId>spring-boot-starter-parent</artifactId>
        <version>1.5.8.RELEASE</version>
        <relativePath/> <!-- lookup parent from repository -->
    </parent>

    <properties>
        <project.build.sourceEncoding>UTF-8</project.build.sourceEncoding>
        <project.reporting.outputEncoding>UTF-8</project.reporting.outputEncoding>
        <java.version>1.8</java.version>
    </properties>

    <dependencies>
        <dependency>
            <groupId>org.springframework.boot</groupId>
            <artifactId>spring-boot-starter-web</artifactId>
        </dependency>

        <dependency>
            <groupId>org.springframework.boot</groupId>
            <artifactId>spring-boot-starter-test</artifactId>
            <scope>test</scope>
        </dependency>
    </dependencies>

    <build>
        <plugins>
            <plugin>
                <groupId>org.springframework.boot</groupId>
                <artifactId>spring-boot-maven-plugin</artifactId>
            </plugin>
        </plugins>
    </build>


</project>
福利:SpringBoot專案腳手架 -> 點選前往
該腳手架包含的東西
》開發熱部署
》日誌檔案配置;注意:日誌檔案配置在static中的logback-spring.xml,如果要使用將這個配置檔案移動到resources目錄下後進入該配置檔案修改日誌存放路徑即可使用
》多環境配置;注意:預設使用的是開發環境
》資料庫配置;注意:使用的mysql資料庫
1.1 利用springBoot專案編寫一個hello world
編寫一個controller類,當前段請求為 http://127.0.0.1:8080/ 時以JSON格式放回 Hello World!
package cn.xinagxu.girl02.controller;

import org.springframework.web.bind.annotation.RequestMapping;
import org.springframework.web.bind.annotation.RestController;

@RestController
public class HelloController {

    @RequestMapping(value = "/")
    public String hello() {
        return "Hello World!";
    }
}
注意:@RestController = @Controller + @ResponseBody
1.2 啟動應用
1.2.1 直接在應用入口類中點選右鍵執行即可

1.2.2 利用maven啟動
進入到專案的根目錄後執行
mnv spring-boot:run

1.2.3 利用maven啟動方式2
進入到醒目根目錄
執行 mvn install 編譯專案

再去到 target 目錄下 cd target
注意:target目錄存放的都是編譯過後的檔案
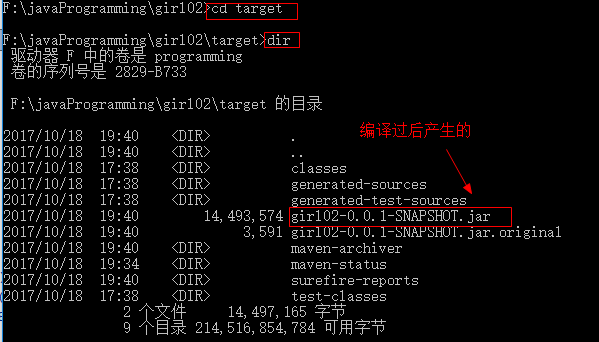
再利用 java -jar 專案名.jar

2 屬性配置
2.1 springBoot支援兩種方式的配置檔案
properties yml
配置上下文路徑為 /girl02
配置埠為:8888
properties 配置
server.context-path=/girl02
server.port=8888
yml 配置
server:
  context-path: /girl
  port: 9999
注意:yml的配置時冒號後面必須加一個空格;推薦使用yml格式的配置方式
2.2 單個的屬性配置
在配置檔案中配置變數以及變數值
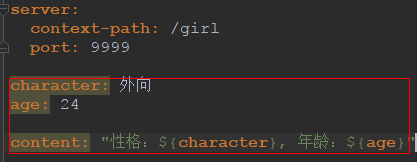
在需要用到的地方引入這個屬性,類似於從容器中引入物件一樣
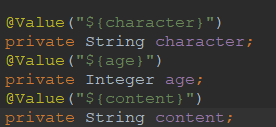
package cn.xinagxu.girl02.controller;

import org.springframework.beans.factory.annotation.Value;
import org.springframework.stereotype.Controller;
import org.springframework.web.bind.annotation.RequestMapping;
import org.springframework.web.bind.annotation.ResponseBody;
import org.springframework.web.bind.annotation.RestController;

@RestController
@Controller
@ResponseBody
public class HelloController {

    @Value("${character}")
    private String character;
    @Value("${age}")
    private Integer age;
    @Value("${content}")
    private String content;

    @RequestMapping(value = "/")
    public String hello() {
        return "Hello World!" + "性格:" + character + " 年齡:" + age + " 詳細資訊為:" + content;
    }
}
2.3 將一個物件作為單個屬性進行配置
編寫一個實體類
package cn.xinagxu.girl02.entity;

import org.springframework.boot.context.properties.ConfigurationProperties;
import org.springframework.stereotype.Component;

@Component
@ConfigurationProperties(prefix = "student")
public class Student {
    private Integer id;
    private String name;
    private Integer age;

    public Student() {
    }

    public Integer getId() {
        return id;
    }

    public void setId(Integer id) {
        this.id = id;
    }

    public String getName() {
        return name;
    }

    public void setName(String name) {
        this.name = name;
    }

    public Integer getAge() {
        return age;
    }

    public void setAge(Integer age) {
        this.age = age;
    }

    @Override
    public String toString() {
        return "Student{" +
                "id=" + id +
                ", name='" + name + '\'' +
                ", age=" + age +
                '}';
    }
}
在配置檔案中配置實體類的屬性值
類似於給一個實體bean賦值
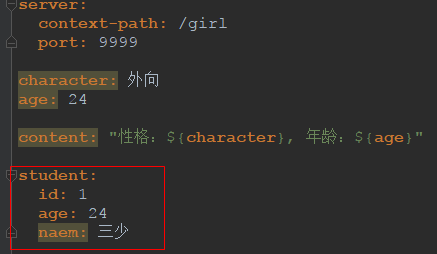
在用到的地方引入這個實體類

package cn.xinagxu.girl02.controller;

import cn.xinagxu.girl02.entity.Student;
import org.springframework.beans.factory.annotation.Autowired;
import org.springframework.beans.factory.annotation.Value;
import org.springframework.stereotype.Controller;
import org.springframework.web.bind.annotation.RequestMapping;
import org.springframework.web.bind.annotation.ResponseBody;
import org.springframework.web.bind.annotation.RestController;

@RestController
@Controller
@ResponseBody
public class HelloController {

    @Value("${character}")
    private String character;
    @Value("${age}")
    private Integer age;
    @Value("${content}")
    private String content;

    @Autowired
    private Student student;

    @RequestMapping(value = "/")
    public String hello() {
//        return "Hello World!" + "性格:" + character + " 年齡:" + age + " 詳細資訊為:" + content;
        return student.toString();
    }
}
2.4 坑:在工具類中如何獲取配置檔案資訊
獲取方式不變,但是如果使用new去建立工具例項,那麼工具類中就不會獲取到相關的配置檔案資訊;必須將配置類被容器管理,然後在需要使用配置類的地方依賴注入即可;否則讀取到的配置資訊全部都是null;參考博文
package cn.xiangxu.redis_demo.common.uitls;

import org.springframework.beans.factory.annotation.Value;
import org.springframework.stereotype.Component;
import redis.clients.jedis.Jedis;

/**
 * @author 王楊帥
 * @create 2018-06-25 13:35
 * @desc jedis客戶端工具類
 **/
@Component
public class JedisClientUtil {

    @Value("${spring.redis.host}")
    private String host;

    @Value("${spring.redis.port}")
    private Integer port;

    private final byte[] temp_lock = new byte[1];
    private Jedis jedis;

    public JedisClientUtil(){}

    public Jedis getRedisClient() {
        if (jedis == null) {
            synchronized (temp_lock) {
                if (jedis == null) {
                    System.out.println(host);
                    System.out.println(port);
                    jedis = new Jedis(host,port);
                }
            }
        }
        return jedis;
    }

}

package cn.xiangxu.redis_demo.web;

import cn.xiangxu.redis_demo.common.uitls.JedisClientUtil;
import lombok.extern.slf4j.Slf4j;
import org.junit.jupiter.api.Test;
import org.springframework.beans.factory.annotation.Autowired;
import org.springframework.beans.factory.annotation.Value;
import org.springframework.web.bind.annotation.GetMapping;
import org.springframework.web.bind.annotation.RequestMapping;
import org.springframework.web.bind.annotation.RestController;
import redis.clients.jedis.Jedis;
import redis.clients.jedis.JedisPool;
import redis.clients.jedis.JedisPoolConfig;

/**
 * @author 王楊帥
 * @create 2018-06-25 13:35
 * @desc Redis相關
 **/
@RestController
@RequestMapping(value = "/redis")
@Slf4j
public class RedisController {

    /**
     * 單例模式
     */
    @Test
    public void test01() {
        // 01 獲取Jedis客戶端【設定IP和埠】
        Jedis jedis = new Jedis("192.168.233.134", 6379);

        // 02 儲存資料
        jedis.set("name", "王楊帥");

        // 03 獲取資料
        String value = jedis.get("name");
        System.out.println("獲取到的資料為:" + value);

        String age = jedis.get("age");
        System.out.println("獲取到的年齡資訊為:" + age);


        // 04 釋放資源
        jedis.close();
    }

    /**
     * 使用連線池模式
     */
    @Test
    public void test02() {
        System.out.println("Hello Warrior");

        // 01 獲取連線池物件
        JedisPoolConfig config = new JedisPoolConfig();
        // 0101 最大連線數
        config.setMaxTotal(30);
        // 0102 最大空閒連線數
        config.setMaxIdle(10);

        // 02 獲取連線池
        JedisPool jedisPool = new JedisPool(config, "192.168.233.134", 6379);

        // 03 核心物件【獲取Jedis客戶端物件】
        Jedis jedis = null;
        try {
            // 0301 通過連線池獲取Jedis客戶端
            jedis = jedisPool.getResource();
            // 0302 設定資料
            jedis.set("name", "三少");
            // 0303 獲取資料
            String value = jedis.get("name");
            System.out.println(value);
        } catch (Exception e) {
            // TODO: handle exception
            e.printStackTrace();
        } finally {
            if (jedis != null) {
                jedis.close();
            }
            if (jedisPool != null) {
                jedisPool.close();
            }
        }
    }

    @Autowired
    private JedisClientUtil jedisClientUtil;

    @GetMapping(value = "/connect")
    public void connect() {
//        JedisClientUtil jedisClientUtil = new JedisClientUtil();
        Jedis jedis = jedisClientUtil.getRedisClient();
    }

}
3 多環境配置

注意:前面兩個配置檔案中配置的東西是公用的,後面兩個中一個是開發環境,一個是生產環境

#server:
#  context-path: /girl
#  port: 9999

spring:
  profiles:
    active: prod


character: 外向
age: 24

content: "性格:${character}, 年齡:${age}"

student:
  id: 1
  age: 24
  naem: 三少
server:
  context-path: /girl
  port: 9999
server:
  context-path: /girl
  port: 8888
3.1 同時在啟動兩個環境
在IntelliJ IDEA中啟動主配置中指定的那個環境
利用maven啟動專案,並指定執行環境
java -jar 專案名.jar --spring.profiles.active=prod
注意:執行前需要編譯專案然後進入到target資料夾中
4自定義properties配置
4.1 properties配置檔案
在properties配置檔案中配置一個自定義配置,例如
xiangxu.security.browser.loginPage = /demo-signIn.html
4.2 建立一個SecurityProperty物件
該物件是用來儲存properties配置檔案中以 xiangxu.security開始的所有配置資訊
技巧01:需要在該實體類上標註 @ConfigurationProperties(prefix = "xiangxu.security") 註解來宣告該實體類是用來儲存properties配置檔案中以 xiangxu.security開始的所有配置資訊
技巧02:該物件中有一個名為browser的實體屬性,該屬性是用來存放在properties檔案中以browser開始的配置資訊
技巧03:在properties檔案中xiangxu.security的配置資訊屬性名必須和SecurityProperty物件的例項屬性名保持一致
技巧04:如果給實體類的屬性設定了預設值後,如果在配置檔案中沒有對應的配置就會使用屬性對應的預設值作為預設配置
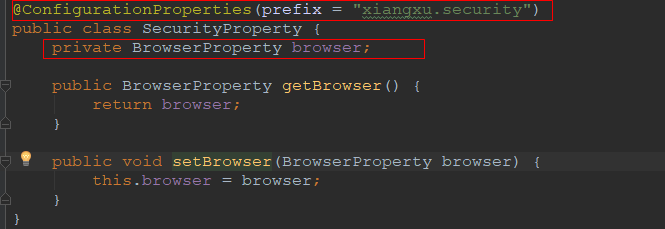
package com.example.wiremock.entity.properties;

import org.springframework.boot.context.properties.ConfigurationProperties;

/**
 * @author 王楊帥
 * @create 2018-05-13 13:45
 * @desc
 **/
@ConfigurationProperties(prefix = "xiangxu.security")
public class SecurityProperty {
    private BrowserProperty browser;

    public BrowserProperty getBrowser() {
        return browser;
    }

    public void setBrowser(BrowserProperty browser) {
        this.browser = browser;
    }
}
4.3 建立 BrowserProperty 物件
該物件是用來存放propertes檔案中browser開始的配置資訊
技巧01:properties配置檔案中browser後面的屬性名必須和實體類BrowserProperty的例項屬性名一致

package com.example.wiremock.entity.properties;

/**
 * @author 王楊帥
 * @create 2018-05-13 13:46
 * @desc
 **/
public class BrowserProperty {
    private String loginPage;

    public String getLoginPage() {
        return loginPage;
    }

    public void setLoginPage(String loginPage) {
        this.loginPage = loginPage;
    }
}
4.4 SpringBoot配置類
建立一個配置類,來讓我們定義的實體類和properties配置檔案中的配置資訊對應起來;這樣我們只需要依賴注入我們建立的實體類SecurityProperty就可以讀取到properties中的配置資訊了

package com.example.wiremock.config;

import com.example.wiremock.entity.properties.SecurityProperty;
import org.springframework.boot.context.properties.EnableConfigurationProperties;
import org.springframework.context.annotation.Configuration;

@Configuration
@EnableConfigurationProperties(SecurityProperty.class)
public class PropertiesConfig {


}
4.5 測試類
專案啟動後依賴注入配置實體類後,就可以通過依賴注入的物件去獲取到對應的propertes配置資訊
package com.example.wiremock.controller;

import com.example.wiremock.entity.properties.SecurityProperty;
import lombok.extern.slf4j.Slf4j;
import org.apache.commons.lang.builder.ReflectionToStringBuilder;
import org.apache.commons.lang.builder.ToStringStyle;
import org.junit.Test;
import org.junit.runner.RunWith;
import org.springframework.beans.factory.annotation.Autowired;
import org.springframework.boot.test.context.SpringBootTest;
import org.springframework.test.context.junit4.SpringRunner;

/**
 * @author 王楊帥
 * @create 2018-05-13 14:15
 * @desc
 **/
@RunWith(SpringRunner.class)
@SpringBootTest
@Slf4j
public class PropertiesTest {

    // 01 依賴注入配置實體類
    @Autowired
    private SecurityProperty securityProperty;

    @Test
    public void test01() {
        log.info(ReflectionToStringBuilder.toString(securityProperty, ToStringStyle.MULTI_LINE_STYLE));
        log.info(securityProperty.getBrowser().getLoginPage());
    }

}
關注公眾號,將會有更多精彩每天送達:
公眾號內有精彩內容,可以提現

