
【CentOS 7】nginx配置web伺服器
阿新 • • 發佈:2018-12-17
1,安裝過程
[[email protected]_1_14_centos ~]# cd /data/ [[email protected]_1_14_centos data]# wget http://nginx.org/download/nginx-1.15.7.tar.gz [[email protected]_1_14_centos data]# tar -xvf nginx-1.15.7.tar.gz [[email protected]_1_14_centos data]# mkdir //usr/local/nginx -p [[email protected]_1_14_centos data]# ll total 1008 drwxr-xr-x 9 1001 1001 4096 Dec 17 15:16 nginx-1.15.7 -rw-r--r-- 1 root root 1026732 Nov 27 22:51 nginx-1.15.7.tar.gz [[email protected]_1_14_centos data]# cd nginx-1.15.7/ [[email protected]_1_14_centos nginx-1.15.7]# ./configure --prefix=/usr/local/nginx [[email protected]_1_14_centos nginx-1.15.7]#make&&make install
2,假設伺服器外網IP為129.129.129.129,需要通過web訪問的index檔案是 /usr/index.html,index.html檔案內容是:
<!DOCTYPE html> <html> <head> <meta charset="UTF-8"> <title></title> </head> <body> <h1>標題1</h1> <h2>標題2</h2> <h3>標題3</h3> <h4>標題4</h4> <h5>標題5</h5> <h6>標題6</h6> <h7>標題7</h7> </body> </html>
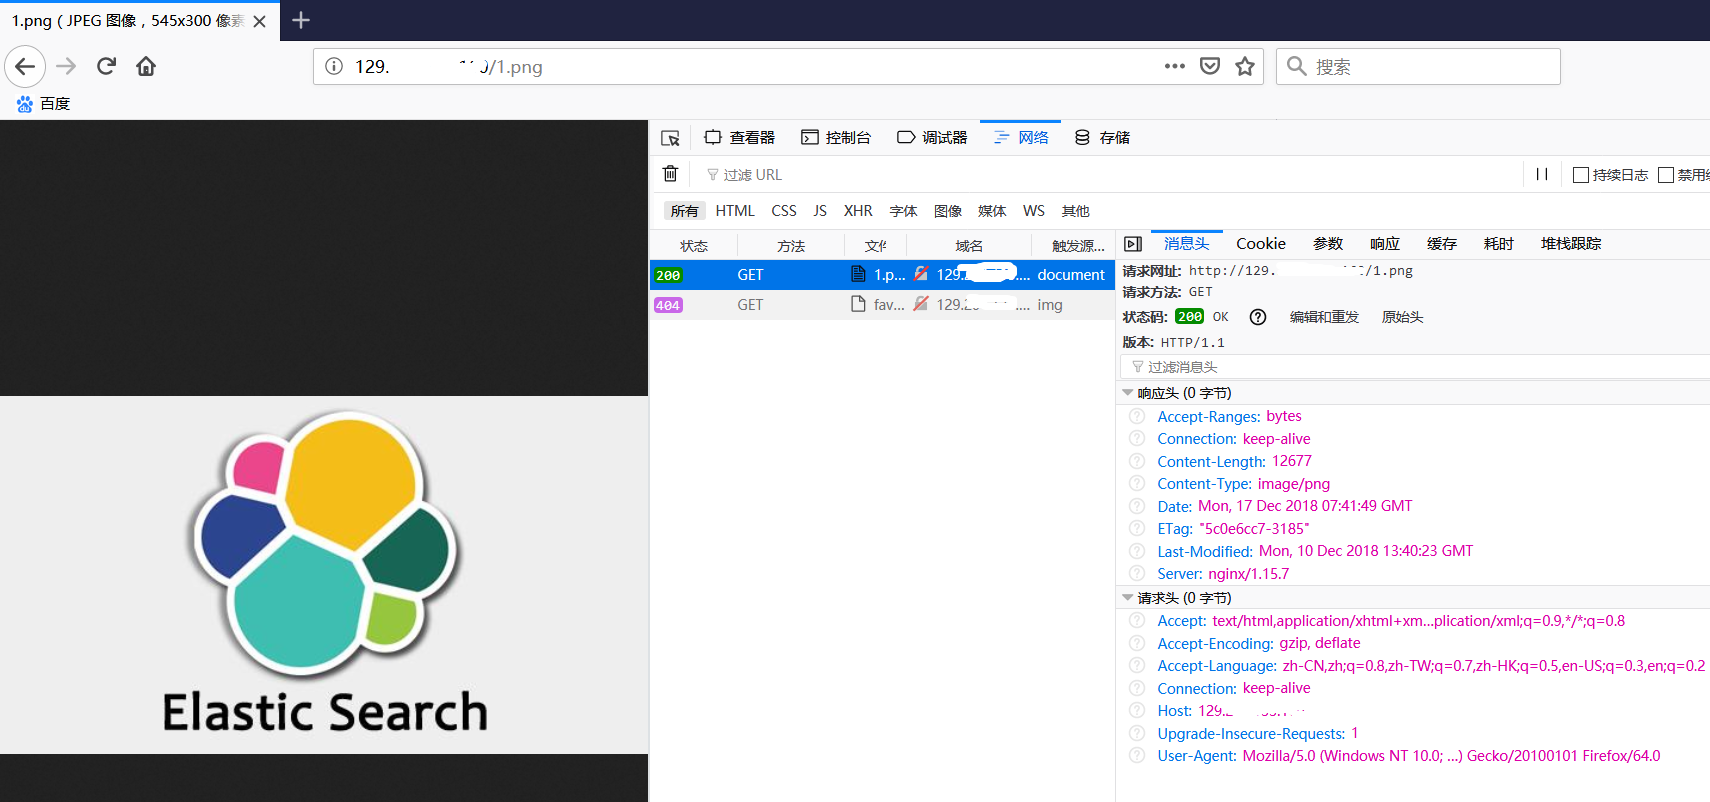
同時,需要訪問某個圖片檔案/usr/1.png
3,此時我們需要配置nginx
[[email protected]_1_14_centos /]# cd /usr/local/nginx/conf/
[[email protected]_1_14_centos conf]#
[[email protected]_1_14_centos conf]#
[[email protected]_1_14_centos conf]#
[[email protected]_1_14_centos conf]# vim nginx.conf

#user  nobody;
worker_processes  1;

#error_log  logs/error.log;
#error_log  logs/error.log  notice;
#error_log  logs/error.log  info;

#pid        logs/nginx.pid;


events {
    worker_connections  1024;
}


http {
    include       mime.types;
    default_type  application/octet-stream;

    #log_format  main  '$remote_addr - $remote_user [$time_local] "$request" '
    #                  '$status $body_bytes_sent "$http_referer" '
    #                  '"$http_user_agent" "$http_x_forwarded_for"';

    #access_log  logs/access.log  main;

    sendfile        on;
    #tcp_nopush     on;

    #keepalive_timeout  0;
    keepalive_timeout  65;

    #gzip  on;

    server {
        listen       80;             #這裡需要我們設定web訪問的埠
        server_name  129.xxx.xxx.xxx;       #這裡設定web訪問的IP,最終在瀏覽器訪問    129.xxx.xxx.xxx:80/index.html

        #charset koi8-r;

        #access_log  logs/host.access.log  main;

        location / {                                  #這裡很重要,原因參考下一行
            root   /usr;                              #這裡更重要,root是指直接訪問 IP:port 時,獲取檔案的根目錄,如果上一行設定為 / ,則直接訪問IP:port會去拉取 /usr下面的index.html
            index  index.html index.htm;              #接上一行,如果location後面設定了目錄  /abc ,則訪問IP:port時,會拉取 /usr/abc/index.html.
        }

        #error_page  404              /404.html;

        # redirect server error pages to the static page /50x.html
        #
        error_page   500 502 503 504  /50x.html;
        location = /50x.html {
            root   html;
        }

        # proxy the PHP scripts to Apache listening on 127.0.0.1:80
        #
        #location ~ \.php$ {
        #    proxy_pass   http://127.0.0.1;
        #}

        # pass the PHP scripts to FastCGI server listening on 127.0.0.1:9000
        #
        #location ~ \.php$ {
        #    root           html;
        #    fastcgi_pass   127.0.0.1:9000;
        #    fastcgi_index  index.php;
        #    fastcgi_param  SCRIPT_FILENAME  /scripts$fastcgi_script_name;
        #    include        fastcgi_params;
        #}

        # deny access to .htaccess files, if Apache's document root
        # concurs with nginx's one
        #
        #location ~ /\.ht {
        #    deny  all;
        #}
    }


    # another virtual host using mix of IP-, name-, and port-based configuration
    #
    #server {
    #    listen       8000;
    #    listen       somename:8080;
    #    server_name  somename  alias  another.alias;

    #    location / {
    #        root   html;
    #        index  index.html index.htm;
    #    }
    #}


    # HTTPS server
    #
    #server {
    #    listen       443 ssl;
    #    server_name  localhost;

    #    ssl_certificate      cert.pem;
    #    ssl_certificate_key  cert.key;

    #    ssl_session_cache    shared:SSL:1m;
    #    ssl_session_timeout  5m;

    #    ssl_ciphers  HIGH:!aNULL:!MD5;
    #    ssl_prefer_server_ciphers  on;

    #    location / {
    #        root   html;
    #        index  index.html index.htm;
    #    }
    #}

}
4,啟動nginx服務,使用上面的配置檔案
[[email protected]_1_14_centos sbin]# pwd
/usr/local/nginx/sbin
[[email protected]_1_14_centos sbin]# ./nginx -t #檢查配置檔案是否正確無誤
nginx: the configuration file /usr/local/nginx/conf/nginx.conf syntax is ok
nginx: configuration file /usr/local/nginx/conf/nginx.conf test is successful
[[email protected]_1_14_centos sbin]# ./nginx -c /usr/local/nginx/conf/nginx.conf  #使用上一步配置的nginx.conf啟動nginx服務
[[email protected]_1_14_centos sbin]# ps -aux | grep nginx
root      6341  0.0  0.0  20552   620 ?        Ss   16:04   0:00 nginx: master process ./nginx -c /usr/local/nginx/conf/nginx.conf
nobody    6342  0.0  0.0  23088  1396 ?        S    16:04   0:00 nginx: worker process
root      6360  0.0  0.0 112708   980 pts/1    S+   16:05   0:00 grep --color=auto nginx
5,使用瀏覽器開啟對應IP:port
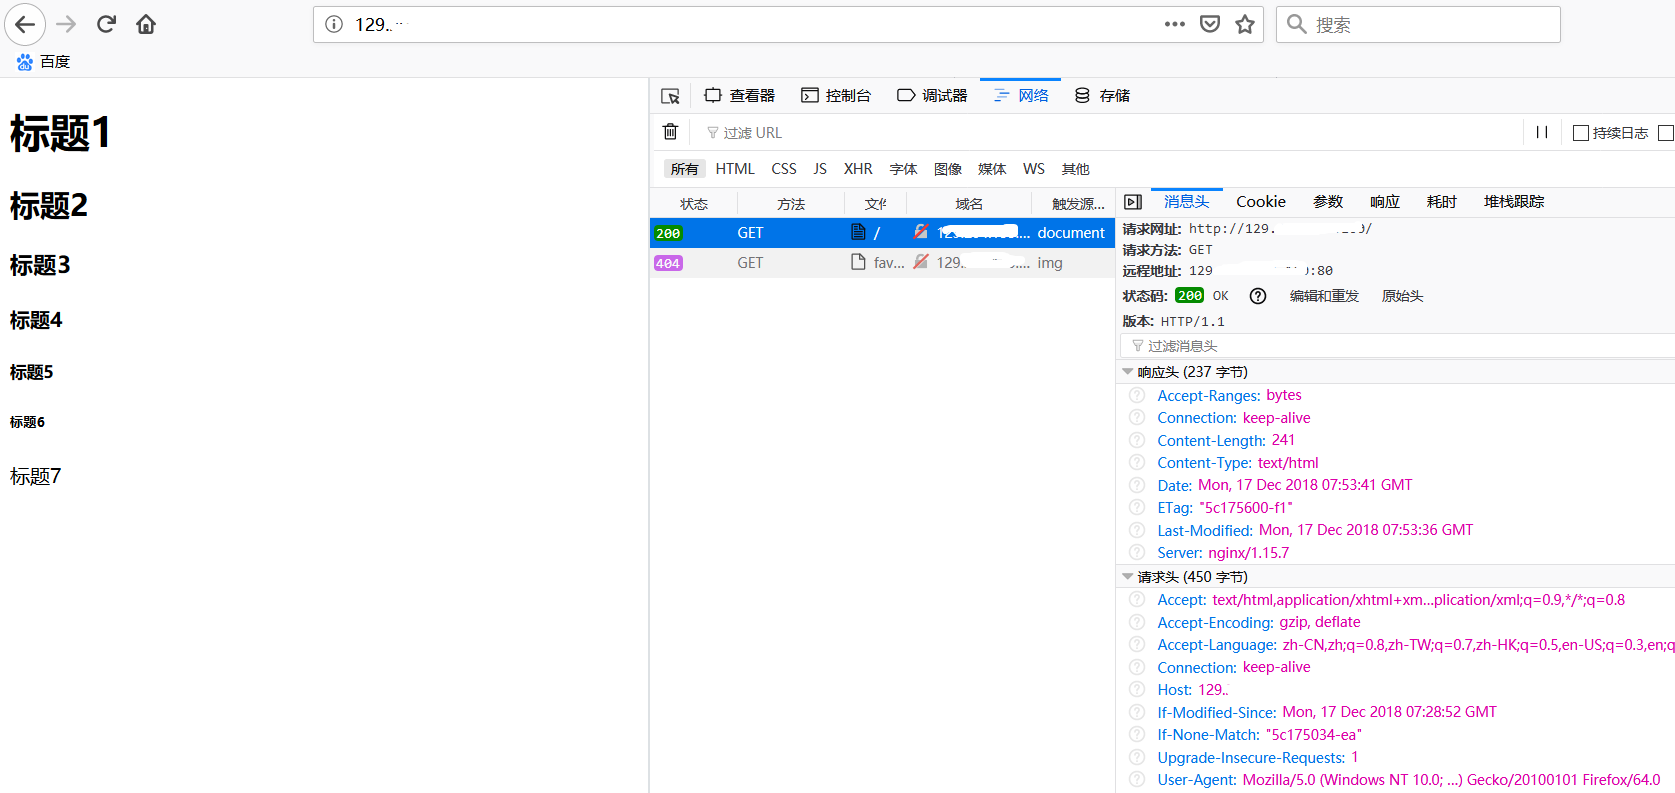
如上圖,直接訪問IP,會使用預設埠80並拉取index.html.
如果我們需要訪問web伺服器上的1.png圖片,只需要訪問url 129.xxx.xxx.xxx:80/1.png,若埠號設定為80時,在瀏覽器中訪問也可以不帶埠號。
【Finished】
附:
nginx常用命令
./nginx -s reload 重啟nginx
./nginx -s stop 停止nginx