
Spring原始碼——訊息佇列
前言
內容主要參考自《Spring原始碼深度解析》一書,算是讀書筆記或是原書的補充。進入正文後可能會引來各種不適,畢竟閱讀原始碼是件極其痛苦的事情。
本文主要涉及書中第十三章的部分,依照書中內容以及個人理解對Spring原始碼進行了註釋,詳見Github倉庫:https://github.com/MrSorrow/spring-framework
Java訊息服務 (Java Message Service,JMS) 應用程式介面是一個Java平臺中關於面向訊息中介軟體(MOM)的API,用於在兩個應用程式之間或分散式系統中傳送訊息進行非同步通訊。Java訊息服務是一個與具體平臺無關的API,絕大多數 MOM
Java訊息服務的規範包括兩種訊息模式,點對點和釋出者/訂閱者。許多提供商支援這一通用框架。因此,程式設計師可以在他們的分散式軟體中實現面向訊息的操作,這些操作將具有不同面向訊息中介軟體產品的可移植性。
Java訊息服務支援同步和非同步的訊息處理,在某些場景下,非同步訊息是必要的,而且比同步訊息操作更加便利。
本文以 Java 訊息服務的開源實現產品 ActiveMQ 為例來進行Spring整合訊息服務功能的實現分析。
I. 單獨使用ActiveMQ
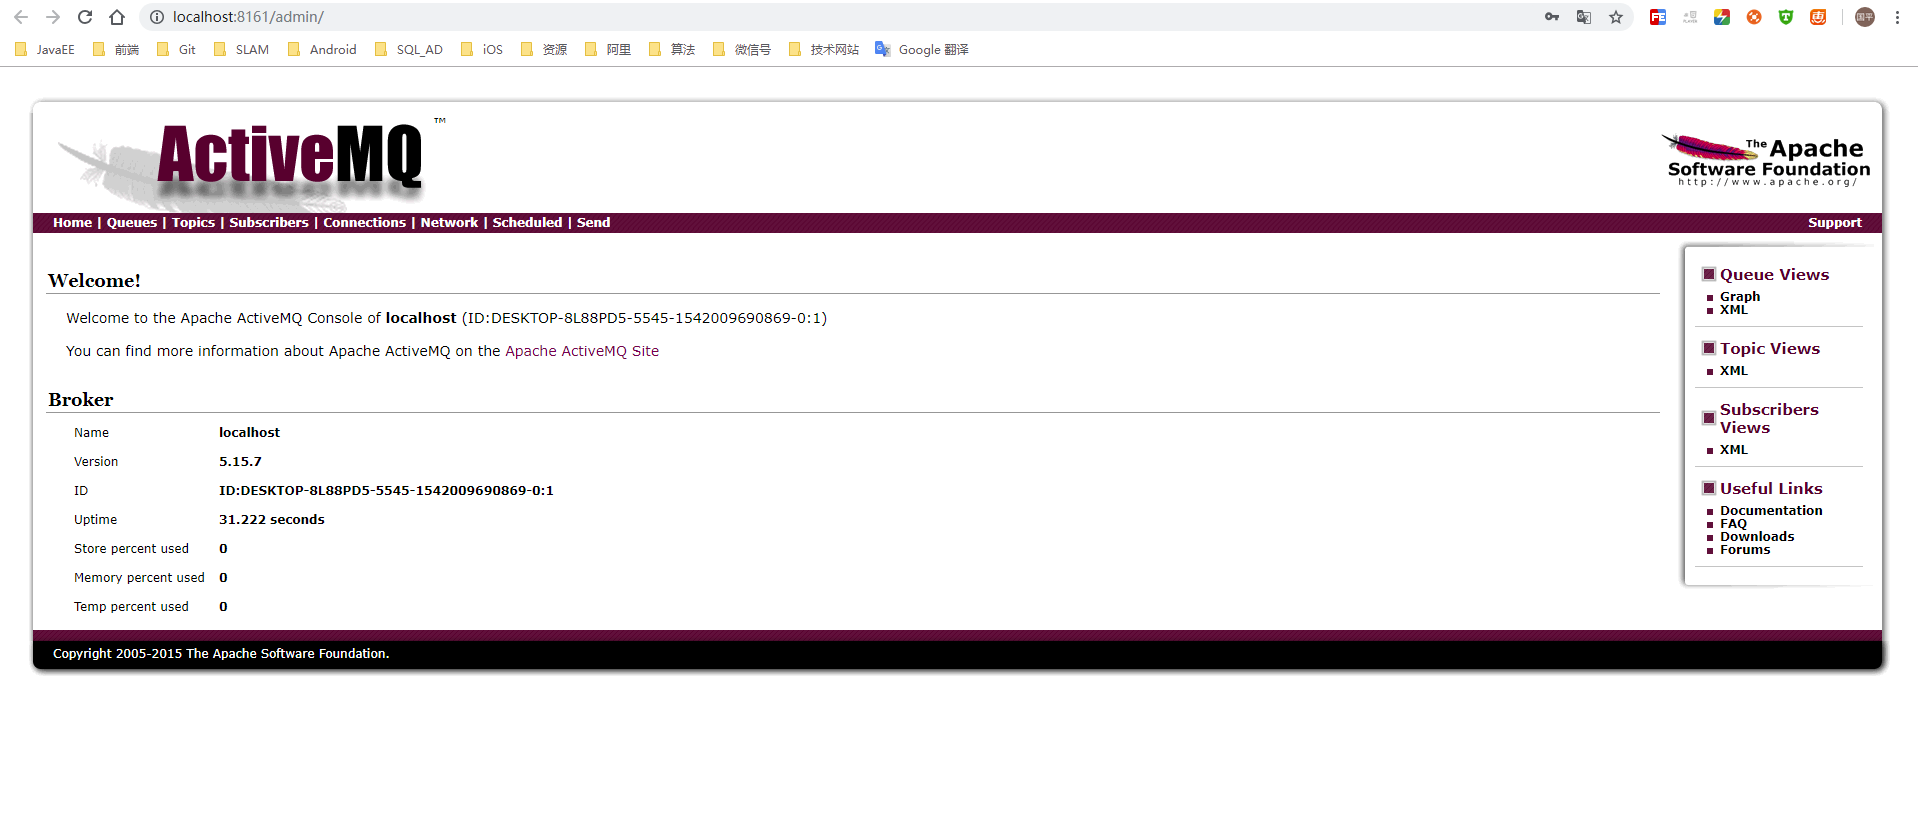
安裝ActiveMQ
這裡我是在Windows平臺上安裝 ActiveMQ 的。需要等上官網,下載
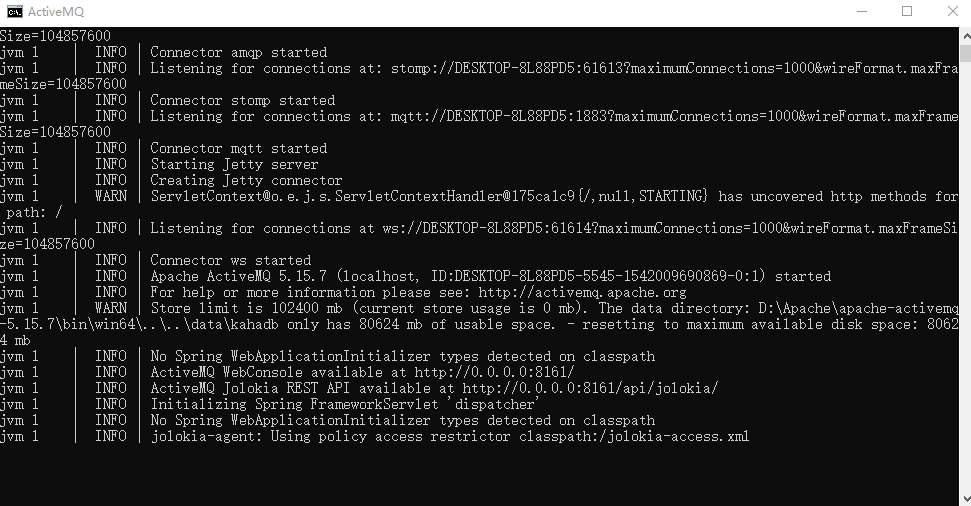
訪問 http://localhost:8161/admin,登入預設賬號密碼都為 admin。
JMS獨立使用
儘管大多數的Java訊息服務的使用都會跟Spring相結合,但是,我們還是非常有必要了解訊息的獨立使用方法,這對於我們瞭解訊息的實現原理以及後續的與Spring整合實現分析都非常重要。訊息服務的使用除了要開啟訊息伺服器外,還需要構建訊息的傳送端與接收端,傳送端主要用來將包含業務邏輯的訊息傳送至訊息伺服器,而訊息接收端則用於將伺服器中的訊息提取並進行相應的處理。
① 傳送端
傳送端主要用於傳送訊息到訊息伺服器,以下為傳送訊息測試,嘗試傳送 10 條訊息到訊息伺服器,訊息的內容為“測試傳送訊息”。
public class Sender {

   public static void main(String[] args) throws JMSException, InterruptedException {
      ConnectionFactory connectionFactory = new ActiveMQConnectionFactory();

      Connection connection = connectionFactory.createConnection();
      Session session = connection.createSession(true, Session.AUTO_ACKNOWLEDGE);
      Destination destination = session.createQueue("my-queue");

      MessageProducer producer = session.createProducer(destination);
      for (int i = 0; i < 10; i++) {
         TextMessage message = session.createTextMessage("測試傳送訊息");
         Thread.sleep(1000);
         producer.send(message);
      }

      session.commit();
      session.close();
      connection.close();
   }
}
② 接收端
接收端主要用於連線訊息伺服器並接收伺服器上的訊息。
public class Receiver {

   public static void main(String[] args) throws JMSException {
      ConnectionFactory connectionFactory = new ActiveMQConnectionFactory();

      Connection connection = connectionFactory.createConnection();
      connection.start();

      Session session = connection.createSession(true, Session.AUTO_ACKNOWLEDGE);
      Destination destination = session.createQueue("my-queue");

      MessageConsumer consumer = session.createConsumer(destination);

      int i = 0;
      while (i < 10) {
         i++;
         TextMessage message = (TextMessage) consumer.receive();
         session.commit();
         System.out.println("接收到訊息內容為:" + message.getText());
      }

      session.close();
      connection.close();
   }
}
③ 測試結果
先執行傳送端向訊息佇列中傳送 10 條訊息,然後執行接收端,即可打印出傳送端向 my-queue 傳送的 10 條訊息內容。接收端總共消費了10次訊息,訊息佇列中 my-queue 中的訊息應該全部被消費完畢。
分析
從傳送端與接收端的程式碼可以看出,整個訊息的傳送與接收過程非常簡單,但是其中卻參雜著大量的冗餘程式碼,比如 Connection 的建立與關閉,Session 的建立與關閉等。
對於傳送的流程,主要包括:
- 初始化連線工廠;
- 利用連線工廠建立一個連線;
- 使用連線建立會話 Session;
- 通過會話建立一個管理物件 Destination ,包括佇列 (Queue) 或主題 (Topic);
- 使用會話 Session 和管理物件 Destination 建立訊息生產者 MessageSender;
- 使用訊息生產者 MessageSender 傳送訊息。
對於接收的流程,主要包括:
- 1-4 步與傳送相同;
- 使用會話 Session 和管理物件 Destination 建立訊息消費者 MessageConsumer;
- 使用訊息消費者 MessageConsumer 接收訊息。
很容易讓我們聯想到資料庫JDBC的實現,在使用訊息佇列時都需要一系列冗餘的但又必不可少的套路程式碼,而其中真正用於資料操作/傳送訊息的程式碼其實很簡單。前 1-3 步都可以Spring幫助我們完成,包含個性化資訊的步驟交給使用者進行設定。
所以Spring對於 JMS 訊息佇列同樣利用模板設計模式加上回調的方式提供了一個模板類 JmsTemplate,能讓我們非常快捷方便地利用Spring進行訊息的收發。
II. Spring整合ActiveMQ
和Spring封裝JDBC一樣,Spring也提供了一個模板類 JmsTemplate 來幫助我們使用 JMS。
新增依賴
主要在環境中新增上 spring-jms 和 activemq 兩個依賴即可。
plugins {
    id 'java'
}

group 'org.springframework'
version '5.1.0.BUILD-SNAPSHOT'

sourceCompatibility = 1.8

repositories {
    mavenCentral()
}

dependencies {
    compile(project(":spring-beans"))
    compile(project(":spring-context"))
    compile(project(":spring-aop"))
    compile(project(":spring-jdbc"))
    compile(project(":spring-jms"))
    compile group: 'org.springframework', name: 'spring-aspects', version: '5.0.7.RELEASE'
    compile group: 'org.apache.commons', name: 'commons-dbcp2', version: '2.5.0'
    compile group: 'mysql', name: 'mysql-connector-java', version: '5.1.18'
    compile group: 'org.mybatis', name: 'mybatis', version: '3.4.6'
    compile group: 'org.mybatis', name: 'mybatis-spring', version: '1.3.2'
    compile group: 'org.apache.activemq', name: 'activemq-pool', version: '5.15.7'
    testCompile group: 'junit', name: 'junit', version: '4.12'
}

sourceSets.main.resources.srcDirs = ["src/main/java","src/main/resources"]
配置檔案
Spring整合訊息服務的使用也從配置檔案配置開始。在 Spring 的核心配置檔案中首先要註冊 JmsTemplate 型別的 bean。當然,ActiveMQConnectionFactory 用於連線訊息伺服器,是訊息服務的基礎,也要註冊 ActiveMQQueue 則用於指定訊息的目的地。
<?xml version="1.0" encoding="UTF-8"?>
<beans xmlns="http://www.springframework.org/schema/beans"
       xmlns:xsi="http://www.w3.org/2001/XMLSchema-instance"
       xsi:schemaLocation="http://www.springframework.org/schema/beans http://www.springframework.org/schema/beans/spring-beans.xsd">

   <bean id="connectionFactory" class="org.apache.activemq.ActiveMQConnectionFactory">
      <property name="brokerURL">
         <value>tcp://127.0.0.1:61616</value>
      </property>
   </bean>

   <bean id="jmsTemplate" class="org.springframework.jms.core.JmsTemplate">
      <property name="connectionFactory">
         <ref bean="connectionFactory" />
      </property>
   </bean>

   <bean id="destination" class="org.apache.activemq.command.ActiveMQQueue">
      <constructor-arg index="0">
         <value>spring_and_activemq</value>
      </constructor-arg>
   </bean>
</beans>
傳送端
有了以上的配置,Spring就可以根據配置資訊簡化我們的工作量。Spring中使用傳送訊息到訊息伺服器,省去了冗餘的 Connection 以及 Session 等的建立與銷燬過程,簡化了工作量。
public class SpringSender {

	@Test
	public void sendMessage() {
		ApplicationContext context = new ClassPathXmlApplicationContext("activeMQ-Test.xml");
		JmsTemplate jmsTemplate = (JmsTemplate) context.getBean("jmsTemplate");
		Destination destination = (Destination) context.getBean("destination");

		jmsTemplate.send(destination, new MessageCreator() {
			@Override
			public Message createMessage(Session session) throws JMSException {
				return session.createTextMessage("傳送一個訊息");
			}
		});
	}
}
接收端
同樣,在Spring中接收訊息也非常方便,Spring中連線伺服器接收訊息的示例如下。
public class SpringReceiver {

   @Test
   public void receiveMessage() {
      ApplicationContext context = new ClassPathXmlApplicationContext("activeMQ-Test.xml");
      JmsTemplate jmsTemplate = (JmsTemplate) context.getBean("jmsTemplate");
      Destination destination = (Destination) context.getBean("destination");

      TextMessage textMessage = (TextMessage) jmsTemplate.receive(destination);
      System.out.println("接收到訊息:" + textMessage);
   }
}
測試結果
同樣,先執行傳送端程式,然後執行接收端程式碼,測試結果如下。
監聽器
使用 jmsTemplate.receive(destination) 方法只能接收一次訊息,如果未接收到訊息,則會一直等待,當然使用者可以通過設定 timeout 屬性來控制等待時間,但是一旦接收到訊息本次接收任務就會結束,雖然使用者可以通過 while(true) 的方式來實現迴圈監聽訊息伺服器上的訊息,還有一種更好的解決辦法:建立訊息監聽器。訊息監聽器的使用方式如下。
① 建立訊息監聽器
用於監聽訊息,一旦有新訊息Spring會將訊息引導至訊息監聽器以方便使用者進行相應的邏輯處理。實現監聽器需要實現 MessageListener 介面,重寫 onMessage() 方法。
public class MyMessageListener implements MessageListener {

   @Override
   public void onMessage(Message message) {
      TextMessage msg = (TextMessage) message;
      try {
         System.out.println("接收訊息: " + msg.getText());
      } catch (JMSException e) {
         e.printStackTrace();
      }
   }
}
② 修改配置檔案
注入自定義的監聽器 bean,新增一個監聽器容器。
<?xml version="1.0" encoding="UTF-8"?>
<beans xmlns="http://www.springframework.org/schema/beans"
       xmlns:xsi="http://www.w3.org/2001/XMLSchema-instance"
       xsi:schemaLocation="http://www.springframework.org/schema/beans http://www.springframework.org/schema/beans/spring-beans.xsd">


   <bean id="connectionFactory" class="org.apache.activemq.ActiveMQConnectionFactory">
      <property name="brokerURL">
         <value>tcp://127.0.0.1:61616</value>
      </property>
   </bean>

   <bean id="jmsTemplate" class="org.springframework.jms.core.JmsTemplate">
      <property name="connectionFactory">
         <ref bean="connectionFactory" />
      </property>
   </bean>

   <bean id="destination" class="org.apache.activemq.command.ActiveMQQueue">
      <constructor-arg index="0">
         <value>spring_and_activemq</value>
      </constructor-arg>
   </bean>

   <bean id="myMessageListener" class="guo.ping.activemq.MyMessageListener" />

   <bean id="javaConsumer" class="org.springframework.jms.listener.DefaultMessageListenerContainer">
      <property name="connectionFactory" ref="connectionFactory" />
      <property name="destination" ref="destination" />
      <property name="messageListener" ref="myMessageListener" />
   </bean>

</beans>
③ 測試結果
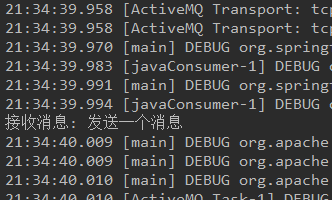
通過以上的修改便可以進行訊息監聽的功能了,一旦有訊息傳入至訊息伺服器,則會被訊息監聽器監聽到,並由Spring將訊息內容引導至訊息監聽器的處理函式中等待使用者的進一步邏輯處理。
將傳送程式碼改為迴圈傳送10條訊息,可以看到結果如下,只截取了部分,可以看到監聽器一直在接收訊息。
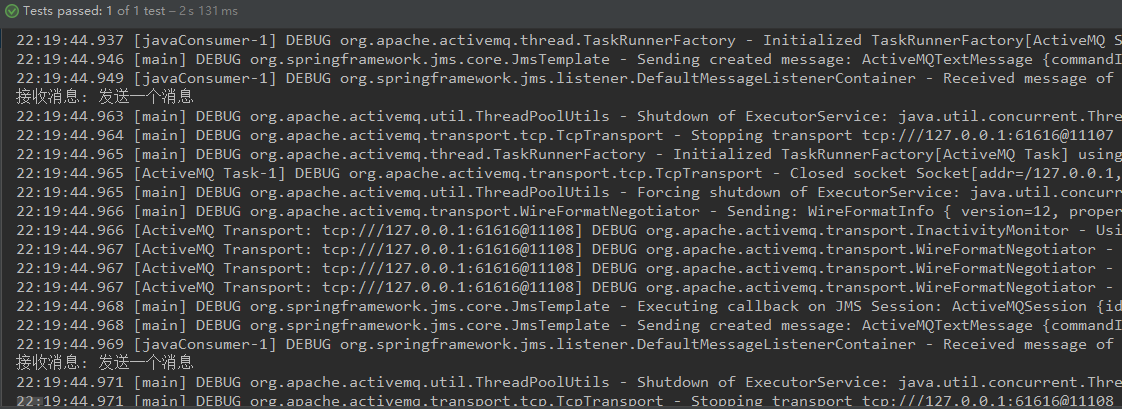
訊息接收可以使用訊息監聽器的方式替代模版方法,但是在傳送訊息的時候是無法替代的。接下來,我們主要研究 JmsTemplate 中的傳送接收訊息方法。
III. 原始碼分析
檢視 JmsTemplate 的型別層級結構圖,發現其實現了 InitializingBean 介面。
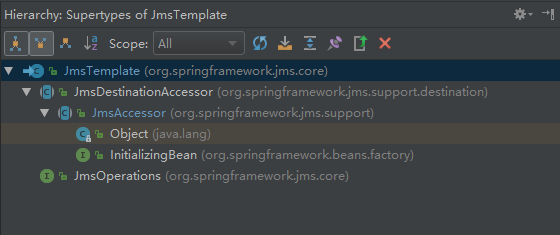
實現 InitializingBean 介面的方法是在 JmsAccessor 抽象類中,實現內容如下。
/**
 * 實現InitializingBean介面
 */
@Override
public void afterPropertiesSet() {
   // 對ConnectionFactory判空
   if (getConnectionFactory() == null) {
      throw new IllegalArgumentException("Property 'connectionFactory' is required");
   }
}

/**
 * Return the ConnectionFactory that this accessor uses for obtaining
 * JMS {@link Connection Connections}.
 */
@Nullable
public ConnectionFactory getConnectionFactory() {
    return this.connectionFactory;
}
方法中只是一個驗證連線工廠存在與否的功能,並沒有其他邏輯實現。所以,建立 JmsTemplate 沒有什麼特殊的 bean 後處理等操作,我們可以直接進行 JmsTemplate 模板類中方法的分析。
JmsTemplate
我們先以傳送方法為例,使用模板類的 send() 方法示例如下。
jmsTemplate.send(destination, new MessageCreator() {
   @Override
   public Message createMessage(Session session) throws JMSException {
      return session.createTextMessage("傳送一個訊息");
   }
});
可以看到方法中傳入了兩個引數,一個是 ActiveMQQueue 型別的 bean——destination,另一個是 MessageCreator 介面的實現類例項。實現介面的 createMessage() 方法我們可以看出,主要目的是根據 session 建立使用者自定義的訊息內容。
繼續檢視 send() 方法中內容。
/**
 * 傳送訊息
 * @param destination the destination to send this message to
 * @param messageCreator callback to create a message
 * @throws JmsException
 */
@Override
public void send(final Destination destination, final MessageCreator messageCreator) throws JmsException {
   execute(session -> {
      doSend(session, destination, messageCreator);
      return null;
   }, false);
}
看到 send() 方法中又呼叫了 execute() 方法,我們不得不回想起 JdbcTemplate 實現風格,極為相似,兩者都是提取一個公共的方法作為最底層、最通用的功能實現,然後又通過回撥函式的不同來區分個性化的功能。我們首先檢視通用程式碼的抽取實現。
① 通用程式碼抽取
通過 send() 方法可以看出,需要傳入的引數包含會話 SessionCallback 回撥函式介面實現以及一個布林值表示是否開啟向伺服器推送連線資訊,只有接收資訊時需要,傳送不需要。由於Spring5對於函式式介面,都採用了 lambda 表示式寫法,所以看起來有點不夠清晰,其實本質上就是實現 SessionCallback 介面的 doInJms() 方法。
execute(new SessionCallback<Object>() {
    public Object doInJms(Session session) throws JMSException {
        doSend(session, destination, messageCreator);
        return null;
    }
}, false);
也就是說,doInJms() 方法中最後真正做的是 doSend(session, destination, messageCreator) 方法,就是實際傳送訊息的操作,這其實僅與傳送有關,我們完全可以把 doInJms() 方法的實際內容替換成接收訊息方法,所以Spring利用回撥介面,先進行通用程式碼的抽取。
我們回過頭來研究 execute() 方法,沒錯,execute() 方法就是通用程式碼部分。根據之前分析 JdbcTemplate 的經驗,我們推斷,在 execute() 中一定是封裝了 Connection 以及 Session 的建立操作等套路程式碼。
/**
 * Execute the action specified by the given action object within a
 * JMS Session. Generalized version of {@code execute(SessionCallback)},
 * allowing the JMS Connection to be started on the fly.
 * <p>Use {@code execute(SessionCallback)} for the general case.
 * Starting the JMS Connection is just necessary for receiving messages,
 * which is preferably achieved through the {@code receive} methods.
 * @param action callback object that exposes the Session
 * @param startConnection whether to start the Connection
 * @return the result object from working with the Session
 * @throws JmsException if there is any problem
 * @see #execute(SessionCallback)
 * @see #receive
 */
@Nullable
public <T> T execute(SessionCallback<T> action, boolean startConnection) throws JmsException {
   Assert.notNull(action, "Callback object must not be null");
   Connection conToClose = null;
   Session sessionToClose = null;
   try {
      // 嘗試獲取session
      Session sessionToUse = ConnectionFactoryUtils.doGetTransactionalSession(
            obtainConnectionFactory(), this.transactionalResourceFactory, startConnection);
      if (sessionToUse == null) {
         // 建立connection
         conToClose = createConnection();
         // 根據connection建立session
         sessionToClose = createSession(conToClose);
         // 是否開啟向伺服器推送連線資訊,只有接收資訊時需要,傳送不需要
         if (startConnection) {
            conToClose.start();
         }
         sessionToUse = sessionToClose;
      }
      if (logger.isDebugEnabled()) {
         logger.debug("Executing callback on JMS Session: " + sessionToUse);
      }
      // 呼叫回撥方法
      return action.doInJms(sessionToUse);
   }
   catch (JMSException ex) {
      throw convertJmsAccessException(ex);
   }
   finally {
      // 關閉連線
      JmsUtils.closeSession(sessionToClose);
      // 釋放連線
      ConnectionFactoryUtils.releaseConnection(conToClose, getConnectionFactory(), startConnection);
   }
}
在展示單獨使用 ActiveMQ 時,我們知道為了傳送一條訊息需要做很多工作,需要很多的輔助程式碼,而這些程式碼又都是千篇一律的,沒有任何的差異,所以 execute() 方法的目的就是幫助我們抽離這些冗餘程式碼使我們更加專注於業務邏輯的實現。從函式中看,這些冗餘程式碼包括建立 Connection、建立 Session、當然也包括關閉 Session 和關閉 Connection。而在準備工作結束後,呼叫回撥函式將程式引入使用者自定義實現的個性化處理。
簡單的看一下建立 Connection、建立 Session、關閉 Session 和關閉 Connection 的實現,可以看到和我們單獨使用 ActiveMQ 的程式碼本質上是一致的。
/**
* Create a JMS Connection via this template's ConnectionFactory.
* <p>This implementation uses JMS 1.1 API.
* @return the new JMS Connection
* @throws JMSException if thrown by JMS API methods
* @see javax.jms.ConnectionFactory#createConnection()
*/
protected Connection createConnection() throws JMSException {
return obtainConnectionFactory().createConnection();
}
/**
* Create a JMS Session for the given Connection.
* <p>This implementation uses JMS 1.1 API.
* @param con the JMS Connection to create a Session for
* @return the new JMS Session
* @throws JMSException if thrown by JMS API methods
* @see javax.jms.Connection#createSession(boolean, int)
*/
protected Session createSession(Connection con) throws JMSException {
return con.createSession(isSessionTransacted(), getSessionAcknowledgeMode());
}
/**
* Close the given JMS Session and ignore any thrown exception.
* This is useful for typical {@code finally} blocks in manual JMS code.
* @param session the JMS Session to close (may be {@code null})
*/
public static void closeSession(@Nullable Session session) {
if (session != null) {
try {
session.close();
}
catch (JMSException ex) {
logger.trace("Could not close JMS Session", ex);
}
catch (Throwable ex) {
// We don't trust the JMS provider: It might throw RuntimeException or Error.
logger.trace("Unexpected exception on closing JMS Session", ex);
}
}
}
/**
* Release the given Connection, stopping it (if necessary) and eventually closing it.
* <p>Checks {@link SmartConnectionFactory#shouldStop}, if available.
* This is essentially a more sophisticated version of
* {@link org.springframework.jms.support.JmsUtils#closeConnection}.
* @param con the Connection to release
* (if this is {@code null}, the call will be ignored)
* @param cf the ConnectionFactory that the Connection was obtained from
* (may be {@code null})
* @param started whether the Connection might have been started by the application
* @see SmartConnectionFactory#shouldStop
* @see org.springframework.jms.support.JmsUtils#closeConnection
*/
public static void releaseConnection(@Nullable Connection con, @Nullable ConnectionFactory cf, boolean started) {
if (con == null) {
return;
}
if (started && cf instanceof SmartConnectionFactory && ((SmartConnectionFactory) cf).shouldStop(con)) {
try {
con.stop();
}
catch (Throwable ex) {
logger.debug("Could not stop JMS Connection before closing it", ex);
}
}
try