VGG_face Caffe 微調(finetuing)詳細教程(二)
阿新 • • 發佈:2018-12-18
引言
接著上篇文章,我們瞭解瞭如何在vgg_face模型的基礎上進行微調。接下來我將介紹如何使用微調好的模型識別人臉。
一.deploy配置檔案
在使用模型之前還需要一個deploy.prototxt,該檔案儲存的是神經網路的結構,和train_test.prototxt有什麼不同?train_test.prototxt是訓練時用的網路結構,deploy.prototxt是生產環境所用的網路結構,兩個網路的頭和尾有些不同,中間結構是相同的。
建立一個deploy.prototxt檔案,可直接copy下面程式碼:
name: "VGG_FACE_16_Net"
input: "data"
input_dim: 1
input_dim: 3
input_dim: 224
input_dim: 224
force_backward: true
layer {
  name: "conv1_1"
  type: "Convolution"
  bottom: "data"
  top: "conv1_1"
  convolution_param {
    num_output: 64
    kernel_size: 3
    pad: 1
  }
}
layer {
  name: "relu1_1"
  type: "ReLU"
  bottom: "conv1_1"
  top: "conv1_1"
}
layer {
  name: "conv1_2"
  type: "Convolution"
  bottom: "conv1_1"
  top: "conv1_2"
  convolution_param {
    num_output: 64
    kernel_size: 3
    pad: 1
  }
}
layer {
  name: "relu1_2"
  type: "ReLU"
  bottom: "conv1_2"
  top: "conv1_2"
}
layer {
  name: "pool1"
  type: "Pooling"
  bottom: "conv1_2"
  top: "pool1"
  pooling_param {
    pool: MAX
    kernel_size: 2
    stride: 2
  }
}
layer {
  name: "conv2_1"
  type: "Convolution"
  bottom: "pool1"
  top: "conv2_1"
  convolution_param {
    num_output: 128
    kernel_size: 3
    pad: 1
  }
}
layer {
  name: "relu2_1"
  type: "ReLU"
  bottom: "conv2_1"
  top: "conv2_1"
}
layer {
  name: "conv2_2"
  type: "Convolution"
  bottom: "conv2_1"
  top: "conv2_2"
  convolution_param {
    num_output: 128
    kernel_size: 3
    pad: 1
  }
}
layer {
  name: "relu2_2"
  type: "ReLU"
  bottom: "conv2_2"
  top: "conv2_2"
}
layer {
  name: "pool2"
  type: "Pooling"
  bottom: "conv2_2"
  top: "pool2"
  pooling_param {
    pool: MAX
    kernel_size: 2
    stride: 2
  }
}
layer {
  name: "conv3_1"
  type: "Convolution"
  bottom: "pool2"
  top: "conv3_1"
  convolution_param {
    num_output: 256
    kernel_size: 3
    pad: 1
  }
}
layer {
  name: "relu3_1"
  type: "ReLU"
  bottom: "conv3_1"
  top: "conv3_1"
}
layer {
  name: "conv3_2"
  type: "Convolution"
  bottom: "conv3_1"
  top: "conv3_2"
  convolution_param {
    num_output: 256
    kernel_size: 3
    pad: 1
  }
}
layer {
  name: "relu3_2"
  type: "ReLU"
  bottom: "conv3_2"
  top: "conv3_2"
}
layer {
  name: "conv3_3"
  type: "Convolution"
  bottom: "conv3_2"
  top: "conv3_3"
  convolution_param {
    num_output: 256
    kernel_size: 3
    pad: 1
  }
}
layer {
  name: "relu3_3"
  type: "ReLU"
  bottom: "conv3_3"
  top: "conv3_3"
}
layer {
  name: "pool3"
  type: "Pooling"
  bottom: "conv3_3"
  top: "pool3"
  pooling_param {
    pool: MAX
    kernel_size: 2
    stride: 2
  }
}
layer {
  name: "conv4_1"
  type: "Convolution"
  bottom: "pool3"
  top: "conv4_1"
  convolution_param {
    num_output: 512
    kernel_size: 3
    pad: 1
  }
}
layer {
  name: "relu4_1"
  type: "ReLU"
  bottom: "conv4_1"
  top: "conv4_1"
}
layer {
  name: "conv4_2"
  type: "Convolution"
  bottom: "conv4_1"
  top: "conv4_2"
  convolution_param {
    num_output: 512
    kernel_size: 3
    pad: 1
  }
}
layer {
  name: "relu4_2"
  type: "ReLU"
  bottom: "conv4_2"
  top: "conv4_2"
}
layer {
  name: "conv4_3"
  type: "Convolution"
  bottom: "conv4_2"
  top: "conv4_3"
  convolution_param {
    num_output: 512
    kernel_size: 3
    pad: 1
  }
}
layer {
  name: "relu4_3"
  type: "ReLU"
  bottom: "conv4_3"
  top: "conv4_3"
}
layer {
  name: "pool4"
  type: "Pooling"
  bottom: "conv4_3"
  top: "pool4"
  pooling_param {
    pool: MAX
    kernel_size: 2
    stride: 2
  }
}
layer {
  name: "conv5_1"
  type: "Convolution"
  bottom: "pool4"
  top: "conv5_1"
  convolution_param {
    num_output: 512
    kernel_size: 3
    pad: 1
  }
}
layer {
  name: "relu5_1"
  type: "ReLU"
  bottom: "conv5_1"
  top: "conv5_1"
}
layer {
  name: "conv5_2"
  type: "Convolution"
  bottom: "conv5_1"
  top: "conv5_2"
  convolution_param {
    num_output: 512
    kernel_size: 3
    pad: 1
  }
}
layer {
  name: "relu5_2"
  type: "ReLU"
  bottom: "conv5_2"
  top: "conv5_2"
}
layer {
  name: "conv5_3"
  type: "Convolution"
  bottom: "conv5_2"
  top: "conv5_3"
  convolution_param {
    num_output: 512
    kernel_size: 3
    pad: 1
  }
}
layer {
  name: "relu5_3"
  type: "ReLU"
  bottom: "conv5_3"
  top: "conv5_3"
}
layer {
  name: "pool5"
  type: "Pooling"
  bottom: "conv5_3"
  top: "pool5"
  pooling_param {
    pool: MAX
    kernel_size: 2
    stride: 2
  }
}

layer {
  name: "fc6"
  type: "InnerProduct"
  bottom: "pool5"
  top: "fc6"
  inner_product_param {
    num_output: 4096
  }
}
layer {
  name: "relu6"
  type: "ReLU"
  bottom: "fc6"
  top: "fc6"
}
layer {
  name: "drop6"
  type: "Dropout"
  bottom: "fc6"
  top: "fc6"
  dropout_param {
    dropout_ratio: 0.5
  }
}
layer {
  name: "fc7"
  type: "InnerProduct"
  bottom: "fc6"
  top: "fc7"
  # Note that lr_mult can be set to 0 to disable any fine-tuning of this, and any other, layer
  inner_product_param {
    num_output: 4096
  }
}
layer {
  name: "relu7"
  type: "ReLU"
  bottom: "fc7"
  top: "fc7"
}
layer {
  name: "drop7"
  type: "Dropout"
  bottom: "fc7"
  top: "fc7"
  dropout_param {
    dropout_ratio: 0.5
  }
}
layer {
  name: "fc8_flickr"
  type: "InnerProduct"
  bottom: "fc7"
  top: "fc8_flickr"
  # lr_mult is set to higher than for other layers, because this layer is starting from random while the others are already trained
  propagate_down: false
  inner_product_param {
    num_output: 200         # 改,有多少類別就改為多少,根據上篇文章,這裡改為40
  }
}
layer {
  name: "prob"
  type: "Softmax"
  bottom: "fc8_flickr"
  top: "prob"
}
二.python指令碼使用模型
不多說,直接上程式碼:
import caffe

deployFile = '/home/pzs/husin/caffePython/husin_download/VGG_face/deploy.prototxt'
modelFile = '/home/pzs/husin/caffePython/husin_download/VGG_face/snapshot/solver_iter_1000.caffemodel'
imgPath = '/home/pzs/husin/caffePython/husin_download/VGG_face/val/40-5m.jpg'      # 這裡我選擇的人臉是40-5m.jpg,讀者可以任意選擇

def predictImg(net,imgPath):
    # 得到data的形狀,這裡的圖片是預設matplotlib底層載入的
    #  matplotlib載入的image是畫素[0-1],圖片的資料格式[weight,high,channels],RGB
    #  caffe載入的圖片需要的是[0-255]畫素,資料格式[channels,weight,high],BGR,那麼就需要轉換
    transformer = caffe.io.Transformer({'data':net.blobs['data'].data.shape})
    transformer.set_transpose('data',(2,0,1))               # 改成[channels,weight,high]
    transformer.set_raw_scale('data',255)                   # 畫素區間擴充套件為[0,255]
    transformer.set_channel_swap('data',(2,1,0))        # RGB
    im = caffe.io.load_image(imgPath)                        # 載入圖片
    net.blobs['data'].data[...] = transformer.preprocess('data',im)   # 用上面的transformer.preprocess來處理剛剛載入圖片

    output = net.forward()                                            # 進行前向傳播
    output_prob = output['prob'][0]                              #  最終的結果: 當前這個圖片的屬於哪個物體的概率(列表表示)
    print '---------------------------------------------------------------------------------------------------------------------'
    print str(output_prob.argmax())                             #  輸出概率最大的標籤

if __name__=='__main__':
    net = caffe.Net(deployFile,modelFile,caffe.TEST)
    predictImg(net,imgPath)
三 . 執行結果
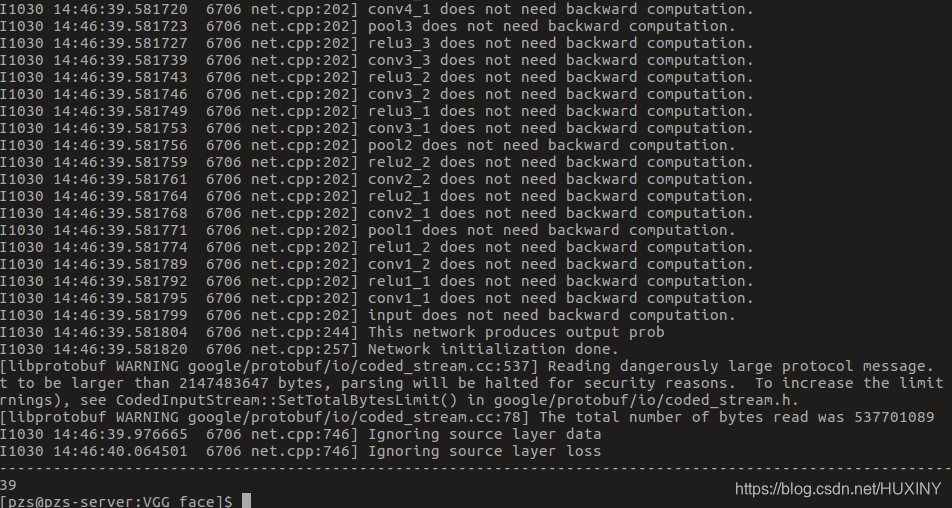
這裡我檢測的是val/40-5m.jpg, 所屬類應該是39(因為從0開始), 下面是輸出結果:

可以看到,檢測很準確,讀者可以試試其他的人臉,我這裡試過,都是準確的。
結束語
該文章是本人對caffe學習的階段總結,有錯誤之處還請大家指出,以共同學習。
And let us not be weary in well-doing, for in due season, we shall reap, if we faint not
