Spring-Boot新增MyBatis:手動新增程式碼方式
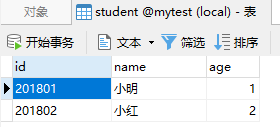
建立了一個MySQL資料庫,並添加了一張表:

新增MyBatis後,有兩種使用方式:
- 註解方式。簡單快速,適合規模較小的資料庫。
- xml配置方式。支援動態生成SQL,調整SQL更方便,適合大型資料庫。
無論哪種方式,都需要共同執行的前期工作:
- 在pom.xml中新增依賴庫。
<!-- 新增mybatis --> <dependency> <groupId>org.mybatis.spring.boot</groupId> <artifactId>mybatis-spring-boot-starter</artifactId> <version>1.3.2</version> </dependency> <!-- 新增mysql驅動 --> <dependency> <groupId>mysql</groupId> <artifactId>mysql-connector-java</artifactId> </dependency> - 在application.properites中新增配置項來配置資料庫。
spring.datasource.driverClassName = com.mysql.jdbc.Driver
spring.datasource.url = jdbc:mysql://localhost:3306/mytest?useUnicode=true&characterEncoding=utf-8
spring.datasource.username = root
spring.datasource.password = 123456
這些配置項的key都是固定的,只需要修改後面的值。
- 建立表對應的實體類Student。
import java.io.Serializable;

public class Student implements Serializable {
    private String id = "";
    private String name = "";
    private Integer age = 0;

    public String getId() {
        return id;
    }

    public void setId(String id) {
        this.id = id;
    }

    public String getName() {
        return name;
    }

    public void setName(String name) {
        this.name = name;
    }

    public Integer getAge() {
        return age;
    }

    public void setAge(Integer age) {
        this.age = age;
    }
}
-
註解方式
- 在src/main/java/com/template/dao資料夾下建立操作表用的mapper.java,其中引用了實體類Student。
import com.template.model.Student;
import org.apache.ibatis.annotations.*;

public interface StudentMapper {
    @Select("select * from student where id = ${id}")
    @Results({
            @Result(property = "id",  column = "id"),
            @Result(property = "name", column = "name"),
            @Result(property = "age", column = "age")
    })
    Student get(@Param("id") String id);
}
該mapper檔案是一個interface,每個介面都需要使用@Select /@Insert/@Update/@Delete等註解來新增SQL語句。對於需要返回值的,還要使用@Results來定義返回的資料。特別注意,要在程式入口檔案application類前添加註解:@MapperScan("com.template.dao")
這樣spring才會將該資料夾下的所有檔案掃描為mapper檔案,spring才會識別它們。
當然也可以在每個mapper檔案上方新增@Mapper註解,只是這樣就意味著每個mapper檔案都要新增一次,比較麻煩。
- 在需要的地方通過@Autowired引入mapper檔案,呼叫介面來操作資料表。
引入:
@Autowired
private StudentMapper studentMapper;
呼叫:
Student student = studentMapper.get("201802");
String name = student.getName();
Integer age = student.getAge();
-
xml配置方式
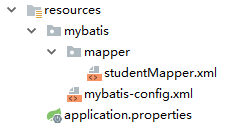
- 在src/main/java/resources/下新增一個mybatis資料夾,在其下新增一個mybatis-config.xml檔案,然後新增一個mapper資料夾,並在mapper資料夾下新增一個studentMapper.xml檔案。新增完成後,結構如下:

然後修改application.properties,新增:
mybatis.config-location = classpath:mybatis/mybatis-config.xml
mybatis.mapper-locations = classpath:mybatis/mapper/*.xml
這兩個配置項指定了剛才新增的mybatis-config.xml配置檔案以及mapper資料夾下所有的對映xml檔案。
- 開啟mybatis-config.xml,將內容修改為:
<?xml version="1.0" encoding="UTF-8" ?>
<!DOCTYPE configuration PUBLIC "-//mybatis.org//DTD Config 3.0//EN" "http://mybatis.org/dtd/mybatis-3-config.dtd">
<configuration>
    <typeAliases>
        <typeAlias alias="Integer" type="java.lang.Integer" />
        <typeAlias alias="Long" type="java.lang.Long" />
        <typeAlias alias="HashMap" type="java.util.HashMap" />
        <typeAlias alias="LinkedHashMap" type="java.util.LinkedHashMap" />
        <typeAlias alias="ArrayList" type="java.util.ArrayList" />
        <typeAlias alias="LinkedList" type="java.util.LinkedList" />
    </typeAliases>
</configuration>
這樣就為常用的資料型別定義了別名。
- 開啟mapper/studentMapper.xml,將內容修改為:
<?xml version="1.0" encoding="UTF-8" ?>
<!DOCTYPE mapper PUBLIC "-//mybatis.org//DTD Mapper 3.0//EN" "http://mybatis.org/dtd/mybatis-3-mapper.dtd" >
<mapper namespace="com.template.dao.StudentMapper">
    <resultMap id="BaseResultMap" type="com.template.model.Student">
        <result column="id" property="id" jdbcType="VARCHAR"/>
        <result column="name" property="name" jdbcType="VARCHAR"/>
        <result column="age" property="age" jdbcType="INTEGER"/>
    </resultMap>

    <sql id="Base_Column_List">
        id, name, age
    </sql>

    <select id="get" parameterType="java.lang.String" resultMap="BaseResultMap">
        SELECT
        <include refid="Base_Column_List"/>
        FROM student
        WHERE id = #{id}
    </select>
</mapper>
注意:
①namespace屬性必須與即將建立的mapper.java檔案路徑相同。 ②jdbcType務必確保正確,否則編譯錯誤。 - 在src/main/java/com/template/dao資料夾下建立操作表用的mapper.java,其中引用了實體類Student。
import com.template.model.Student;

public interface StudentMapper {
    Student get(String id);
}
可以看到相比於註解的方式,該方式的mapper檔案由於將SQL語句,引數,返回值等移到了上面3中的xml裡,因此更加簡潔。
同1,需要在程式入口檔案application類前添加註解:@MapperScan("com.template.dao")
- 在需要的地方通過@Autowired引入mapper檔案,呼叫介面來操作資料表。
引入:
@Autowired
private StudentMapper studentMapper;
呼叫:
Student student = studentMapper.get("201802");
String name = student.getName();
Integer age = student.getAge();
可見兩種方式的區別僅僅在於mapper的實現。最終的使用方式是相同的。
其他:
- xml檔案路徑問題
在properties配置檔案中,使用classpath來指定基礎路徑,也就是target/classes資料夾。就像上面引入mybiatis-config.xml時:
mybatis.config-location = classpath:mybatis/mybatis-config.xml
該路徑等同於:
target/classes/mybatis/mybatis-config.xml
spring-boot編譯後會將各種編譯和資原始檔放到classes資料夾下,程式實際執行需要從classes檔案下引用自己所需要的各種資源,例如xml檔案。spring-boot的classpath就是classes資料夾。
而針對於mapper,使用上面的配置,則java類放在:
src/main/java/com/template/dao
資料夾下,而配套的xml檔案放在:
src/main/resources/mybatis/mapper
資料夾下。
要新增一個數據庫操作,就必須同時修改這兩個檔案,而這兩個檔案的目錄相隔有點遠,來回切換並不是特別方便。因此希望可以將這兩個檔案的目錄放在一起,就像這樣:

然而,這樣放置,就是將xml檔案放在了src/main/java路徑下。存在的一個問題就是隻有java-resource型別資料夾才會將自身的子檔案複製到classes下。工程預設的java-resource型別資料夾只有一個,那就是src/main/resources。因此這樣放置xml,是不會被複制到classes資料夾下的。
解決的方法是將該資料夾設定為Resources型別資料夾。
可以使用修改iml檔案的方式,也可以使用 Resource Plugin:
在pom.xml中,<build>節點下新增一個新的resource路徑:
<build>
   <resources>
      <resource>
         <directory>src/main/java/com/template/mapper</directory>
         <targetPath>mapper</targetPath>
      </resource>
      <resource>
         <directory>src/main/resources</directory>
      </resource>
   </resources>
</build>
這樣,src/main/java/com/template/mapper這個目錄下的所有資源就會被複制到classes/mapper資料夾下,mapper路徑是<targetPath>設定的。然後修改application.properties檔案中mybatis.mapper-locations設定:
mybatis.mapper-locations = classpath: mapper/*.xml
即告訴工程說,去classes/mapper資料夾下取所有的xml檔案。
重新編譯,即可。
- 呼叫時提示Could not autowire問題
在呼叫時:
@Autowired
private StudentMapper studentMapper;
結果提示錯誤:
Could not autowire. No beans of 'StudentMapper' type found. more... (Ctrl+F1)
然而卻可以正常執行。
有兩種解決方案:
- 降低提示等級,從而看到的是低等級提示,不再是錯誤警告。
- 為IDEA安裝MyBatis plugin。
MyBatis plugin收費,推薦使用1。
