
Android UI繪製
基礎知識
measure
MeasureSpecs
MeasureSpecs維護一個int型(32bit)資料,其中2bit表示mode,30bit表示size
size = MeasureSpec.getSize(measureSpec)
mode = MeasureSpec.getMode(measureSpec)
measureSpec = MeasureSpec.makeMeasureSpec(size, mode)
getDefaultSize(size,measureSpec)//根據View預設大小size和父類measureSpec來測量當前View的大小
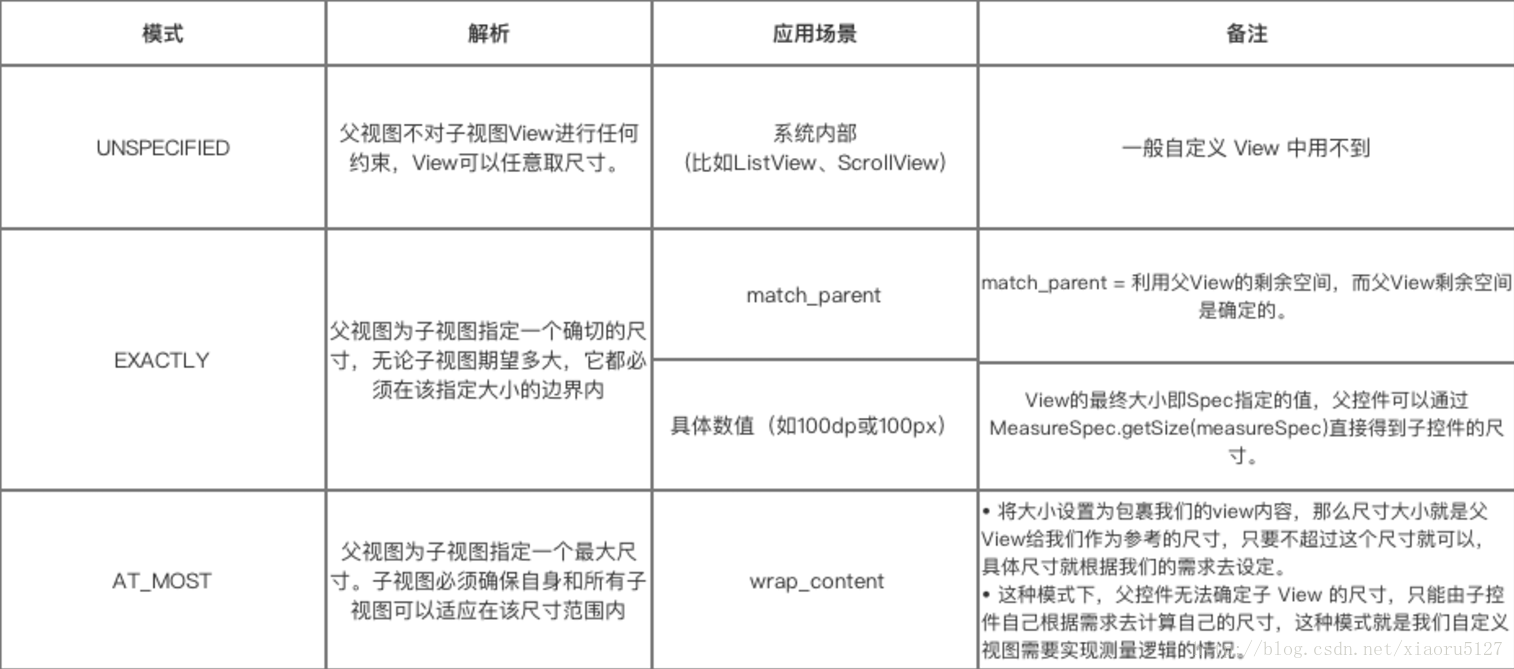
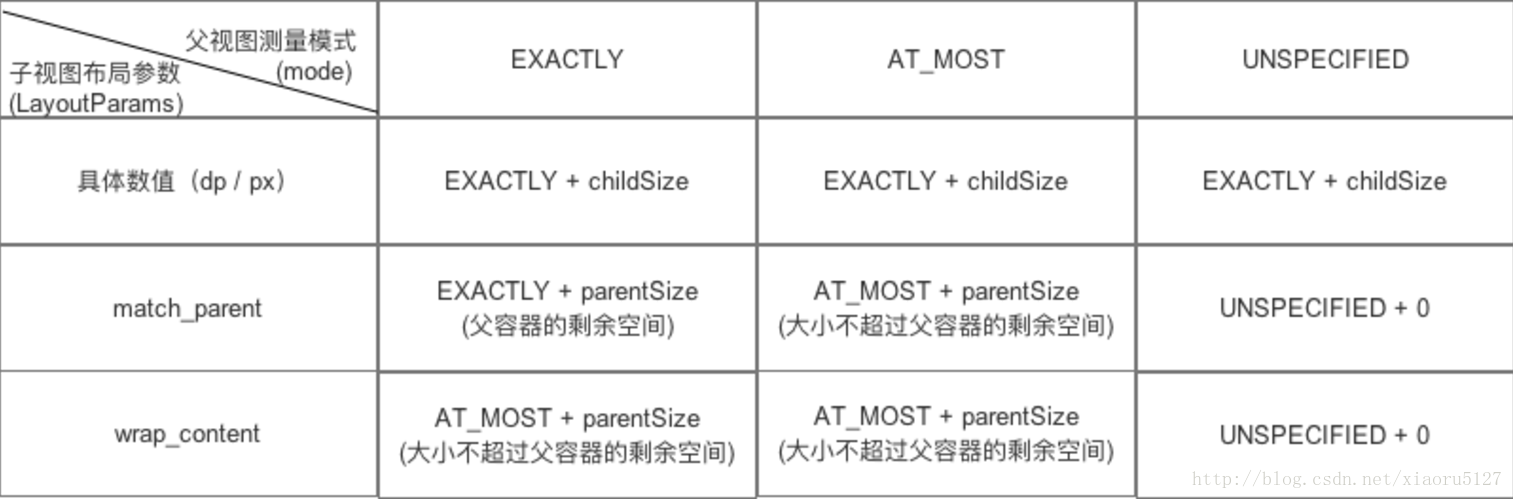
一個View的大小由父容器的MeasureSpec和自身的LayoutParams決定
測量過程
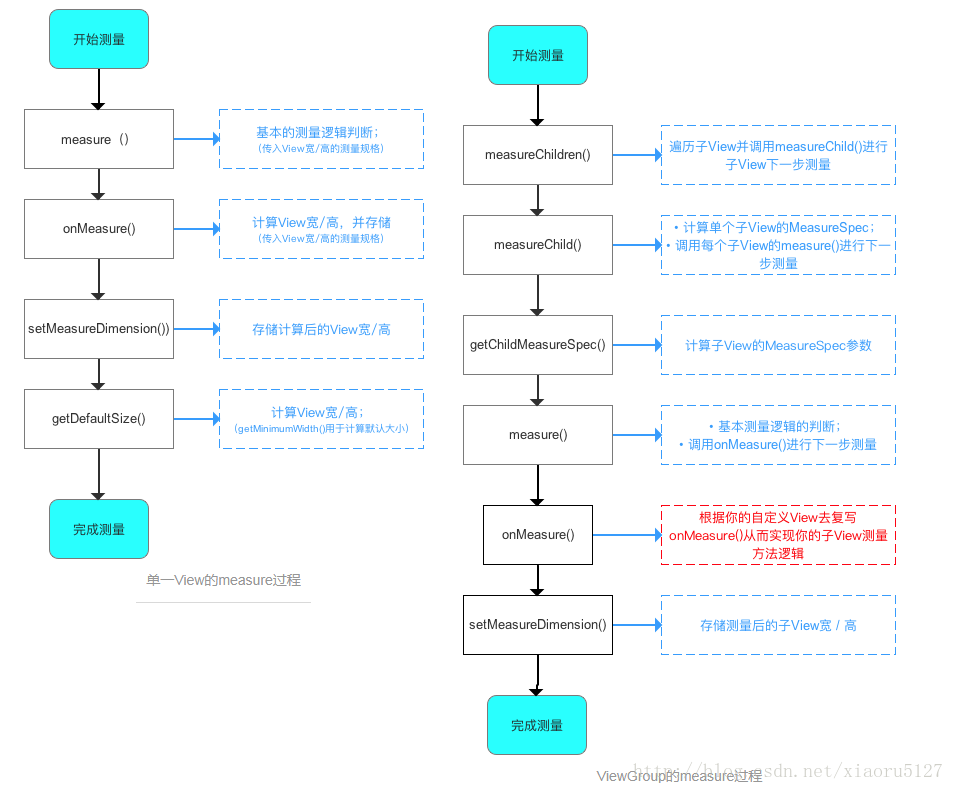
例子:修改ListView的onMeasure使得ListView完全展開
@Override
protected void onMeasure(int widthMeasureSpec, int heightMeasureSpec) {
    //int widthMeasureSpec, int heightMeasureSpec是父容器的測量spec,現將父容器的高度測量spec修改成足夠大,並且是AT_MOST模式,這樣子容器即ListView認為父容器有足夠大的空間就會將所有的內容完全展開了。
        heightMeasureSpec = MeasureSpec.makeMeasureSpec(Integer.MAX_VALUE >> 2, MeasureSpec.AT_MOST);
        super.onMeasure(widthMeasureSpec, heightMeasureSpec);
}
layout
view的layout過程:layout(確定自身的位置)->onLayout(空實現) ViewGroup的layout過程:layout(確定自身的位置)->onLayout(確定子控制元件的位置,這裡實現具體佈局,並且會遍歷子控制元件的layout對子控制元件執行layout) 例子:簡單實現一個類似LinearLayout的橫向佈局
public class CustomViewGroup extends ViewGroup {

    private final static String TAG = "CustomViewGroup";

    // view 的間隔
    private final static int VIEW_MARGIN = 0;

    public CustomViewGroup(Context context) {
        super(context);
    }

    // 重寫它的onMeasure() 在該方法中進行對子View的大小進行測量
    @Override
    protected void onMeasure(int widthMeasureSpec, int heightMeasureSpec) {
        for (int index = 0; index < getChildCount(); index++) {
            final View child = getChildAt(index);
            child.measure(MeasureSpec.UNSPECIFIED, MeasureSpec.UNSPECIFIED);
        }
        super.onMeasure(widthMeasureSpec, heightMeasureSpec);
    }

    // 重寫onLayout方法實現子View的定位
    @Override
    protected void onLayout(boolean changed, int l, int t, int r, int b) {
        final int count = getChildCount();
        int row = 0;
        //當前寬度
        int lengthX = l;
        //當前高度
        int lengthY = t;
        for (int i = 0; i < count; i++) {
            final View child = this.getChildAt(i);
            int width = child.getMeasuredWidth();
            int height = child.getMeasuredHeight();
            lengthX += width + VIEW_MARGIN;
            lengthY = row * (height + VIEW_MARGIN) + VIEW_MARGIN + height
                    + t;
            if (lengthX > r) {
                lengthX = width + VIEW_MARGIN + l;
                row++;
                lengthY = row * (height + VIEW_MARGIN) + VIEW_MARGIN + height
                        + t;
            }
            child.layout(lengthX - width, lengthY - height, lengthX, lengthY);
        }
    }
}
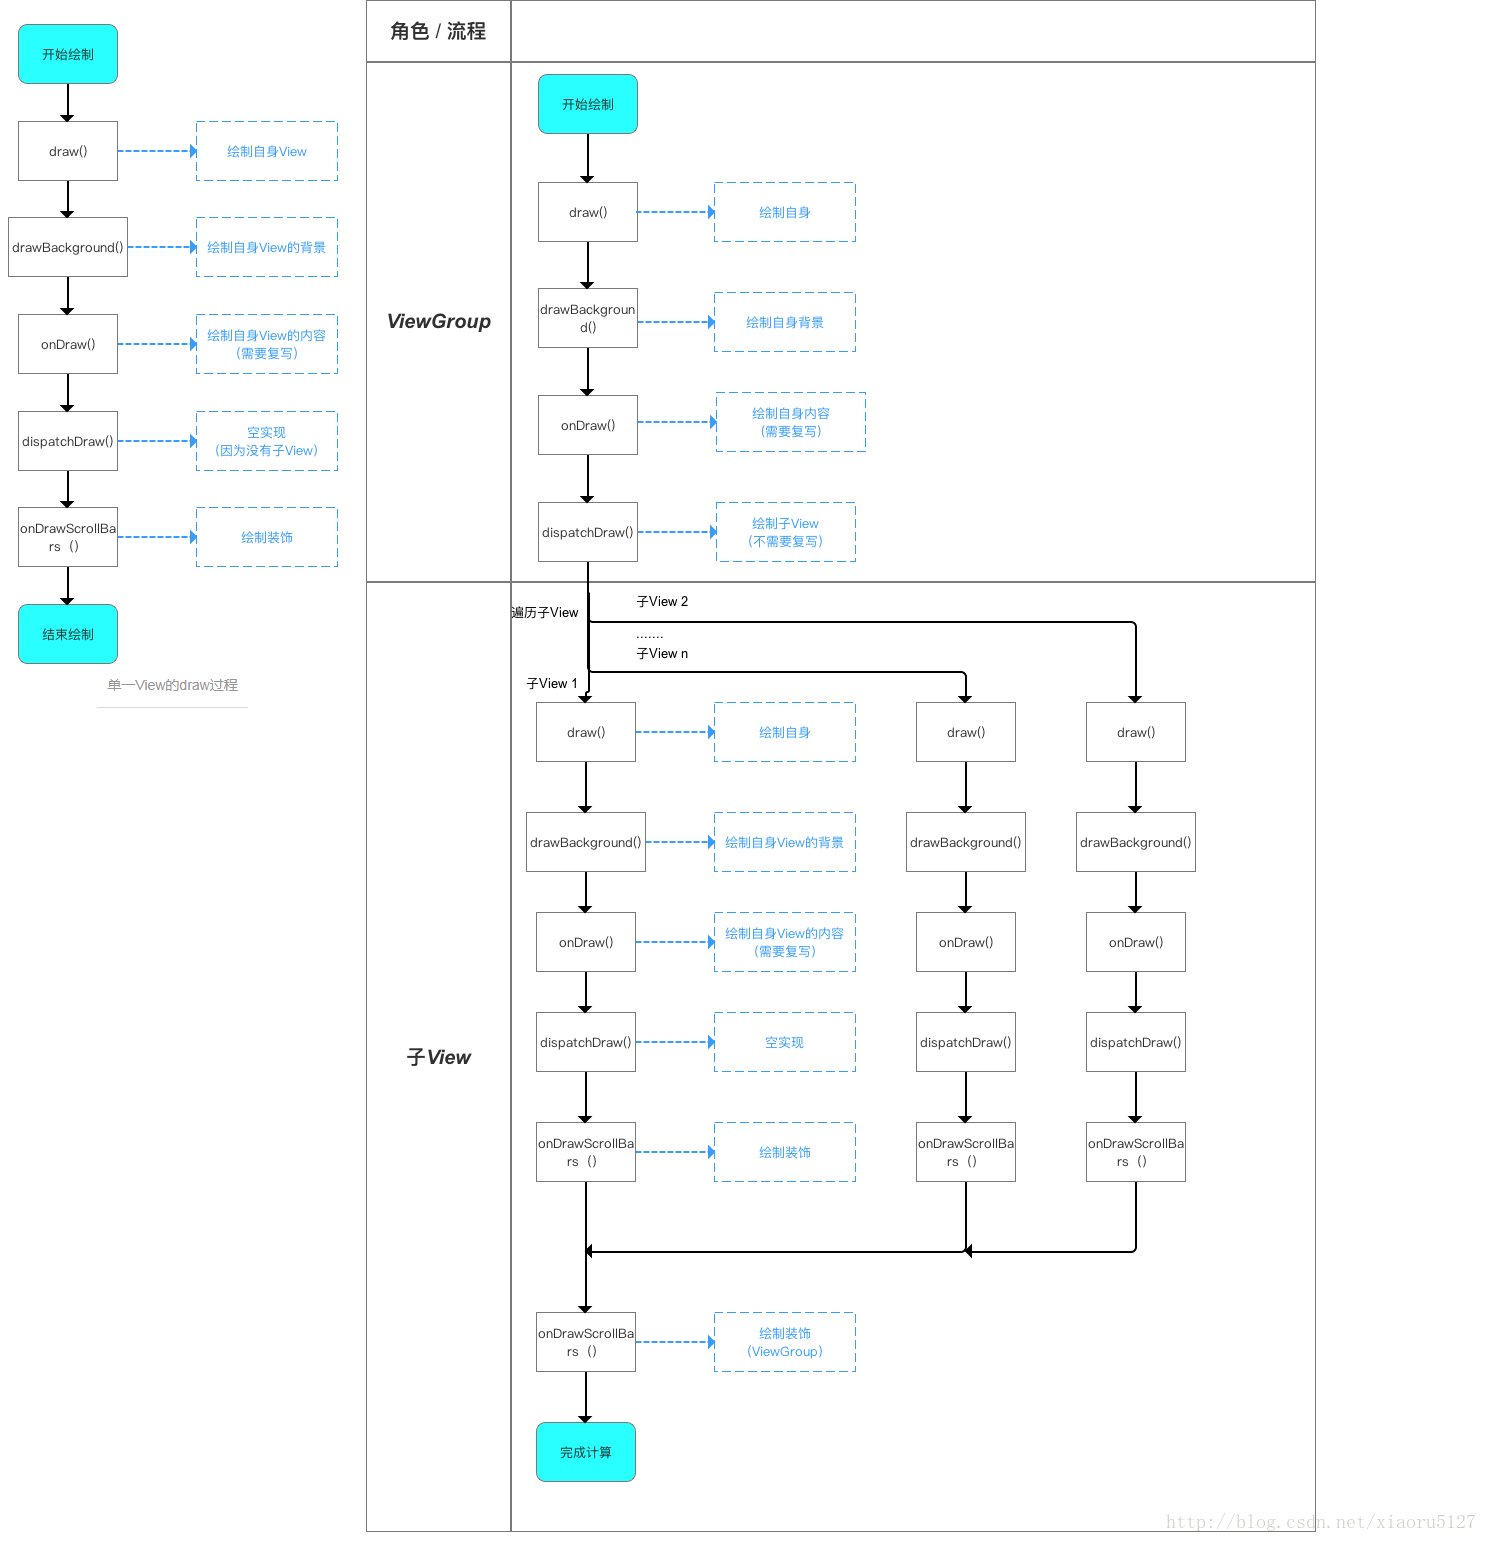
draw
自定義View的四種建構函式及常見函式
// 如果View是在Java程式碼裡面new的,則呼叫第一個建構函式
 public CarsonView(Context context) {
        super(context);
    }

// 如果View是在.xml裡宣告的,則呼叫第二個建構函式
// 自定義屬性是從AttributeSet引數傳進來的
    public  CarsonView(Context context, AttributeSet attrs) {
        super(context, attrs);
    }

// 不會自動呼叫
// 一般是在第二個建構函式裡主動呼叫
// 如View有style屬性時
    public  CarsonView(Context context, AttributeSet attrs, int defStyleAttr) {
        super(context, attrs, defStyleAttr);
    }

    //API21之後才使用
    // 不會自動呼叫
    // 一般是在第二個建構函式裡主動呼叫
    // 如View有style屬性時
    public  CarsonView(Context context, AttributeSet attrs, int defStyleAttr, int defStyleRes) {
        super(context, attrs, defStyleAttr, defStyleRes);
    }
view.getTop() 子View左上角距父View頂部的距離
view.getBottom() 子View右下角距父View頂部的距離
view.getLeft() 子View左上角距父View左側
view.getRight() 子View右下角距父View左側
event.getX()/event.getY() 觸控點相對於其所在元件座標系的座標
event.getRawX()/event.getRawY() 觸控點相對於螢幕預設座標系的座標
view的移動方式
layout offsetTopAndBottom、offsetLeftAndRight scrollTo、scrollBy LayoutParams Scroller
顏色

自定義屬性
在values目錄下建立自定義屬性的xml檔案attrs_circle_view.xml
<?xml version="1.0" encoding="utf-8"?>
<resources>
    <declare-styleable name="CircleView">
        <attr name="circle_color" format="color"/>
    </declare-styleable>
</resources>
常用單位format:color boolean dimension float integer string fraction(百分比) enum(eg:orientation,單選) flag(eg:adjustResize|adjustPan,多選)
佈局中進行設定
<?xml version="1.0" encoding="utf-8"?>
<RelativeLayout xmlns:android="http://schemas.android.com/apk/res/android"
    xmlns:app="http://schemas.android.com/apk/res-auto"
    >
    <scut.carson_ho.diy_view.CircleView
        app:circle_color="#FF4081"
         />
</RelativeLayout>
在程式碼中解析獲取
mColor = a.getColor(R.styleable.CircleView_circle_color,Color.RED);
或者 直接在xml中使用(這種方式屬性必須賦值否則會出錯)
<TextView
        android:id="@+id/dialog_loading_message"
        android:layout_width="wrap_content"
        android:layout_height="wrap_content"
        android:textColor="?attr/circle_color"/>
PS:還可以在lib中設定一個預設的style樣式,在View直接取過來用。業務層需要使用時只需寫一個同名的style則可覆蓋之,達到全域性修改樣式的效果。
其他小細節
- post替代handler,View的內部本身提供了post系列的方法,完全可以替代Handler的作用,使用起來更加方便、直接。
- onAttachedToWindow,呼叫的時機是當包含View的Activity啟動的時刻,適合啟動執行緒/動畫/註冊各種東東
- onDetachedFromWindow,呼叫的時機是當包含View的Activity退出或當前View被remove的時刻,適合結束執行緒/動畫/登出各種東東
幀動畫
<?xml version="1.0" encoding="utf-8"?>
<animation-list xmlns:android="http://schemas.android.com/apk/res/android">
    <item
        android:drawable="@drawable/a_0"
        android:duration="100" />
    <item
        android:drawable="@drawable/a_1"
        android:duration="100" />
    <item
        android:drawable="@drawable/a_2"
        android:duration="100" />
</animation-list>
同樣的也可用AnimationDrawable實現
補間動畫
平移動畫TranslateAnimation、縮放動畫ScaleAnimation、旋轉動畫RotateAnimatioin、透明度動畫AlphaAnimation 自定義動畫:通過矩陣變換來實現,可用來做3D動畫!繼承Animation,實現initialize(初始化工作)、applyTransFormation(動畫實現)即可。
常見屬性
- < translate> ■ 表示x的起始值 ■ 表示x的結束值 ■ 表示y的起始值 ■ 表示y的結束值
- < scale> ■ fromX 水平方向縮放起始值 ■ toX 水平方向縮放結束值 ■ fromY ■ toY ■ pivotX 縮放的軸點的x座標 ■ pivotY 縮放的軸點的y座標 ■ pivotXType x軸的所發模式,即中心點相對於哪個物體Animation.ABSOLUTE/RELATIVE_TO_SELF/RELATIVE_TO_PARENT ■ pivotYType y軸的所發模式
- < rotate> ■ fromeDegres旋轉開始的角度 ■ toDegrees ■ pivotX旋轉的軸點的x座標 ■ pivotY
- < alpha> ■ fromAlpha透明度起始值 ■ toAlpha透明度結束值
- 共有屬性 ■duration動畫持續時間 ■ fillAfter動畫結束後是否停留在結束位置
自定義補間動畫
public class MyAnimation extends Animation
{
    @Override
    protected void applyTransformation(float interpolatedTime,Transformation transformation){
    //interpolatedTime表示動畫的時間進行比,transformation表示補間動畫在不同時刻對View的變形程度
    }
}
佈局動畫LayoutAnimation
為容器型控制元件裡的子View設定動畫 LayoutAnimationController
xml實現
android:delay子類動畫時間間隔
android:animationOrder="random"   子類的顯示方式 normal預設random隨機reverse倒序
android:animation="@anim/slide_right" 表示孩子顯示時的具體動畫是什麼
組合動畫
AnimationSet
屬性動畫
ObjectAnimator
ObjectAnimator//
         .ofFloat(view, "rotationX", 0.0F, 360.0F)//
         .setDuration(500)//
         .start();
一次性修改多個屬性
PropertyValuesHolder pvhX = PropertyValuesHolder.ofFloat("alpha", 1f,
                0f, 1f);
PropertyValuesHolder pvhY = PropertyValuesHolder.ofFloat("scaleX", 1f,
                0, 1f);
PropertyValuesHolder pvhZ = PropertyValuesHolder.ofFloat("scaleY", 1f,
                0, 1f);
ObjectAnimator.ofPropertyValuesHolder(view, pvhX, pvhY,pvhZ).setDuration(1000).start();
ValueAnimator
ValueAnimator animator = ValueAnimator.ofFloat(0, mScreenHeight
                - mBlueBall.getHeight());
        animator.setTarget(mBlueBall);
        animator.setDuration(1000).start();
//      animator.setInterpolator(value)
        animator.addUpdateListener(new AnimatorUpdateListener()
        {
            @Override
            public void onAnimationUpdate(ValueAnimator animation)
            {
                mBlueBall.setTranslationY((Float) animation.getAnimatedValue());
            }
        });
常見屬性

Transtion 過度動畫
本質上過渡動畫也還是屬性動畫,只不過做了一層封裝,方便實現Activity和View的過渡效果
繪製輔助
Interpplator 插值器
- AccelerateDecelerateInterpolator:開始與結束時速度快,中間慢
- AccelerateInterpolator:開始慢然後加速
- CycleInterpolator:動畫迴圈播放特定的次數,速率改變沿著正弦曲線
- DecelerateInterpolator:開始速度快然後減速
- LinearInterpolator:均勻的改變速度
TypeEvaluator 型別估值,主要用於設定動畫操作屬性的值。設定 屬性值 從初始值過渡到結束值 的變化具體數值
- IntEvaluator Int型別估值器,返回int型別的屬性改變
- FloatEvaluator Float型別估值器,返回Float型別屬性改變
- ArgbEvaluator 顏色型別估值器
// 實現TypeEvaluator介面
public class PointEvaluator implements TypeEvaluator {
    // 複寫evaluate()在裡面寫入物件動畫過渡的邏輯
    @Override
    public Object evaluate(float fraction, Object startValue, Object endValue) {
        //fraction為插值器getInterpolation()的返回值,startValue/endValue為初始值/結束值
        // 將動畫初始值startValue 和 動畫結束值endValue 強制型別轉換成Point物件
        Point startPoint = (Point) startValue;
        Point endPoint = (Point) endValue;

        // 根據fraction來計算當前動畫的x和y的值
        float x = startPoint.getX() + fraction * (endPoint.getX() - startPoint.getX());
        float y = startPoint.getY() + fraction * (endPoint.getY() - startPoint.getY());

        // 將計算後的座標封裝到一個新的Point物件中並返回
        Point point = new Point(x, y);
        return point;
    }

}
Activity轉場動畫
overridePendingTransition