
springboot學習中------
springboot誕生背景
多年來,spring大量的xml配置和複雜的依賴一直困擾著java開發人員,Spring Boot是Spring社群釋出的一個開源專案,旨在幫助開發者快速並且更簡單的構建專案。
springboot是什麼
pring boot是由spring官方推出的一個新框架,對spring進行了高度封裝,是spring未來的發展方向。spring boot功用眾多,其中最主要的功能就是自動化配置,簡化開化。
為什麼使用springboot
1)獨立執行spring專案
spring boot可以以jar包形式獨立執行,執行一個spring boot專案只需要通過java -jar xx.jar來執行
2)內嵌servlet容器
Spring Boot可以選擇內嵌Tomcat、jetty,這樣我們無須以war包形式部署專案。
3)提供starter簡化Maven配置
spring提供了一系列的start pom來簡化Maven的依賴載入,
4)自動裝配Spring
SpringBoot會根據在類路徑中的jar包,類、為jar包裡面的類自動配置Bean,這樣會極大地減少我們要使用的配置。
如何建立springboot專案
(1)new project

(2)選擇專案的檔案結構及jdk版本

(3)選擇專案所需要的依賴

看下pom檔案
<?xml version="1.0" encoding="UTF-8"?>
<project xmlns="http://maven.apache.org/POM/4.0.0" xmlns:xsi="http://www.w3.org/2001/XMLSchema-instance"
         xsi:schemaLocation="http://maven.apache.org/POM/4.0.0 http://maven.apache.org/xsd/maven-4.0.0.xsd">
    <modelVersion>4.0.0</modelVersion>

    <groupId>com.zhangchao.springbootdemo</groupId>
    <artifactId>springbootdemo</artifactId>
    <version>0.0.1-SNAPSHOT</version>
    <packaging>jar</packaging>

    <name>springbootdemo</name>
    <description>Demo project for Spring Boot</description>

    <parent>
        <!--繼承spring boot的相關配置,主要用於依賴管理,自動配置,日誌和yaml.-->
        <groupId>org.springframework.boot</groupId>
        <artifactId>spring-boot-starter-parent</artifactId>
        <version>2.0.5.RELEASE</version>
        <relativePath/> <!-- lookup parent from repository -->
    </parent>

    <properties>
        <project.build.sourceEncoding>UTF-8</project.build.sourceEncoding>
        <project.reporting.outputEncoding>UTF-8</project.reporting.outputEncoding>
        <java.version>1.8</java.version>
    </properties>

    <dependencies>
        <!--代表一個spring boot模組,代表web模組,對全棧web開發的支援,包括內建的tomcat, spring-webmvc等。-->
        <dependency>
            <groupId>org.springframework.boot</groupId>
            <artifactId>spring-boot-starter-web</artifactId>
        </dependency>
        <!--jdbc支援-->
        <dependency>
            <groupId>org.springframework.boot</groupId>
            <artifactId>spring-boot-starter-jdbc</artifactId>
        </dependency>
        <!--aop的支援-->
        <dependency>
            <groupId>org.springframework.boot</groupId>
            <artifactId>spring-boot-starter-aop</artifactId>
        </dependency>
        <!--mySQL的支援-->
        <dependency>
            <groupId>mysql</groupId>
            <artifactId>mysql-connector-java</artifactId>
        </dependency>
        <!--mybatis支援-->
        <dependency>
            <groupId>org.mybatis.spring.boot</groupId>
            <artifactId>mybatis-spring-boot-starter</artifactId>
            <version>1.3.0</version>
        </dependency>
        <!--單元測試的支援-->
        <dependency>
            <groupId>org.springframework.boot</groupId>
            <artifactId>spring-boot-starter-test</artifactId>
            <scope>test</scope>
        </dependency>
        <!--熱部署的支援-->
        <dependency>
            <groupId>org.springframework.boot</groupId>
            <artifactId>spring-boot-devtools</artifactId>
            <optional>true</optional><!--表示兩個專案之間依賴不傳遞-->
        </dependency>
        <!--thymeleaf支援,預設的模板對映路徑是:src/main/resources/templates-->
        <dependency>
            <groupId>org.springframework.boot</groupId>
            <artifactId>spring-boot-thymeleaf</artifactId>
        </dependency>
    </dependencies>

    <build>
        <plugins>
            <!--預設情況下,maven打包生成的jar檔案是用來給其他專案依賴用的,是無法直接執行的。
            spring boot根據自生需要,提供了一個外掛來生成可執行jar檔案。我們只需要在自己專案的pom.xml中宣告這個外掛,就會生效
            執行過mvn package打包命令後,target目錄會生成*.jar,和*.jar.original
            .jar.original檔案僅僅只有原始碼,就是maven原版打包的內容
            jar檔案是內建了tomcat和spring boot環境,可以直接執行的。在dos命令中,進入jar包所在的路徑,執行如下命令: java -jar module-1.0.jar
            -->
            <plugin>
                <groupId>org.springframework.boot</groupId>
                <artifactId>spring-boot-maven-plugin</artifactId>
            </plugin>
        </plugins>
    </build>


</project>
支援熱部署配置
1.pom依賴
<!--熱部署的支援-->
<dependency>
    <groupId>org.springframework.boot</groupId>
    <artifactId>spring-boot-devtools</artifactId>
    <optional>true</optional><!--表示兩個專案之間依賴不傳遞-->
</dependency>
2. 在application.yml檔案中新增spring:devtools:restart:enabled:true

或者 application.properties 中新增spring.devtools.restart.enabled=true
![]()
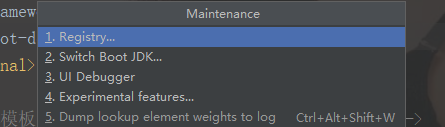
3. 按快捷鍵:crtl+alt+shift+/,找到Registry,點選進入:勾選compiler.automake.allow.when.app.running,點選close,關閉。

4. 點選File->Setting->Build,Execution,Deployment->Compiler,在右側勾選Bulid project automatically,點選Apply,點選Ok關閉。

先看下目錄結構

- SpringbootdemoApplication 該類在啟動的時候會預設掃描它的同級目錄和子目錄。
-
Application.properties是springboot工程的核心配置檔案
- static目錄用來存放網站的靜態資源,例如js,css,圖片等內容。
- Templates目錄用來存放網站的模板檔案,例如freemaker,thymeleaf等
springboot中預設靜態資源對映
Spring Boot 預設將 /** 所有訪問對映到以下目錄:
classpath:/static
classpath:/public
classpath:/resources
classpath:/META-INF/resources
自定義靜態資源對映
在application.properties配置
spring.mvc.static-path-pattern=/static/**
springboot的特點
- springboot是建立在spring之上的,或者說是以spring為基礎的。例如Springboot2.0是以spring5.x為基礎的。內建tomcat版本為8.5.
- springboot遵循的原則是“約定大於配置”。例如:工程的目錄結構,配置檔案的名稱,配置檔案中的鍵值對....
- 開箱即用,內建了很多元件,只需要進入相應的依賴即可。例如:使用web元件只需要引入spring-boot-starter-web那麼springmvc中的註解requestmapping等、內建web容器就自動新增好了。
- 自動配置,例如我們的tomcat,事務,mybatis等自動配置。
- 完全相容spring,即spring支援的,它就支援。
預設生成的專案啟動類
/**
 * 專案啟動類
 */
@SpringBootApplication  //@SpringBootApplication是一個組合註解
public class SpringbootdemoApplication {

    public static void main(String[] args) {
        SpringApplication.run(SpringbootdemoApplication.class, args);
    }
}
下面看看這個組合註解
@Target({ElementType.TYPE})
@Retention(RetentionPolicy.RUNTIME)
@Documented
@Inherited
@SpringBootConfiguration
@EnableAutoConfiguration
@ComponentScan(
    excludeFilters = {
        @Filter(
            type = FilterType.CUSTOM,
            classes = {TypeExcludeFilter.class}
        ), @Filter(
            type = FilterType.CUSTOM,
            classes = {AutoConfigurationExcludeFilter.class}
        )
    }
)
public @interface SpringBootApplication {

//前四個註解:是元註解,用來修飾當前註解,就像public類的修飾詞,沒有實際功能
//@SpringBootConfiguration:當前類是一個配置類,就像xml配置檔案
//@EnableAutoConfiguration:這就是spring boot的核心功能,自動配置。就是根據當前引入的JAR包進行自動配置,比如:
        //引入了spring boot的web模組,就會自動配置web.xml等與web專案相關的內容,所以這些配置都不需要我們自己配了
//@ComponentScan:用註解配置實現自動掃描,預設會掃描當前包和所有子包,和xml配置自動掃描效果一樣,@Filter是排除了兩個系統類
執行專案啟動類

說下springboot中其中一個註解 RestController,他是ResponseBody和@Controller的組合
springMVC開發的時候需要我們提供json介面的時候需要
(1)新增jackson等相關的jar包
(2)配置spring controller掃描
(3)對接的方法新增@ResponseBody註解

然而springboot,只需要類新增@RestCOntroller即可,預設類的方法都會以json的格式返回。

同時springboot也簡化了@RequestMapping註解


springboot中使用事務支援
- 加入JDBC依賴,此時就可以自動的配置上述XML中的TrasactionManager物件
- 在需要的方法上使用@Trasactional註解
- spring boot同樣自動配置好了事務,在service層 只需要一個註解即可使用,例子:
dao層
@Repository
public interface UserDao {

    List<User> getUser();

    Integer addUser(User user);

    Integer addUserClass(UserClass userClass);

}
mapping
 <insert id="addUser" parameterType="user">
        <selectKey resultType="integer" order="AFTER" keyProperty="id">
          select last_insert_id()
        </selectKey>
        insert into user(<include refid="insertSql"></include>) values(
          #{username},#{password},#{age},#{job}
        )
    </insert>

    <insert id="addUserClass" parameterType="userClass">
        insert into user_class (<include refid="insertSql2"></include>) values(
          #{id},#{uid},#{className}
        )
    </insert>
service層
public interface UserService {

    List<User> getUser();

    Integer addUserAndUserClass(User user, UserClass userClass);

}
service實現層
   /**
     *  Transactional 宣告在類上面:類的所有方法有效,宣告在方法上面:該方法有效
     * @param user
     * @param userClass
     * @return
     */
    @Transactional
    @Override
    public Integer addUserAndUserClass(User user, UserClass userClass) {
        userDao.addUser(user);
//        userClass.setUid(user.getId()); //測試事務,發生異常時,是否會回滾
        Integer row = userDao.addUserClass(userClass);
        System.out.println(row+"=================");
        return row;
    }
事務test類
@RunWith(SpringRunner.class)
@MapperScan("com.zhangchao.springboot.dao") //必須掃描dao層
@SpringBootTest
public class SpringbootdemoApplicationTests {
    @Autowired
    private UserService userService;

    /**
     * 測試springboot事務,如果serviceImp中userClass有id,則正常執行,若沒有,則發生異常,
     *  serviceImp中兩個方法都不執行
     */
    @Test
    public void addUserAndUserClass() {
        User user = new User();
        user.setAge(33);
        user.setJob("學生");
        user.setUsername("wangba");
        user.setPassword("admin");

        UserClass userClass = new UserClass();
        userClass.setClassName("八班");

        userService.addUserAndUserClass(user,userClass);

    }

}
在springboot中使用日誌
1.日誌的級別
debug-info-warn-error
2.日誌的級別越低則輸出的內容越多,越詳細。
3.通過配置使用slf4j日誌
在application.properties檔案中通過設定以下鍵值對來配置日誌:
logging.level.org.springframework=debug
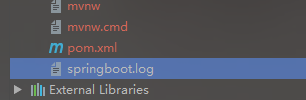
logging.file=springboot.log
springboot會根據配置,每天生產一個log檔案,如果配置了檔案大的最大尺寸則滿足最大尺寸的時候會再次生成一個新的log檔案,如圖:
例子:controller層
@RestController   //頁面資料以json格式輸出,如下個方法,以及下面圖片
@RequestMapping("/user")
public class UserController {

    private static org.slf4j.Logger Logger =  LoggerFactory.getLogger(UserController.class);
    @Resource
    private UserService userService;

    @RequestMapping("/getUser")
    public List<User> getUser(){
        List<User> user = userService.getUser();

        for (User user1 : user) {
            System.out.println(user1);
            // 測試springboot日誌功能
            Logger.error("=========="+user1);
        }
        return user;
    }
}


預設異常處理
Spring Boot提供了一個預設的對映:/error,當處理中丟擲異常之後,會轉到該請求中處理,並且該請求有一個全域性的錯誤頁面用來展示異常內容。

springboot定時任務
1、啟動類啟用定時
在啟動類上面加上@EnableScheduling即可開啟定時
/**
 * 專案啟動類
 */
@ServletComponentScan //掃描servlet註解
@EnableScheduling //開啟spring定時任務
@MapperScan(basePackages = "com.zhangchao.springboot.dao")//mybatis註解,掃描mapper介面檔案
@SpringBootApplication
public class SpringbootdemoApplication {

    public static void main(String[] args) {
        SpringApplication.run(SpringbootdemoApplication.class, args);
    }
}
2、建立定時任務實現類
@Component
public class SchedulerTask {

    private AtomicInteger num = new AtomicInteger(0);
    private SimpleDateFormat format = new SimpleDateFormat("yyyy-MM--dd HH:mm:ss");

    /**
     * corn表示式 6s一次
     */
    @Scheduled(cron = "*/6 * * * * ?")
    private void countNum(){
        System.out.println("定時任務觸發次數 "+num.getAndIncrement());
    }
    /**
     *  6s一次
     */
    @Scheduled(fixedRate = 6000)
    private void currentTime(){
        System.out.println("定時任務當前時間: "+format.format(new Date()));
    }

}執行專案啟動類結果:

- @Scheduled(fixedRate = 6000) :上一次開始執行時間點之後6秒再執行;
- @Scheduled(fixedDelay = 6000) :上一次執行完畢時間點之後6秒再執行;
- @Scheduled(initialDelay=1000, fixedRate=6000) :第一次延遲1秒後執行,之後按fixedRate的規則每6秒執行一次。
springboot 配置AOP切面
1、新增依賴
<dependency>
    <groupId>org.springframework.boot</groupId>
    <artifactId>spring-boot-starter-aop</artifactId>
</dependency>
2、切面類 ,使用 @Component,@Aspect 標記到切面類上:
@Component
@Aspect
public class TimeAspect {
    @Around("execution(* com.zhangchao.springboot.controller..*(..))")
    public Object timeMethod(ProceedingJoinPoint joinPoint) throws Throwable{
        System.out.println("===========================Aspect處理 - start ==========================");
        Object[] args = joinPoint.getArgs();
        for (Object arg : args) {
            System.out.println("引數: "+arg);
        }
        long startTime = System.currentTimeMillis();
        Object o = joinPoint.proceed();
        System.out.println("aop耗時 "+(System.currentTimeMillis()-startTime));
        System.out.println("===========================Aspect處理 - end =============================");
        return o;
    }

}

springboot專案新增webapp

獲取配置檔案的引數值
application.properties
user.id=${random.int}
user.username=qixing${random.value}
user.pwd=admin${random.uuid}
user.age=user.age=${random.int[10,100]}
user.job=教師
User類,省略getset
@Component
@ConfigurationProperties(prefix = "user")
public class User {

    private Integer id;
    private Integer age;
    private String username;
    /**
     *  當配置檔案中屬性名與實體類屬性名有區別時,使用@value
     */
    @Value("${user.pwd}")
    private String password;
    private String job;
測試
package com.zhangchao.springboot.commandLineRunner;

import com.zhangchao.springboot.entity.User;
import org.springframework.beans.factory.annotation.Autowired;
import org.springframework.boot.ApplicationArguments;
import org.springframework.boot.ApplicationRunner;
import org.springframework.stereotype.Component;

/**
 * 〈CommandLineRunner和ApplicationRunner〉
 *
 *  容器啟動完成時執行run方法中內容
 *  注意新增 @Component
 *
 *  獲取 application-dev.properties 中user配置的屬性
 * @author 22902
 * @create 2018/11/15
 */
/*@Component
public class TestCommandLineRunner implements CommandLineRunner {
    @Autowired
    private User user;
    @Override
    public void run(String... args) throws Exception {
        System.out.println(user.toString());
    }
}*/
@Component
public class TestCommandLineRunner implements ApplicationRunner {
    @Autowired
    private User user;

    @Override
    public void run(ApplicationArguments args) throws Exception {
        System.out.println(user.toString());
    }

}
輸出
User{id=1250477733age=30, username='qixing74e3c8284d60295d05e46bd55aae83a6', password='admin3304d20a-6818-4451-99f5-882381f60912', job='教師'}random.* 屬性
Spring Boot 通過 RandomValuePropertySource 提供了很多關於隨機數的工具類。
可以生成隨機字串、隨機 int 、隨機 long、某範圍的隨機數。
多環境配置
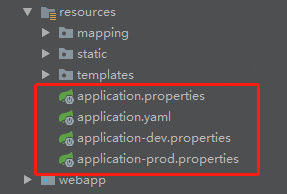
Spring Boot 是通過 application.properties 檔案中,設定 spring.profiles.active 屬性,比如 ,配置了 dev ,則載入的是 application-dev.properties ,必須是這種格式 application-xxxx.properties
# 定義讀取的properties檔案
spring.profiles.active=dev
# 定義讀取的properties檔案,可以多個,逗號隔開
#spring.profiles.include=dev,prod