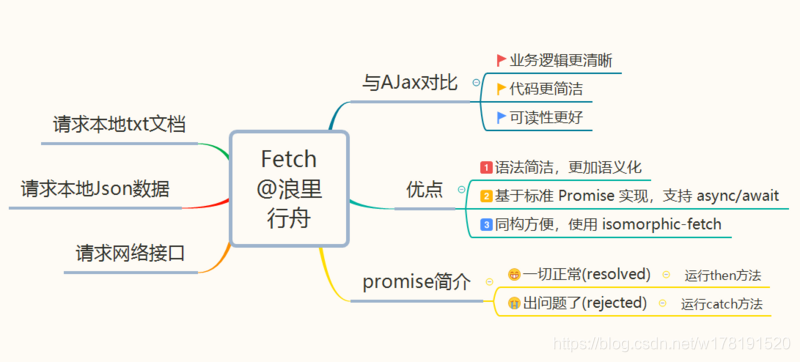
fetch 如何請求資料
一 序言
在 傳統Ajax 時代,進行 API 等網路請求都是通過XMLHttpRequest或者封裝後的框架進行網路請求,然而配置和呼叫方式非常混亂,對於剛入門的新手並不友好。今天我們介紹的Fetch提供了一個更好的替代方法,它不僅提供了一種簡單,合乎邏輯的方式來跨網路非同步獲取資源,而且可以很容易地被其他技術使用,例如 Service Workers。
本文首發地址為GitHub部落格,寫文章不易,請多多支援與關注!

二 與Ajax對比
使用Ajax請求一個 JSON 資料一般是這樣:
var xhr = new XMLHttpRequest();
xhr.open('GET', url/file,true);
xhr.onreadystatechange = function() {
   if(xhr.readyState==4){
        if(xhr.status==200){
            var data=xhr.responseText;
             console.log(data);
   }
};
xhr.onerror = function() {
  console.log("Oh, error");
};
xhr.send();
同樣我們使用fetch請求JSON資料:
fetch(url).then(response => response.json())//解析為可讀資料
  .then(data => console.log(data))//執行結果是 resolve就呼叫then方法
  .catch(err => console.log("Oh, error", err))//執行結果是 reject就呼叫catch方法
從兩者對比來看,fetch程式碼精簡許多,業務邏輯更清晰明瞭,使得程式碼易於維護,可讀性更高。
總而言之,Fetch 優點主要有:
1. 語法簡潔,更加語義化,業務邏輯更清晰
2. 基於標準 Promise 實現,支援 async/await
3. 同構方便,使用isomorphic-fetch
三 Promise簡介
由於 Fetch API 是基於 Promise 設計,接下來我們簡單介紹下Promise工作流程,方便大家更好理解Fetch。

fetch方法返回一個Promise物件, 根據 Promise Api 的特性, fetch可以方便地使用then方法將各個處理邏輯串起來, 使用 Promise.resolve() 或 Promise.reject() 方法將分別返會肯定結果的Promise或否定結果的Promise, 從而呼叫下一個then 或者 catch。一旦then中的語句出現錯誤, 也將跳到catch中。
四 請求常見資料格式
接下來將介紹如何使用fetch請求本地文字資料,請求本地JSON資料以及請求網路介面。其實操作相比與Ajax,簡單很多!
//HTML部分
  <div class="container">
    <h1>Fetch Api sandbox</h1>
    <button id="button1">請求本地文字資料</button>
    <button id="button2">請求本地json資料</button>
    <button id="button3">請求網路介面</button>
    <br><br>
    <div id="output"></div>
  </div>
  <script src="app.js"></script>
1.fetch請求本地文字資料
本地有一個test.txt文件,通過以下程式碼就可以獲取其中的資料,並且顯示在頁面上。
document.getElementById('button1').addEventListener('click',getText);
function getText(){
  fetch("test.txt")
      .then((res) => res.text())//注意:此處是res.text()
      .then(data => {
        console.log(data);
        document.getElementById('output').innerHTML = data;
      })
      .catch(err => console.log(err));
}
2.fetch請求本地JSON資料
本地有個posts.json資料,與請求本地文字不同的是,得到資料後還要用forEach遍歷,最後呈現在頁面上。
document.getElementById('button2').addEventListener('click',getJson);
function getJson(){
  fetch("posts.json")
      .then((res) => res.json())
      .then(data => {
        console.log(data);
        let output = '';
        data.forEach((post) => {
          output += `<li>${post.title}</li>`;
        })
        document.getElementById('output').innerHTML = output;
      })
      .catch(err => console.log(err));
}
3.fetch請求網路介面
獲取https://api.github.com/users中的資料,做法與獲取本地JSON的方法類似,得到資料後,同樣要經過處理
document.getElementById('button3').addEventListener('click',getExternal);
function getExternal(){
  // https://api.github.com/users
  fetch("https://api.github.com/users")
      .then((res) => res.json())
      .then(data => {
        console.log(data);
        let output = '';
        data.forEach((user) => {
          output += `<li>${user.login}</li>`;
        })
        document.getElementById('output').innerHTML = output;
      })
      .catch(err => console.log(err));
}
