Tensorflow object detection API 訓練自己的資料集
環境:win10
Anaconda3 tensorflow 1.9.0
上篇運行了demo之後,打算訓練自己的資料集,但是沒有完全成功,不過反覆弄了好幾次後,這些步驟還是熟了的,把遇到的問題也貼出來,有人會的話幫我解答下
一、準備資料集
資料集用 LabelImg 標註會會生成相應的xml檔案,具體不在詳述,我是直接找了之前用過的一個車的資料集(300張做訓練集,60張做測試集),但是這裡除了原圖跟xml檔案外,還需要.cvs和.record檔案,生成這兩個檔案的python程式碼如下(參考的博主有提供,這裡我做個簡單的註釋,不懂可以問)
注:.cvs和.record檔案這兩個檔案訓練集train和測試集test都需要有,所以下面的程式碼裡修改資料集路徑就可以成相應的檔案啦,也就是這些python指令碼分別要操作訓練集跟測試集,最後生成4個檔案
1.生成.cvs檔案python指令碼
#生成.cvs檔案pyhon指令碼
# -*- coding: utf-8 -*-
"""
Created on Tue Jan 16 00:52:02 2018
@author: Xiang Guo  #博主,感謝
將資料夾內所有XML檔案的資訊記錄到CSV檔案中
"""

import os
import glob
import pandas as pd
import xml.etree.ElementTree as ET

os.chdir('D:\\RaniFile\\CarModelYHQ\\test')  #資料集路徑
path = 'D:\\RaniFile\\CarModelYHQ\\test'     #生成的.cvs檔案路徑

def xml_to_csv(path):
    xml_list = []
    for xml_file in glob.glob(path + '/*.xml'):
        tree = ET.parse(xml_file)
        root = tree.getroot()
        for member in root.findall('object'):
            value = (root.find('filename').text,
                     int(root.find('size')[0].text),
                     int(root.find('size')[1].text),
                     member[0].text,
                     int(member[4][0].text),
                     int(member[4][1].text),
                     int(member[4][2].text),
                     int(member[4][3].text)
                     )
            xml_list.append(value)
    column_name = ['filename', 'width', 'height', 'class', 'xmin', 'ymin', 'xmax', 'ymax']
    xml_df = pd.DataFrame(xml_list, columns=column_name)
    return xml_df


def main():
    image_path = path
    xml_df = xml_to_csv(image_path)
    xml_df.to_csv('tv_vehicle_labels.csv', index=None)  #第一個引數是生成的檔名
    print('Successfully converted xml to csv.')


main()
2.生成.recored檔案python指令碼
程式碼裡原博主非常用心的寫了使用方法,我在這裡在說一下吧
##  --csv_input=引數表示.cvs路徑及檔名 --output_path=引數表示生成的檔名
##
python generate_tfrecord.py --csv_input=data/tv_vehicle_labels.csv  --output_path=train.record

  python generate_tfrecord.py --csv_input=data/test_labels.csv  --output_path=test.record
#生成.recored檔案python指令碼 # -*- coding: utf-8 -*- """ Created on Tue Jan 16 01:04:55 2018 @author: Xiang Guo 由CSV檔案生成TFRecord檔案 """ """ Usage: # From tensorflow/models/ # Create train data: python generate_tfrecord.py --csv_input=data/tv_vehicle_labels.csv --output_path=train.record # Create test data: python generate_tfrecord.py --csv_input=data/test_labels.csv --output_path=test.record """ import os import io import pandas as pd import tensorflow as tf from PIL import Image from object_detection.utils import dataset_util from collections import namedtuple, OrderedDict os.chdir('D:\\RaniFile\\myproject\\tensorflow\\models\\research\\object_detection') #這個跟路徑下面會用到還會再接一段,包括執行時候引數的路徑的路徑也是接著這個 flags = tf.app.flags flags.DEFINE_string('csv_input', '', 'Path to the CSV input') flags.DEFINE_string('output_path', '', 'Path to output TFRecord') FLAGS = flags.FLAGS # TO-DO replace this with label map #注意將對應的label改成自己的類別!!!!!!!!!! def class_text_to_int(row_label): if row_label == 'sedan': return 1 elif row_label == 'van': return 2 elif row_label == 'SUV': return 3 elif row_label == 'truck': return 4 elif row_label == 'minibus': return 5 elif row_label == 'hatchback': return 6 elif row_label == 'tricycle': return 7 elif row_label == 'bus': return 8 else: 0 def split(df, group): data = namedtuple('data', ['filename', 'object']) gb = df.groupby(group) return [data(filename, gb.get_group(x)) for filename, x in zip(gb.groups.keys(), gb.groups)] def create_tf_example(group, path): with tf.gfile.GFile(os.path.join(path, '{}'.format(group.filename)), 'rb') as fid: encoded_jpg = fid.read() encoded_jpg_io = io.BytesIO(encoded_jpg) image = Image.open(encoded_jpg_io) width, height = image.size filename = group.filename.encode('utf8') image_format = b'jpg' xmins = [] xmaxs = [] ymins = [] ymaxs = [] classes_text = [] classes = [] for index, row in group.object.iterrows(): xmins.append(row['xmin'] / width) xmaxs.append(row['xmax'] / width) ymins.append(row['ymin'] / height) ymaxs.append(row['ymax'] / height) classes_text.append(row['class'].encode('utf8')) classes.append(class_text_to_int(row['class'])) tf_example = tf.train.Example(features=tf.train.Features(feature={ 'image/height': dataset_util.int64_feature(height), 'image/width': dataset_util.int64_feature(width), 'image/filename': dataset_util.bytes_feature(filename), 'image/source_id': dataset_util.bytes_feature(filename), 'image/encoded': dataset_util.bytes_feature(encoded_jpg), 'image/format': dataset_util.bytes_feature(image_format), 'image/object/bbox/xmin': dataset_util.float_list_feature(xmins), 'image/object/bbox/xmax': dataset_util.float_list_feature(xmaxs), 'image/object/bbox/ymin': dataset_util.float_list_feature(ymins), 'image/object/bbox/ymax': dataset_util.float_list_feature(ymaxs), 'image/object/class/text': dataset_util.bytes_list_feature(classes_text), 'image/object/class/label': dataset_util.int64_list_feature(classes), })) return tf_example def main(_): writer = tf.python_io.TFRecordWriter(FLAGS.output_path) path = os.path.join(os.getcwd(), 'myimages\\test') #第二個引數,這個原圖路徑接著前面那個註釋的路徑的 examples = pd.read_csv(FLAGS.csv_input) grouped = split(examples, 'filename') for group in grouped: tf_example = create_tf_example(group, path) writer.write(tf_example.SerializeToString()) writer.close() output_path = os.path.join(os.getcwd(), FLAGS.output_path) print('Successfully created the TFRecords: {}'.format(output_path)) if __name__ == '__main__': tf.app.run()
這裡面的路徑如果有點糾結理不清地話,可以先是這執行下,找不到會報錯,然後慢慢改。。。我就是這樣的,其實python程式碼仔細看看也不難理解
3.建一個.pbtxt檔案,裡面寫類別,我的檔名是tv_vehicle_detection.pbtxt
#這個id跟name,要跟上不一個生成.record腳本里面的那個類別一致
item {
  id: 1
  name: 'sedan'
}
...
...

item {
  id: 8
  name: 'bus'
}
好了資料集的準備到此就做完了
二、配置檔案與模型
先列一下資料夾,這些檔案都是 object_detection這個資料夾下,相信執行過demo的同學對這個檔案的位置應該很熟悉了
-mydata/
--test_labels.csv    #這些檔案都在上一步準備好了
--test.record
--train_labels.csv
--train.record
--tv_vehicle_detection.pbtxt


-myimages/
--test/             #測試集圖片
---testingimages.jpg
--train/            #訓練集圖片
---testingimages.jpg


-mytraining
接下來要配置模型檔案了
1.下載所需預訓練模型COCO-trained models
我用的是ssd_mobilenet_v1_coco_2018_01_28.tar.gz所以下面配置都以它為例講,下載下來後解壓就行
2.把裡面的model.ckpt、model.ckpt.data-00000-of-00001、model.ckpt.index這三個檔案都放到mydata資料夾下
3.把pipeline.config檔案放到mytraining資料夾下,裡面一些引數要配置(之後有時間仔細讀下這個配置檔案,寫個註釋吧)
model {
  ssd {
    num_classes: 8    #類別個數,我的標籤一共是有8類
    image_resizer {
      fixed_shape_resizer {
        height: 300
        width: 300
      }
    }
    feature_extractor {
      type: "ssd_mobilenet_v1"  #模型名稱
      depth_multiplier: 1.0
      min_depth: 16
      conv_hyperparams {
        regularizer {
          l2_regularizer {
            weight: 3.99999989895e-05
          }
        }
        initializer {
          truncated_normal_initializer {
            mean: 0.0
            stddev: 0.0299999993294
          }
        }
        activation: RELU_6
        batch_norm {
          decay: 0.999700009823
          center: true
          scale: true
          epsilon: 0.0010000000475
          train: true
        }
      }
    }
    box_coder {
      faster_rcnn_box_coder {
        y_scale: 10.0
        x_scale: 10.0
        height_scale: 5.0
        width_scale: 5.0
      }
    }
    matcher {
      argmax_matcher {
        matched_threshold: 0.5
        unmatched_threshold: 0.5
        ignore_thresholds: false
        negatives_lower_than_unmatched: true
        force_match_for_each_row: true
      }
    }
    similarity_calculator {
      iou_similarity {
      }
    }
    box_predictor {
      convolutional_box_predictor {
        conv_hyperparams {
          regularizer {
            l2_regularizer {
              weight: 3.99999989895e-05
            }
          }
          initializer {
            truncated_normal_initializer {
              mean: 0.0
              stddev: 0.0299999993294
            }
          }
          activation: RELU_6
          batch_norm {
            decay: 0.999700009823
            center: true
            scale: true
            epsilon: 0.0010000000475
            train: true
          }
        }
        min_depth: 0
        max_depth: 0
        num_layers_before_predictor: 0
        use_dropout: false
        dropout_keep_probability: 0.800000011921
        kernel_size: 1
        box_code_size: 4
        apply_sigmoid_to_scores: false
      }
    }
    anchor_generator {
      ssd_anchor_generator {
        num_layers: 6
        min_scale: 0.20000000298
        max_scale: 0.949999988079
        aspect_ratios: 1.0
        aspect_ratios: 2.0
        aspect_ratios: 0.5
        aspect_ratios: 3.0
        aspect_ratios: 0.333299994469
      }
    }
    post_processing {
      batch_non_max_suppression {
        score_threshold: 0.300000011921
        iou_threshold: 0.600000023842
        max_detections_per_class: 100
        max_total_detections: 100
      }
      score_converter: SIGMOID
    }
    normalize_loss_by_num_matches: true
    loss {
      localization_loss {
        weighted_smooth_l1 {
        }
      }
      classification_loss {
        weighted_sigmoid {
        }
      }
      hard_example_miner {
        num_hard_examples: 3000
        iou_threshold: 0.990000009537
        loss_type: CLASSIFICATION
        max_negatives_per_positive: 3
        min_negatives_per_image: 0
      }
      classification_weight: 1.0
      localization_weight: 1.0
    }
  }
}
train_config {                 #訓練的一些配置
  batch_size: 1                #batch_size大小,改成了1,怕視訊記憶體不足,硬體支援的話可以不改
  data_augmentation_options {
    random_horizontal_flip {
    }
  }
  data_augmentation_options {
    ssd_random_crop {
    }
  }
  optimizer {
    rms_prop_optimizer {
      learning_rate {
        exponential_decay_learning_rate {
          initial_learning_rate: 0.00400000018999
          decay_steps: 800720
          decay_factor: 0.949999988079
        }
      }
      momentum_optimizer_value: 0.899999976158
      decay: 0.899999976158
      epsilon: 1.0
    }
  }
  fine_tune_checkpoint: "mydata/model.ckpt"
  from_detection_checkpoint: true
  num_steps: 200000     #訓練迭代次數,當然執行的時候也可以寫引數設定
}
train_input_reader {
  label_map_path: "mydata/tv_vehicle_detection.pbtxt"  #類別路徑
  tf_record_input_reader {
    input_path: "mydata/train.record"   #訓練集.record檔案路徑
  }
}
eval_config {
  num_examples: 8000
  max_evals: 10
  use_moving_averages: false
}
eval_input_reader {
  label_map_path: "mydata/tv_vehicle_detection.pbtxt" #類別路徑,同上
  shuffle: false
  num_readers: 1
  tf_record_input_reader {
    input_path: "mydata/test.record"  #測試集.record檔案路徑
  }
}
好了檔案配置也完成了
三、訓練模型
Anaconda Prompt 定位到 models\research\object_detection資料夾下,執行如下命令:
python model_main.py
--pipeline_config_path=mytraining/pipeline.config  #pipeline.config路徑
--model_dir=object_detection/mytraining            #生成模型的資料夾
--num_train_steps=20000                            #訓練20000步
--num_eval_steps=1000                              #測試1000步
--alsologtostderr
然後就開始訓練了

tensorboard可以視覺化訓練過程,所以我也試了下, Anaconda Prompt 定位到 models\research\object_detection資料夾下,執行如下命令
tensorboard --logdir='mytraining' #這個資料夾就是存訓練好的模型的那個資料夾路徑對的話就可以出來,關於tensordboard可以展示還有很多,不過要在程式碼里加上你需要統計的資訊,我就簡單看了下,有興趣的可以仔細研究嘗試

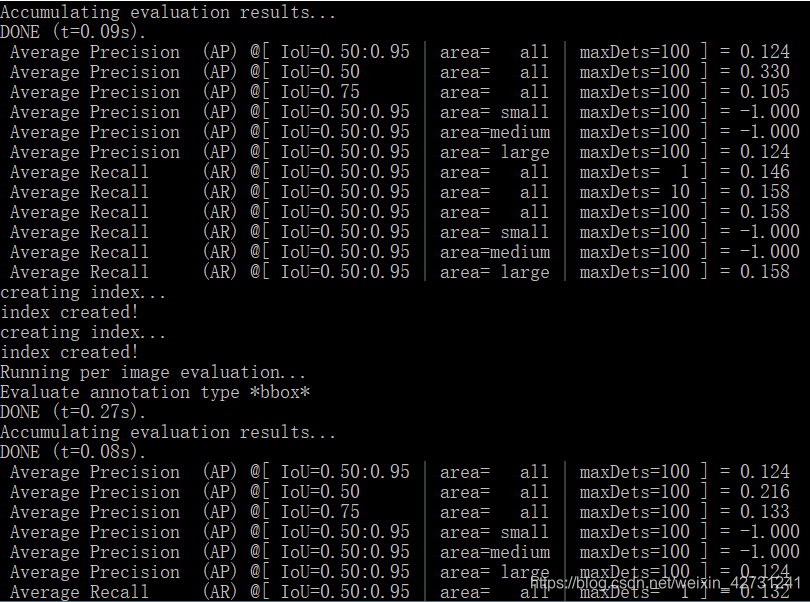
其實我訓練到後面還是出了問題。。。。。(訓練就很慢了,當時就只留了這張截圖,不知道能不能明白問題的意思,有時間在嘗試下。。。。)

