Android之ConstraintLayout用法全面解析
在Android開發中我們在寫佈局時候經常會使用到佈局的巢狀,比如常見的Android佈局FrameLayout LinearLayout
RelativeLayout等佈局的相互巢狀,而且在寫xml佈局時候對佈局視覺化的操作不是很到位(很雞肋)
而ConstarintLayout的出現就能夠有效的解決以上的兩個痛點,即:
1.佈局巢狀過多的問題
2.佈局視覺化支援不夠喲好的問題
而本文主要是講解ConstraintLayout 通過xml手動操作的方式,畢竟知其然還要知其所以然嗎啊(手寫的方式回了視覺化
肯定也沒有什麼大的問題)而且現在我們android新建的專案中也都是預設以ConstraintLayout做為預設的根佈局的
開始:
首先匯入ConstraintLayout 庫
dependencies {
    implementation  'com.android.support.constraint:constraint-layout:1.1.3'
}
本文以ConstraintLayout1.1.3版本為基礎進行講解:
ConstraintLayout 中的 Constraint 翻譯為:約束,限制,強制,所以顧名思義該佈局在每個在子 View 上新增各種約束條件來控制
每個子 View 所處的位置以及顯示的尺寸。ConstraintLayout 在 1.1.3 版本有如下 的佈局屬性:
ConstraintLayout_Layout_android_orientation = 0;
ConstraintLayout_Layout_android_maxWidth = 1;
ConstraintLayout_Layout_android_maxHeight = 2;
ConstraintLayout_Layout_android_minWidth = 3;
ConstraintLayout_Layout_android_minHeight = 4;
ConstraintLayout_Layout_barrierAllowsGoneWidgets = 5;
ConstraintLayout_Layout_barrierDirection = 6;
ConstraintLayout_Layout_chainUseRtl = 7;
ConstraintLayout_Layout_constraintSet = 8;
ConstraintLayout_Layout_constraint_referenced_ids = 9;
ConstraintLayout_Layout_layout_constrainedHeight = 10;
ConstraintLayout_Layout_layout_constrainedWidth = 11;
ConstraintLayout_Layout_layout_constraintBaseline_creator = 12;
ConstraintLayout_Layout_layout_constraintBaseline_toBaselineOf =
ConstraintLayout_Layout_layout_constraintBottom_creator = 14;
ConstraintLayout_Layout_layout_constraintBottom_toBottomOf = 15;
ConstraintLayout_Layout_layout_constraintBottom_toTopOf = 16;
ConstraintLayout_Layout_layout_constraintCircle = 17;
ConstraintLayout_Layout_layout_constraintCircleAngle = 18;
ConstraintLayout_Layout_layout_constraintCircleRadius = 19;
ConstraintLayout_Layout_layout_constraintDimensionRatio = 20;
ConstraintLayout_Layout_layout_constraintEnd_toEndOf = 21;
ConstraintLayout_Layout_layout_constraintEnd_toStartOf = 22;
ConstraintLayout_Layout_layout_constraintGuide_begin = 23;
ConstraintLayout_Layout_layout_constraintGuide_end = 24;
ConstraintLayout_Layout_layout_constraintGuide_percent = 25;
ConstraintLayout_Layout_layout_constraintHeight_default = 26;
ConstraintLayout_Layout_layout_constraintHeight_max = 27;
ConstraintLayout_Layout_layout_constraintHeight_min = 28;
ConstraintLayout_Layout_layout_constraintHeight_percent = 29;
ConstraintLayout_Layout_layout_constraintHorizontal_bias = 30;
ConstraintLayout_Layout_layout_constraintHorizontal_chainStyle =
ConstraintLayout_Layout_layout_constraintHorizontal_weight = 32;
ConstraintLayout_Layout_layout_constraintLeft_creator = 33;
ConstraintLayout_Layout_layout_constraintLeft_toLeftOf = 34;
ConstraintLayout_Layout_layout_constraintLeft_toRightOf = 35;
ConstraintLayout_Layout_layout_constraintRight_creator = 36;
ConstraintLayout_Layout_layout_constraintRight_toLeftOf = 37;
ConstraintLayout_Layout_layout_constraintRight_toRightOf = 38;
ConstraintLayout_Layout_layout_constraintStart_toEndOf = 39;
ConstraintLayout_Layout_layout_constraintStart_toStartOf = 40;
ConstraintLayout_Layout_layout_constraintTop_creator = 41;
ConstraintLayout_Layout_layout_constraintTop_toBottomOf = 42;
ConstraintLayout_Layout_layout_constraintTop_toTopOf = 43;
ConstraintLayout_Layout_layout_constraintVertical_bias = 44;
ConstraintLayout_Layout_layout_constraintVertical_chainStyle = 4
ConstraintLayout_Layout_layout_constraintVertical_weight = 46;
ConstraintLayout_Layout_layout_constraintWidth_default = 47;
ConstraintLayout_Layout_layout_constraintWidth_max = 48;
ConstraintLayout_Layout_layout_constraintWidth_min = 49;
ConstraintLayout_Layout_layout_constraintWidth_percent = 50;
ConstraintLayout_Layout_layout_editor_absoluteX = 51;
ConstraintLayout_Layout_layout_editor_absoluteY = 52;
ConstraintLayout_Layout_layout_goneMarginBottom = 53;
ConstraintLayout_Layout_layout_goneMarginEnd = 54;
ConstraintLayout_Layout_layout_goneMarginLeft = 55;
ConstraintLayout_Layout_layout_goneMarginRight = 56;
ConstraintLayout_Layout_layout_goneMarginStart = 57;
ConstraintLayout_Layout_layout_goneMarginTop = 58;
ConstraintLayout_Layout_layout_optimizationLevel = 59;
ConstraintLayout_placeholder_content = 0;
ConstraintLayout_placeholder_emptyVisibility = 1;
ConstraintSet_android_orientation = 0;
ConstraintSet_android_id = 1;
ConstraintSet_android_visibility = 2;
ConstraintSet_android_layout_width = 3;
ConstraintSet_android_layout_height = 4;
ConstraintSet_android_layout_marginLeft = 5;
ConstraintSet_android_layout_marginTop = 6;
ConstraintSet_android_layout_marginRight = 7;
ConstraintSet_android_layout_marginBottom = 8;
ConstraintSet_android_maxWidth = 9;
ConstraintSet_android_maxHeight = 10;
ConstraintSet_android_minWidth = 11;
ConstraintSet_android_minHeight = 12;
ConstraintSet_android_alpha = 13;
ConstraintSet_android_transformPivotX = 14;
ConstraintSet_android_transformPivotY = 15;
ConstraintSet_android_translationX = 16;
ConstraintSet_android_translationY = 17;
ConstraintSet_android_scaleX = 18;
ConstraintSet_android_scaleY = 19;
ConstraintSet_android_rotation = 20;
ConstraintSet_android_rotationX = 21;
ConstraintSet_android_rotationY = 22;
ConstraintSet_android_layout_marginStart = 23;
ConstraintSet_android_layout_marginEnd = 24;
ConstraintSet_android_translationZ = 25;
ConstraintSet_android_elevation = 26;
ConstraintSet_barrierAllowsGoneWidgets = 27;
ConstraintSet_barrierDirection = 28;
ConstraintSet_chainUseRtl = 29;
ConstraintSet_constraint_referenced_ids = 30;
ConstraintSet_layout_constrainedHeight = 31;
ConstraintSet_layout_constrainedWidth = 32;
ConstraintSet_layout_constraintBaseline_creator = 33;
ConstraintSet_layout_constraintBaseline_toBaselineOf = 34;
ConstraintSet_layout_constraintBottom_creator = 35;
ConstraintSet_layout_constraintBottom_toBottomOf = 36;
ConstraintSet_layout_constraintBottom_toTopOf = 37;
ConstraintSet_layout_constraintCircle = 38;
ConstraintSet_layout_constraintCircleAngle = 39;
ConstraintSet_layout_constraintCircleRadius = 40;
ConstraintSet_layout_constraintDimensionRatio = 41;
ConstraintSet_layout_constraintEnd_toEndOf = 42;
ConstraintSet_layout_constraintEnd_toStartOf = 43;
ConstraintSet_layout_constraintGuide_begin = 44;
ConstraintSet_layout_constraintGuide_end = 45;
ConstraintSet_layout_constraintGuide_percent = 46;
ConstraintSet_layout_constraintHeight_default = 47;
ConstraintSet_layout_constraintHeight_max = 48;
ConstraintSet_layout_constraintHeight_min = 49;
ConstraintSet_layout_constraintHeight_percent = 50;
ConstraintSet_layout_constraintHorizontal_bias = 51;
ConstraintSet_layout_constraintHorizontal_chainStyle = 52;
ConstraintSet_layout_constraintHorizontal_weight = 53;
ConstraintSet_layout_constraintLeft_creator = 54;
ConstraintSet_layout_constraintLeft_toLeftOf = 55;
ConstraintSet_layout_constraintLeft_toRightOf = 56;
ConstraintSet_layout_constraintRight_creator = 57;
ConstraintSet_layout_constraintRight_toLeftOf = 58;
ConstraintSet_layout_constraintRight_toRightOf = 59;
ConstraintSet_layout_constraintStart_toEndOf = 60;
ConstraintSet_layout_constraintStart_toStartOf = 61;
ConstraintSet_layout_constraintTop_creator = 62;
ConstraintSet_layout_constraintTop_toBottomOf = 63;
ConstraintSet_layout_constraintTop_toTopOf = 64;
ConstraintSet_layout_constraintVertical_bias = 65;
ConstraintSet_layout_constraintVertical_chainStyle = 66;
ConstraintSet_layout_constraintVertical_weight = 67;
ConstraintSet_layout_constraintWidth_default = 68;
ConstraintSet_layout_constraintWidth_max = 69;
ConstraintSet_layout_constraintWidth_min = 70;
ConstraintSet_layout_constraintWidth_percent = 71;
ConstraintSet_layout_editor_absoluteX = 72;
ConstraintSet_layout_editor_absoluteY = 73;
ConstraintSet_layout_goneMarginBottom = 74;
ConstraintSet_layout_goneMarginEnd = 75;
ConstraintSet_layout_goneMarginLeft = 76;
ConstraintSet_layout_goneMarginRight = 77;
ConstraintSet_layout_goneMarginStart = 78;
ConstraintSet_layout_goneMarginTop = 79;
LinearConstraintLayout_android_orientation = 0;
但是以上的這些個佈局屬性通過分類我們可以將它們分為一下的幾類:
1.ConstraintLayout基本設定寬width和高height的基本屬性:
Constraintlayout自身的寬高在wrap_content的情況下可以使用android:minWidth/android:minHeight
android:maxWidth/android:maxHeight來限制自身的大小 ConstraintLayout包含的控制元件的尺寸大小有以下四種模式:
1.wrap_content 根據內容計算合適的大小 在wrap_content的模式下有一個強制約束(enforcing constraints (Added in 1.1))
1.1以後的版本意味著如果生成的尺寸過大,將會導致約束失效(從翻譯來看說的是約束不會限制生成的尺寸) 如果你仍然
要保持約束性,則可以增加app:layout_constrainedWidth/app:layout_constrainedHeight屬性來保持這個約束 例如TextView的
文字長度會動態的變化如果過長約束可能就會失效而且會有我們意想不到的視覺效果因此就需要使用強制約束 來限制TextView
的內容區域不會超出我們預期指定的範圍裡面 當一個控制元件設為wrap_content時,再新增約束尺寸是不起效果的。 如需生效,需
要設定如下屬性為true使用強制約束: app:layout_constrainedWidth=”true|false” app:layout_constrainedHeight=”true|false” 配合
以下屬性使用 layout_constraintWidth_min和layout_constraintHeight_min:設定最小值 layout_constraintWidth_max和layout_constraintHeight_max:設定最大值 也可以使用android自帶的屬性android:minWidth android:minHeight來進行設定不需要
開啟強制約束
2.fixed 固定大小模式 如120dp
3.match_parent:填充滿父佈局,但是此時設定的約束都失效了(具體可看下面的例子) (在之前的約束佈局版本貌似不允許在其
子view中使用match_parent屬性,但是在新版本上也是可以用上去的) 但是view設定的margin padding值之類都會是有效的 這種
方式不推薦在Constraintlayout中進行使用
4.any size 0dp match_constraint任意模式(控制元件的最終大小由該控制元件設定的約束限制來決定可以用這個來代替之前的match_parent屬性) layout_constraintWidth_percent和layout_constraintHeight_percent:設定控制元件相對於父容器的百分比大小(1.1.0開始支援) 使用
之前需要先設定為百分比模式,然後設定設定寬高值為0~1之間. 設定為百分比模式的
屬性: app:layout_constraintWidth_default="percent" app:layout_constraintHeight_default="percent"
對於constraintWidth_default / constraintHeight_default這兩個屬性有三種模式可以提供選擇:
spread: 這種模式下是將控制元件的寬度或者高度儘量展開填充父佈局
wrap: 以view自身內容的大小來決定寬或者高(即包裹內容)
percent: 以設定的約束形成的寬和高的百分比來決定控制元件自身的寬高 最後還有一種形式使用dimensionRatio的形式來確定寬和高
2.GuideLine的使用
GuideLine是不會顯示在裝置上(標記為View.GONE).GuideLine可以是水平的也可以是垂直的
可以通過三種不同的方式定位指南:
指定佈局左側或頂部的固定距離(layout_constraintGuide_begin)
指定佈局右側或底部的固定距離(layout_constraintGuide_end)
指定佈局的寬度或高度的百分比(layout_constraintGuide_percent)
看如下的示例:
<?xml version="1.0" encoding="utf-8"?>
<android.support.constraint.ConstraintLayout
    xmlns:android="http://schemas.android.com/apk/res/android"
    xmlns:app="http://schemas.android.com/apk/res-auto"
    android:layout_width="match_parent"
    android:layout_height="match_parent">


    <!--使用百分比的方式垂直方向位於父佈局的正中間-->
    <android.support.constraint.Guideline
        android:id="@+id/guidelines"
        android:layout_width="0dp"
        android:layout_height="match_parent"
        android:orientation="vertical"
        app:layout_constraintGuide_percent="0.5" />

    <Button
        android:id="@+id/btn_login"
        android:layout_width="wrap_content"
        android:layout_height="wrap_content"
        android:layout_marginBottom="64dp"
        android:text="@string/login"
        app:layout_constraintBottom_toBottomOf="parent"
        app:layout_constraintRight_toLeftOf="@id/guidelines" />


    <Button
        android:id="@+id/btn_register"
        android:layout_width="wrap_content"
        android:layout_height="wrap_content"
        android:text="@string/register"
        app:layout_constraintBottom_toBottomOf="@id/btn_login"
        app:layout_constraintLeft_toRightOf="@id/guidelines" />

    <android.support.constraint.Guideline
        android:id="@+id/guidelines2"
        android:orientation="horizontal"
        android:layout_width="wrap_content"
        android:layout_height="wrap_content"
        app:layout_constraintGuide_begin="100dp"/>

    <Button
        android:text="Guideline上方"
        app:layout_constraintBottom_toTopOf="@id/guidelines2"
        android:layout_marginLeft="100dp"
        app:layout_constraintLeft_toLeftOf="parent"
        android:layout_width="wrap_content"
        android:textAllCaps="false"
        android:layout_height="wrap_content" />

    <Button
        android:text="Guideline下方"
        android:textAllCaps="false"
        android:layout_width="wrap_content"
        android:layout_marginLeft="100dp"
        app:layout_constraintLeft_toLeftOf="parent"
        app:layout_constraintTop_toBottomOf="@id/guidelines2"
        android:layout_height="wrap_content" />

    <android.support.constraint.Guideline
        android:id="@+id/guidelines3"
        android:orientation="vertical"
        app:layout_constraintGuide_end="150dp"
        android:layout_width="wrap_content"
        android:layout_height="wrap_content" />


    <Button
        android:id="@+id/btn_guide"
        android:text="Guideline左邊"
        app:layout_constraintRight_toLeftOf="@id/guidelines3"
        android:textAllCaps="false"
        app:layout_constraintTop_toTopOf="parent"
        app:layout_constraintBottom_toBottomOf="parent"
        app:layout_constraintVertical_bias="0.6"
        android:layout_width="wrap_content"
        android:layout_height="wrap_content" />


    <Button
        app:layout_constraintLeft_toRightOf="@id/guidelines3"
        android:text="Guideline右邊"
        android:textAllCaps="false"
        app:layout_constraintTop_toTopOf="@id/btn_guide"
        app:layout_constraintBottom_toBottomOf="@id/btn_guide"
        android:layout_width="wrap_content"
        android:layout_height="wrap_content" />


</android.support.constraint.ConstraintLayout>
效果如下圖:

自定義Guideline:
對Guideline設定相對位置屬性是不生效的,因此當我們想要一個相對於某個view的Guideline時,
約束佈局是不能滿足我們的要求的。
在Constraintlayout中margin只能設定正值或者0,負值無效
我們之前實現重疊佈局時,會通過設定負的margin值實現。
但是在約束佈局中,負的margin值不會生效,只能設定0或者大於0的值,小於0也當作0處理。
Guideline是一個不可見的view,
我們可以佈局時放置一個不可見的view來作為Guideline的替代品,實現一些特殊佈局要求。
例如本例中的按鈕B需要一部分重疊在按鈕A的上面
同時這種方式可以彌補margin不能設定為負值的不足,而且並沒有增加布局層級
<?xml version="1.0" encoding="utf-8"?>
<android.support.constraint.ConstraintLayout
    xmlns:android="http://schemas.android.com/apk/res/android"
    xmlns:app="http://schemas.android.com/apk/res-auto"
    xmlns:tools="http://schemas.android.com/tools"
    android:layout_width="match_parent"
    android:layout_height="match_parent"
    tools:layout_editor_absoluteX="0dp"
    tools:layout_editor_absoluteY="81dp">

    <Button
        android:id="@+id/btn_a"
        android:layout_width="0dp"
        android:layout_height="200dp"
        android:background="@color/colorAccent"
        android:text="A"
        app:layout_constraintLeft_toLeftOf="parent"
        app:layout_constraintRight_toRightOf="parent"
        app:layout_constraintTop_toTopOf="parent" />

    <View
        android:id="@+id/guidelines"
        android:layout_width="0dp"
        app:layout_constraintLeft_toLeftOf="parent"
        app:layout_constraintRight_toRightOf="parent"
        app:layout_constraintBottom_toBottomOf="@+id/btn_a"
        android:layout_marginBottom="50dp"
        android:background="@color/colorPrimary"
        android:visibility="invisible"
        android:layout_height="1dp"/>

    <Button
        android:layout_width="wrap_content"
        android:layout_height="200dp"
        android:background="@color/colorGreen"
        app:layout_constraintLeft_toLeftOf="parent"
        app:layout_constraintRight_toRightOf="parent"
        app:layout_constraintTop_toBottomOf="@+id/guidelines"
        android:text="B" />

</android.support.constraint.ConstraintLayout>
3.相對位置屬性的使用
ConstraintLayout有一下的一些相對位置屬性:
layout_constraintLeft_toLeftOf
layout_constraintLeft_toRightOf
layout_constraintRight_toLeftOf
layout_constraintRight_toRightOf
layout_constraintTop_toTopOf
layout_constraintTop_toBottomOf
layout_constraintBottom_toTopOf
layout_constraintBottom_toBottomOf
layout_constraintBaseline_toBaselineOf
layout_constraintStart_toEndOf
layout_constraintStart_toStartOf
layout_constraintEnd_toStartOf
layout_constraintEnd_toEndOf
以上這些屬性,用於設定一個控制元件相對於其他控制元件、Guideline或者父容器的位置。
以layout_constraintLeft_toLeftOf為例,其中layout_部分是固定格式,主要的資訊包含在下面兩部分:
constraintXXX:指定當前控制元件需要設定約束的屬性部分。如constraintLeft表示對當前控制元件的左邊進行約束設定。
toXXXOf:其指定的內容是作為當前控制元件設定約束需要依賴的控制元件或父容器(可以理解為設定約束的參照物).
並通過XXX指定被依賴物件用於參考的屬性。如toLeftOf="parent" :表示當前控制元件相對於父容器的左邊進行約束設定。
<?xml version="1.0" encoding="utf-8"?>
<android.support.constraint.ConstraintLayout xmlns:android="http://schemas.android.com/apk/res/android"
    xmlns:app="http://schemas.android.com/apk/res-auto"
    android:layout_width="match_parent"
    android:layout_height="match_parent">

    <Button
        android:id="@+id/btn_a"
        android:layout_width="wrap_content"
        android:layout_height="wrap_content"
        android:text="A"
        android:textSize="@dimen/sp_10"
        app:layout_constraintBottom_toBottomOf="parent"
        app:layout_constraintLeft_toLeftOf="parent"
        app:layout_constraintRight_toRightOf="parent"
        app:layout_constraintTop_toTopOf="parent" />

    <Button
        android:layout_width="wrap_content"
        android:layout_height="wrap_content"
        android:layout_marginBottom="50dp"
        android:text="在A上方,與A居中對齊"
        android:textSize="@dimen/sp_10"
        app:layout_constraintBottom_toTopOf="@id/btn_a"
        app:layout_constraintLeft_toLeftOf="@id/btn_a"
        app:layout_constraintRight_toRightOf="@id/btn_a" />

    <Button
        android:layout_width="wrap_content"
        android:layout_height="100dp"
        android:layout_marginRight="10dp"
        android:gravity="bottom"
        android:paddingBottom="@dimen/padding_10dp"
        android:text="與A BaseLine對齊"
        android:textAllCaps="false"
        android:textSize="@dimen/sp_10"
        app:layout_constraintHorizontal_bias="0.5"
        app:layout_constraintBaseline_toBaselineOf="@id/btn_a"
        app:layout_constraintRight_toLeftOf="@id/btn_a"
        app:layout_constraintLeft_toLeftOf="parent"/>

    <Button
        android:layout_width="wrap_content"
        android:layout_height="80dp"
        android:layout_marginLeft="10dp"
        android:gravity="bottom"
        android:text="水平居中對齊"
        app:layout_constraintVertical_bias="0.5"
        android:textSize="@dimen/sp_10"
        app:layout_constraintBottom_toBottomOf="@id/btn_a"
        app:layout_constraintLeft_toRightOf="@id/btn_a"
        app:layout_constraintTop_toTopOf="@id/btn_a"/>

    <Button
        android:layout_width="150dp"
        android:layout_height="wrap_content"
        android:layout_marginTop="20dp"
        android:text="在A下方,與A左對齊"
        android:textSize="@dimen/sp_10"
        app:layout_constraintLeft_toLeftOf="@id/btn_a"
        app:layout_constraintTop_toBottomOf="@id/btn_a" />


</android.support.constraint.ConstraintLayout>
4.Margin邊距的使用
在ConstraintLayout中,控制元件除了可以設定普通的邊距屬性,
還可以設定當控制元件依賴的控制元件GONE之後的邊距屬性。
即我們可以理解可以根據被依賴控制元件是否GONE的狀態,
設定兩種邊距值。分別通過如下屬性進行設定:
    普通邊距屬性
    android:layout_marginStart
    android:layout_marginEnd
    android:layout_marginLeft
    android:layout_marginTop
    android:layout_marginRight
    android:layout_marginBottom
    被依賴控制元件GONE之後的邊距屬性
    layout_goneMarginStart
    layout_goneMarginEnd
    layout_goneMarginLeft
    layout_goneMarginTop
    layout_goneMarginRight
    layout_goneMarginBottom
另外要注意:
可見性這個屬性大家應該很熟悉,但是約束佈局的可見性屬性和其它佈局相比,存在以下區別:
 當控制元件設為GONE時,被認為尺寸為0。可以理解為佈局上的一個點。
 而傳統的view設定gone時該view會移除出這個佈局容器
 若GONE的控制元件對其它控制元件有約束,則約束保留並生效,但所有的邊距(margin)會清零。
 傳統情況下如果GONE控制元件對其它控制元件有約束的話 會提示找不到該控制元件view
<?xml version="1.0" encoding="utf-8"?>

<layout xmlns:android="http://schemas.android.com/apk/res/android"
    xmlns:app="http://schemas.android.com/apk/res-auto">

    <data>

        <import type="com.jeremy.constraintlayoutsample.ConstraintLayoutMarginActivity.ViewModel" />

        <variable
            name="vm"
            type="ViewModel" />

    </data>

    <android.support.constraint.ConstraintLayout
        android:layout_width="match_parent"
        android:layout_height="match_parent">


        <Button
            android:layout_width="wrap_content"
            android:layout_height="wrap_content"
            android:layout_marginTop="10dp"
            android:onClick="@{()->vm.changeVisibility()}"
            android:text="改變A按鈕的狀態(gone/visible)\nB按鈕動態改變左margin值"
            android:textAllCaps="false"
            app:layout_constraintLeft_toLeftOf="parent"
            app:layout_constraintRight_toRightOf="parent" />

        <Button
            android:id="@id/btn_a"
            android:layout_width="wrap_content"
            android:layout_height="wrap_content"
            android:layout_marginLeft="20dp"
            android:text="A按鈕"
            android:visibility="@{vm.visible}"
            app:layout_constraintBottom_toBottomOf="parent"
            app:layout_constraintLeft_toLeftOf="parent"
            app:layout_constraintTop_toTopOf="parent" />


        <!--
            B按鈕在A按鈕的右邊在可見Visible狀態在的邊距為20dp
            當A按鈕不可見的時候的邊距為160dp
        -->
        <Button
            android:layout_width="wrap_content"
            android:layout_height="wrap_content"
            android:layout_marginLeft="20dp"
            android:text="B按鈕"
           app:layout_constraintLeft_toRightOf="@id/btn_a"
            app:layout_constraintTop_toTopOf="@id/btn_a"
            app:layout_constraintBottom_toBottomOf="@id/btn_a"
            app:layout_goneMarginLeft="180dp" />

    </android.support.constraint.ConstraintLayout>
</layout>
5.bias 居中和偏移
偏移:
在設定控制元件的居中屬性之後,通過偏移屬性可以設定讓控制元件更偏向於依賴控制元件的某一方,
偏移設定為0~1之間的值。

相應屬性:
    layout_constraintHorizontal_bias // 水平偏移
    layout_constraintVertical_bias   // 垂直偏移
<?xml version="1.0" encoding="utf-8"?>
<android.support.constraint.ConstraintLayout xmlns:android="http://schemas.android.com/apk/res/android"
    xmlns:app="http://schemas.android.com/apk/res-auto"
    android:layout_width="match_parent"
    android:layout_height="match_parent">


    <Button
        android:layout_width="wrap_content"
        android:layout_height="wrap_content"
        android:text="水平居中"
        app:layout_constraintLeft_toLeftOf="parent"
        app:layout_constraintRight_toRightOf="parent" />

    <Button
        android:layout_width="wrap_content"
        android:layout_height="wrap_content"
        android:text="水平偏移0.9"
        app:layout_constraintHorizontal_bias="0.9"
        app:layout_constraintLeft_toLeftOf="parent"
        app:layout_constraintRight_toRightOf="parent" />


    <Button
        android:layout_width="wrap_content"
        android:layout_height="wrap_content"
        android:text="垂直居中"
        app:layout_constraintBottom_toBottomOf="parent"
        app:layout_constraintTop_toTopOf="parent" />

    <Button
        android:layout_width="wrap_content"
        android:layout_height="wrap_content"
        android:text="垂直偏移0.35"
        app:layout_constraintBottom_toBottomOf="parent"
        app:layout_constraintTop_toTopOf="parent"
        app:layout_constraintVertical_bias="0.25" />

    <Button
        android:layout_width="wrap_content"
        android:layout_height="wrap_content"
        android:text="整體居中"
        app:layout_constraintBottom_toBottomOf="parent"
        app:layout_constraintLeft_toLeftOf="parent"
        app:layout_constraintRight_toRightOf="parent"
        app:layout_constraintTop_toTopOf="parent" />

    <Button
        android:layout_width="wrap_content"
        android:layout_height="wrap_content"
        android:text="整體水平偏移0.6 垂直偏移0.8"
        app:layout_constraintBottom_toBottomOf="parent"
        app:layout_constraintHorizontal_bias="0.6"
        app:layout_constraintLeft_toLeftOf="parent"
        app:layout_constraintRight_toRightOf="parent"
        app:layout_constraintTop_toTopOf="parent"
        app:layout_constraintVertical_bias="0.8" />

</android.support.constraint.ConstraintLayout>
6.比例Ratio的使用
控制元件可以定義兩個尺寸之間的比例,目前支援寬高比。 前提條件是至少有一個尺寸設定為0dp, 然後通過layout_constraintDimentionRatio屬性設定寬高比。 設定方式有以下幾種: 直接設定一個float值,表示寬高比 以” width:height”形式設定 通過設定字首W或H,指定一邊相對於另一邊的尺寸,如”H, 16:9”,高比寬為16:9 如果寬高都設定為0dp,也可以用ratio設定。這種情況下控制元件會在滿足比例 約束的條件下,儘可能填滿父佈局。 對於以上的情況是寬w和高h至少有一邊的長度是確定的因此我們可以使用 1.直接設定一個float值 確定寬和高的長度的比值 2.使用W:H的形式確定寬和高的比值 對於另外一種情況就是寬w和高h都是0dp(match_constraint)的情況 在這種情況下,系統會使用滿足所有約束條件和比率的最大尺寸。 如果需要根據一個維度的尺寸去約束另一個維度的尺寸。 則可以在比率值的前面新增 W 或者 H 來分別約束寬度或者高度。 當寬和高都為match_constraint即0dp時有兩種情況: 約束方向為x軸時(寬為parent): w, 1:2 高比寬; h, 2:1 寬比高 約束方向為y軸時(高為parent): w, 1:2 寬比高; h, 2:1 高比寬
<?xml version="1.0" encoding="utf-8"?>

<android.support.constraint.ConstraintLayout xmlns:android="http://schemas.android.com/apk/res/android"
    xmlns:app="http://schemas.android.com/apk/res-auto"
    android:layout_width="match_parent"
    android:layout_height="match_parent">


    <Button
        android:id="@id/btn1"
        android:layout_width="0dp"
        android:layout_height="wrap_content"
        android:text="設定float值1.5實現寬高比3:2"
        android:textAllCaps="false"
        app:layout_constraintDimensionRatio="1.5"
        app:layout_constraintLeft_toLeftOf="parent" />

    <Button
        android:id="@id/btn2"
        android:layout_width="wrap_content"
        android:layout_height="0dp"
        android:text="設定(W:H)2:1實現寬高比2:1"
        app:layout_constraintDimensionRatio="2:1"
        app:layout_constraintLeft_toLeftOf="parent"
        app:layout_constraintRight_toRightOf="parent"
        app:layout_constraintTop_toBottomOf="@id/btn1" />

    <!--
        對於以上兩種情況是寬w和高h至少有一邊的長度是確定的因此我們可以使用
            1.直接設定一個float值 確定寬和高的長度的比值
            2.使用W:H的形式確定寬和高的比值
       對於另外一種情況就是寬w和高h都是0dp(match_constraint)的情況
        在這種情況下,系統會使用滿足所有約束條件和比率的最大尺寸。
        如果需要根據一個維度的尺寸去約束另一個維度的尺寸。
        則可以在比率值的前面新增 W 或者 H 來分別約束寬度或者高度。

        當寬和高都為match_constraint即0dp時有兩種情況:
        約束方向為x軸時(寬為parent):
        w, 1:2 高比寬; h, 2:1 寬比高
        約束方向為y軸時(高為parent):
        w, 1:2 寬比高; h, 2:1 高比寬
    -->

    <!--約束方向是y軸 高度確定-->
    <Button
        android:layout_width="0dp"
        android:layout_height="0dp"
        android:text="寬和高都為0dp(match_constraint)的情況\nH,2:1以高度為約束高寬比為2:1"
        android:textAllCaps="false"
        app:layout_constraintDimensionRatio="h,2:1"
        app:layout_constraintTop_toBottomOf="@id/btn2"
        app:layout_constraintBottom_toBottomOf="parent"/>


    <!--約束方向為x軸 寬度確定-->
    <!--<Button-->
        <!--android:layout_width="0dp"-->
        <!--android:layout_height="0dp"-->
        <!--android:text="寬和高都為0dp(match_constraint)的情況\nH,2:1以高度為約束高寬比為2:1"-->
        <!--android:textAllCaps="false"-->
        <!--app:layout_constraintDimensionRatio="h,2:1"-->
        <!--app:layout_constraintLeft_toLeftOf="parent"-->
        <!--app:layout_constraintBottom_toBottomOf="parent"-->
        <!--app:layout_constraintRight_toRightOf="parent"/>-->

    <Button
        android:layout_width="0dp"
        android:textAllCaps="false"
        android:layout_height="wrap_content"
        android:text="按鈕的寬度是螢幕寬度的60%"
        app:layout_constraintBottom_toBottomOf="parent"
        app:layout_constraintLeft_toLeftOf="parent"
        app:layout_constraintRight_toRightOf="parent"
        app:layout_constraintWidth_default="percent"
        app:layout_constraintWidth_percent="0.6"
        android:layout_marginBottom="50dp" />

</android.support.constraint.ConstraintLayout><!--</ScrollView>-->
7.chains鏈條的使用
Chains 為同一個方向(水平或者垂直)上的多個子 View 提供一個類似群組的概念。其他的方向則可以單獨控制。 Chain 鏈是
一種特殊的約束讓多個 chain 鏈連線的 Views 能夠平分剩餘空間位置。 在 Android 傳統佈局特性裡面最相似的應該是 LinearLayout
中的權重比 weight , 但 Chains 鏈能做到的遠遠不止權重比 weight 的功能。 chain head:最左邊或最上邊的控制元件為鏈頭,鏈的屬性
由鏈頭控制 我們可以對鏈頭設定整個鏈的樣式style: spread:Chain 鏈的預設模式就是 spread 模式,它將平分間隙讓多個 Views
佈局到剩餘空間 spread inside:spread inside 模式,它將會把兩邊最邊緣的兩個 View 到外向父元件邊緣的距離去除, 然後讓剩
餘的 Views 在剩餘的空間內平分間隙佈局。 packed:packed,它將所有 Views 打包到一起不分配多餘的間隙 (當然不包括通過
margin 設定多個 Views 之間的間隙),然後將整個元件組在可用的剩餘位置居中 我們通過設定鏈頭的bias來是整個鏈的位置
進行指定的偏移

8.Barrier的使用
Barrier是一個虛擬的輔助控制元件,它可以阻止一個或者多個控制元件越過自己,就像一個屏障一樣。
當某個控制元件要越過自己的時候,Barrier會自動移動,避免自己被覆蓋

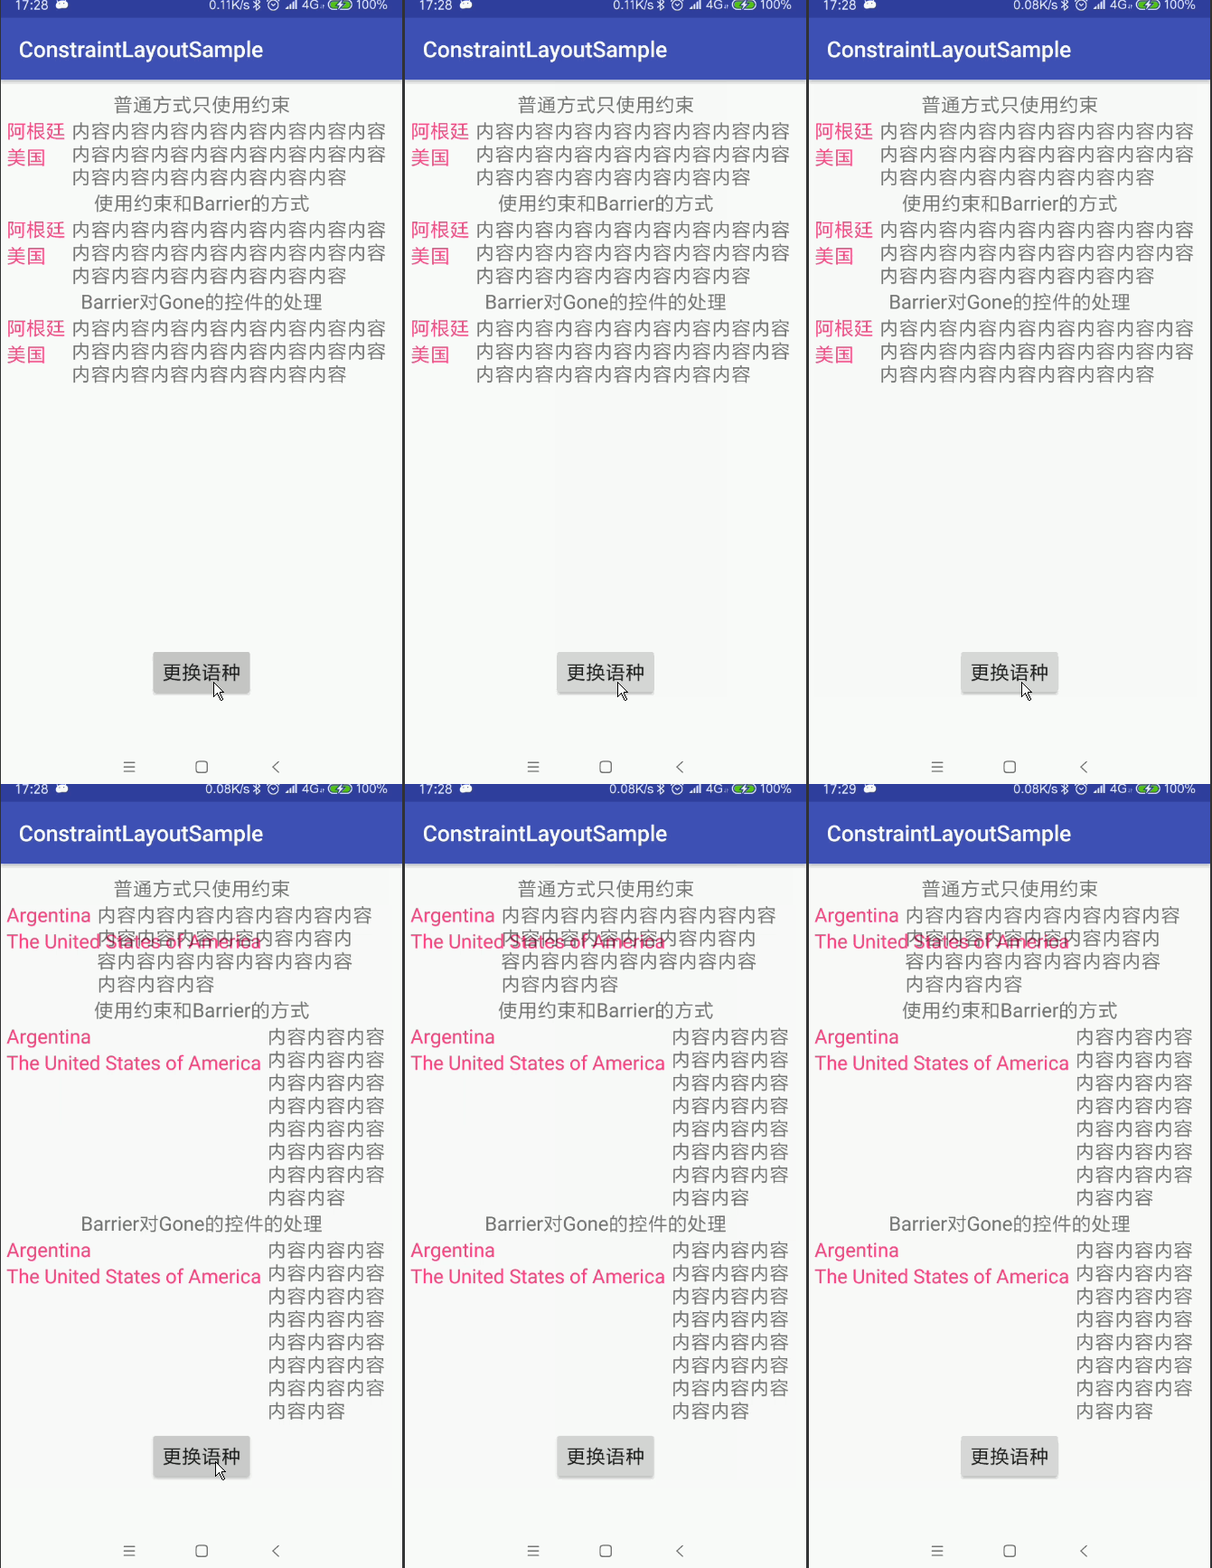
當我們建立佈局的時候,有時會遇到佈局會隨著本地化變化的情況,比如下面的例子:
    我們有三個TextViews: 左邊 textView1 和 textView2,右邊 textView3。
    textView3 約束在 textView1 的右邊,效果也符合我們的預期。
    但是當需要支援多語言的時候事情就變得複雜了。如果我們新增英語就出現了問題,
    因為在中文裡面textView1(阿根廷)的文字是長於textView2(美國)的,
    但是在英語中卻是textView2(美國)的文字比textView1(阿根廷)長

    這裡的問題在於textView3仍然是相對於textView1的,所以textView2直接插入了textView3中

    比較直接的解決辦法是使用TableLayout表格佈局,
    或者把 textView1 & textView2 包裹在一個垂直的,
    android:layout_width="wrap_content" 的 LinearLayout中。
    然後讓textView3約束在這個LinearLayout的後面。
    但是我們有更好的辦法:Barriers。
<?xml version="1.0" encoding="utf-8"?>

<layout xmlns:android="http://schemas.android.com/apk/res/android"
    xmlns:app="http://schemas.android.com/apk/res-auto"
    xmlns:tools="http://schemas.android.com/tools">

    <data>

        <import type="com.jeremy.constraintlayoutsample.BarrierActivity.ViewModel" />

        <variable
            name="vm"
            type="ViewModel" />

    </data>

    <android.support.constraint.ConstraintLayout
        android:layout_width="match_parent"
        android:layout_height="match_parent"
        android:paddingBottom="@dimen/padding_10dp"
        android:paddingLeft="@dimen/padding_5dp"
        android:paddingRight="@dimen/padding_5dp"
        android:paddingTop="@dimen/padding_10dp">

        <TextView
            android:id="@+id/tv_way1"
            android:layout_width="wrap_content"
            android:layout_height="wrap_content"
            android:text="普通方式只使用約束"
            app:layout_constraintLeft_toLeftOf="parent"
            app:layout_constraintRight_toRightOf="parent"
            app:layout_constraintTop_toTopOf="parent" />

        <TextView
            android:id="@+id/tv_1"
            android:layout_width="wrap_content"
            android:layout_height="wrap_content"
            android:text="@{vm.agn}"
            android:textColor="@color/colorAccent"
            app:layout_constraintLeft_toLeftOf="parent"
            app:layout_constraintTop_toBottomOf="@+id/tv_way1"
            tools:text="阿根廷" />


        <TextView
            android:id="@+id/tv_2"
            android:layout_width="wrap_content"
            android:layout_height="wrap_content"
            android:text="@{vm.usa}"
            android:textColor="@color/colorAccent"
            app:layout_constraintLeft_toLeftOf="parent"
            app:layout_constraintTop_toBottomOf="@+id/tv_1"
            tools:text="美國" />

        <TextView
            android:id="@+id/tv_content"
            android:layout_width="0dp"
            android:layout_height="wrap_content"
            android:layout_marginLeft="5dp"
            android:layout_marginStart="5dp"
            android:text="內容內容內容內容內容內容內容內容內容內容內容內容內容內容內容內容內容內容內容內容內容內容內容"
            app:layout_constraintLeft_toRightOf="@+id/tv_1"
            app:layout_constraintRight_toRightOf="parent"
            app:layout_constraintTop_toBottomOf="@+id/tv_way1" />

        <TextView
            android:id="@+id/tv_way2"
            android:layout_width="wrap_content"
            android:layout_height="wrap_content"
            android:text="使用約束和Barrier的方式"
            app:layout_constraintLeft_toLeftOf="parent"
            app:layout_constraintRight_toRightOf="parent"
            app:layout_constraintTop_toBottomOf="@+id/tv_content" />


        <TextView
            android:id="@+id/tv_11"
            android:layout_width="wrap_content"
            android:layout_height="wrap_content"
            android:text="@{vm.agn}"
            android:textColor="@color/colorAccent"
            app:layout_constraintLeft_toLeftOf="parent"
            app:layout_constraintTop_toBottomOf="@+id/tv_way2"
            tools:text="阿根廷" />


        <TextView
            android:id="@+id/tv_12"
            android:layout_width="wrap_content"
            android:layout_height="wrap_content"
            android:text="@{vm.usa}"
            android:textColor="@color/colorAccent"
            app:layout_constraintLeft_toLeftOf="parent"
            app:layout_constraintTop_toBottomOf="@+id/tv_11"
            tools:text="美國" />

        <android.support.constraint.Barrier
            android:id="@+id/barrier"
            android:layout_width="wrap_content"
            android:layout_height="wrap_content"
            app:barrierDirection="end"
            app:constraint_referenced_ids="tv_11,tv_12" />


        <TextView
            android:id="@+id/tv_content2"
            android:layout_width="0dp"
            android:layout_height="wrap_content"
            android:layout_marginLeft="5dp"
            android:layout_marginStart="5dp"
            android:text="內容內容內容內容內容內容內容內容內容內容內容內容內容內容內容內容內容內容內容內容內容內容內容"
            app:layout_constraintLeft_toRightOf="@+id/barrier"
            app:layout_constraintRight_toRightOf="parent"
            app:layout_constraintTop_toTopOf="@+id/tv_11" />


        <Button
            android:layout_width="wrap_content"
            android:layout_height="wrap_content"
            android:layout_marginBottom="30dp"
            android:onClick="@{()->vm.changeLanguage()}"
            android:text="更換語種"
            android:textAllCaps="false"
            app:layout_constraintBottom_toBottomOf="parent"
            app:layout_constraintLeft_toLeftOf="parent"
            app:layout_constraintRight_toRightOf="parent" />


        <TextView
            android:id="@+id/tv_way3"
            android:layout_width="wrap_content"
            android:layout_height="wrap_content"
            android:text="Barrier對Gone的控制元件的處理"
            app:layout_constraintLeft_toLeftOf="parent"
            app:layout_constraintRight_toRightOf="parent"
            app:layout_constraintTop_toBottomOf="@id/tv_content2" />

        <!--
            GONE小部件處理
            如果Barrier引用GONE的view,則預設行為是在GONE的view已解析位置上建立屏障Barrier。
            如果您不想讓Barrier考慮GONE的view,
            可以通過將屬性barrierAllowsGoneWidgets設定 為false(預設為true)來更改此設定。
        -->

        <TextView
            android:id="@+id/tv_21"
            android:layout_width="wrap_content"
            android:layout_height="wrap_content"
            android:text="@{vm.agn}"
            android:visibility="visible"
            android:textColor="@color/colorAccent"
            app:layout_constraintLeft_toLeftOf="parent"
            app:layout_constraintTop_toBottomOf="@+id/tv_way3"
            tools:text="阿根廷" />


        <TextView
            android:id="@+id/tv_22"
            android:layout_width="wrap_content"
            android:layout_height="wrap_content"
            android:text="@{vm.usa}"
            android:textColor="@color/colorAccent"
            app:layout_constraintLeft_toLeftOf="parent"
            app:layout_constraintTop_toBottomOf="@+id/tv_21"
            tools:text="美國" />

        <android.support.constraint.Barrier
            android:id="@+id/barrier2"
            android:layout_width="wrap_content"
            android:layout_height="wrap_content"
            app:barrierAllowsGoneWidgets="false"
            app:barrierDirection="end"
            app:constraint_referenced_ids="tv_21,tv_22" />

        <TextView
            android:id="@+id/tv_content3"
            android:layout_width="0dp"
            android:layout_height="wrap_content"
            android:layout_marginLeft="5dp"
            android:text="內容內容內容內容內容內容內容內容內容內容內容內容內容內容內容內容內容內容內容內容內容內容內容"
            app:layout_constraintLeft_toRightOf="@+id/barrier2"
            app:layout_constraintRight_toRightOf="parent"
            app:layout_constraintTop_toTopOf="@+id/tv_21" />

    </android.support.constraint.ConstraintLayout>
</layout>
9.環形佈局circular position
圓形定位(Circular Positioning)可以讓一個控制元件以另一個控制元件的中心為中心點, 來設定其相對與該中心點的距離和角度。 可以設定的屬性有: layout_constraintCircle:引用另一個控制元件的 id。 layout_constraintCircleRadius:到另一個控制元件中心的距離。 layout_constraintCircleAngle:控制元件的角度(順時針,0 - 360 度)。
例如常見的訊息小紅點,或者各種用傳統的佈局不易實現的佈局,都可以使用環形定位來實現
<?xml version="1.0" encoding="utf-8"?>
<android.support.constraint.ConstraintLayout xmlns:android="http://schemas.android.com/apk/res/android"
    xmlns:app="http://schemas.android.com/apk/res-auto"
    android:layout_width="match_parent"
    android:layout_height="match_parent">

    <!--實現一個訊息提示的badge view-->
    <TextView
        android:id="@+id/tv_msg"
        android:layout_width="45dp"
        android:layout_height="0dp"
        android:layout_marginTop="20dp"
        android:background="@color/colorYellow"
        android:gravity="center"
        android:text="未讀\n訊息"
        app:layout_constraintDimensionRatio="1:1"
        app:layout_constraintHorizontal_bias="0.9"
        app:layout_constraintLeft_toLeftOf="parent"
        app:layout_constraintRight_toRightOf="parent"
        app:layout_constraintTop_toTopOf="parent" />

    <TextView
        android:id="@+id/tv_count"
        android:layout_width="wrap_content"
        android:layout_height="0dp"
        android:background="@drawable/shape_circular"
        android:ellipsize="end"
        android:gravity="center"
        android:maxLines="1"
        android:text="99+"
        android:textColor="@android:color/white"
        android:textSize="@dimen/sp_10"
        app:layout_constrainedWidth="true"
        app:layout_constraintCircle="@+id/tv_msg"
        app:layout_constraintCircleAngle="45"
        app:layout_constraintCircleRadius="30dp"
        app:layout_constraintDimensionRatio="1:1"
        app:layout_constraintWidth_max="25dp"
        app:layout_constraintWidth_min="15dp" />


    <android.support.constraint.Guideline
        android:id="@+id/guidelines"
        android:layout_width="wrap_content"
        android:layout_height="wrap_content"
        android:orientation="vertical"
        app:layout_constraintGuide_percent="0.5" />

    <ImageView
        android:id="@+id/iv_sigpore"
        android:layout_width="100dp"
        android:layout_height="0dp"
        app:layout_constraintDimensionRatio="1"
        android:scaleType="fitXY"
        app:layout_constraintHorizontal_bias="0.5"
        android:layout_marginTop="@dimen/padding_10dp"
        android:src="@mipmap/singapore"
        app:layout_constraintLeft_toLeftOf="parent"
        app:layout_constraintRight_toRightOf="@id/guidelines"
        app:layout_constraintTop_toTopOf="parent" />

    <TextView
        android:layout_width="wrap_content"
        android:layout_height="wrap_content"
        android:text="VIP"
        android:textColor="@color/colorYellow"
        android:textSize="@dimen/sp_14"
        android:textStyle="bold"
        app:layout_constraintCircle="@+id/iv_sigpore"
        app:layout_constraintCircleRadius="50dp"
        app:layout_constraintCircleAngle="-45" />

    <ImageView
        android:id="@+id/iv_star"
        android:src="@mipmap/ic_star"
        android:background="@drawable/shape_circular"
        app:layout_constraintLeft_toLeftOf="parent"
        app:layout_constraintRight_toRightOf="parent"
        app:layout_constraintTop_toTopOf="parent"
        app:layout_constraintBottom_toBottomOf="parent"
        android:layout_width="wrap_content"
        app:layout_constraintDimensionRatio="1:1"
        android:layout_height="0dp" />

    <TextView
        android:text="0度"
        app:layout_constraintCircle="@+id/iv_star"
        app:layout_constraintCircleAngle="0"
        app:layout_constraintCircleRadius="100dp"
        android:layout_width="wrap_content"
        android:layout_height="wrap_content" />

    <TextView
        android:text="45度"
        app:layout_constraintCircleAngle="45"
        app:layout_constraintCircle="@+id/iv_star"
        app:layout_constraintCircleRadius="100dp"
        android:layout_width="wrap_content"
        android:layout_height="wrap_content" />

    <TextView
        android:text="90度"
        app:layout_constraintCircle="@id/iv_star"
        app:layout_constraintCircleRadius="100dp"
        app:layout_constraintCircleAngle="90"
        android:layout_width="wrap_content"
        android:layout_height="wrap_content" />

    <TextView
        android:text="180度"
        app:layout_constraintCircle="@id/iv_star"
        app:layout_constraintCircleRadius="100dp"
        app:layout_constraintCircleAngle="180"
        android:layout_width="wrap_content"
        android:layout_height="wrap_content" />
    <TextView
        android:text="135度"
        app:layout_constraintCircle="@id/iv_star"
        app:layout_constraintCircleRadius="100dp"
        app:layout_constraintCircleAngle="135"
        android:layout_width="wrap_content"
        android:layout_height="wrap_content" />

    <TextView
        android:text="-45度"
        app:layout_constraintCircle="@id/iv_star"
        app:layout_constraintCircleRadius="100dp"
        app:layout_constraintCircleAngle="315"
        android:layout_width="wrap_content"
        android:layout_height="wrap_content" />

    <TextView
        android:text="-180度"
        app:layout_constraintCircle="@id/iv_star"
        app:layout_constraintCircleRadius="100dp"
        app:layout_constraintCircleAngle="270"
        android:layout_width="wrap_content"
        android:layout_height="wrap_content" />

    <TextView
        android:text="225度"
        app:layout_constraintCircle="@id/iv_star"
        app:layout_constraintCircleRadius="100dp"
        app:layout_constraintCircleAngle="225"
        android:layout_width="wrap_content"
        android:layout_height="wrap_content" />
</android.support.constraint.ConstraintLayout>
10. 組Group的使用
使用組,您可以將某些檢視分組在一起。不要把這與Android中的普通ViewGroups混淆。
ConstraintLayout中的一個組僅包含對檢視ID的引用,而不將組合中的檢視巢狀。
這樣一來,您可以設定組中控制元件的可見性僅通過設定組的可見性就行了,
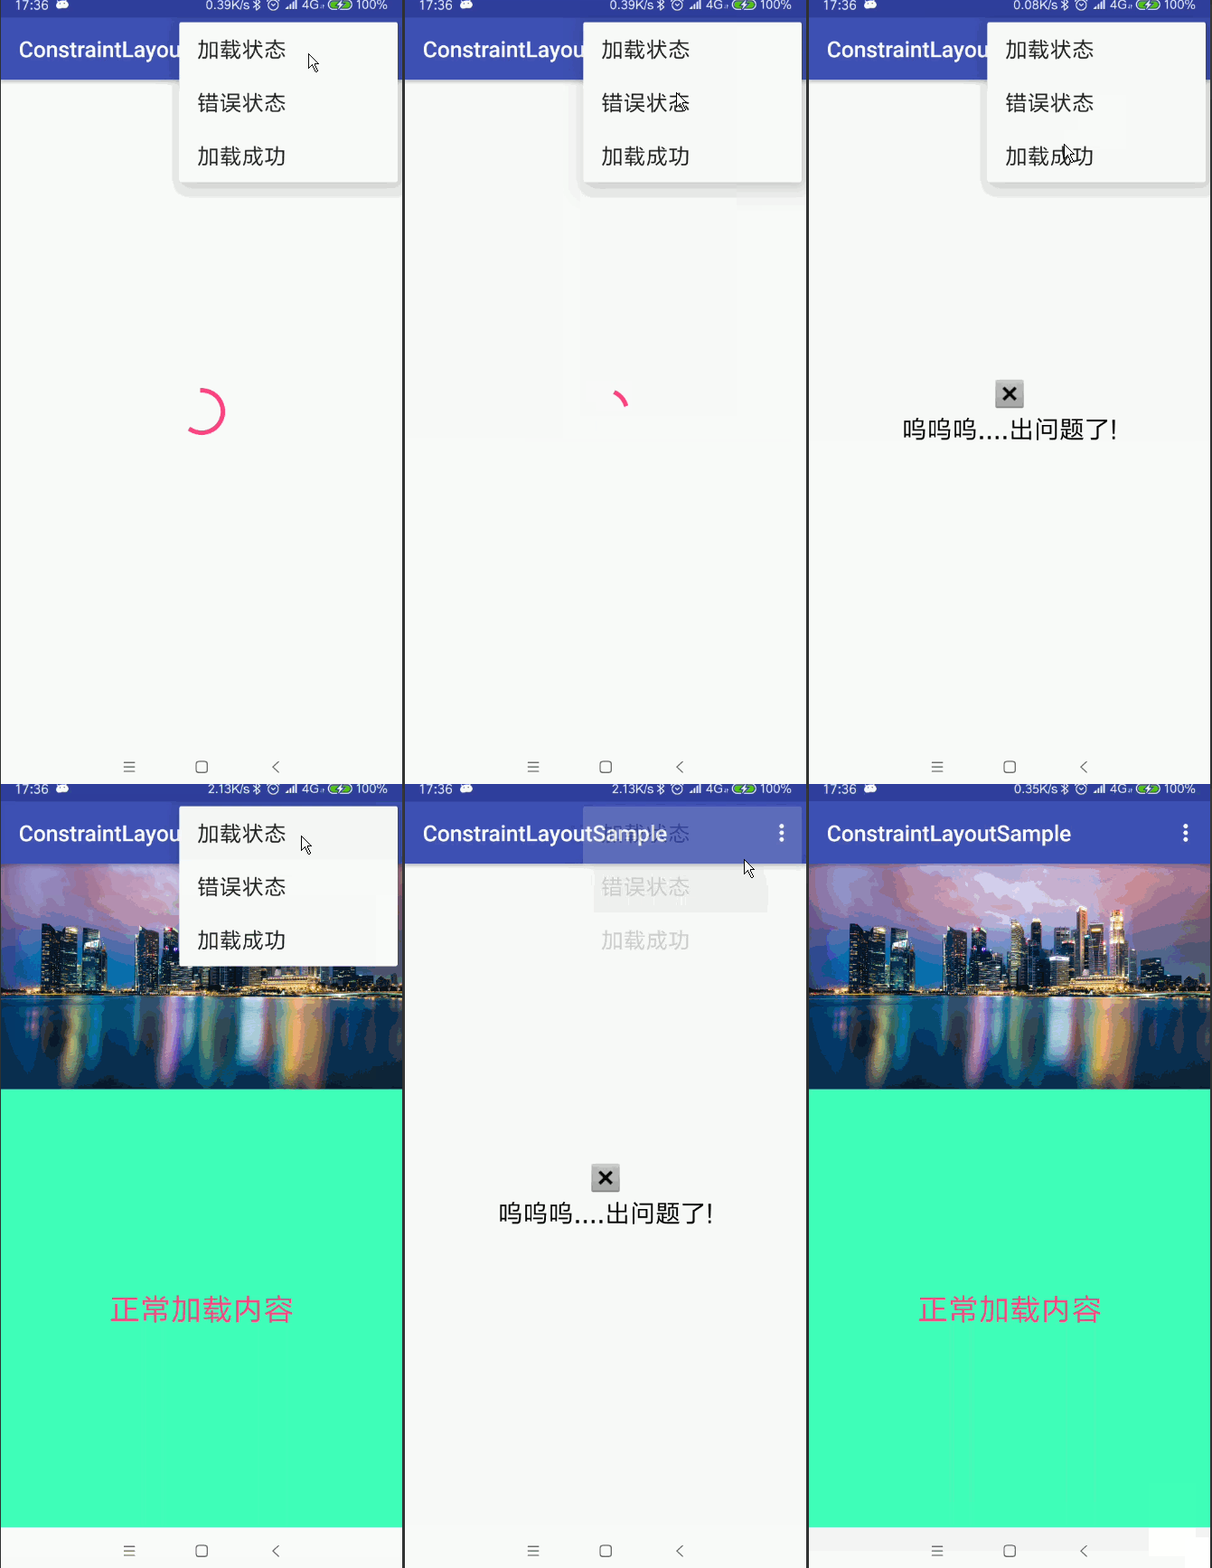
而無需設定每個檢視的可見性。這對於諸如錯誤螢幕或載入螢幕的事情是有用的
,其中一些元素需要一次更改其可見性。
例如我們可以使用Group的特性實現我們常見的頁面多狀態檢視的載入(載入狀態 錯誤狀態 載入成功狀態)
<?xml version="1.0" encoding="utf-8"?>

<layout xmlns:android="http://schemas.android.com/apk/res/android"
    xmlns:app="http://schemas.android.com/apk/res-auto">


    <data>

        <import type="com.jeremy.constraintlayoutsample.GroupActivity.ViewModel" />

        <variable
            name="vm"
            type="ViewModel" />


    </data>

    <android.support.constraint.ConstraintLayout
        android:layout_width="match_parent"
        android:layout_height="match_parent">

        <ProgressBar
            android:id="@+id/pb_loading"
            style="?android:progressBarStyleLargeInverse"
            android:layout_width="50dp"
            android:layout_height="50dp"
            android:indeterminate="true"
            app:layout_constraintBottom_toBottomOf="parent"
            app:layout_constraintLeft_toLeftOf="parent"
            app:layout_constraintRight_toRightOf="parent"
            app:layout_constraintTop_toTopOf="parent" />


        <android.support.constraint.Guideline
            android:id="@+id/guidelines"
            android:layout_width="wrap_content"
            android:layout_height="wrap_content"
            android:orientation="horizontal"
            app:layout_constraintGuide_percent="0.5" />

        <ImageView
            android:id="@+id/iv_error"
            android:layout_width="wrap_content"
            android:layout_height="wrap_content"
            app:layout_constraintBottom_toTopOf="@id/guidelines"
            app:layout_constraintLeft_toLeftOf="parent"
            app:layout_constraintRight_toRightOf="parent"
            app:srcCompat="@android:drawable/btn_dialog" />


        <TextView
            android:id="@+id/tv_error"
            android:layout_width="wrap_content"
            android:layout_height="wrap_content"
            android:text="嗚嗚嗚....出問題了!"
            android:textColor="@android:color/black"
            android:textSize="@dimen/sp_18"
            app:layout_constraintLeft_toLeftOf="parent"
            app:layout_constraintRight_toRightOf="parent"
            app:layout_constraintTop_toBottomOf="@id/guidelines" />


        <ImageView
            android:id="@+id/iv_content"
            android:layout_width="0dp"
            android:layout_height="0dp"
            android:src="@mipmap/singapore"
            app:layout_constraintDimensionRatio="16:9"
            app:layout_constraintLeft_toLeftOf="parent"
            app:layout_constraintRight_toRightOf="parent"
            app:layout_constraintTop_toTopOf="parent" />

        <TextView
            android:id="@+id/tv_content"
            android:layout_width="0dp"
            android:layout_height="0dp"
            android:background="@color/colorGreen"
            android:gravity="center"
            android:text="正常載入內容"
            android:textColor="@color/colorAccent"
            android:textSize="@dimen/sp_20"
            app:layout_constraintBottom_toBottomOf="parent"
            app:layout_constraintLeft_toLeftOf="parent"
            app:layout_constraintRight_toRightOf="parent"
            app:layout_constraintTop_toBottomOf="@+id/iv_content" />

        <!--
            屬性 app:constraint_referenced_ids 包含需要成為組的一部分的所有檢視ID的列表。
        -->
        <android.support.constraint.Group
            android:layout_width="wrap_content"
            android:layout_height="wrap_content"
            android:visibility="@{vm.isLoading()}"
            app:constraint_referenced_ids="pb_loading" />

        <android.support.constraint.Group
            android:layout_width="wrap_content"
            android:layout_height="wrap_content"
            android:visibility="@{vm.isError()}"
            app:constraint_referenced_ids="iv_error,tv_error" />

        <android.support.constraint.Group
            android:layout_width="wrap_content"
            android:layout_height="wrap_content"
            android:visibility="@{vm.isSuccess()}"
            app:constraint_referenced_ids="tv_content,iv_content" />

    </android.support.constraint.ConstraintLayout>
</layout>
注意多個組 Mutiple groups
多個組Group可以引用相同的view
在這種情況下,XML宣告順序將定義應用view的最終的可見性狀態(view的可見性狀態將由最後宣告的組Group決定)。
11. PlaceHolder的使用
Placeholder顧名思義,就是用來一個佔位的東西,它可以把自己的內容設定為ConstraintLayout內的其它view。
因此它用來寫佈局的模版,也可以用來動態修改UI的內容。

用作模版:
我們用Placeholder建立一個名為placeholder_template1.xml的模版

我們把剛才定義的模版include到真正的佈局檔案中,並且在這個佈局檔案中新增真實的控制元件,
注意這裡的控制元件無需新增任何約束,因為它們的位置是由Placeholder決定的。

還有一點就是模版要放在被引用的所有控制元件之前

這就是PlaceHolder的使用場景之一模版功能
<?xml version="1.0" encoding="utf-8"?>
<android.support.constraint.ConstraintLayout xmlns:android="http://schemas.android.com/apk/res/android"
    xmlns:app="http://schemas.android.com/apk/res-auto"
    android:layout_width="match_parent"
    android:layout_height="match_parent">

     //引入模版
    <include layout="@layout/placeholder_template1" />

    <ImageView
        android:id="@+id/iv_left"
        android:layout_width="0dp"
        android:layout_height="0dp"
        android:scaleType="fitXY"
        app:srcCompat="@mipmap/lake" />

    <ImageView
        android:id="@+id/iv_middle"
        android:layout_width="0dp"
        android:layout_height="0dp"
        android:scaleType="fitXY"
        app:srcCompat="@mipmap/singapore" />

    <ImageView
        android:id="@+id/iv_right"
        android:layout_width="0dp"
        android:layout_height="0dp"
        android:scaleType="fitXY"
        app:srcCompat="@mipmap/dvt_hyde_park" />


</android.support.constraint.ConstraintLayout>
模版如下:
<?xml version="1.0" encoding="utf-8"?>
<merge xmlns:android="http://schemas.android.com/apk/res/android"
    xmlns:app="http://schemas.android.com/apk/res-auto"
    xmlns:tools="http://schemas.android.com/tools"
    android:layout_width="match_parent"
    android:layout_height="match_parent"
    tools:parentTag="android.support.constraint.ConstraintLayout">

    <android.support.constraint.Placeholder
        android:id="@+id/holder1"
        android:layout_width="0dp"
        android:layout_height="0dp"
        android:layout_marginBottom="10dp"
        app:content="@+id/iv_left"
        app:layout_constraintBottom_toBottomOf="parent"
        app:layout_constraintDimensionRatio="16:9"
        app:layout_constraintHorizontal_chainStyle="spread"
        app:layout_constraintHorizontal_weight="1"
        app:layout_constraintLeft_toLeftOf="parent"
        app:layout_constraintRight_toLeftOf="@+id/holder2" />

    <android.support.constraint.Placeholder
        android:id="@+id/holder2"
        android:layout_width="0dp"
        android:layout_height="0dp"
        app:content="@+id/iv_middle"
        app:layout_constraintBottom_toBottomOf="@+id/holder1"
        app:layout_constraintDimensionRatio="16:9"
        app:layout_constraintHorizontal_weight="2"
        app:layout_constraintLeft_toRightOf="@+id/holder1"
        app:layout_constraintRight_toLeftOf="@+id/holder3" />

    <android.support.constraint.Placeholder
        android:id="@+id/holder3"
        android:layout_width="0dp"
        android:layout_height="0dp"
        app:content="@+id/iv_right"
        app:layout_constraintBottom_toBottomOf="@id/holder1"
        app:layout_constraintDimensionRatio="16:9"
        app:layout_constraintHorizontal_weight="1"
        app:layout_constraintLeft_toRightOf="@+id/holder2"
        app:layout_constraintRight_toRightOf="parent" />
</merge>
12.ConstraintSet的使用
在ConstraintLayout出來之前,就是在LinearLayout、RelativeLayout時代,如果想要在程式碼中動態修改佈局中控制元件的尺寸、位置、
與其他控制元件的相對關係等,我們都用的是LayoutParams,在剛接觸ConstraintLayout的時候,我也以為仍然是用LayoutParams,
結果發現有ConstraintSet這麼一個好東西,
ConstraintSet是用來通過程式碼管理佈局屬性的集合物件,可以通過這個類來建立各種佈局約束,然後把建立好的佈局約束應
用到一個 ConstraintLayout 上,可以通過如下幾種方式來建立 ConstraintSet:
手工建立: c = new ConstraintSet(); c.connect(….);
從 R.layout.* 物件獲取 c.clone(context, R.layout.layout1);
從 ConstraintLayout 中獲取 c.clone(clayout);
然後通過 applyTo 函式來應用到ConstraintLayout 上
我們以從xml檔案獲取ConstraintSet為例,如下動圖效果:

程式碼如下:
public class MyConstraintLayout2 extends ConstraintLayout implements View.OnClickListener {

    private ConstraintSet set1 = new ConstraintSet();
    private ConstraintSet set2 = new ConstraintSet();

    public MyConstraintLayout2(Context context) {
        super(context);
        init();
    }

    public MyConstraintLayout2(Context context, AttributeSet attrs) {
        super(context, attrs);
        init();
    }

    public MyConstraintLayout2(Context context, AttributeSet attrs, int defStyleAttr) {
        super(context, attrs, defStyleAttr);
        init();
    }

    private void init() {
       inflate(getContext(),R.layout.layout_constraintset,this);

       this.findViewById(R.id.btn_apply).setOnClickListener(this);
       this.findViewById(R.id.btn_reset).setOnClickListener(this);

       set1.clone(this);

       set2.clone(getContext(),R.layout.layout_constraintset2);
    }

    @Override
    public void onClick(View v) {
        TransitionManager.beginDelayedTransition(this);

        switch (v.getId()) {
            case R.id.btn_apply:
                set2.applyTo(this);
                break;
            case R.id.btn_reset:
                set1.applyTo(this);
                break;
        }
    }
}
以上就是ConstraintLayout在開發中常見的用法了,ConstraintLayout其可以有效的減少我們佈局的巢狀層級從而避免佈局過渡繪製的
問題,因此建議大家在開發中使用ConstraintLayout來代替傳統的安卓佈局.
