
DirectX9.0 Texture紋理(貼圖)示例程式
阿新 • • 發佈:2018-12-21
DirectX9.0 Texture紋理對映
將DirectX SDK 上的Texture略微修改,它是一個旋轉的空心圓柱體。我覺得用正方形能更好的理解紋理座標。其實在用遊戲引擎時,是不會關心紋理是如何具體對映的
1.紋理座標
DirectX中的紋理與OpenGL是類似的
紋理是一種點陣圖(2D 貼圖),可以把它貼上到Direct3D物體的表面。比如,可以獲取一張郵票的圖形貼上到正方形中,使正方形看起來像一張郵票。要使郵票保持合適的方向,以使影象井然有序的排列,則必須獲得形狀的每個頂點並在正方形上標記出來,以便郵票和正方形的形狀保持一致
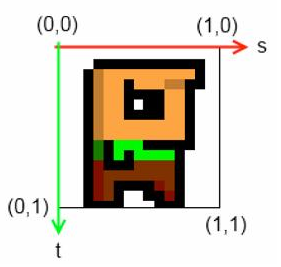
DirectX假設紋理圖始終為1x1的正方形,其原點位於(0,0)處,右下角為(1,1).如圖所示:
紋理座標與頂點座標之間的對映關係:

定義頂點以及紋理座標(紋理作為物體的一部分):
// 自定義定點型別 新增紋理座標
struct CUSTOMVERTEX
{
float x, y, z;
unsigned long color;
FLOAT tu, tv; // 紋理座標
};
// 構造組成物體的頂點,併為其指定紋理座標
CUSTOMVERTEX Vertices[] =
{
{ -1.0f, -1.0f, 0.0f, D3DCOLOR_XRGB(255,255,255),0,1 }, // x, y, z, color,tu,tv
{ -1.0f, 1.0f, 0.0f, D3DCOLOR_XRGB 2.載入紋理圖片
//D3DXCreateTextureFromFile函式原型
HRESULT WINAPI D3DXCreateTextureFromFile(
LPDIRECT3DDEVICE9 pDevice, // 裝置物件
LPCTSTR pSrcFile, // 影象檔名
LPDIRECT3DTEXTURE9 * 3.場景新增紋理步驟對映
- 構造組成物體的頂點,併為其指定紋理座標
- 用函式D3DCreateTextureFromFile為LPDIRECT3DTEXTURE9載入紋理
- 繪製物體前,用函式SetTexture來設定與物體關聯的紋理
紋理複雜起來非常複雜,本文只涉及到紋理座標,程式碼實現:
//
// Globals
//
int width = 800;
int hight = 600;
IDirect3DDevice9* Device = 0; // Our rendering device
LPDIRECT3DTEXTURE9 g_pTexture = NULL; // Our texture
LPDIRECT3DVERTEXBUFFER9 g_pVB = NULL; // Buffer to hold vertices

//
// Framework Functions
//
// 自定義頂點型別,新增紋理座標
struct CUSTOMVERTEX
{
	float x, y, z;
	unsigned long color;
	FLOAT tu, tv; // 紋理座標
};
// 多了紋理,增加D3DFVF_TEX1
#define D3DFVF_CUSTOMVERTEX (D3DFVF_XYZ | D3DFVF_DIFFUSE | D3DFVF_TEX1)

bool Setup()
{
	// Turn off culling
	Device->SetRenderState(D3DRS_CULLMODE, D3DCULL_NONE);
	// Turn off D3D lighting
	Device->SetRenderState(D3DRS_LIGHTING, FALSE);
	// Turn on the zbuffer
	Device->SetRenderState(D3DRS_ZENABLE, TRUE);

	return true;
}

// ---------------------------------------------
// Name: InitGeometry()
// Desc: Create the Textures and Vertex buffer.
// ---------------------------------------------
HRESULT InitGeometry()
{
	// 建立紋理
	D3DXCreateTextureFromFile(Device, "texture.png", &g_pTexture); // texture.png與cpp同目錄存放,可省略路徑
	// 構造組成物體的頂點(正方形),併為其指定紋理座標
	CUSTOMVERTEX Vertices[] =
	{
		 { -1.0f, -1.0f, 0.0f, D3DCOLOR_XRGB(255,255,255),0,1 }, // x, y, z, color,tu,tv
		 { -1.0f, 1.0f, 0.0f, D3DCOLOR_XRGB(255,255,255), 0,0},
		 { 1.0f, -1.0f, 0.0f, D3DCOLOR_XRGB(255,255,255), 1,1},
		 { 1.0f, 1.0f, 0.0f, D3DCOLOR_XRGB(255,255,255), 1,0},
	};
	// 建立頂點緩衝區
	Device->CreateVertexBuffer(sizeof(Vertices), 0, D3DFVF_CUSTOMVERTEX, D3DPOOL_DEFAULT, &g_pVB, NULL);
	VOID *pVertices;
	g_pVB->Lock(0, sizeof(Vertices), (void**)&pVertices, 0);
	memcpy(pVertices, Vertices, sizeof(Vertices));
	g_pVB->Unlock();

	return S_OK;
}
// -----------------------------------------------------------------
// Name: SetupMatrices()
// Desc: Sets up the world, view, and projection transform matrices.
// -----------------------------------------------------------------
VOID SetupMatrices()
{
	// 按照一定時間繞Y軸旋轉
	D3DXMATRIXA16 matWorld;
	D3DXMatrixIdentity(&matWorld);
	D3DXMatrixRotationY(&matWorld, timeGetTime() / 1000.0f);
	Device->SetTransform(D3DTS_WORLD, &matWorld);

	// 設定攝像頭的位置
	D3DXVECTOR3 vEyePt(0.0f, 3.0f, -5.0f);
	D3DXVECTOR3 vLookatPt(0.0f, 0.0f, 0.0f);
	D3DXVECTOR3 vUpVec(0.0f, 1.0f, 0.0f);
	D3DXMATRIXA16 matView;
	D3DXMatrixLookAtLH(&matView, &vEyePt, &vLookatPt, &vUpVec);
	Device->SetTransform(D3DTS_VIEW, &matView);

	// 設定視椎體
	D3DXMATRIXA16 matProj;
	D3DXMatrixPerspectiveFovLH(&matProj, D3DX_PI / 4, 1.0f, 1.0f, 100.0f);
	Device->SetTransform(D3DTS_PROJECTION, &matProj);
}

void Cleanup()
{
	d3d::Release(g_pTexture);
	d3d::Release(g_pVB);
}

bool Display(float timeDelta)
{
	if (Device) // Only use Device methods if we have a valid device.
	{
		Device->Clear(0, 0, D3DCLEAR_TARGET | D3DCLEAR_ZBUFFER, D3DCOLOR_XRGB(100, 100, 100), 1.0f, 0);
		Device->BeginScene();
		SetupMatrices();
		// 繪製物體前,設定物體關聯的紋理
		Device->SetTexture(0, g_pTexture);
		// Render the vertex buffer contents
		Device->SetStreamSource(0, g_pVB, 0, sizeof(CUSTOMVERTEX));
		Device->SetFVF(D3DFVF_CUSTOMVERTEX); // 設定頂點格式
		// 兩個三角形組成矩形
		Device->DrawPrimitive(D3DPT_TRIANGLESTRIP, 0, 2);

		Device->EndScene();
		// Swap the back and front buffers.
		Device->Present(0, 0, 0, 0);
	}
	return true;
}
int WINAPI WinMain(HINSTANCE hinstance,
	HINSTANCE prevInstance,
	PSTR cmdLine,
	int showCmd)
	{
		InitGeometry(); // 注意要在WinMain中呼叫該初始化函式
	}
	// ...其餘程式碼保持框架程式碼不變
執行結果(旋轉的馬里奧.gif):

完整框架程式碼及入門教程:DirectX9.0入門及例項程式